Development log - Building a complete car from scans - VR Game dev
ngon master
Hi All,
I have been working towards building a VR game where you can completely disassemble and repair first generation mazda miatas. Building every component of a car is a massive task - There are a few hundred unique parts + a library of re-use parts (mostly fasteners). Over the last 6 months I have developed a scanning/modeling workflow that allows me to quickly create high quality art.
Photogrammetry does a really good job of capturing rough/cast surfaces but also allows me to build parts that are dimensionally accurate. With this in mind I can approach each part as a separate project and be assured that bolt holes will be perfectly aligned the whole car is assembled.
Right now my workflow looks like this:
1) Disassemble parts into their minimum number of components
2) Spray surfaces with multiple colors of matte spray paint, if I don't want to ruin a part I will use developer spray which can be wiped off.
3) Scan with my photogrammetry setup and process in reality capture
4) Manually remodel any parts that need to be perfectly clean. Things like mating surfaces and highly polished/machined surfaces
5) Combine scan data and manual modeling for a final high poly model
6) Generete a low through mostly automated methods - Zremesher and pro optimize modifiers
7) Bake model and then apply a library of smart materials in substance painter
Some of the work I have done so far:
Front Upright with hub nut, dust cap, and wheel studs:


Front Hub:

Front upper control arm:
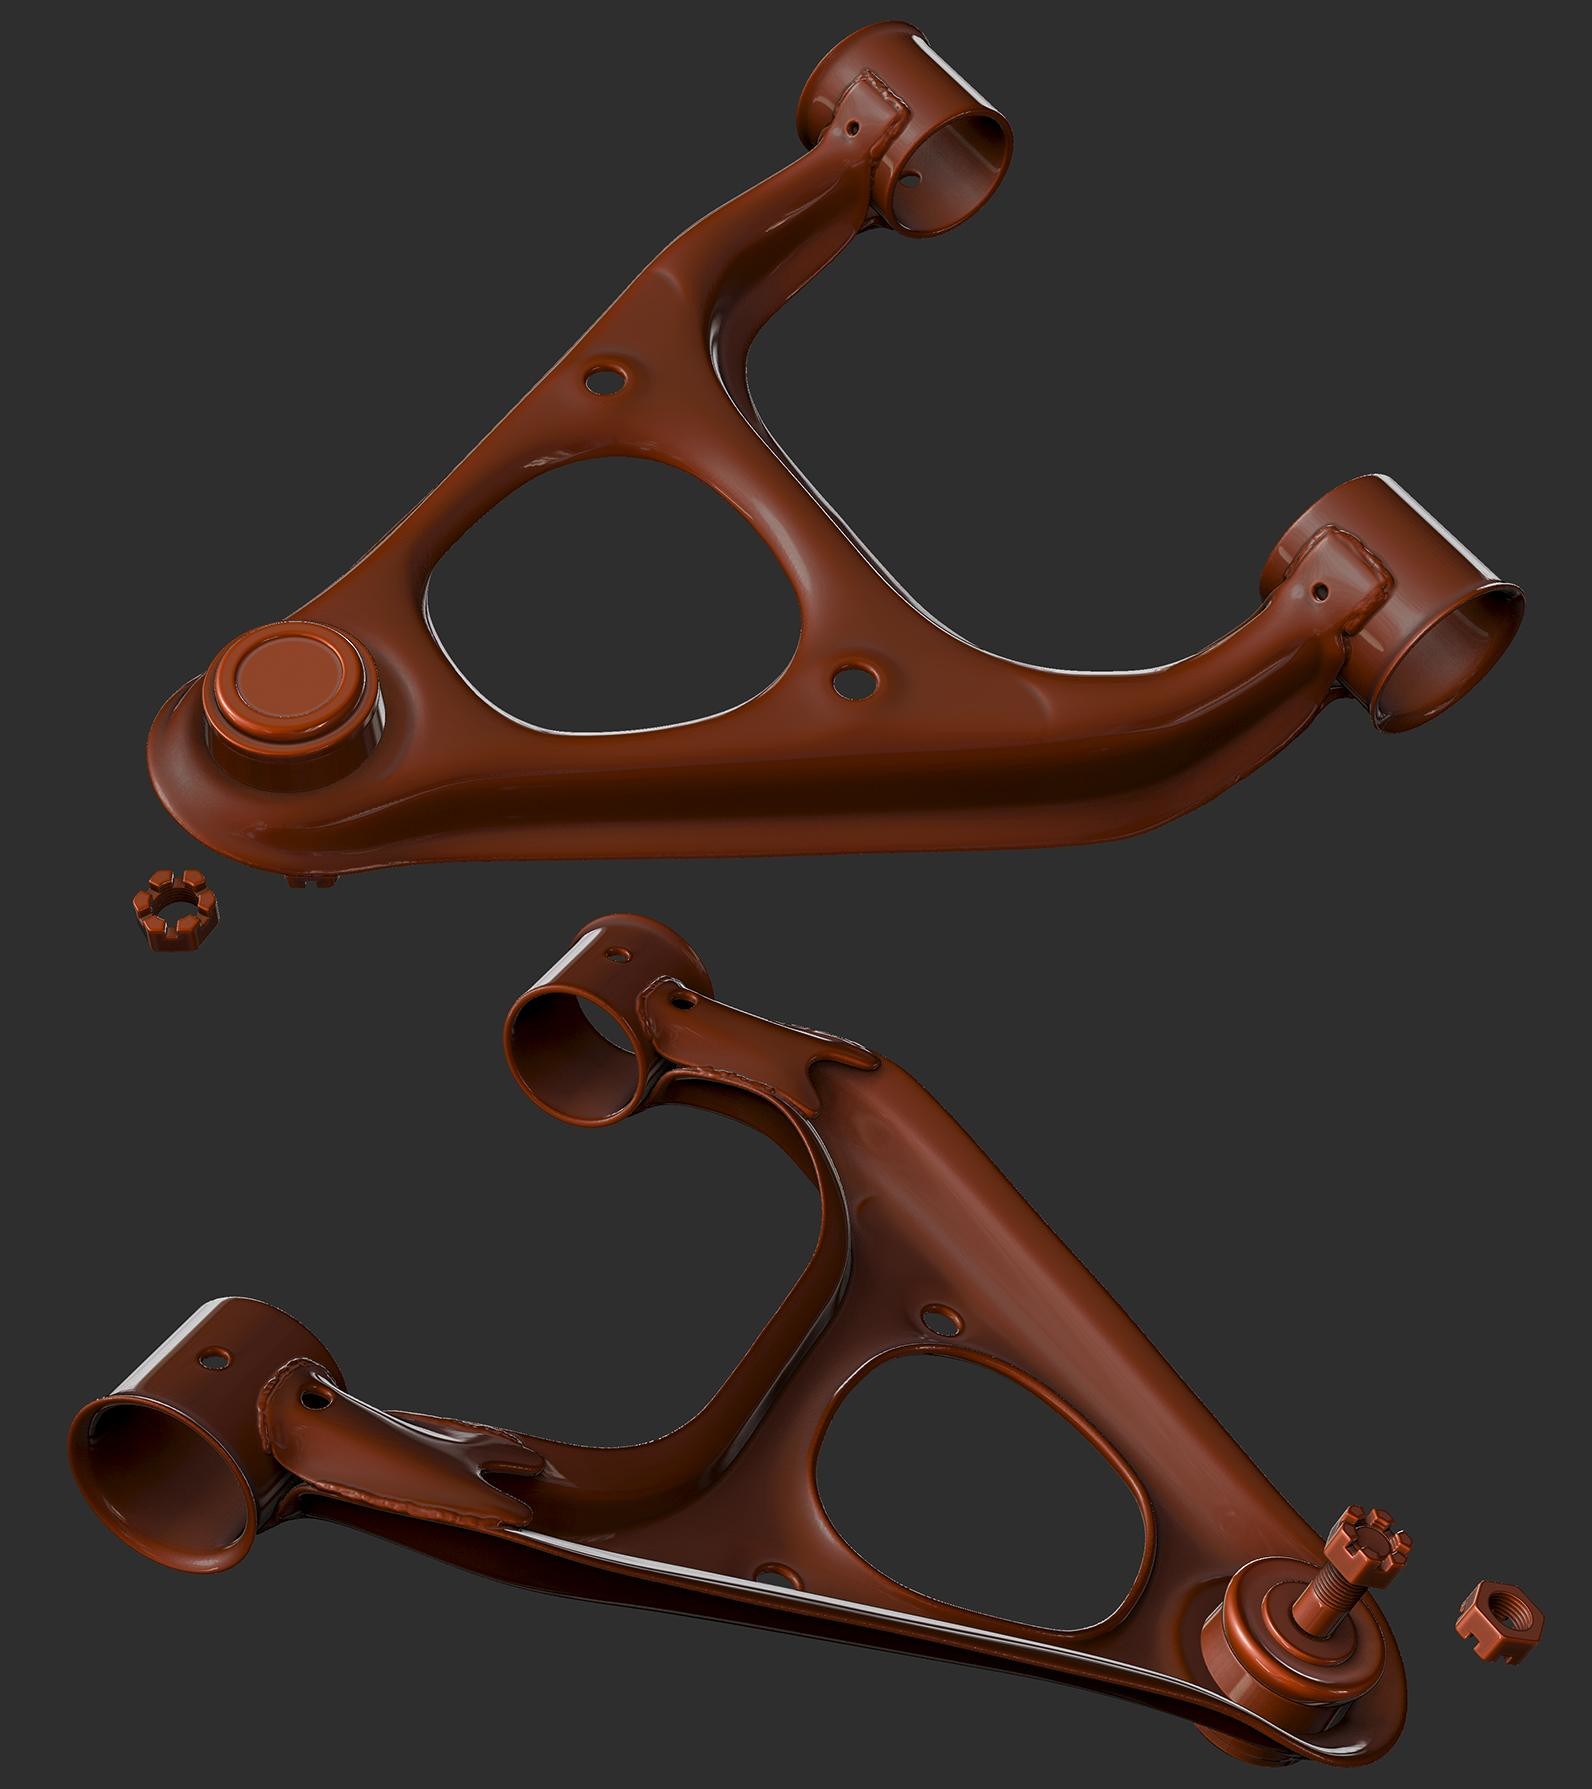
An raw scan of front lower control arm:

A low poly workflow test done with raw scans- these scans were done as a test before I separated these objects into their components and re-scanned them.
I have been working towards building a VR game where you can completely disassemble and repair first generation mazda miatas. Building every component of a car is a massive task - There are a few hundred unique parts + a library of re-use parts (mostly fasteners). Over the last 6 months I have developed a scanning/modeling workflow that allows me to quickly create high quality art.
Photogrammetry does a really good job of capturing rough/cast surfaces but also allows me to build parts that are dimensionally accurate. With this in mind I can approach each part as a separate project and be assured that bolt holes will be perfectly aligned the whole car is assembled.
Right now my workflow looks like this:
1) Disassemble parts into their minimum number of components
2) Spray surfaces with multiple colors of matte spray paint, if I don't want to ruin a part I will use developer spray which can be wiped off.
3) Scan with my photogrammetry setup and process in reality capture
4) Manually remodel any parts that need to be perfectly clean. Things like mating surfaces and highly polished/machined surfaces
5) Combine scan data and manual modeling for a final high poly model
6) Generete a low through mostly automated methods - Zremesher and pro optimize modifiers
7) Bake model and then apply a library of smart materials in substance painter
Some of the work I have done so far:
Front Upright with hub nut, dust cap, and wheel studs:
Front Hub:
Front upper control arm:
An raw scan of front lower control arm:
A low poly workflow test done with raw scans- these scans were done as a test before I separated these objects into their components and re-scanned them.
Replies
I'm planning out a small photogrammetry rig right now for scanning plastic models. I want to use a stepper motor to rotate the model within a sphere of LEDs. Still considering how I'm going to diffuse the LEDs and some other potential technical problems.
https://www.amazon.com/Neewer-Shooting-Diffusion-Backdrops-Photography/dp/B00GKGGICC/ref=sr_1_1?s=photo&ie=UTF8&qid=1488606086&sr=1-1&keywords=Pop+Up+Photo+Box
http://polycount.com/discussion/comment/2515809#Comment_2515807
Scroll down about halfway to see Alec's setup.
http://www.alecmoody.com/rubble/
I moved away from continuous lighting which has allowed me to ditch the tripod and cable release. Shooting with flash units enables me handhold and it takes about 5 minutes to shoot 100 photos. Most of these scans are between 200 and 400 photos- I spend more time prepping the surfaces and coming up with a simple fixture to hold the objects than I do shooting. Also, another nice thing about using artificial lighting is that I can shoot 200 photos, process them, and then see if there are any poorly resolved areas. If I need to I can go shoot more under identical lighting.
As far as threaded holes and concavities go- it really depends on how deep the holes are. As the hole gets deeper it is harder to get any meaningful images/lighting. Fortunately, for my purposes this usually isn't a problem since it will be nearly impossible to see into those holes on a baked game mesh.
Here is as a high res image of the raw scan for the lower ball joint. I will remodel all the areas I outlined for cleanliness and also because I tore the rubber boot when I was popping the joint:
I will also sculpt some repairs on the joint- you can see where I bashed it with hammer to try and pop it before resorting to a pickle fork.
Also,
I am not keeping any scan color data since I am doing aggressive surface treatment in order to get good scans:
Aside from game model use, I am planning to publish a library of decimated scans sitting together in an assembly. Having a 100% complete car that can be brought into cad is a huge resource for designing and testing parts for the aftermarket.
Cleaned up lower ball joint:
http://www.alecmoody.com/hubscene.html
And front caliper scan:
Also, stamped sheet metal suspension parts is my trigger. Thanks Mazda.
And it had been a while since I had done any poly modeling. Since this brake dust shield only bolts to one part and it does so on a simple plane, I decided to polygon model it (it is also hard to scan both sides of a thin sheet metal part):
Rotor scan:
Brake caliper bracket:
I am very familiar with all of these parts but this is forcing me to look closely at them and I am finding little engineering details I hadn't considered before. For example, these slider pins are differentiated by more than just diameter. The larger pin has flats machined into it and the plating on the two pins is different. I have two different brands of pins and both sets show these differences.
Brake lines+ fittings (banjo fitting, crush washers, special hollow bolt)
Brake Pad
Brake pad backing plate
Two types of pad clips
Caliper
Caliper Bracket
Slider Pins
Rotor
I finished this off. I'm not 100% satisfied with the material yet. It looks a little to procedural and obviously from substance painter:
Good work, sent you an email
Marmoset viewer:
http://www.alecmoody.com/Caliper/Caliper.html
http://www.alecmoody.com/rubble/
For big objects I tack togther a steel tube fixture to hold it in the air- usually I am left with one or two bolt holes where my object attaches that I still need to clean up.
The only big thing I still need to test is how unreal batches draw calls and if more unique parts will massively inflate my draw call count.
Step 1 of my project is room scale with the ability to snap and unsnap parts with your hands. I need to plan for long term functionality when the parts can be swapped out for damaged, clean, and aftermarket versions. Also I need it to be possible to remove literally every part from the car, including the entire body, leaving a blank rig with nothing in it. My current plan is to build a rig for the car and add sockets for the location of every part on the car. I need to skin the rig to something, right? A single triangle placed out of view? Am I going to run into any unexpected performance issue with a few hundred static meshes assigned to a few hundred sockets? Is this the right approach to take? Ultimately I want the car on an IK setup so that when the car is raised on a lift the suspension/wheels droop correctly.
Another potential sticking point. There are going to be sub assemblies of the car that I require players to remove and take over to a work bench or other work area to service. Some examples, wheel studs and suspension bushings need to be pressed out on a shop press. If I do bottom end rebuilds players will need to put the engine on a stand before they can pull it apart. I'm having a hard time visualizing how that will interact with this system.
The content looks great in UE4's forward renderer under direct lighting. However, in shadow where the lighting is flat (say under a car) the lack of any ambient occlusion (and especially specular occlusion) is really noticeable. There are a lot of glowy looking edge highlights taht shouldn't be there. I am continuing down this route with the hope that epic implements some kind of AO for forward rendering in VR. If not I will have to hire someone to implement something custom..
Some suggestions for construction mechanics:
If the car is not moving at all but you don't want an insane hierarchy of sockets, at larger levels could you not have groups of parts socket to a dummy object in the correct position? If everything moves up and down together at most that could look just fine.
have you thought about how the player picks up objects? It can be odd sometimes in VR when objects have a set 'holding' pivot that feels unnatural. Will they snap to a default angle?
finally please just have the player spawn in a room next to a pile of loose car parts like lego. call it hard mode.
Lastly, I found a slightly hacky way to improve the extra reflections under the car. I made a box reflection volume and set the brightness to 50%. Everything inboard of the rotor gets much darker reflections. I still really want some kind of dynamic AO between the parts but this is a huge improvement. I wish there was a more memory efficient way to achieve a similar effect. I have the cubemap res set to 512 right. Since it is a global switch there isn't a good way for me to drop the resolution on specific cubemaps where I don't need it.
I also have some early polygon models built from cad data:
My largest 3d scan so far. 1300 photos and 56 hours of processing time. I need to be more deliberate with my photo taking on objects this large. It takes so little time for me to snap off 1300 photos that I'm often not that careful about overshooting. I now know that photo count and processing time to do not scale linearly.