Best Of
Re: What Are You Working On? (3D) 2026
Legends speak of a man who was recently part of a studio closure. He returned to a 4 year old WIP thread in the ancient temple where the the greatest of the 3D wizards honed their craft for years. He hoped once more to draw upon its magical essence and wield it to complete long unfinished tasks.

Link to the old thread: https://polycount.com/discussion/222575/wip-miss-peregrine-eva-green-likeness-realtime#latest
Link to the old thread: https://polycount.com/discussion/222575/wip-miss-peregrine-eva-green-likeness-realtime#latest
 RabidRabit
3 ·
Re: Sketchbook: Frank Polygon
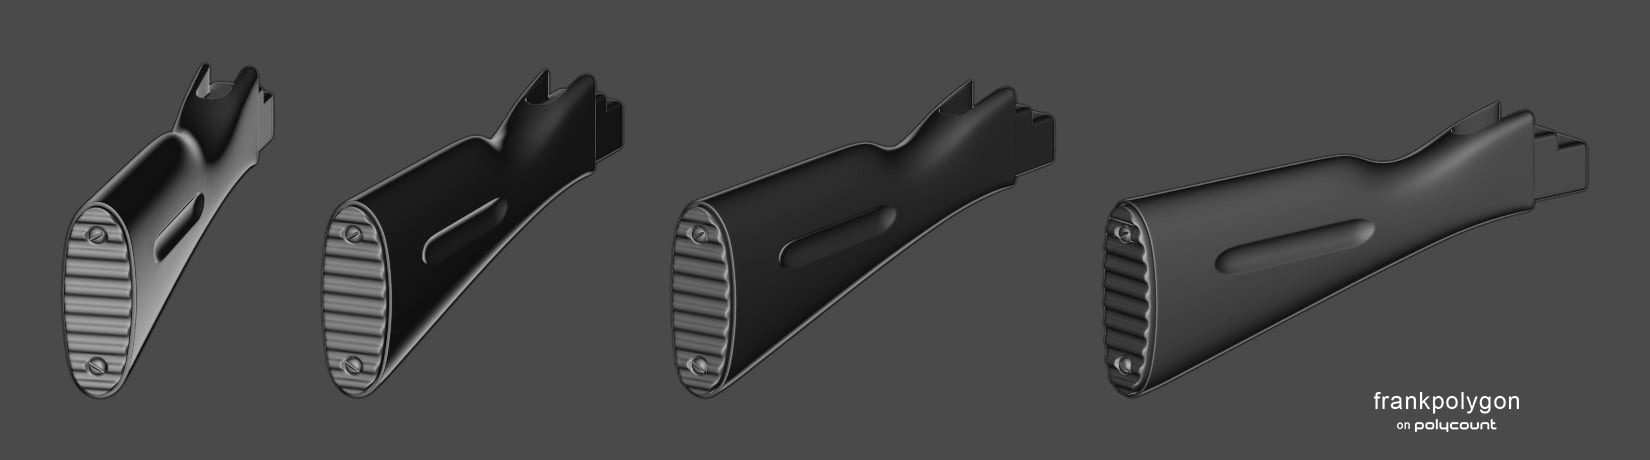
Subdivision sketch: Basic stocks.
Block out. Start by defining the basic volume and proportions then develop the primary shapes and surface profiles. Rely on tools and subdivision smoothing to generate the final curved surface whenever possible. Not only is this typically quicker and easier it also tends to be more accurate than trying to manually bash things into shape.

Refine the primary and secondary forms then add details. Work in stages, developing the shapes from larger to smaller. Apply subdivision levels to increase the geometry density as needed, to preserve the surface quality of the larger forms, when adding smaller details.

Use the existing geometry as support loops. Match the segments in the intersecting shapes to the edges in the underlying curves. Sometimes it makes sense to cut in secondary forms right away and other times it makes more sense to do it after the primary forms are completely locked in and one subdivision level is applied.

Keep things simple and consistent. Focus on creating accurate shapes while maintaining relatively even segment spacing. Resolve topology flow and surface quality issues on the larger primary forms before increasing the mesh density to support smaller shapes. Streamline the modeling workflow with modifiers so it's easier to adjust the larger shapes without disrupting the segment spacing or deforming the curved surfaces.

Balance mesh complexity and surface quality to maintain editability. The base mesh just needs to be able to hold the shapes accurately and subdivide cleanly. If the shapes are fairly straightforward and the surface is relatively smooth then close enough is often good enough.

Use a reasonable amount of geometry so there's consistent segment spacing around the intersecting shapes. For smaller secondary forms and tertiary details it may be necessary to apply one or two levels of subdivision to support both soft and sharp shape transitions on compound curves.

Loop select and edge dissolve operations are a quick way to optimize the
final high poly model. Just double check that everything still
subdivides cleanly.

Regularly view the model from multiple angles while working. This makes it easier to spot shading discontinuities from smoothing artifacts and incorrect shapes that don't match what's in the reference images. It's also much easier to correct problems when the mesh is still relatively simple. So try to resolve most of the shape and topology problems during the first few iterations of the block out.
Recap: Block out the basic shapes. Maintain consistent segment spacing to preserve shape accuracy. Match the segments of intersecting geometry. Apply subdivision levels as needed but keep things as simple as possible. Know when to stop. Unnecessary complexity tends to kneecap editability.
https://polycount.com/discussion/comment/2805682/#Comment_2805682
https://polycount.com/discussion/comment/2805809/#Comment_2805809
https://polycount.com/discussion/comment/2732340/#Comment_2732340https://polycount.com/discussion/comment/2805809/#Comment_2805809
https://polycount.com/discussion/comment/2732427/#Comment_2732427
https://polycount.com/discussion/comment/2777056/#Comment_2777056
https://polycount.com/discussion/comment/2775016/#Comment_2775016
3 ·
Re: [WIP] Miss Peregrine - Eva Green Likeness (Realtime)
Making some progress on the garments. This shot is pretty much a direct dump from Marvelous Designer into Marmoset(also missing the jacket lining etc).


 RabidRabit
5 ·
Re: The Bi-Monthly Environment Art Challenge | March - April (101)
This has suddenly become a set dressing/megascans lesson for me. Due to my self inflicted time constraints I decided to delve deep into the world of megascans for the first time. I've known I needed to address my short comings in set dressing and environmental storytelling, so why not now as there is no better time than the present!
I still intend to polish up my pipes and possibly make some rocks of my own but we shall see how the next 7 days treat me.

I still intend to polish up my pipes and possibly make some rocks of my own but we shall see how the next 7 days treat me.
 Azlios
4 ·
Re: How The F*#% Do I Model This? - Reply for help with specific shapes - (Post attempt before asking)
@hayunchooi Welcome to Polycount. Consider checking out the forum information and introduction thread.
https://polycount.com/discussion/comment/2807099/#Comment_2807099
https://polycount.com/discussion/comment/2803553/#Comment_2803553
https://polycount.com/discussion/comment/2790736/#Comment_2790736


The really short answer is: there needs to be enough geometry in the larger curve to support the smaller details cut into it. How much more geometry is required really depends on the tools and order of operations used to create the model.
It's generally considered best practice to adjust the number of segments in both the underlying curved surface and the intersecting shape until the edge segments in both roughly line up with each other. That way the edges that make up the curve have consistent spacing and can also be used as part of the support loops around the intersecting shape.
Over the last few pages there's a couple of brief discussions about how to cut out details on curved surfaces. Even though the shapes are slightly different the basic principles discussed there can also be applied here.
Over the last few pages there's a couple of brief discussions about how to cut out details on curved surfaces. Even though the shapes are slightly different the basic principles discussed there can also be applied here.
https://polycount.com/discussion/comment/2803553/#Comment_2803553
https://polycount.com/discussion/comment/2790736/#Comment_2790736
https://polycount.com/discussion/comment/2790602/#Comment_2790602
Even further back in the thread there's a longer discussion about how to approach modeling this exact shape. So definitely check out the different solutions proposed there. A couple of them use very lightweight meshes and still produce good results.
Even further back in the thread there's a longer discussion about how to approach modeling this exact shape. So definitely check out the different solutions proposed there. A couple of them use very lightweight meshes and still produce good results.
https://polycount.com/discussion/comment/2690677/#Comment_2690677
https://polycount.com/discussion/comment/2691076/#Comment_2691076
https://polycount.com/discussion/comment/2699006/#Comment_2699006
https://polycount.com/discussion/comment/2691076/#Comment_2691076
https://polycount.com/discussion/comment/2699006/#Comment_2699006
There's also a more in-depth write-up here that covers breaking the shapes down into radially tileable segments.
So lots of different ways to approach the modeling part. The basic
shapes and topology routing can be done on a flat strip then bent into a
curve.
Or everything could be done directly on the surface of a cylinder primitive with more geometry.
What most of these examples have in common is the segment spacing on the curves is kept fairly consistent. Which helps prevent shading artifacts caused by unwanted surface deformation when subdivision smoothing pulls unsupported areas out of shape.
3 ·


Re: What Are You Working On? (3D) 2026
Did a new render of this old monster I made awhile ago, I'm trying to get better at Rendering / Lighting concept by Bobby Rebholz
https://www.artstation.com/artwork/nJg6N6
Also available soon for new projects
https://www.artstation.com/artwork/nJg6N6
Also available soon for new projects
4 ·

Re: The Bi-Monthly Environment Art Challenge | March - April (101)
Life got in the way a little bit but I have some more progress. Filled out the scene with some megaplants trees. Hope to continue moving on with this for the next week and a bit.
Azlios
9 ·
