The BRAWL² Tournament Challenge has been announced!
It starts May 12, and ends Oct 17. Let's see what you got!
https://polycount.com/discussion/237047/the-brawl²-tournament
It starts May 12, and ends Oct 17. Let's see what you got!
https://polycount.com/discussion/237047/the-brawl²-tournament
Best Of
Re: LOW-POLY ART
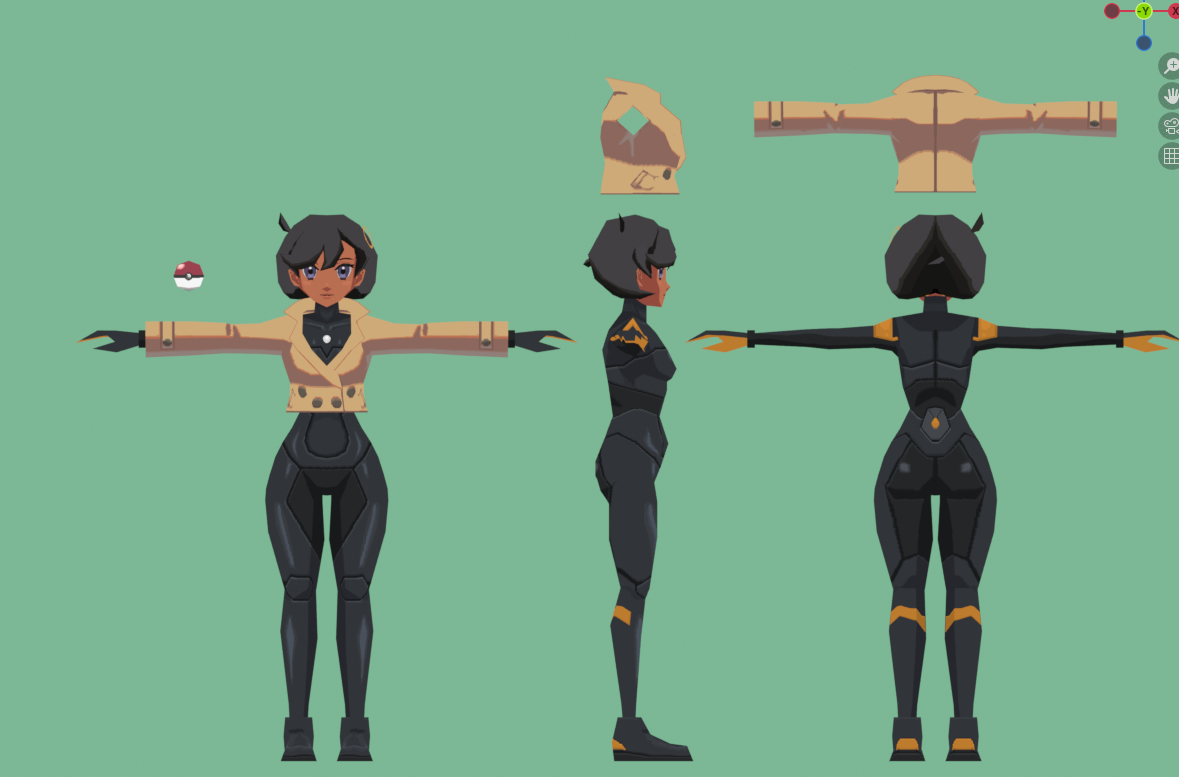
Did this Emma model recently. I was surprised how much I was able to cut down, it actually goes below 1k tris if you get rid of the hidden parts(or take the jacket off)

3 ·
Re: Sketchbook: Frank Polygon
Subdivision sketch: throttle position sensor.
This is a brief visual overview of an iterative block out process and
streamlined subdivision modeling workflow. The write-up portion of the post also covers some questions to think about when it comes to workflow decisions and time.
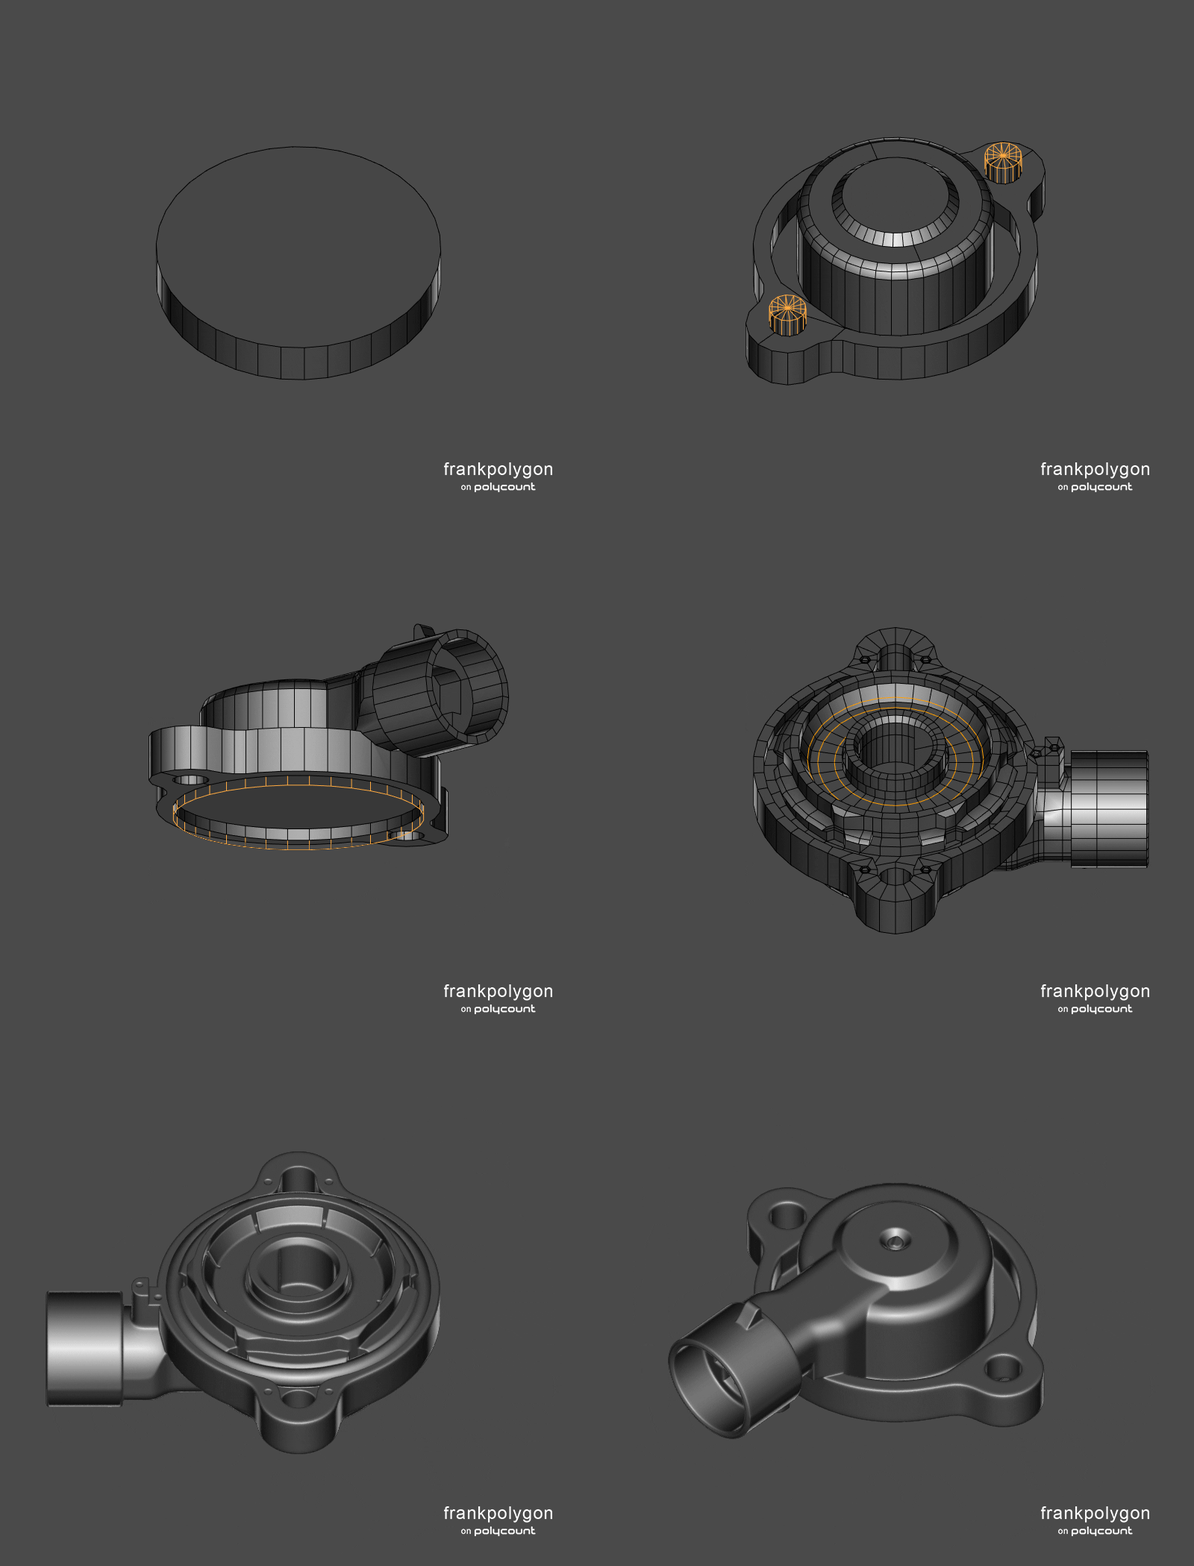
Simplified proportion block out. It all starts with gathering references and figuring out the relative size of the shapes that define the largest forms. Mesh components and parametric primitives used here function as both a simple modeling guide and foundation for the rest of the block out.
The mesh becomes more complex as details are added so it's a lot easier to change the larger shapes now while everything is still fairly simple. So try to identify and correct any scaling or proportion issues sooner rather than later.
Also, use detailed references when available. For real world objects it's often easy enough to find dimensions, line drawings, or even CAD models. Which, if they're accurate, will help speed up the block out process. Sometimes the only references available are turn-around photos or a few concept images. Which can still be used, with some basic camera matching, to verify and correct the model's proportions.

Basic shape block out and segment matching. The block out is done in stages. Typically by developing the primary forms from largest to smallest. While also considering the placement of any features or surface details that either constrain or are constrained by the larger shapes.
Breaking the shapes down by size and accurately defining the larger underlying forms first, before adding complexity with additional detail passes, is often much simpler and easier than trying to model all of the shapes while also juggling the support loop routing tasks at the same time.
Parametric primitives and non-destructive modifiers, including boolean
operations, help streamline the modeling process and also add the
flexibility to easily adjust segment density and shape profiles at any
time during the block out. Which makes segment matching around shape
intersections a more non-linear process and a lot easier when compared
to more conventional poly modeling only workflows.
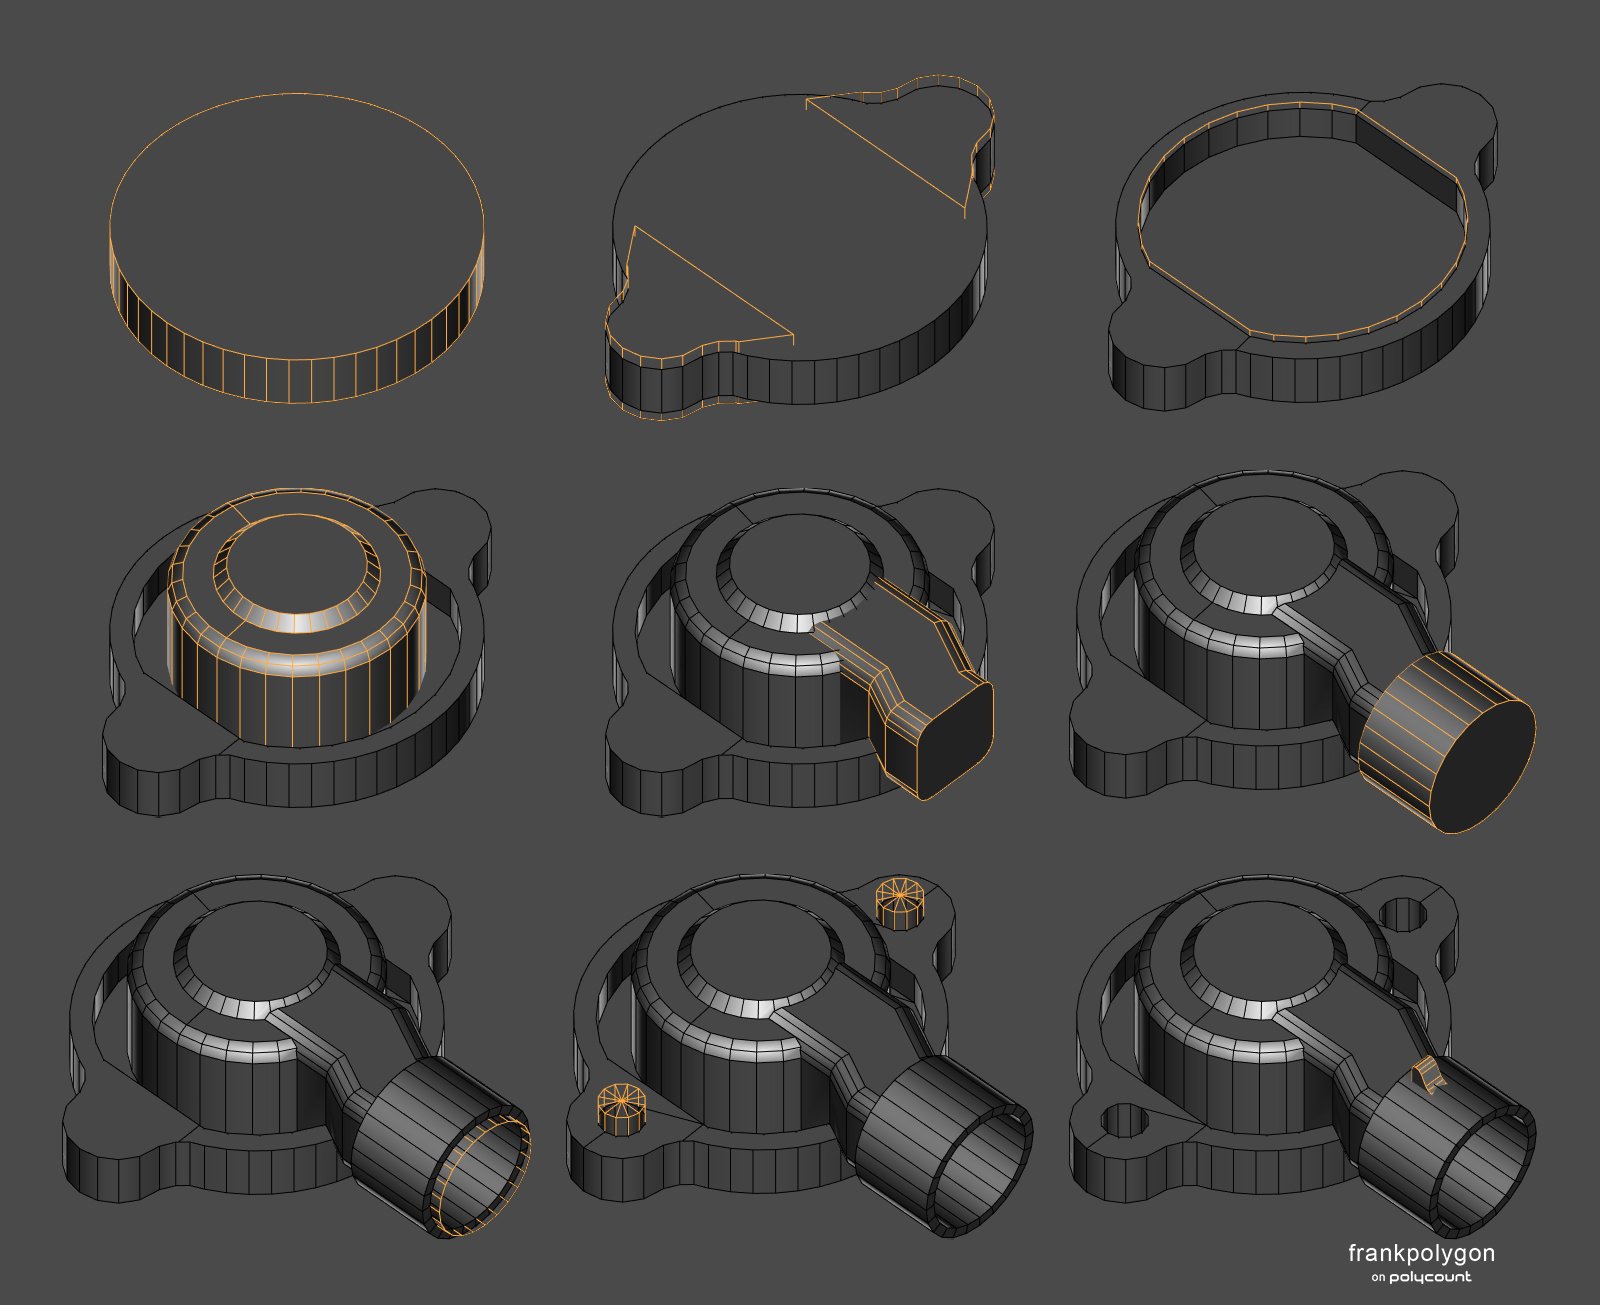
Block outs and the rest of the modeling process. The complexity of the shapes in the block out really depends on the desired level of accuracy and detail. Which is often based on what the model is for and distance it will be viewed from. Mesh density also tends to vary according to surface quality requirements and the type of workflow used to generate the high poly model.
Re-meshing + polishing workflows tend to produce better results when there's more geometry in the curved parts of the base mesh. The example below shows how the previous block out can be used in a single application modeling, re-meshing, and polishing workflow to create a high poly model by simply increasing the mesh density. Something that's relatively easy to to by just adjusting the segment values for the parametric primitives and modifiers used to generate the block out.
Though it is worth noting that even at over 1 million triangles there's still some crunchy looking artifacts after re-meshing and polishing. Which usually means those areas of the base mesh could probably use a bit more geometry or the smoothing value of the polish operation could be increased.
Overall it took about 10 minutes to adjust the parameters on the block out and setup some re-meshing and smoothing modifiers to generate the high poly for this example. One other downside to this particular single application workflow is greater visual separation between the surfaces likely requires some additional micro bevels. Which isn't a deal breaker but does increase the complexity of the base mesh and amount of work required to generate the high poly.

Modifier based SUBD workflows, like the one used for the rest of the examples below, tend to require less geometry and a lot of the support loops can be generated automatically with bevel / chamfer modifiers that are controlled by weights or other parameters like edge angle. Which makes it more time efficient compared to most traditional poly modeling approaches. With the added benefit that it's also a bit easier to control individual edge highlights by simply adjusting the weights and width parameters of the modifiers used to generate the support loops.
For comparison: the subdivided model is about 60,000 triangles yet has smoother surfaces and edge highlights than certain sections of the re-meshed high poly in the previous example. Of course a major downside is most subdivision models will require some segment matching and topology routing management. Even when using modifiers to generate most of the edge sharpening support loops.
It also took about 15-20 minutes to setup the weights that control the bevel / chamfer modifiers used to generate the support loops. Which included resolving a couple of simple topology routing issues on the block out. Along with a few shape changes that were later ported to the re-meshing example above.

Which isn't that much more time or effort, especially considering
there's certain situations where the re-meshing workflow requires
additional micro bevels, but when only look at time there's a simplicity
to the re-meshing + polishing approach that tends to win out in terms
of speed.
All that said: this isn't a direct comparison of modifier based SUBD and re-meshing + polishing workflows. The key takeaway here is the block out is an important part of the modeling process. Working
in stages to create accurate shapes avoids wasting time on re-work and
building in a certain amount of flexibility to easily change things
saves time when adjusting the shapes used to create the base mesh for
the high poly.
Base mesh. This is essentially just a test of the block out to identify any potential problem areas around the shape intersections and confirm that there's enough geometry to hold the shapes when subdivision is applied. All of the major forms are present but some of the shapes have been simplified to make modeling and loop routing a bit easier.
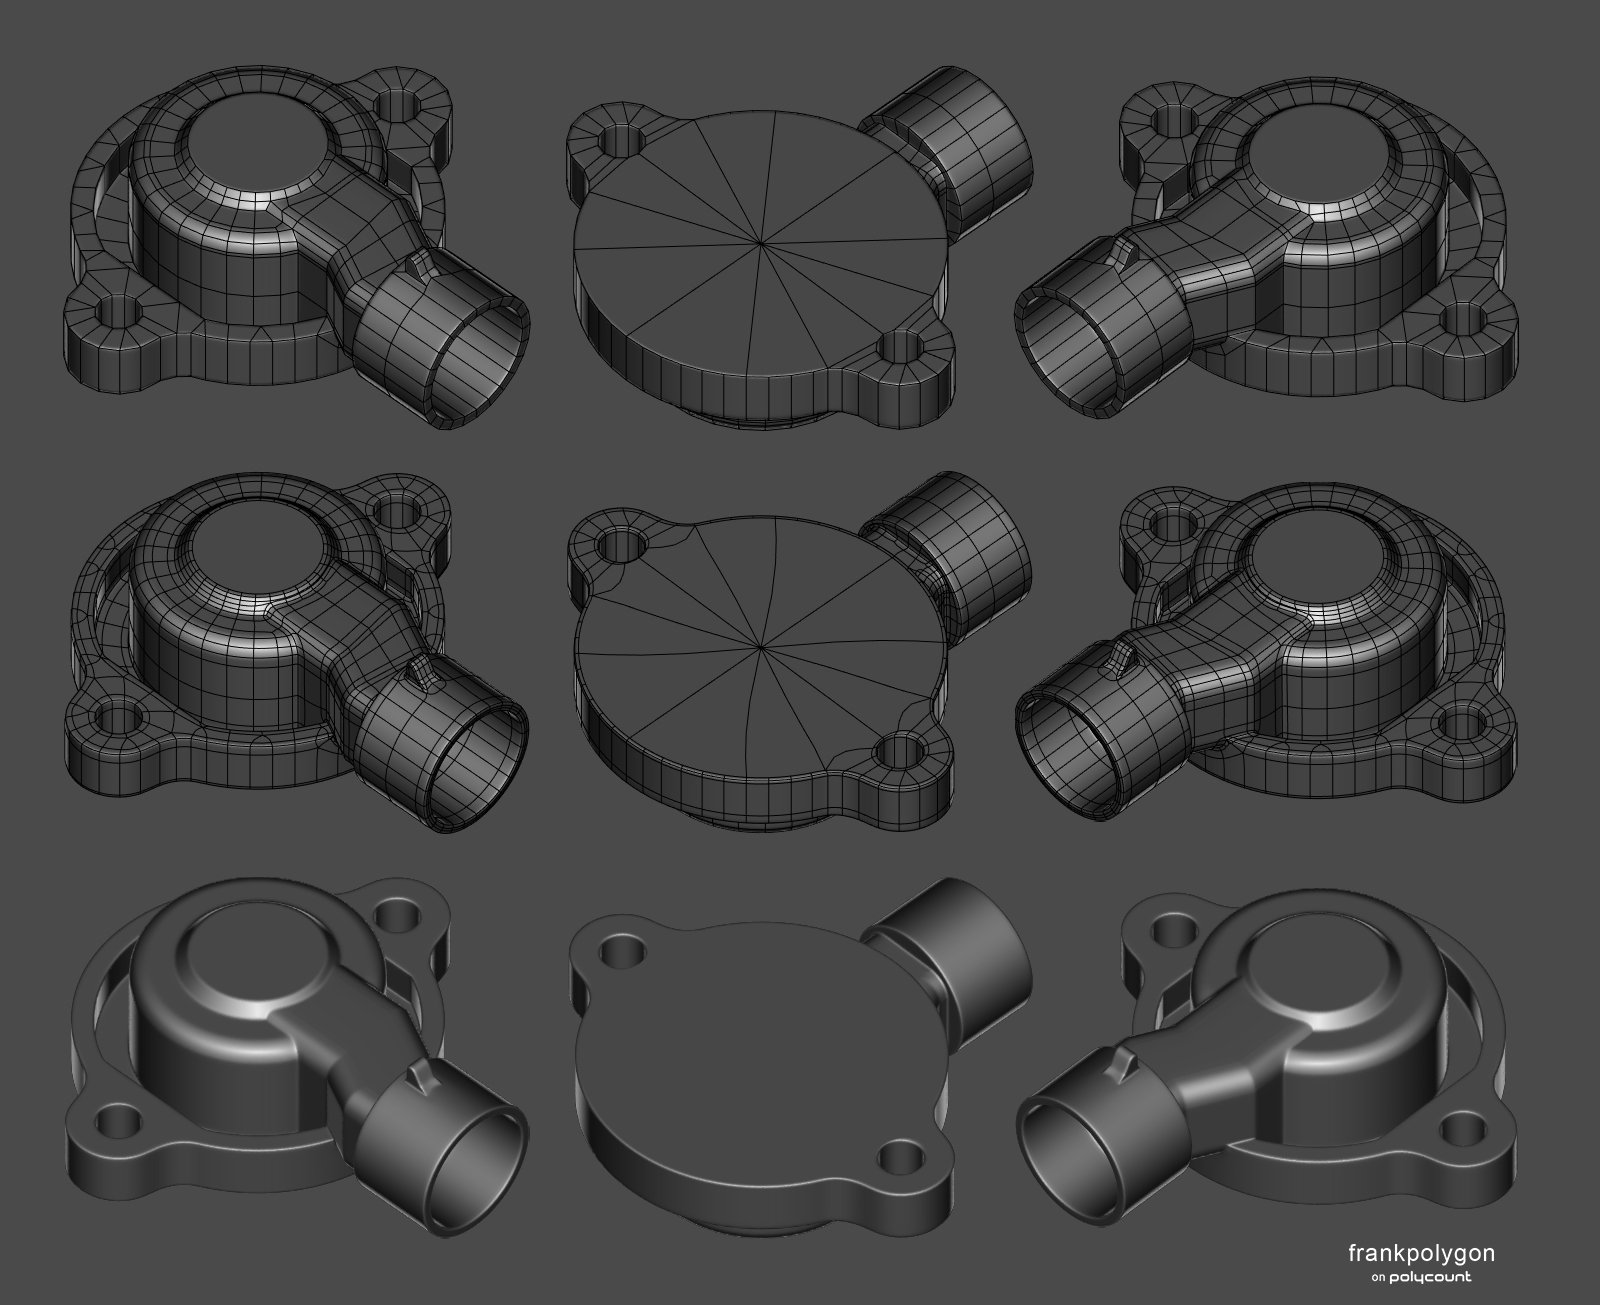
Detail pass I and shape correction. Increasing the accuracy of some of the larger shapes and adding some smaller details requires more segment matching to line up the geometry at the base of the shape intersections. Which just means going back to the parametric primitives and modifiers used to generate the block out, making the adjustments, then merging those changes into the base mesh.
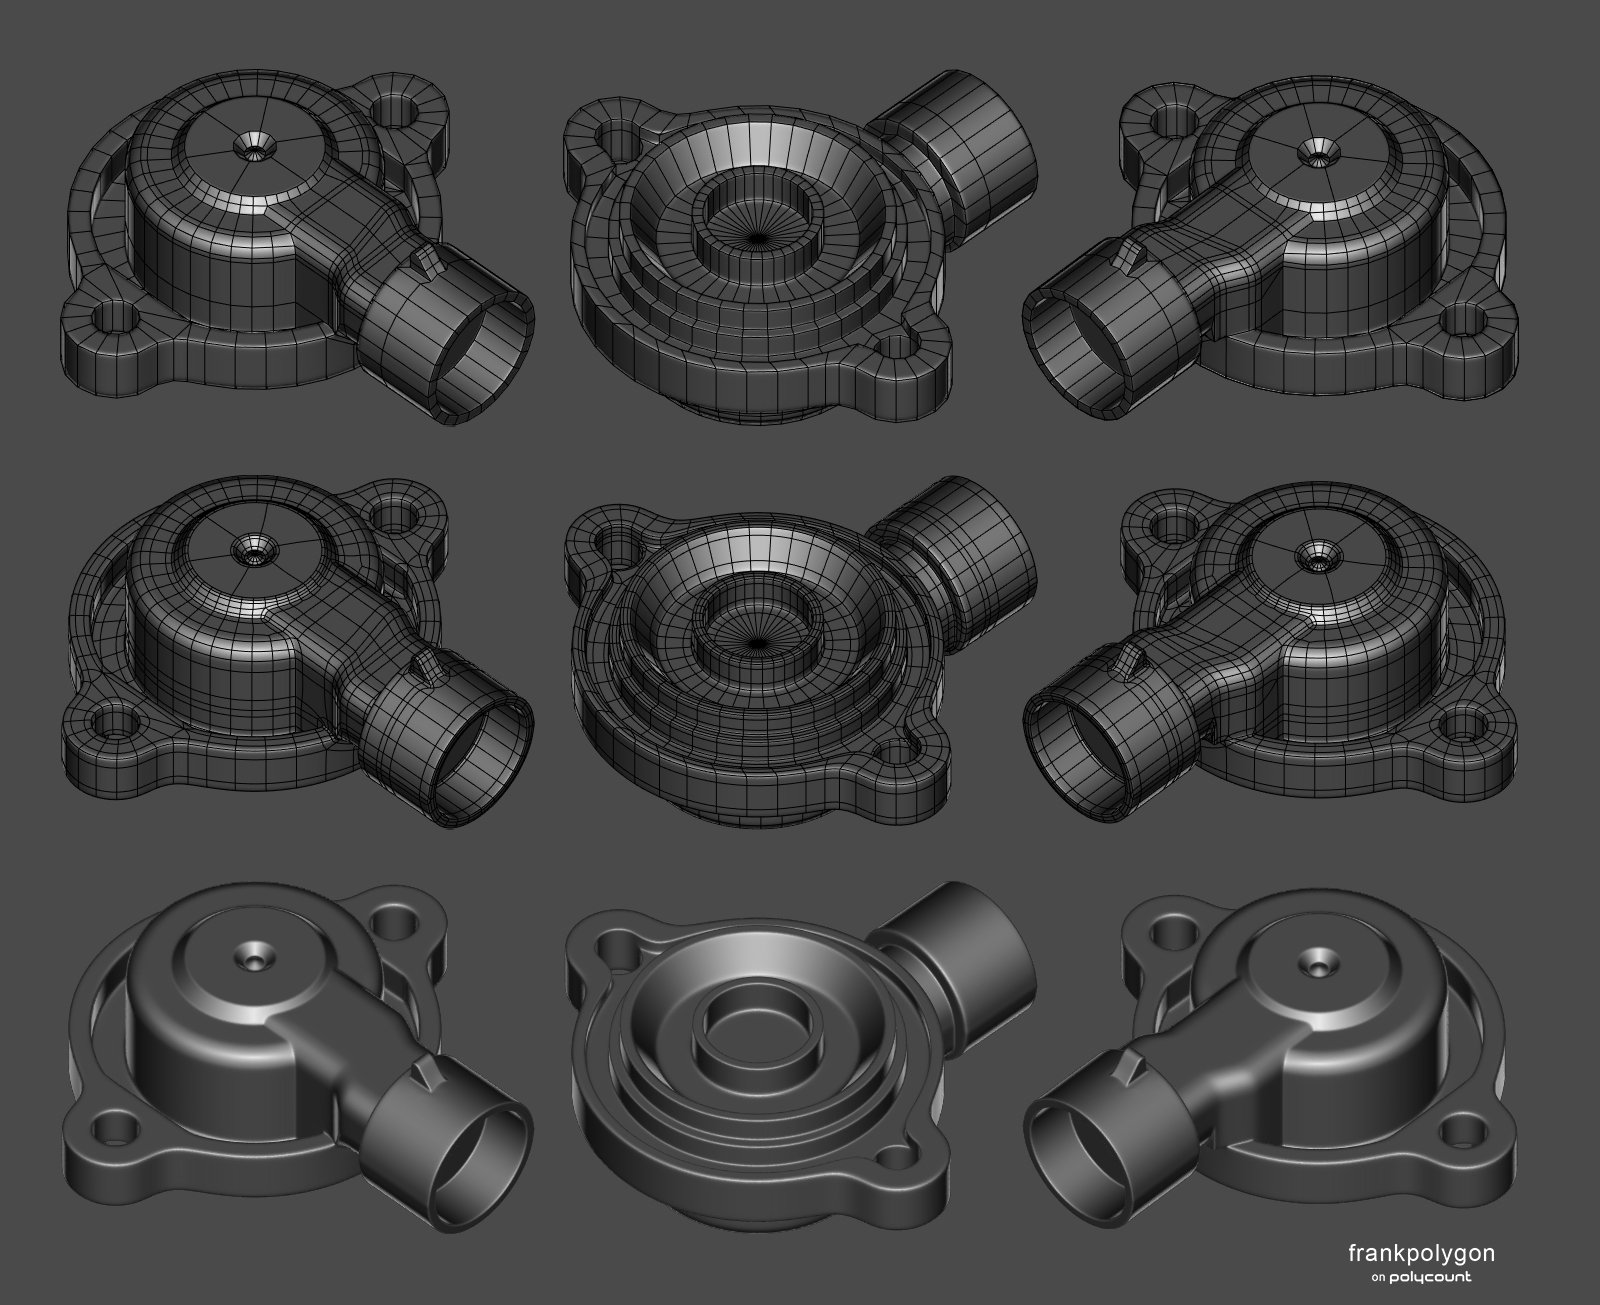
Detail pass II and final high poly. Continued refinement with smaller and smaller details. Some additional parts were also added to fill in the underside of the model. Improved segment matching leads to more consistent topology flow, especially around the top and bottom of the mounting flange.
Some of the remaining mismatch between inside and outside curves is down to specific segment counts needing to be divisible by six to support some radially tiling features and that difference in the topology layout is placed at the bottom of the flat groove around the inside of the recessed area.
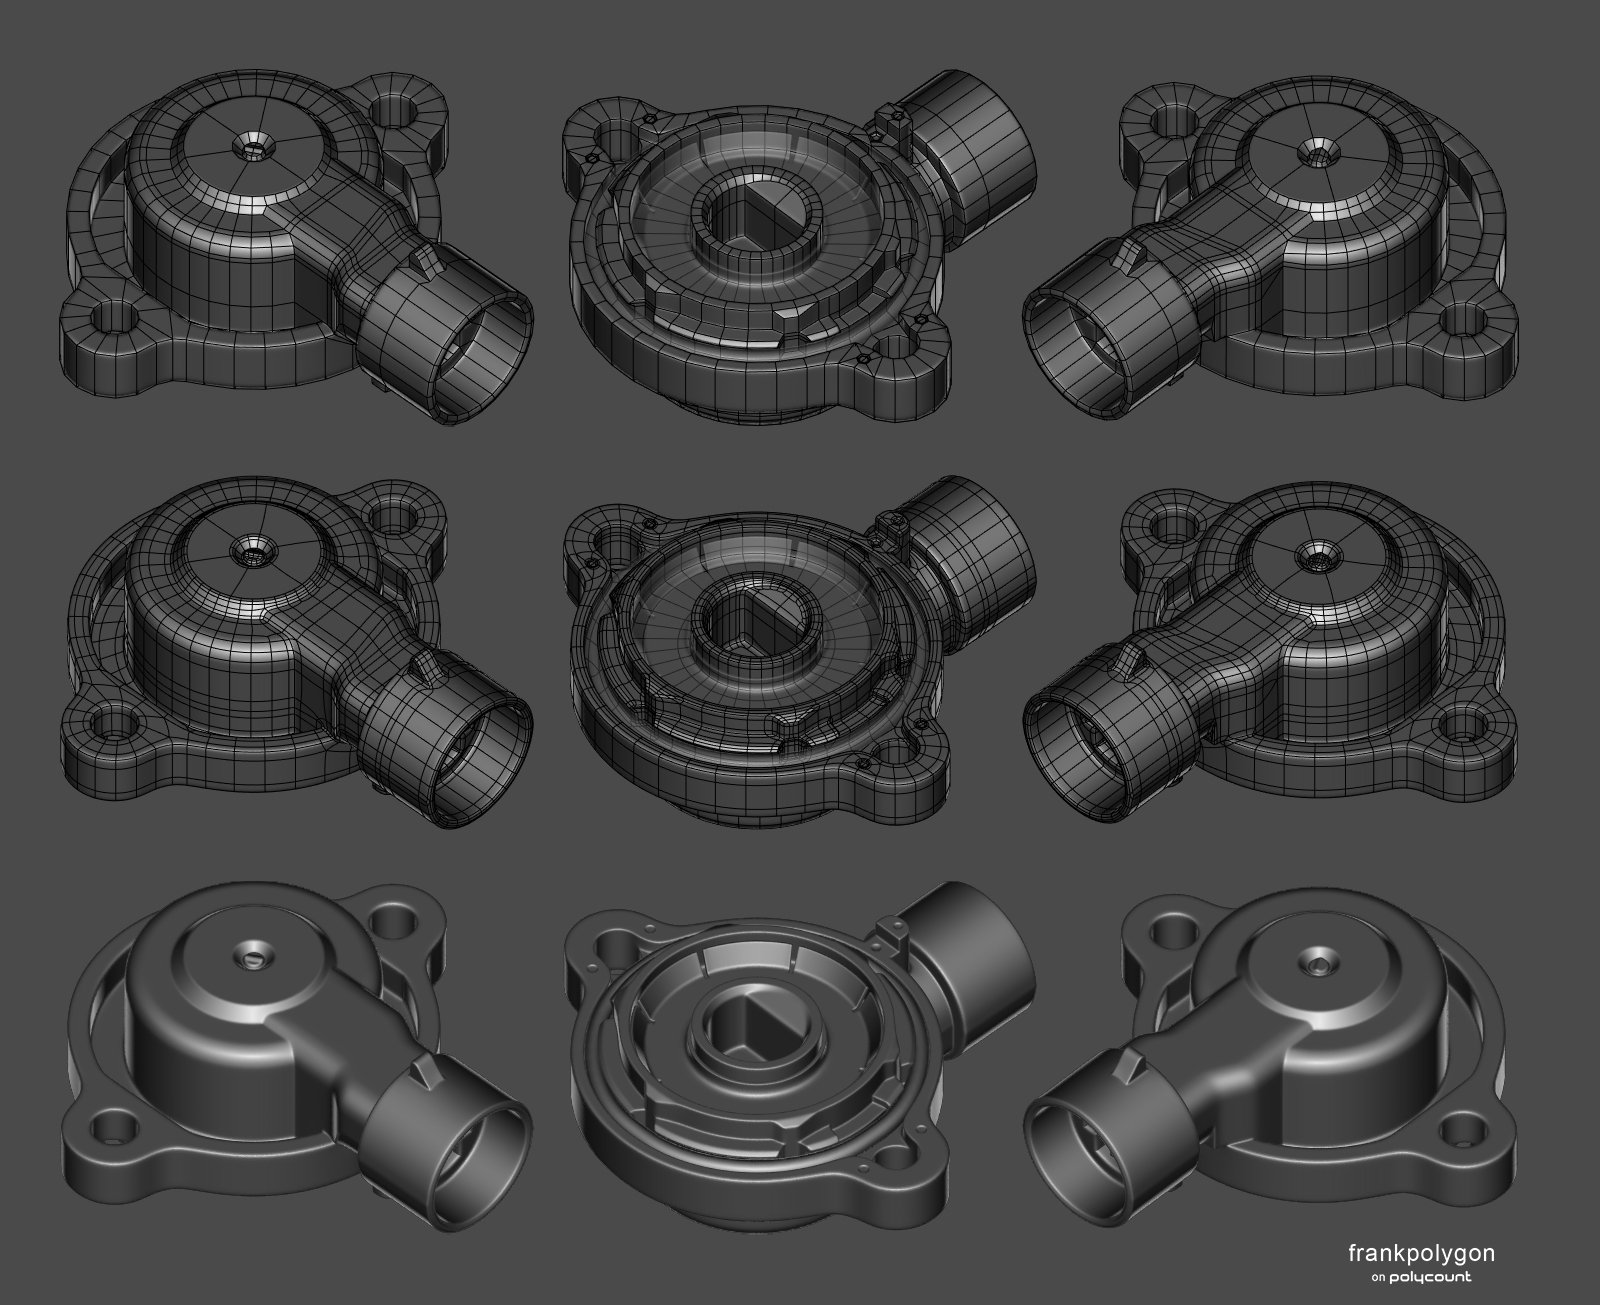
All of the edge support loops on the final high poly model are automatically generated non-destructively by bevel / chamfer modifiers. Which makes editing the base mesh or adjusting the width of the edge highlights relatively quick and easy.

Model comparisons. Each iteration beyond the basic shape block out can technically stand in as a high poly model. Which, independent of block out and high poly workflow choices, brings up some points
about effort, artistic goals, and finding a minim viable product that are worth considering.
There's a visible difference between each iteration beyond the shape block out. Even when scaled down but when is that difference not worth the additional time spent?
The answer really depends on the context: is this a working asset, portfolio piece, or practice exercise? What's the time budget, technical constraints, and art goals? Do the shapes need to be perfectly accurate or can they be abstracted slightly to simplify the modeling process? How close will players be to the in-game model? Will the players ever see those smaller details or internal components?
Something to keep in mind when asking these types of questions is that the answers don't have to be all or nothing.
Certain details do enhance the perceived visual quality and maybe it makes sense to add those kinds of details in one area while also simplifying other things. Especially when it makes modeling easier or when those simplified shapes translate to a low poly that's more efficient, easier to unwrap, or with better bakes and LODs.
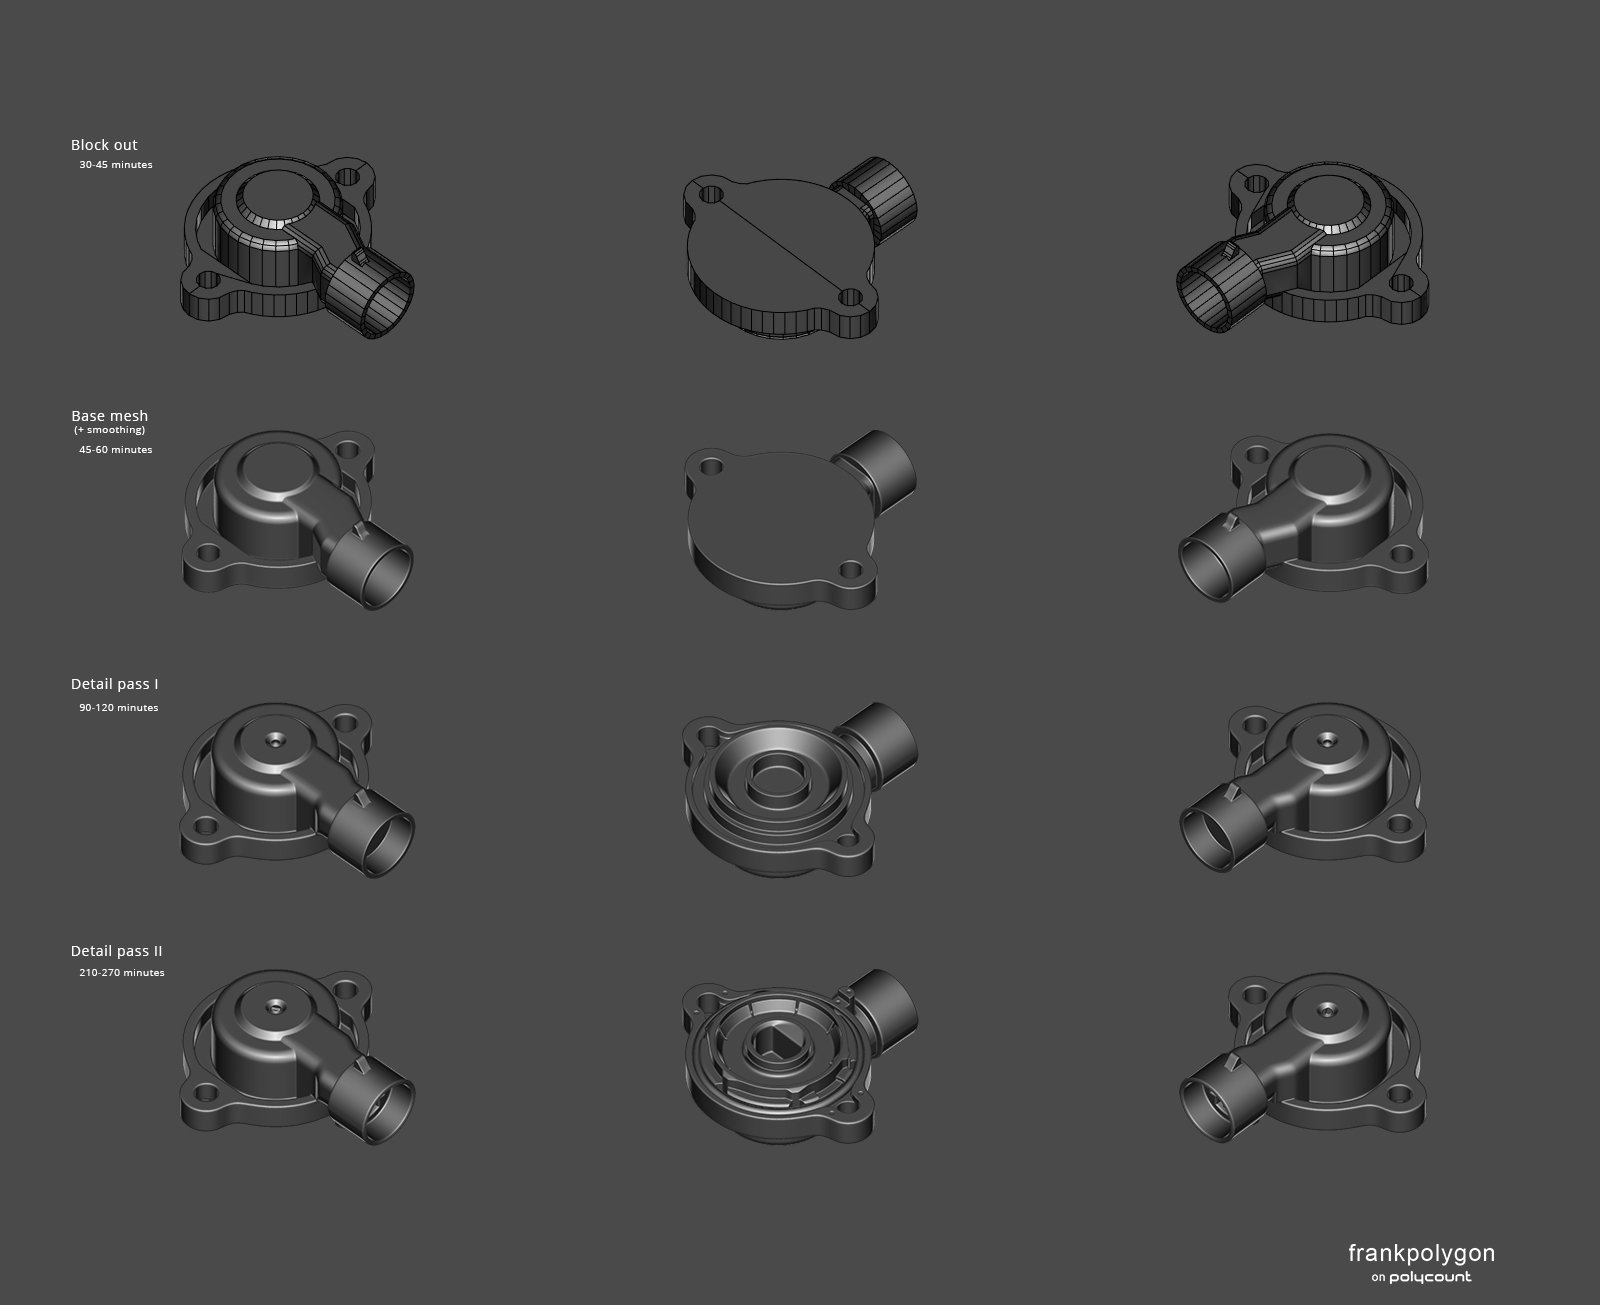
(Note: times listed in the example above are cumulative.)
Some other thoughts on questions about time. Two really common themes in time related questions are often some variation of: "How long should this take?" and "How can I do things faster?".
The short answer to that first question is: it depends. Experience, tool set, workflow, object complexity, technical constraints, artistic goals, etc. all factor in to how long it takes to actually model something. So there's rarely going to be one single answer that covers every possible situation.
The short answer to the second question really boils down to looking at tool and workflow choices. So a lot of those answers are related to using different tools or better workflow automation and not doing stupid shit that requires a lot of extra steps or manual clean up. Because, at the end of the day, rocket powered shit shoveling is still shit shoveling...
But there's also something that's often implied by the way the second question gets asked: which is that speed is a universally measurable indicator of competence and skill. And. Sure: It's a business metric that's easily quantifiable but how does that
relate back to learning and building up a skill set or
trying out different workflows to see what fits personal
preferences and specific project requirements?
Is modeling speed really a
good metric for how well fundamental art skills are acquired or
applied?
In some ways it might be. Since it does tend to correlate with technical skill. In others, not so much. Just because the work is done quickly doesn't mean it is done accurately or correctly. Which begs the question: how many times can something be re-done to correct fundamental art problems, that were glossed over in the name of modeling speed, before completely erasing the time advantage of "faster" workflows that have linear bottlenecks or are too inflexible?
In some ways it might be. Since it does tend to correlate with technical skill. In others, not so much. Just because the work is done quickly doesn't mean it is done accurately or correctly. Which begs the question: how many times can something be re-done to correct fundamental art problems, that were glossed over in the name of modeling speed, before completely erasing the time advantage of "faster" workflows that have linear bottlenecks or are too inflexible?
Another thing to consider (excluding other solutions like scanning, outsourcing, kit-bashing, generative systems, etc.) is that some things just take time. For this example the block out took about 30-45 minutes. To some
degree there really isn't a way around that because the basic shapes need
to be modeled one way or the other. Sure, purely parametric modeling is
probably going to be faster and more flexible than modifier based poly
modeling and that's probably still faster than purely destructive poly
modeling.
The point is: somewhere in that time
range there's a minimum amount of effort required for an artist to find reference images, analyze the shapes, and translate all that information
into some kind of 3D model. So when questions about time or modeling
speed come up, it's often viewed as some sort of vague proxy for skill
level or technical expertise. Which is fine. It's just, how does that
measure the actual usefulness or quality of the art?
Sometimes it's really easy to get wrapped up in hypotheticals and value judgements. If the goal is to go fast then choose the faster workflow. If the goal is to learn or produce a certain type of art then focus on doing that and measure things that have a tangible impact on improving skills, process decisions, and the art that ends up in front of the audience.
3 ·
Re: The Bi-Monthly Environment Art Challenge | September - October (98)
Congrats on finishing your piece @Vastra !
While the visuals are not very 2025, there's a cohesion in the look that reminds me of PS3 graphics and it somehow works for me.
I feel you could add geometry to the walls to attempt the "room carved into rock" look the concept has. I can see you tried something like that with the right-most pillar but the lack of hard edges makes the shape look soft and bubbly.
You could also add larger details in the textures of the walls, right now it's quite high-frequency details only. I also see that some parts of the walls have the rocks grain going vertical and others horizontal. It makes it possible for us to "see" the polygons, I would adjust the UVs of the walls to be more cohesive.
--
As for me, I didn't have time to finish my piece, I'll stick to it though and finish it before I start the next one.
 Grindy
3 ·
Re: The Bi-Monthly Environment Art Challenge | September - October (98)
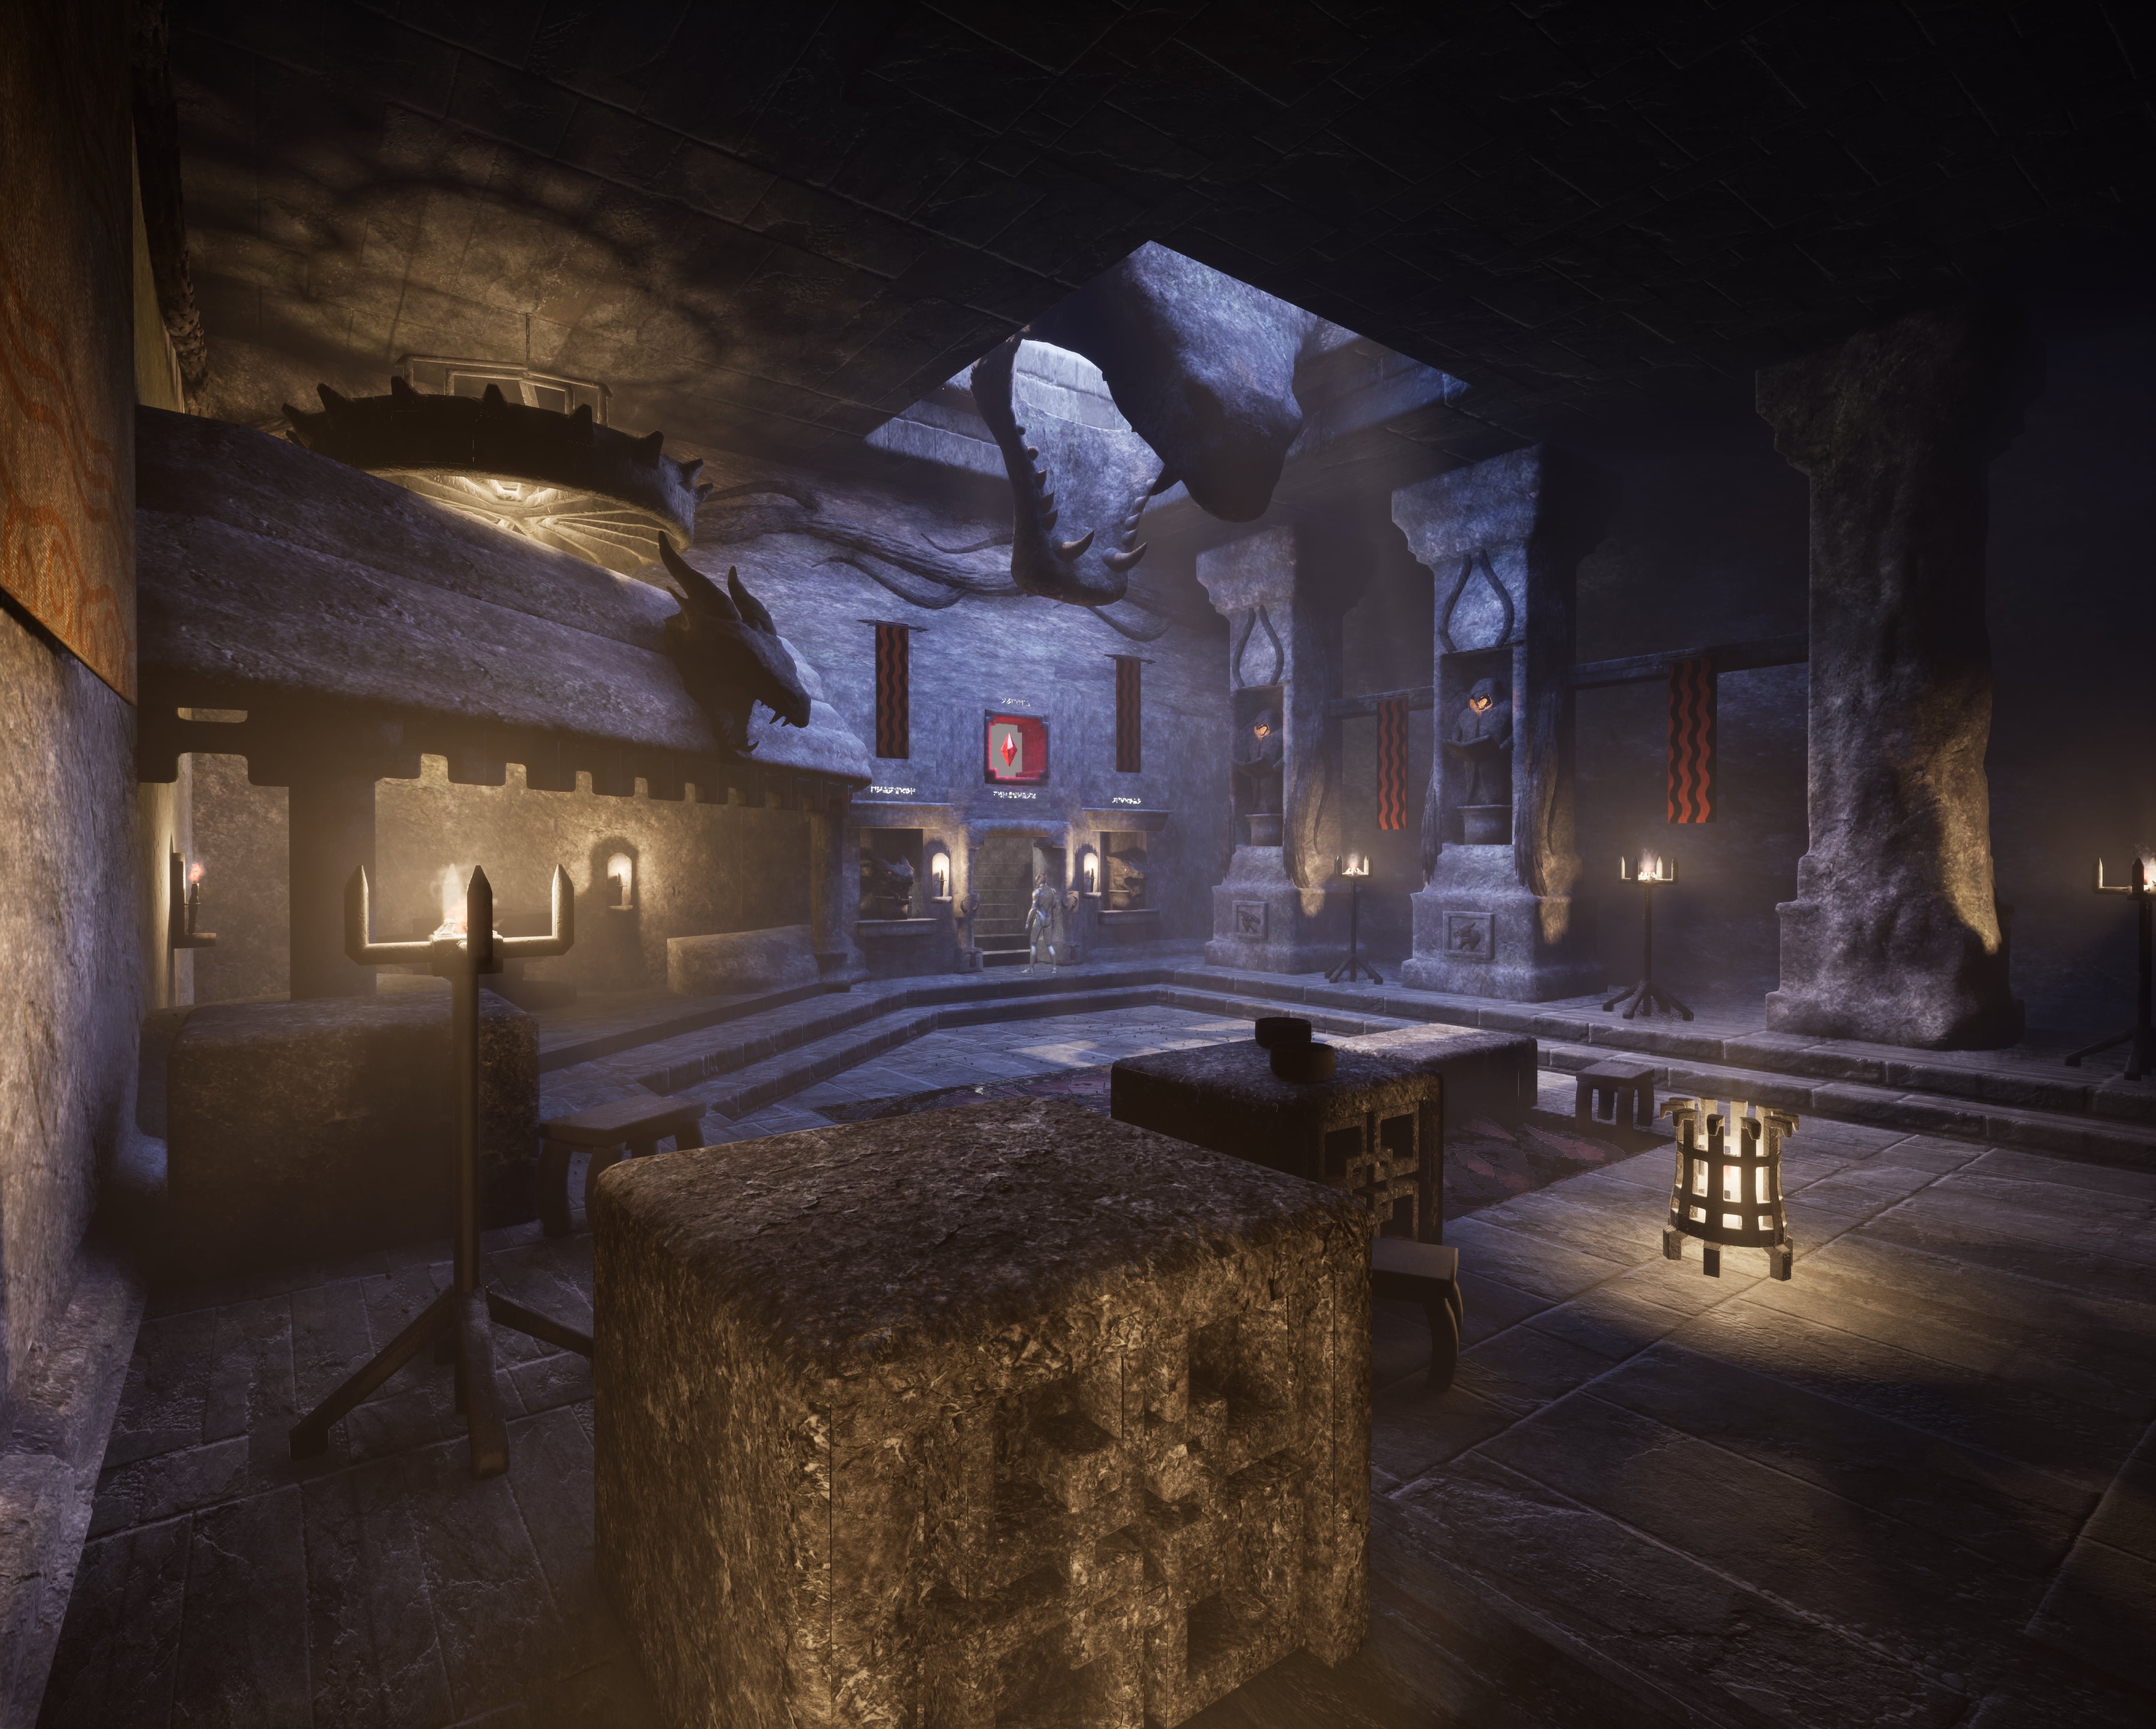
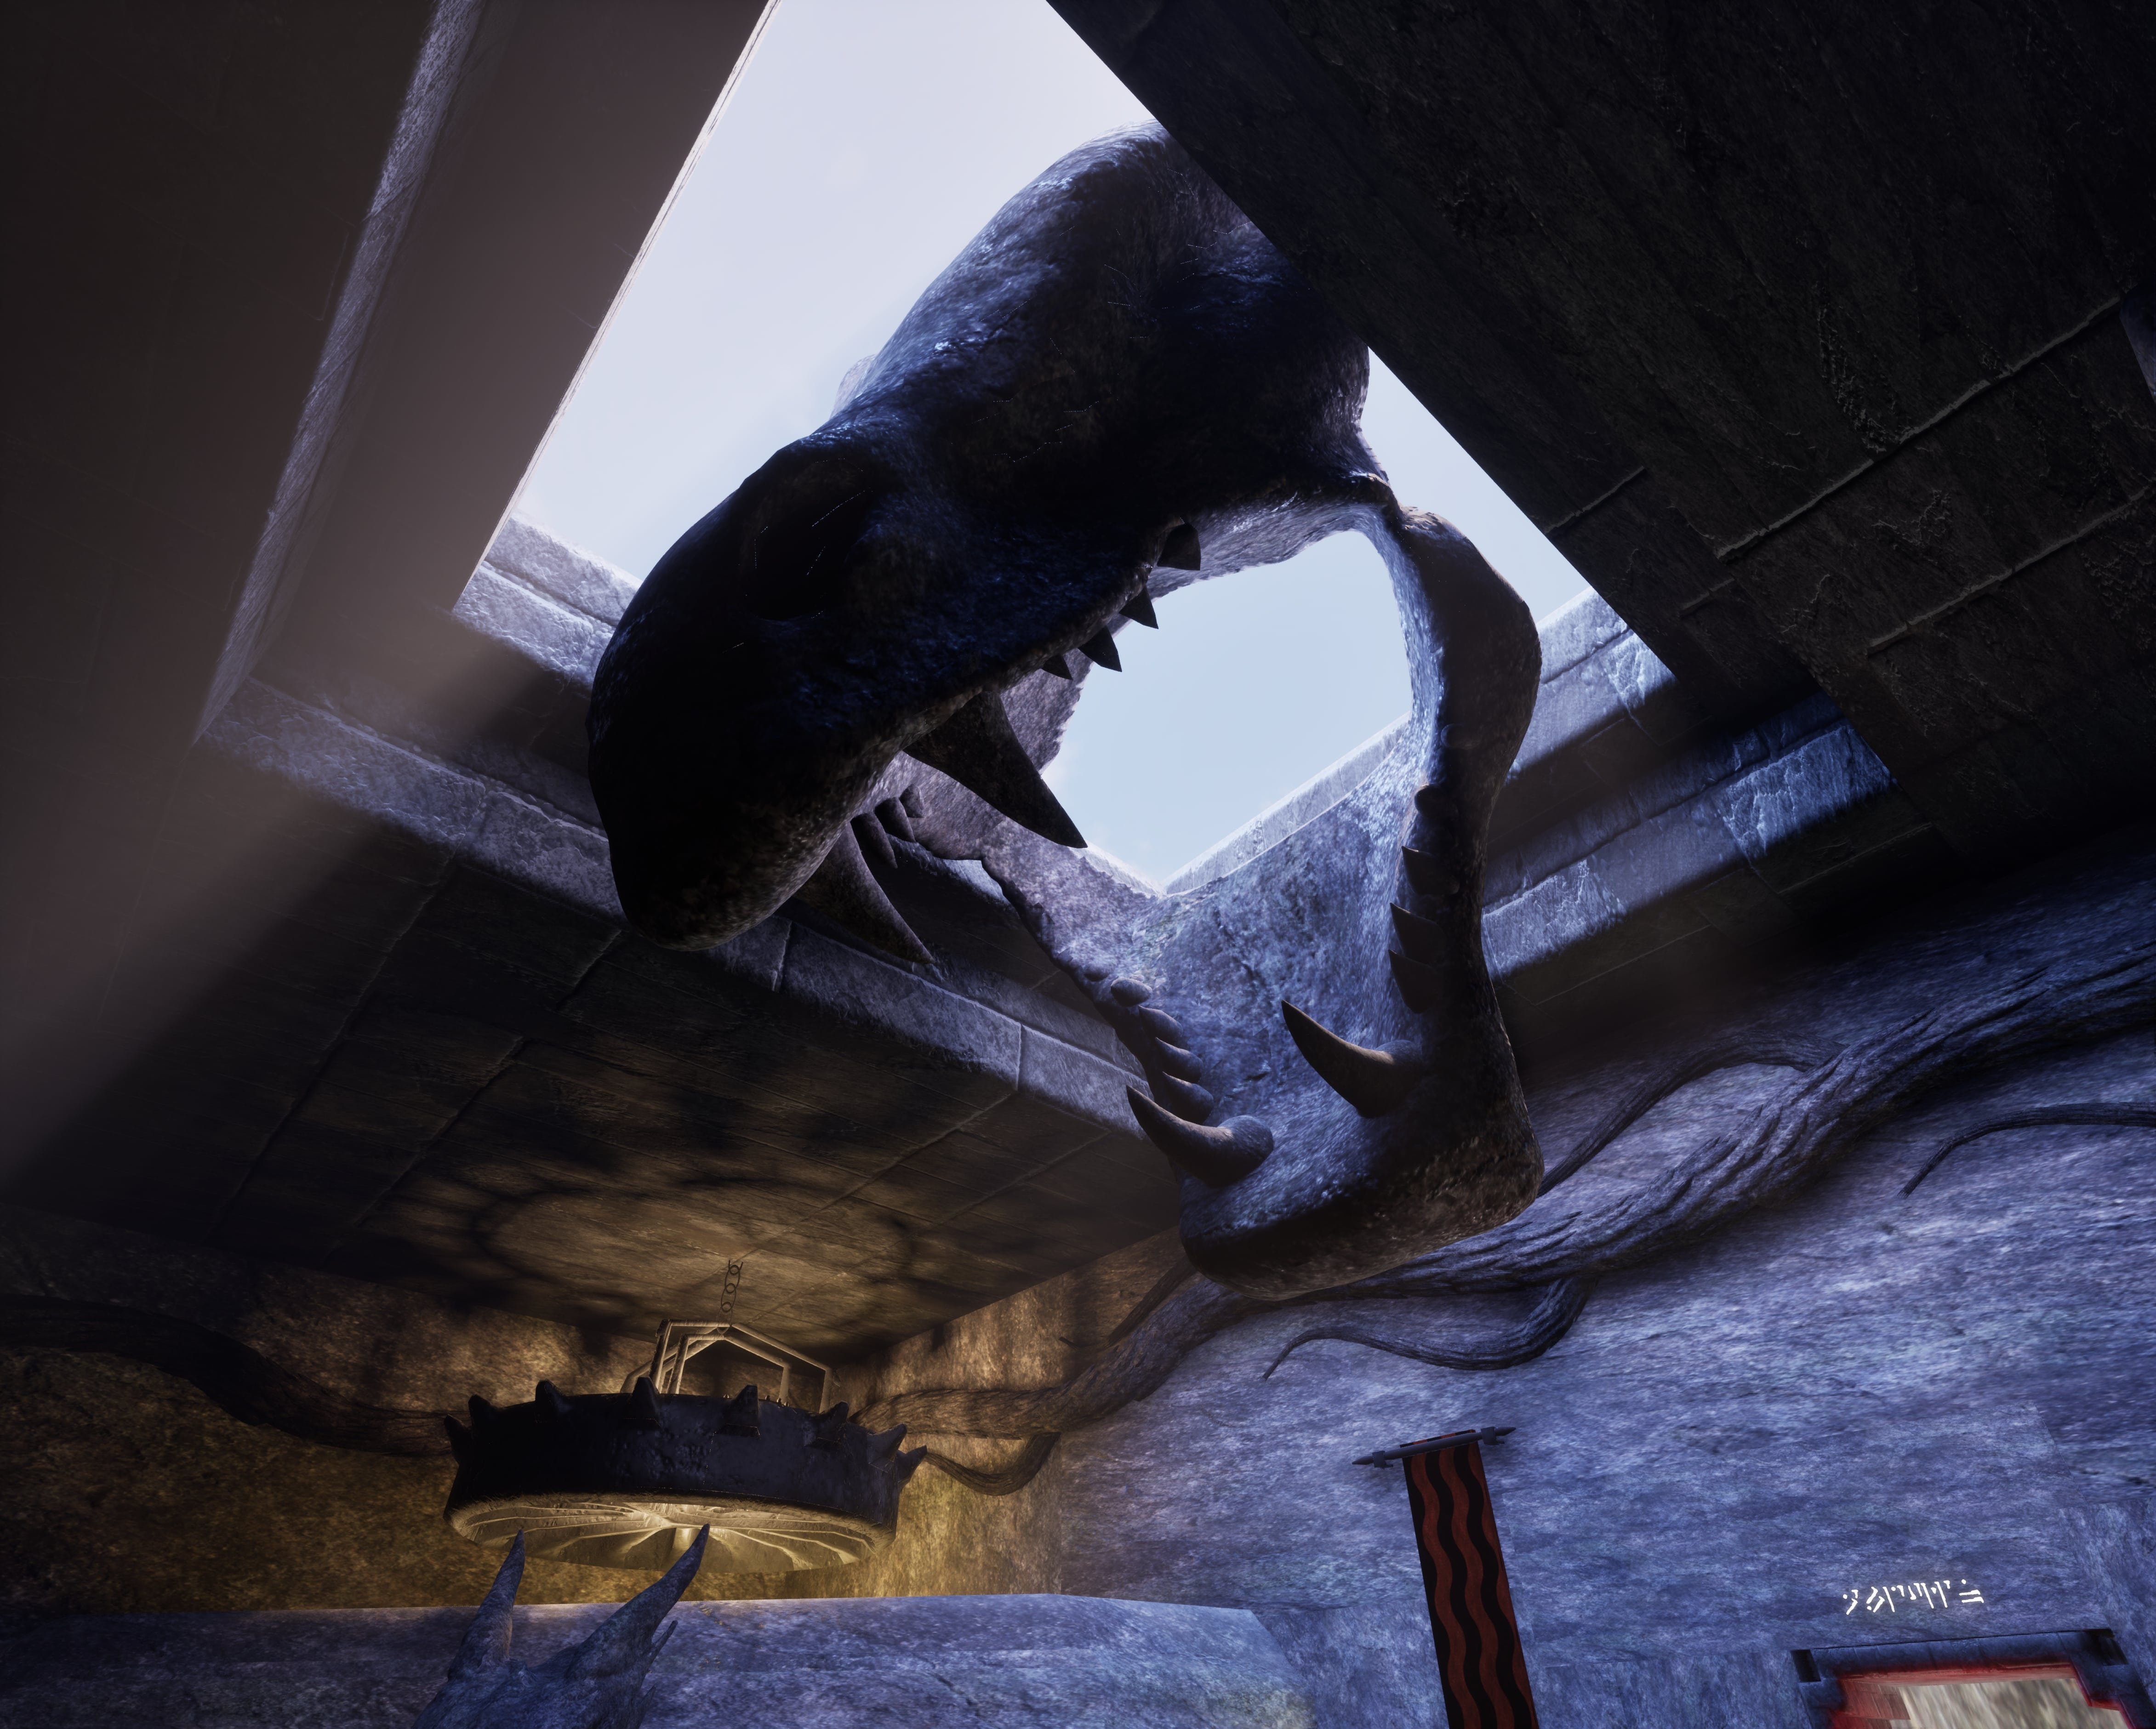
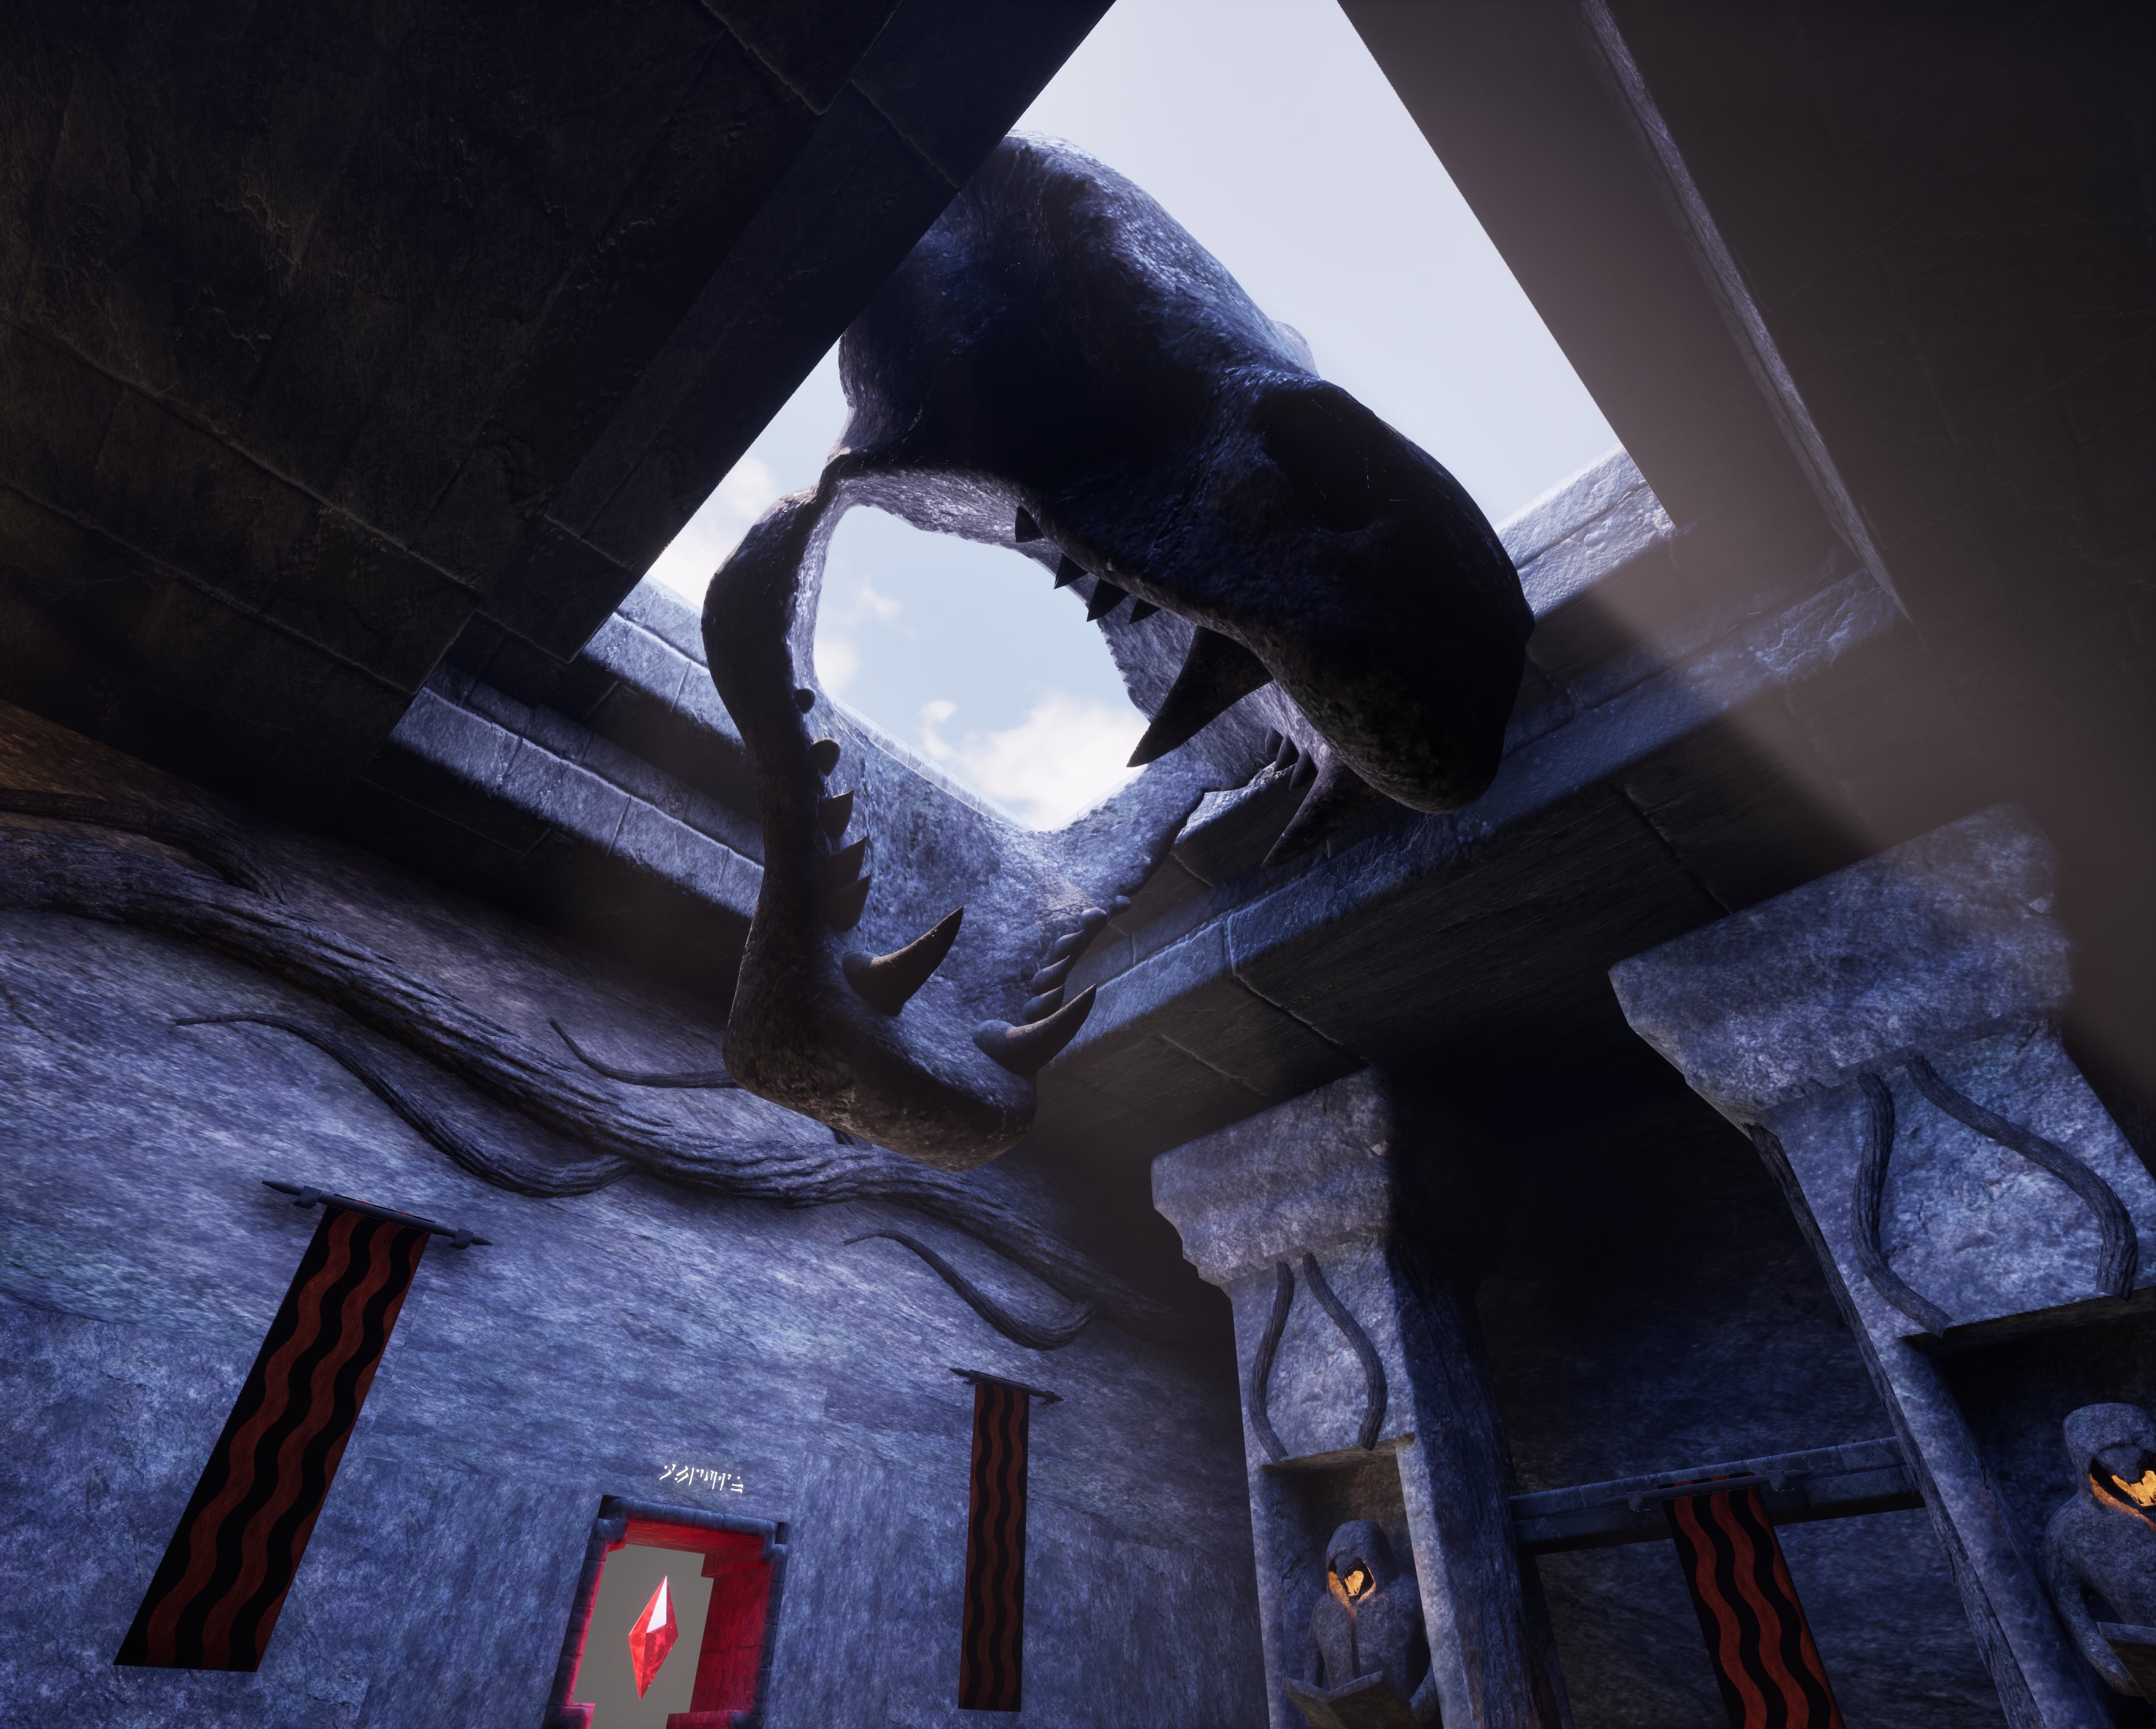
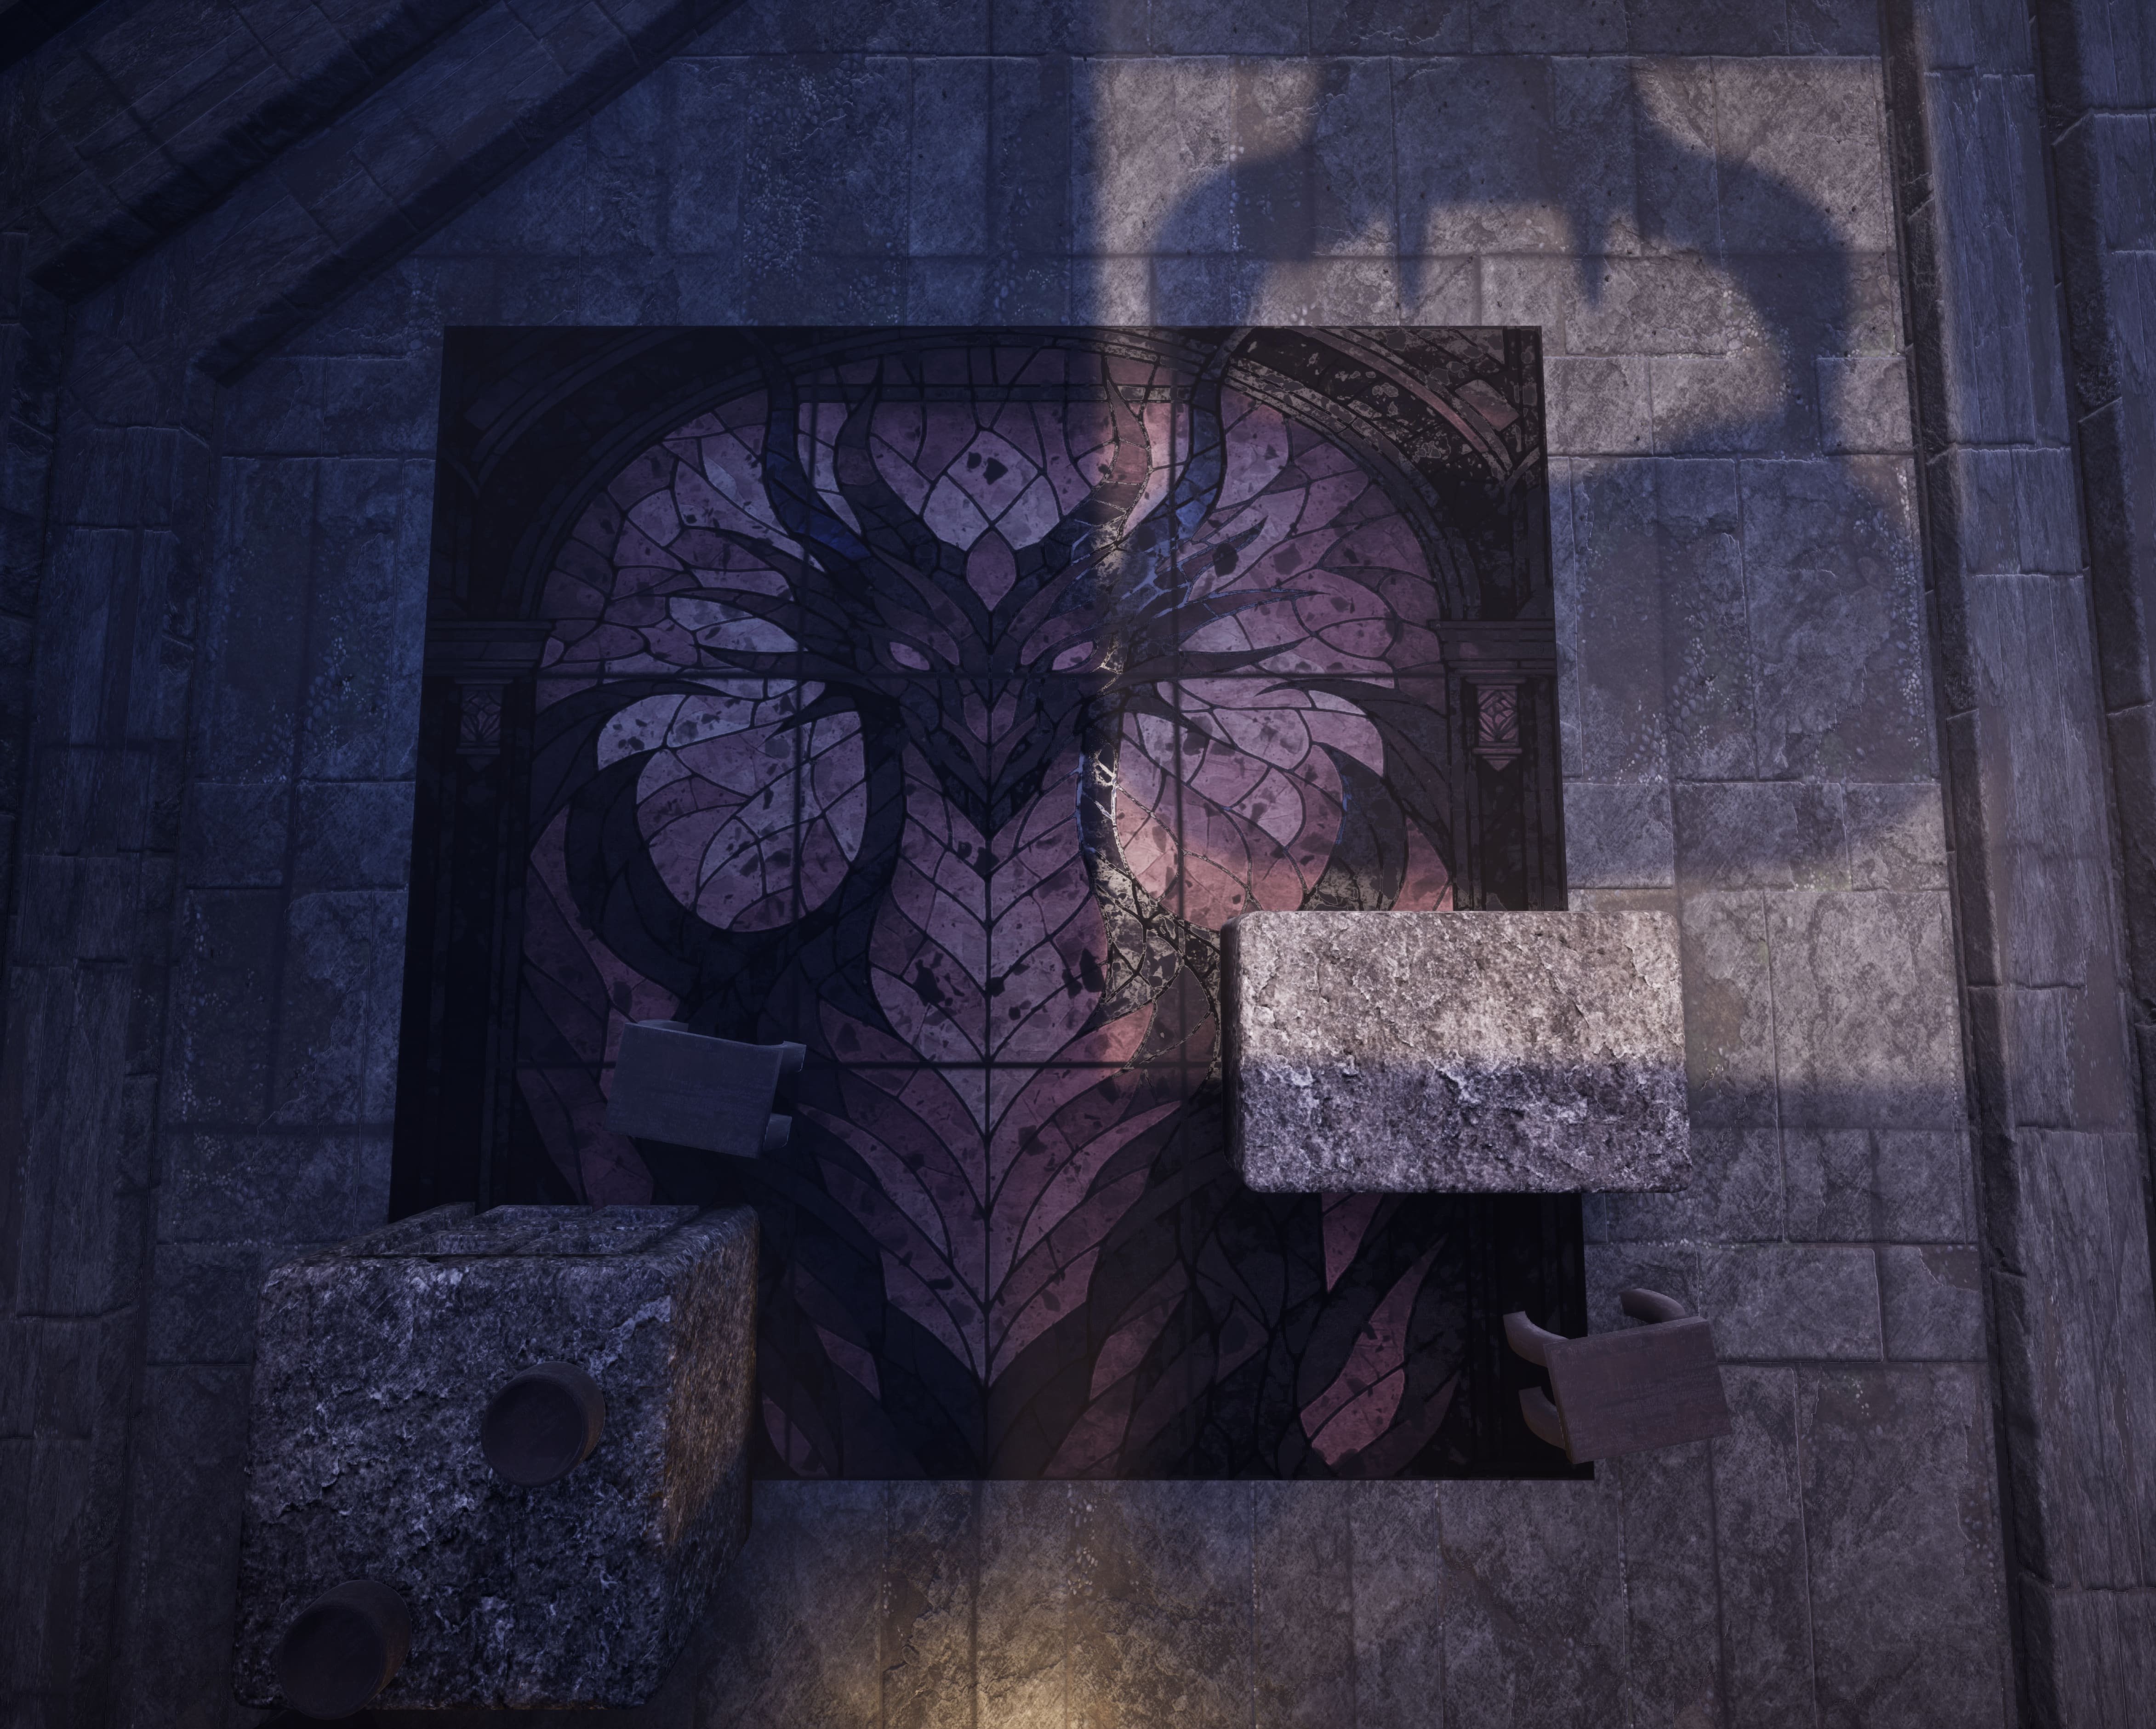
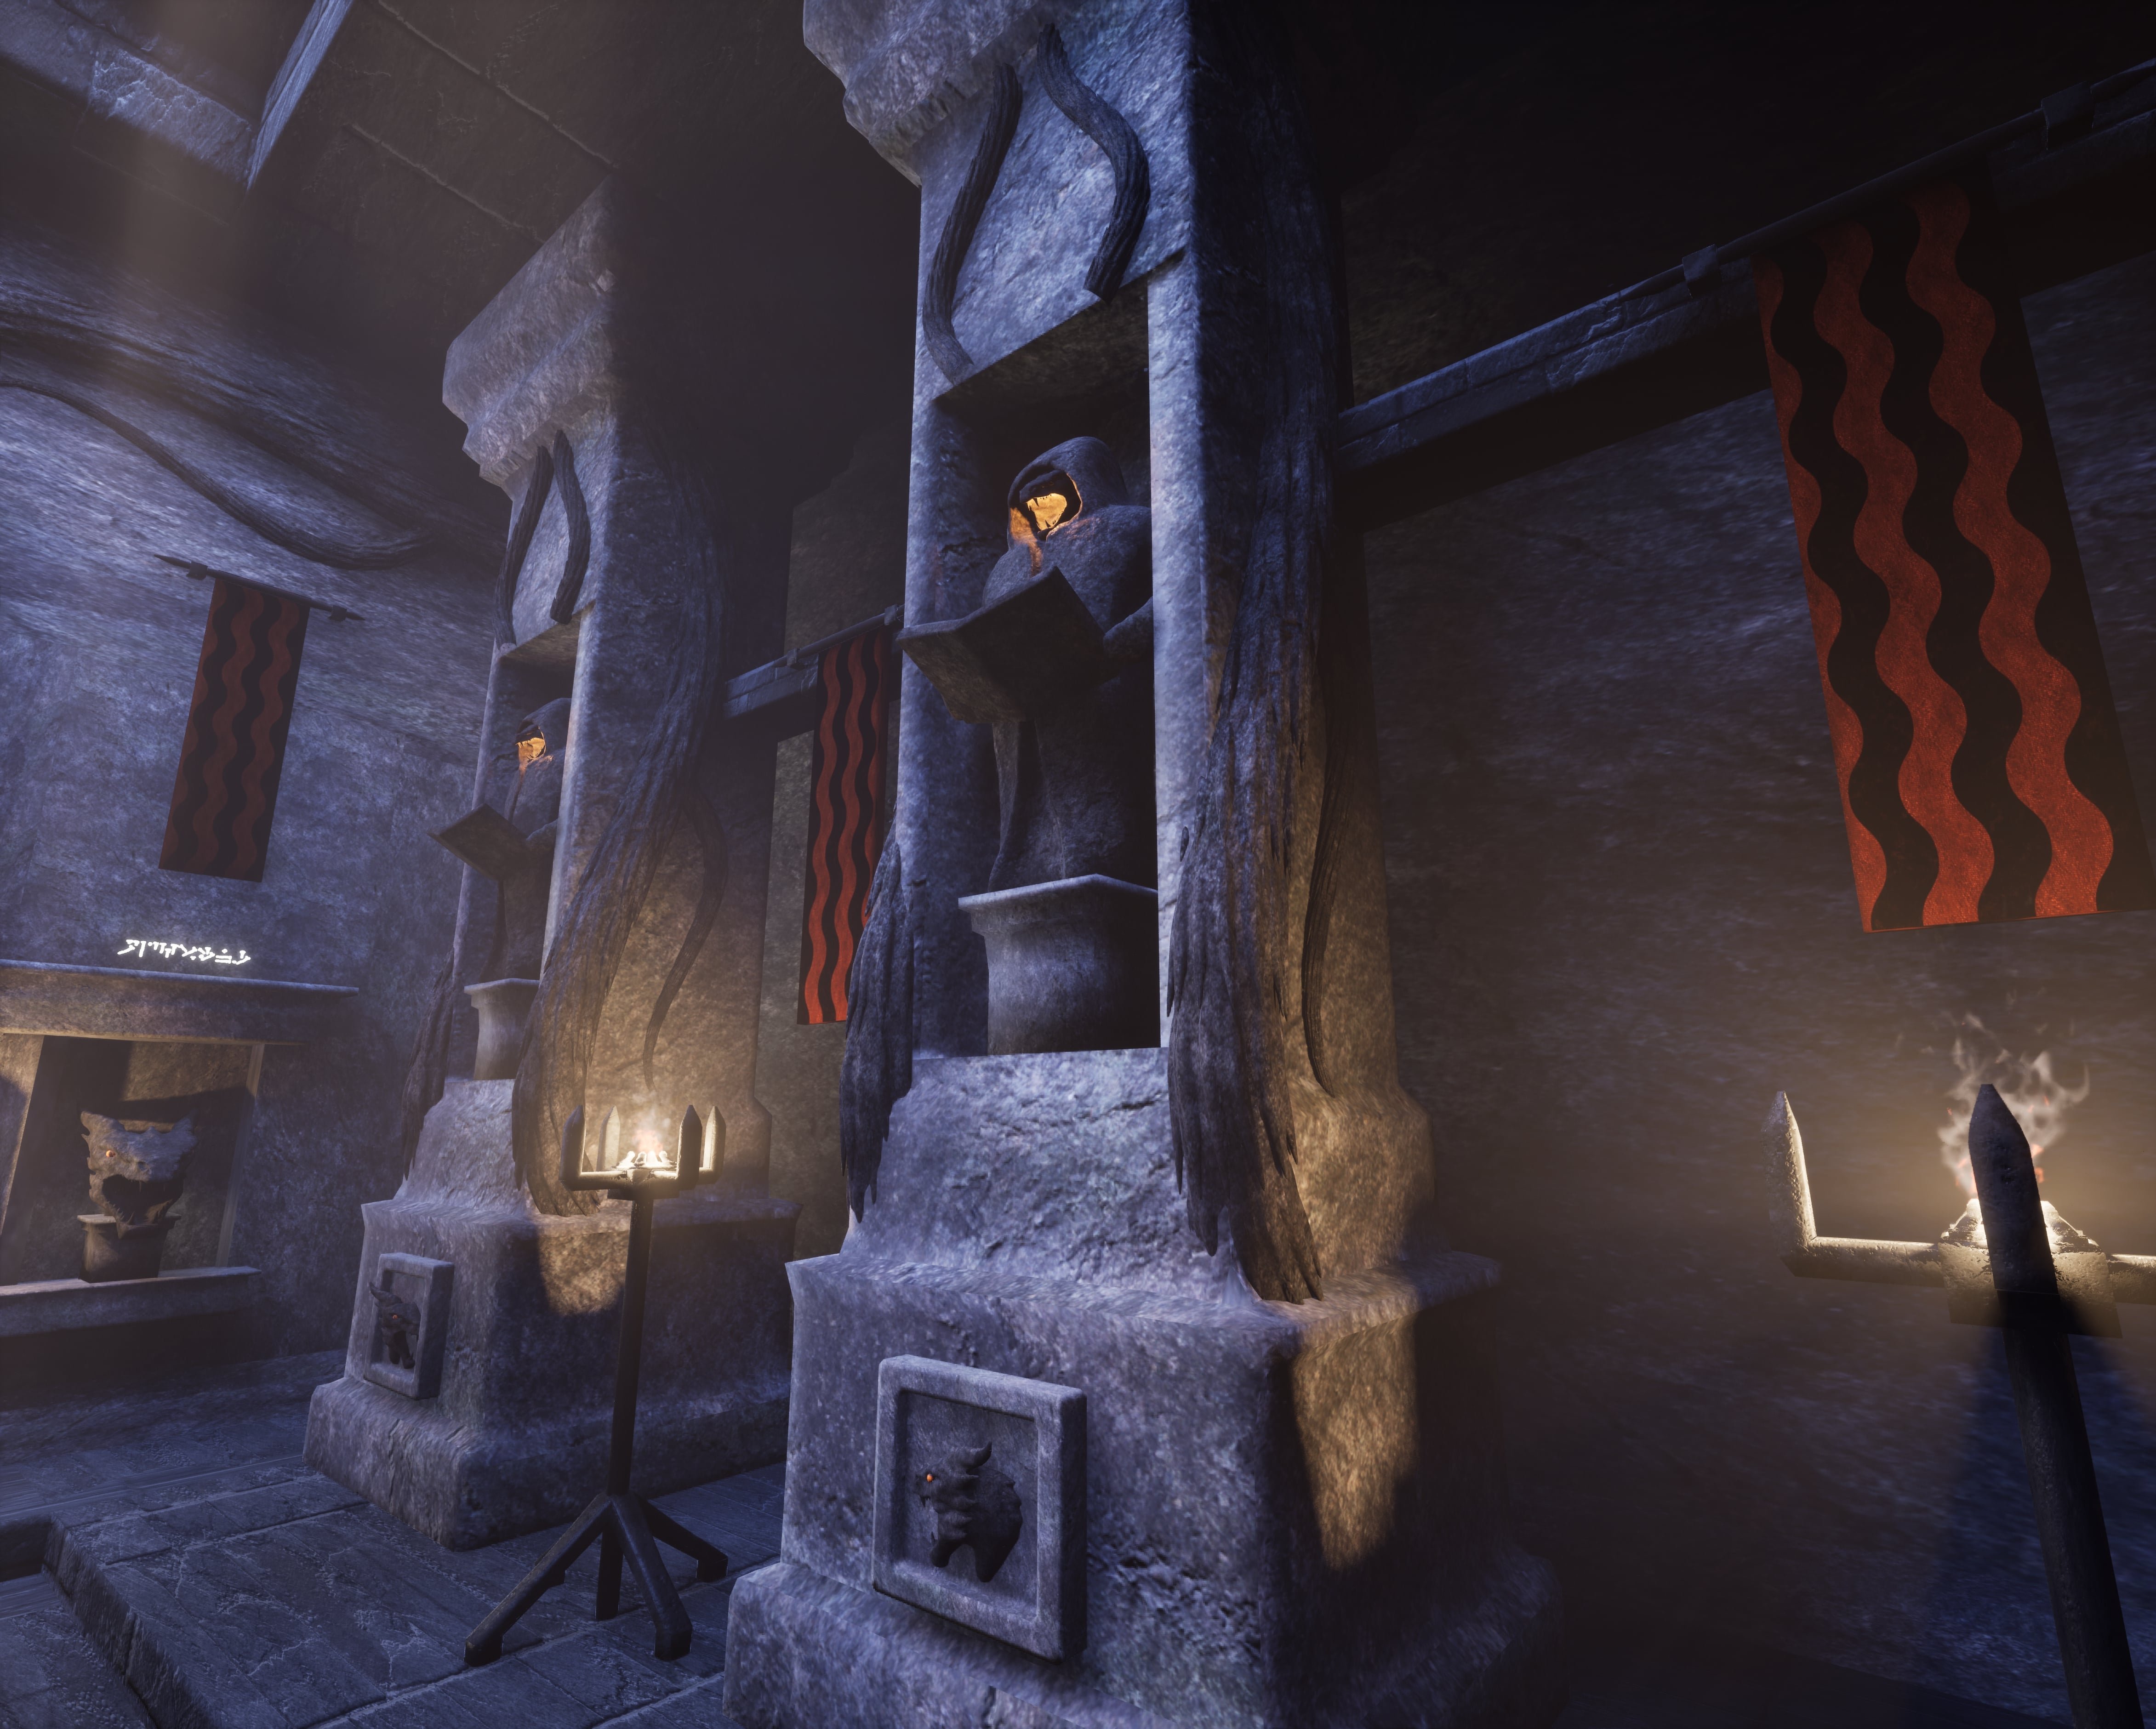
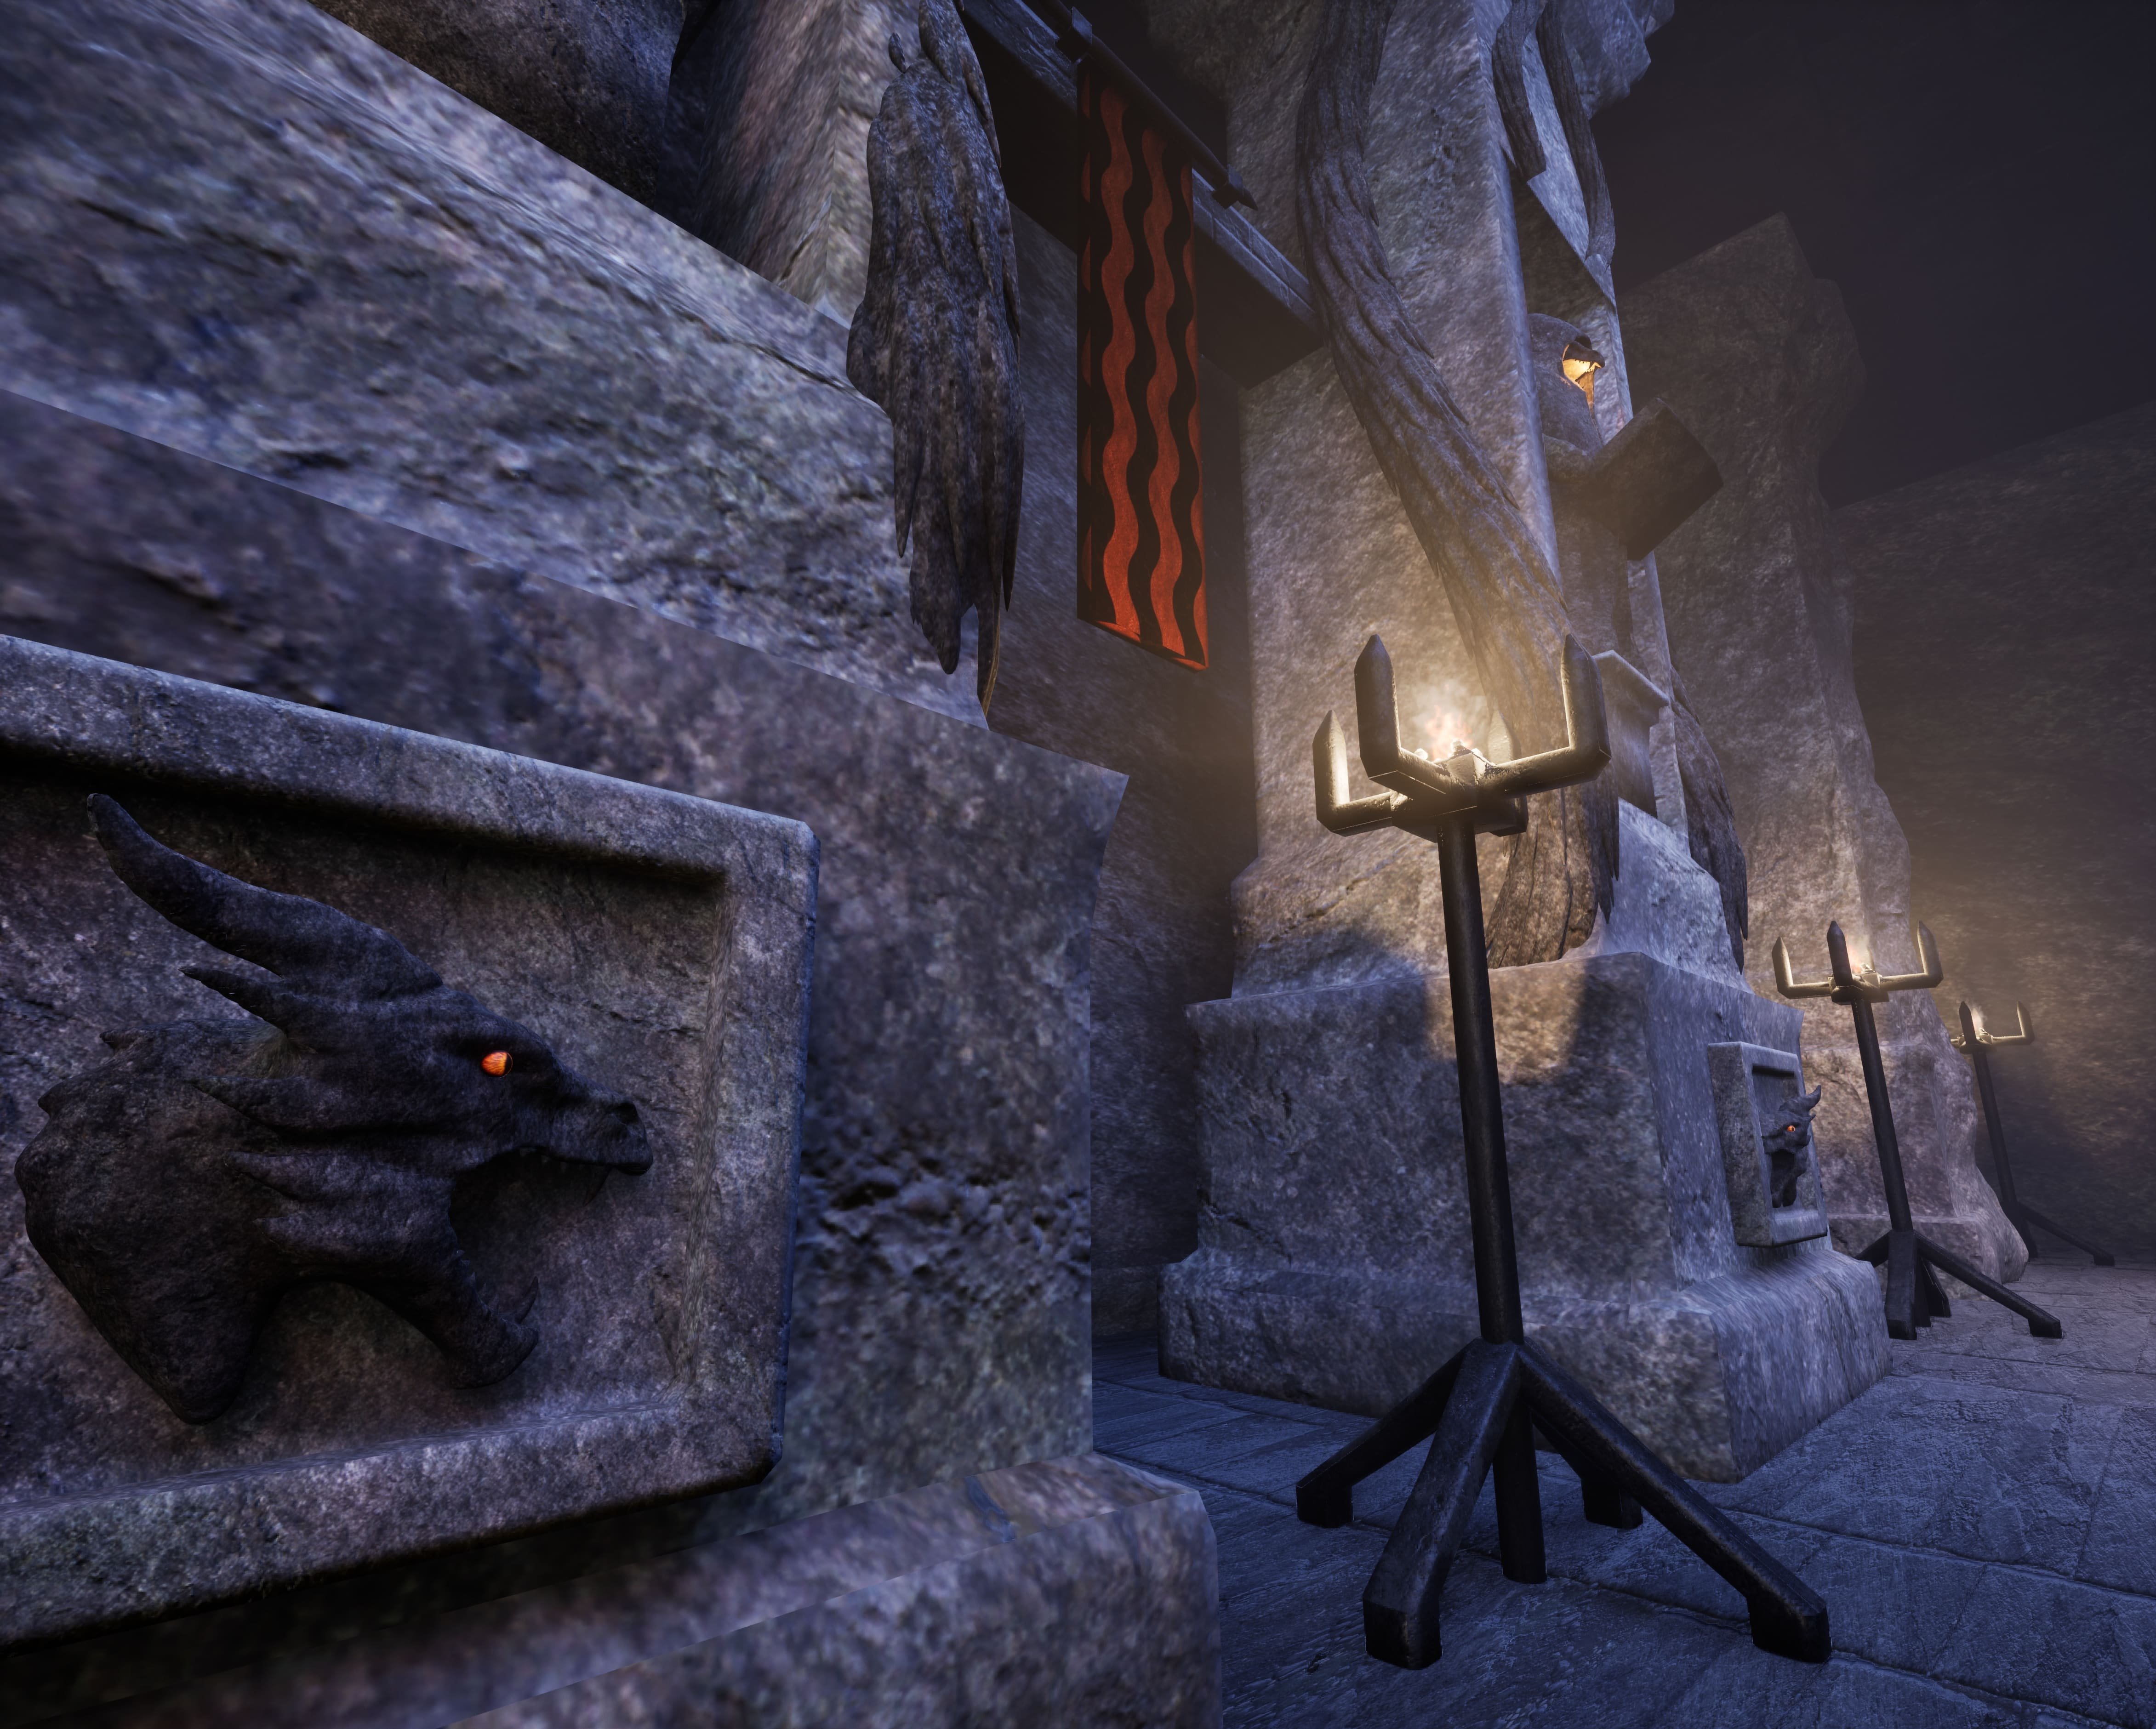
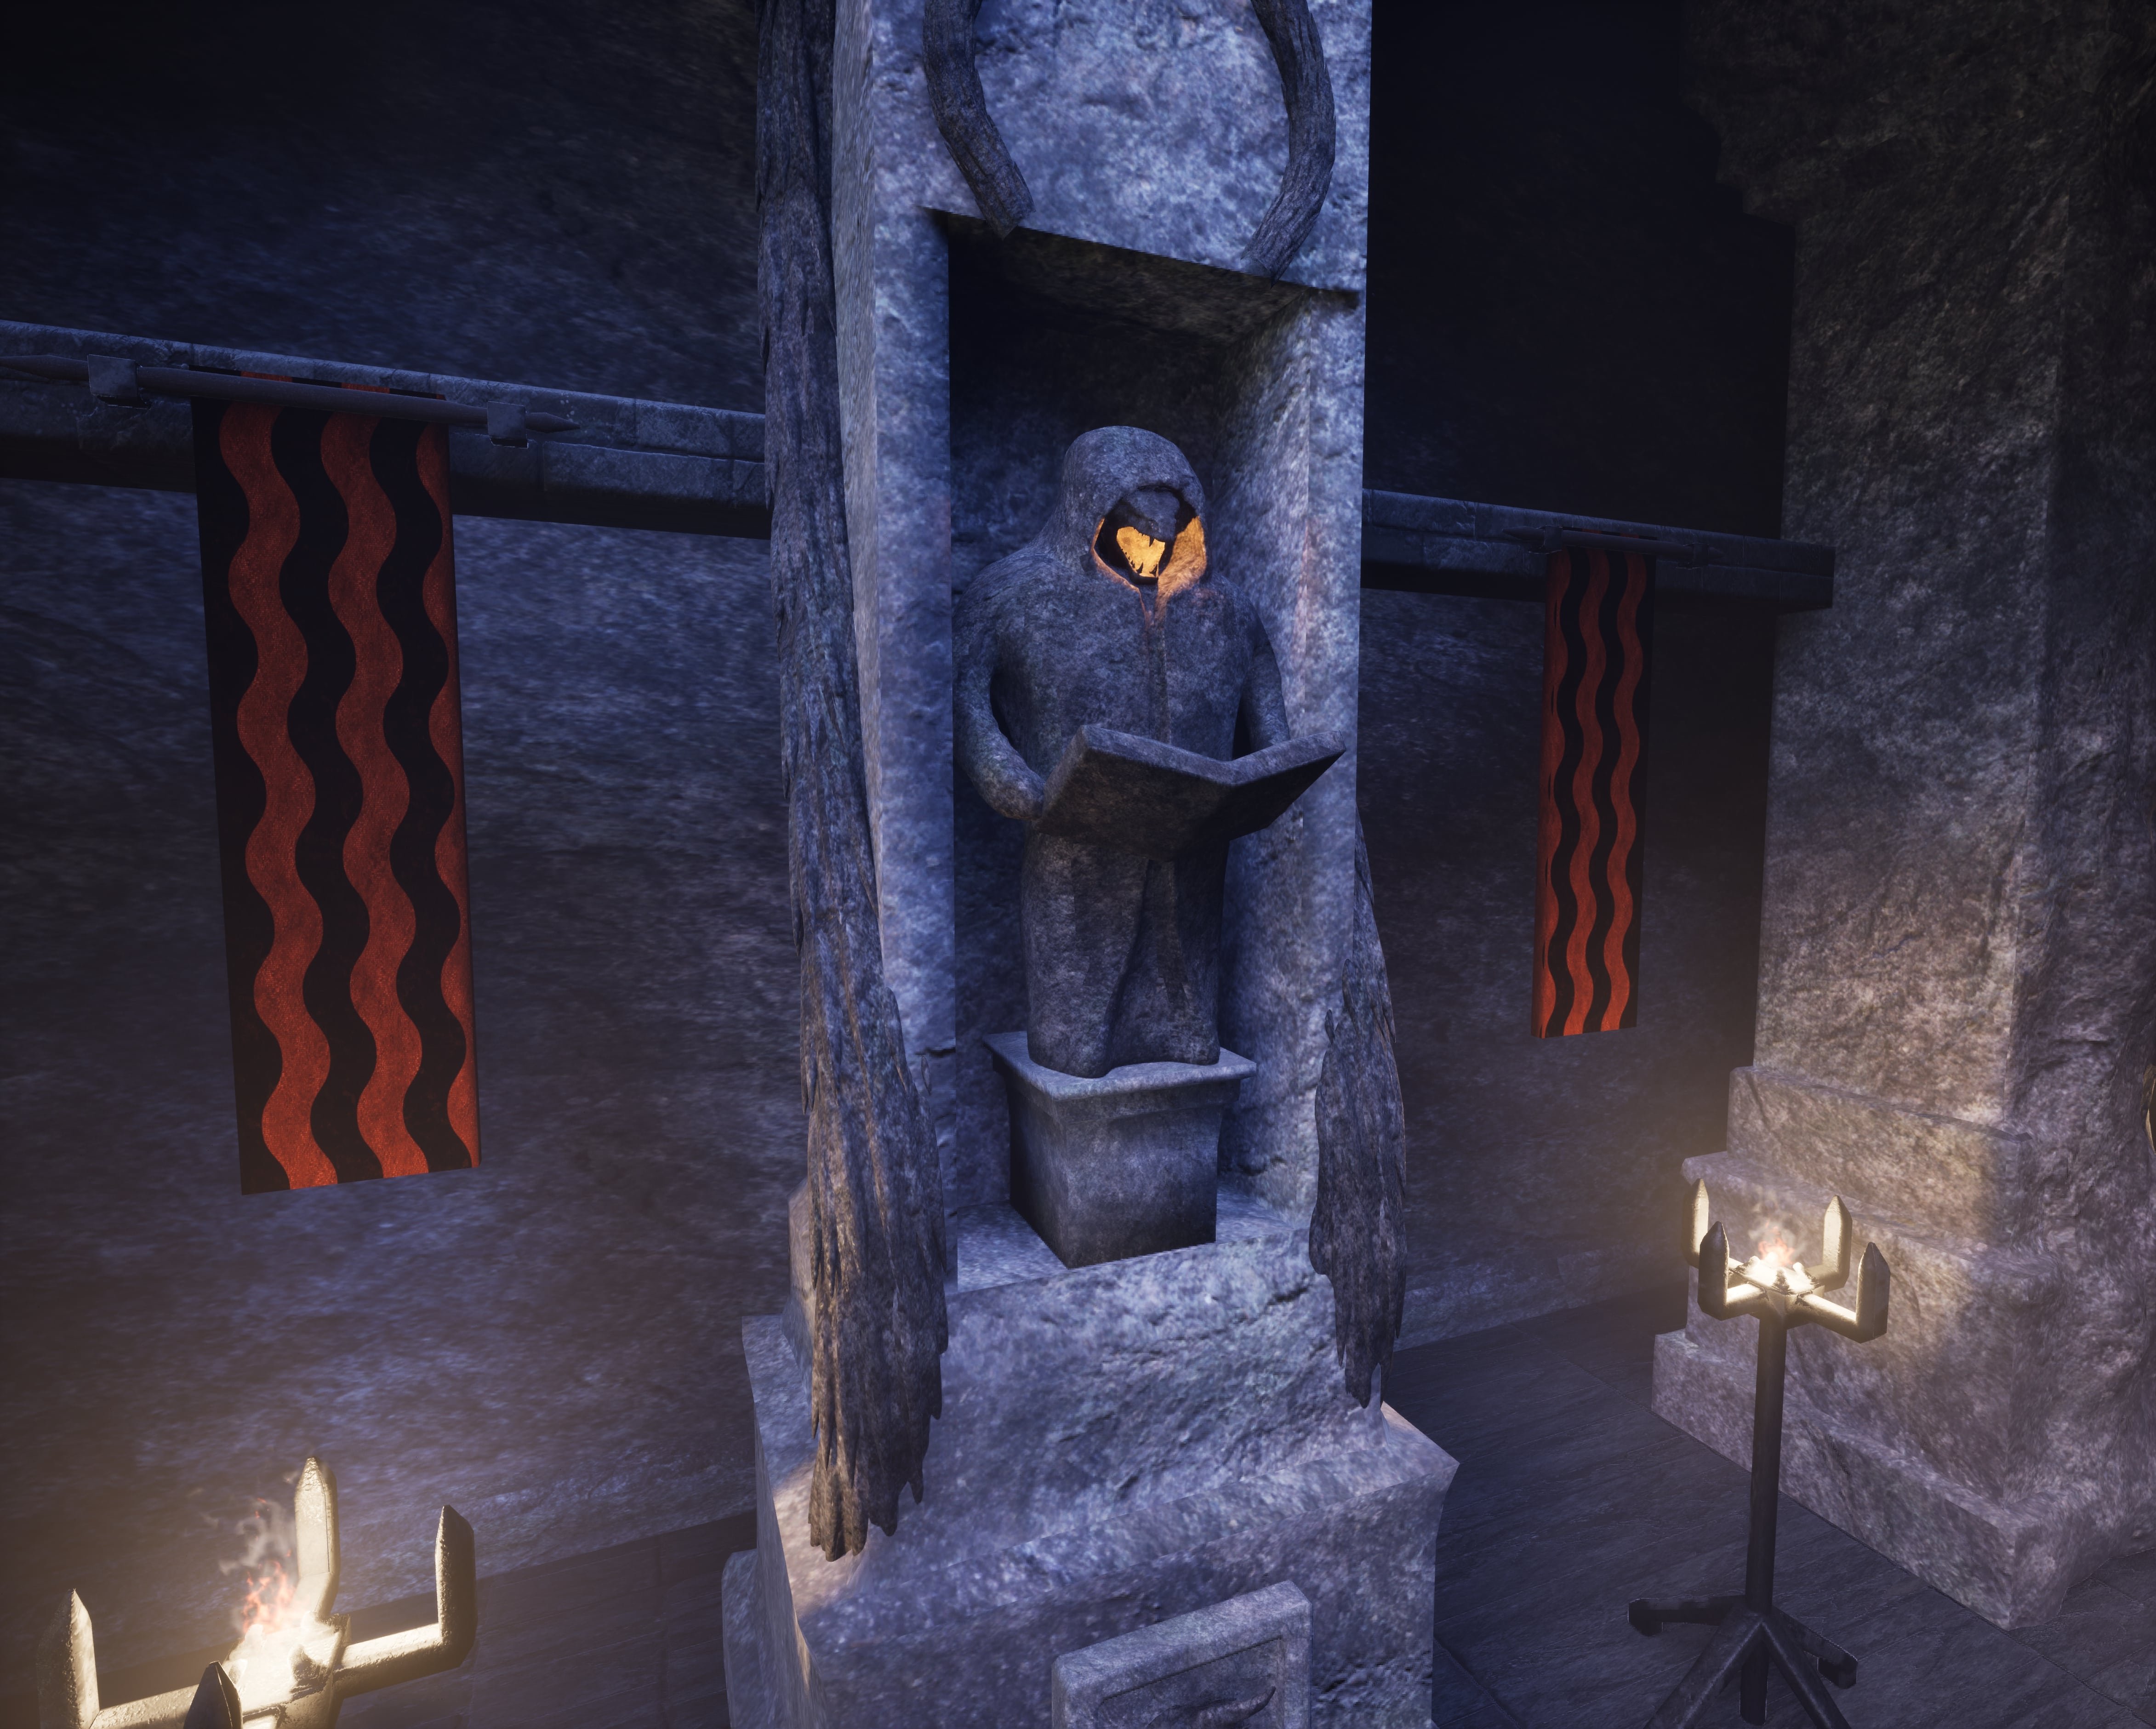
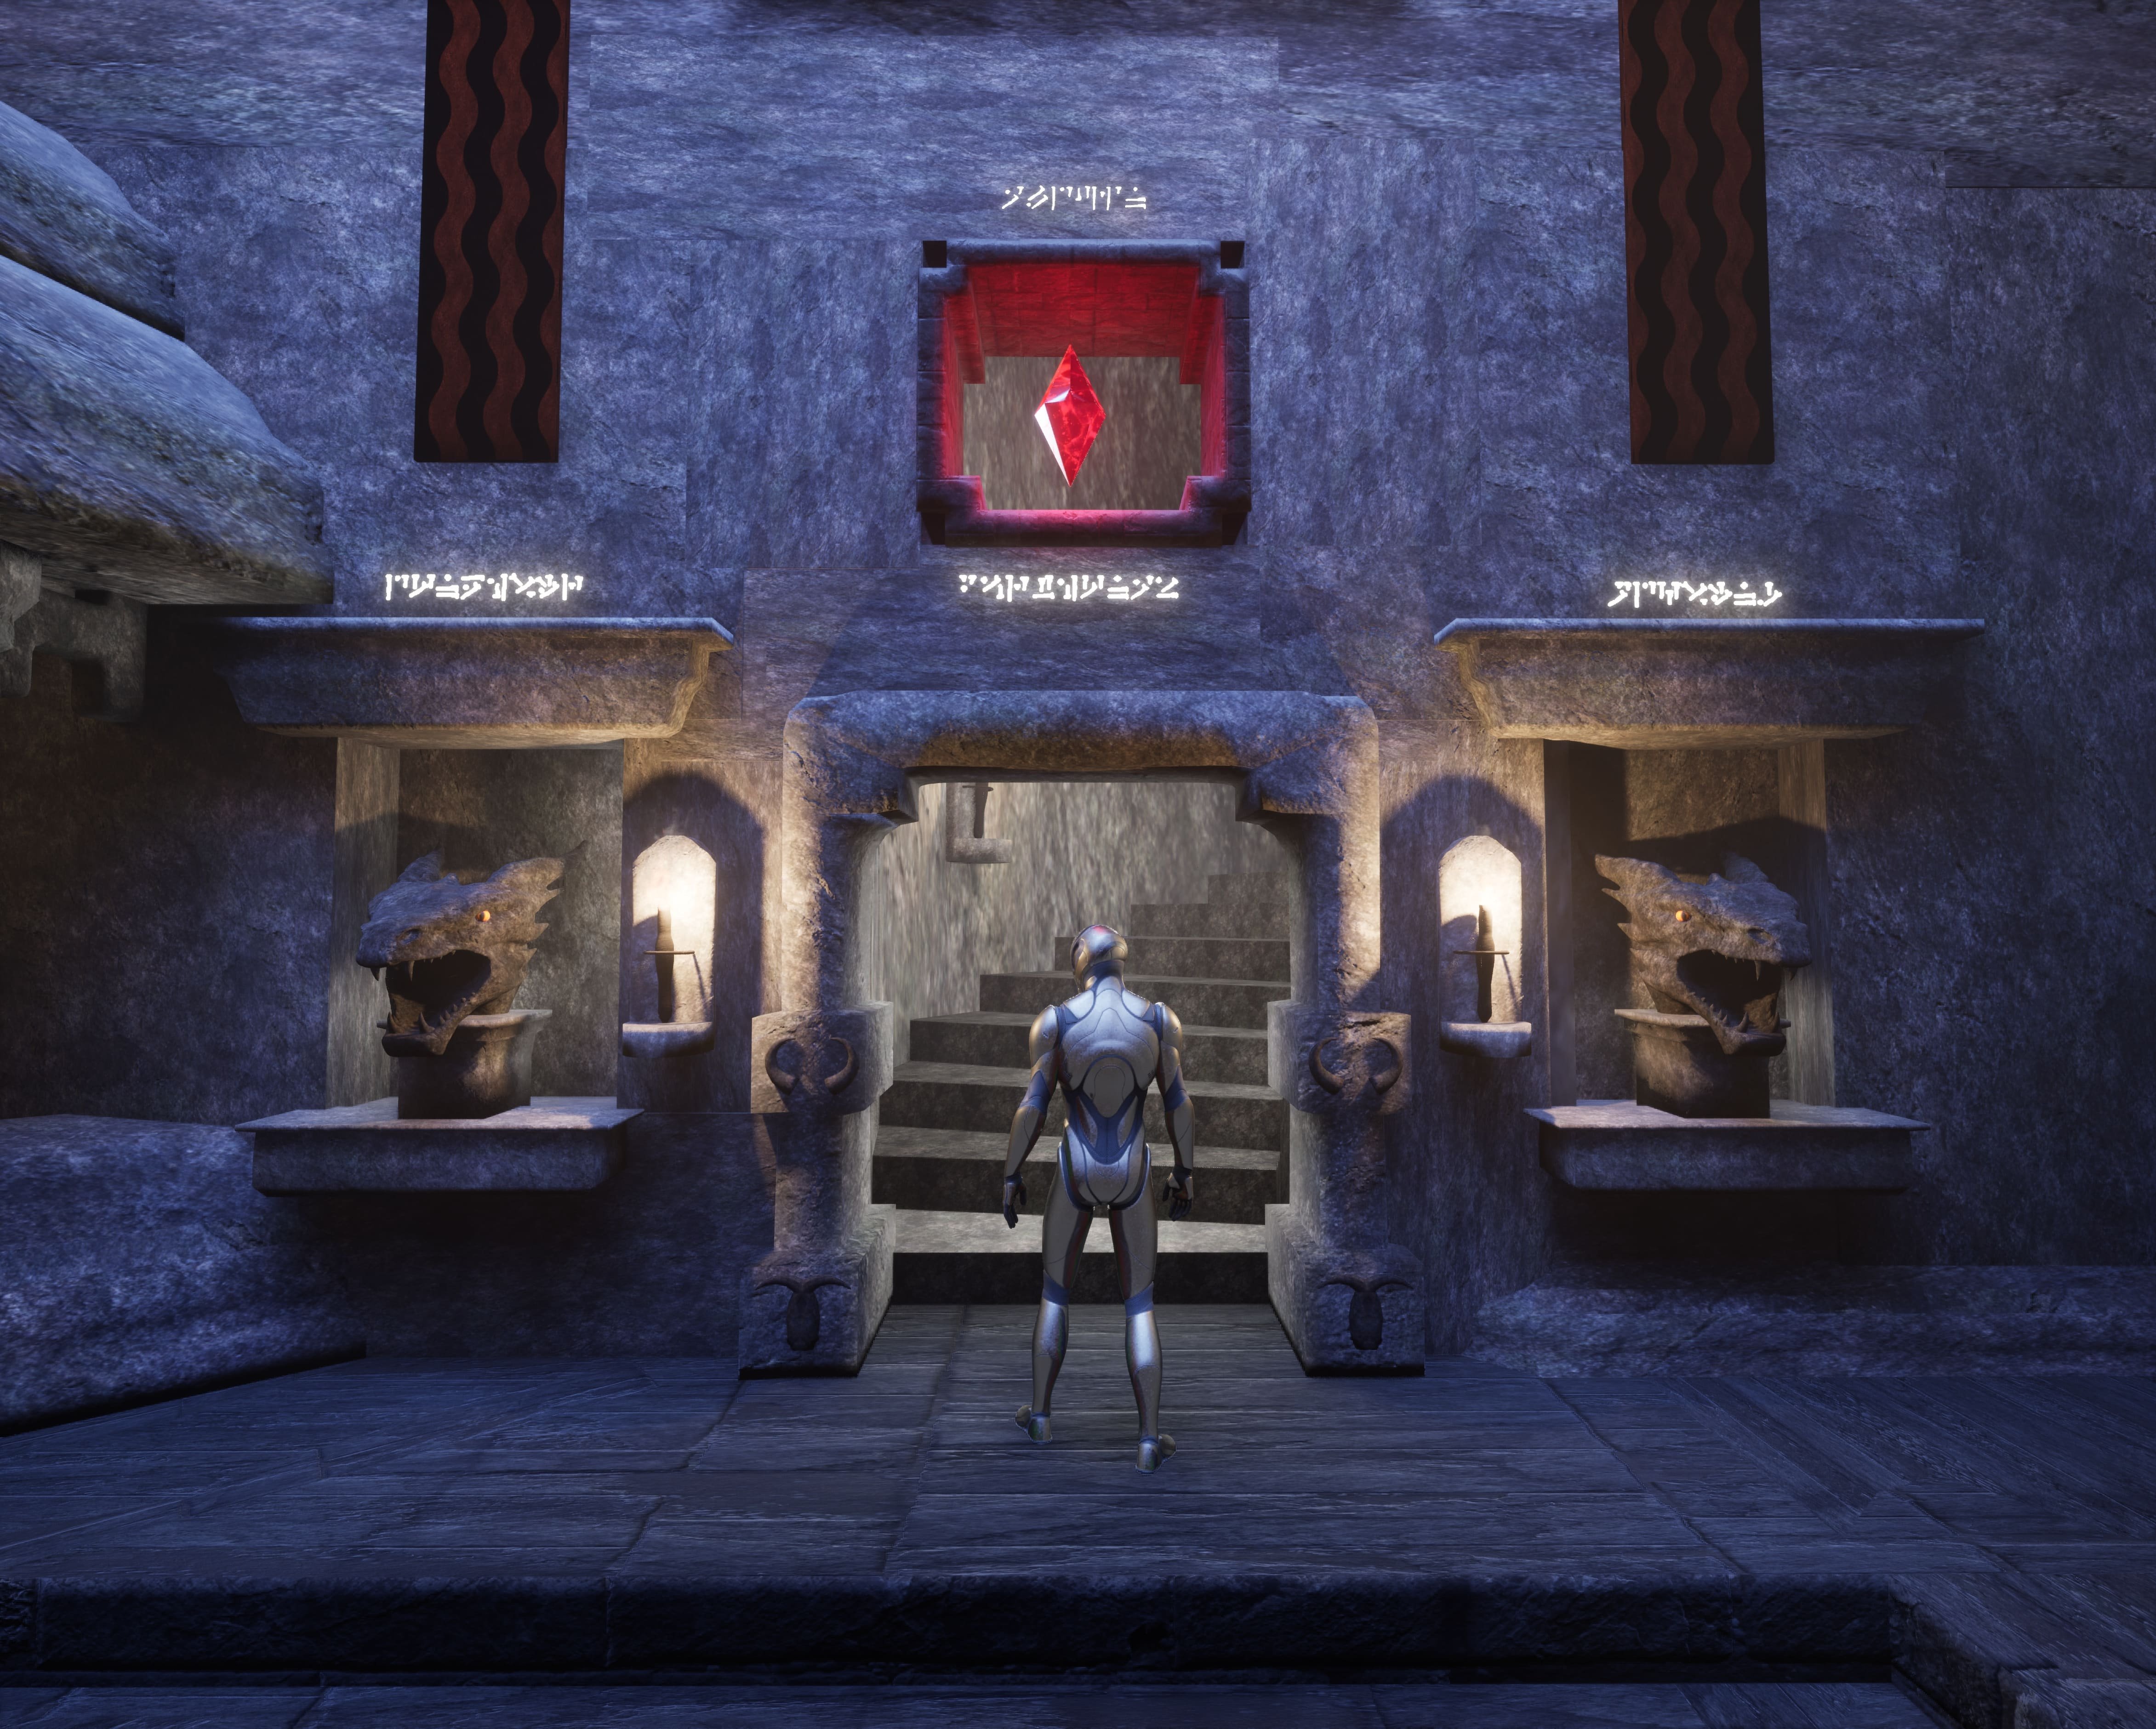
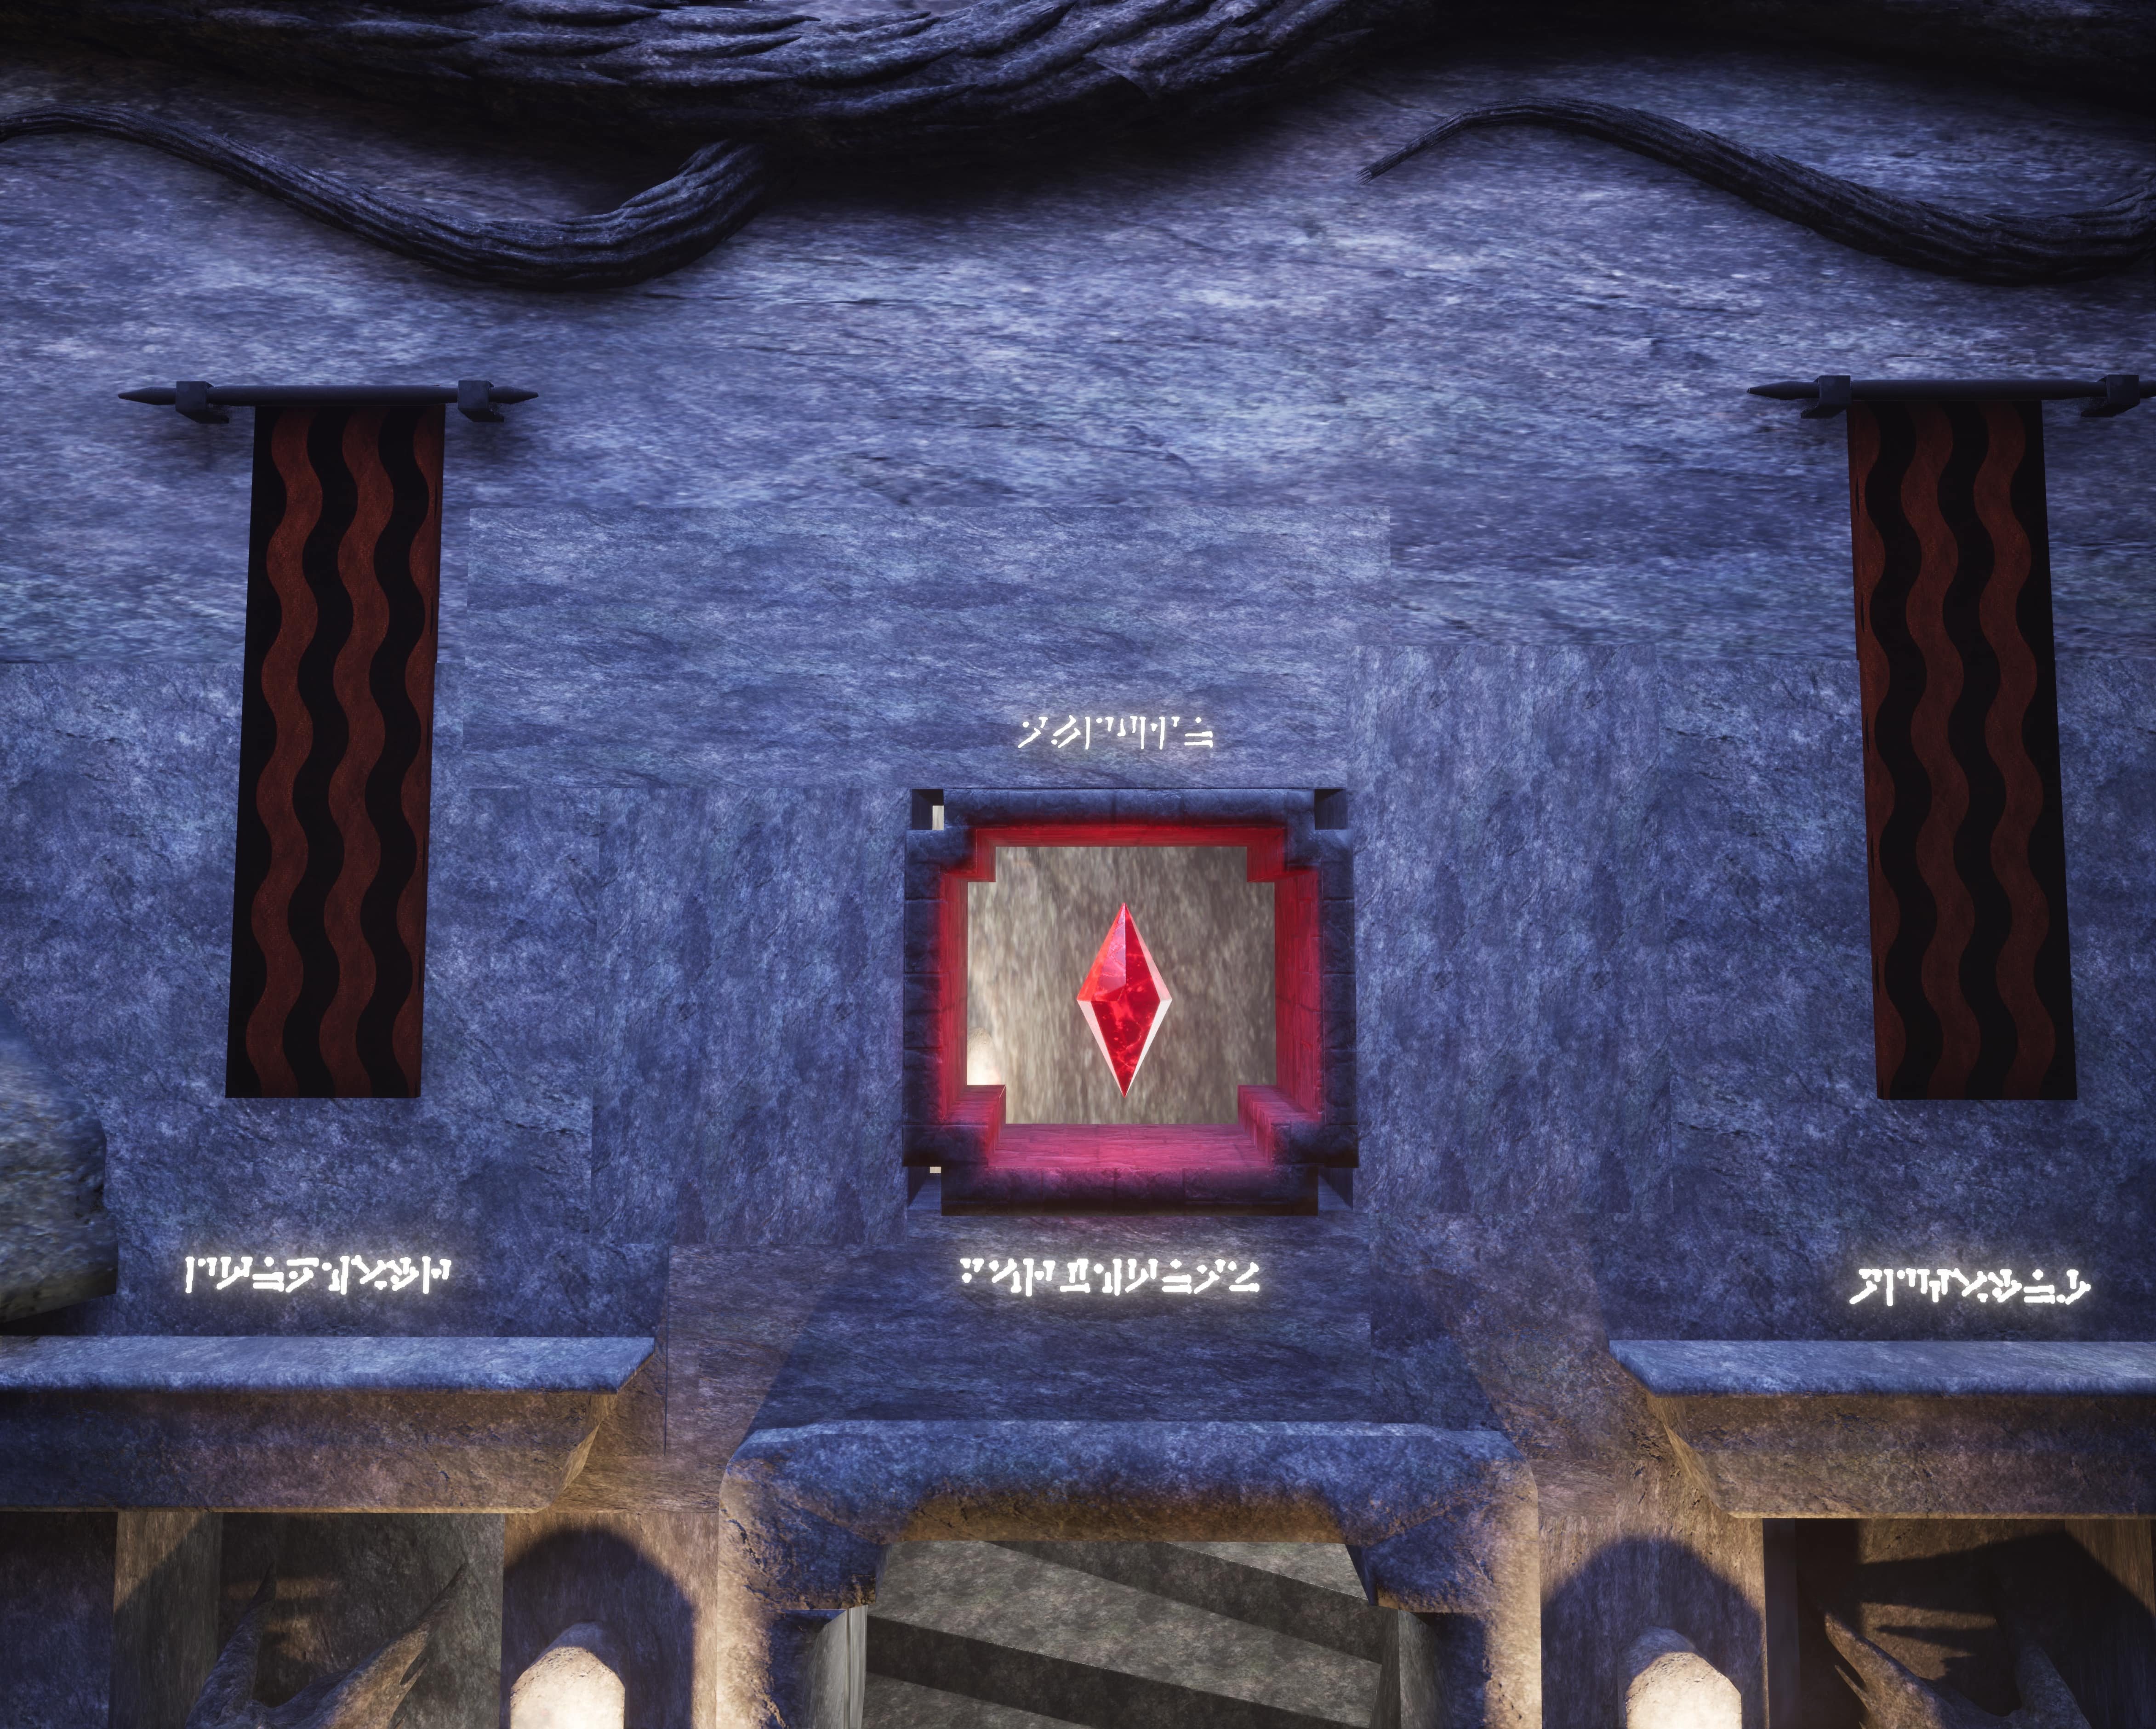
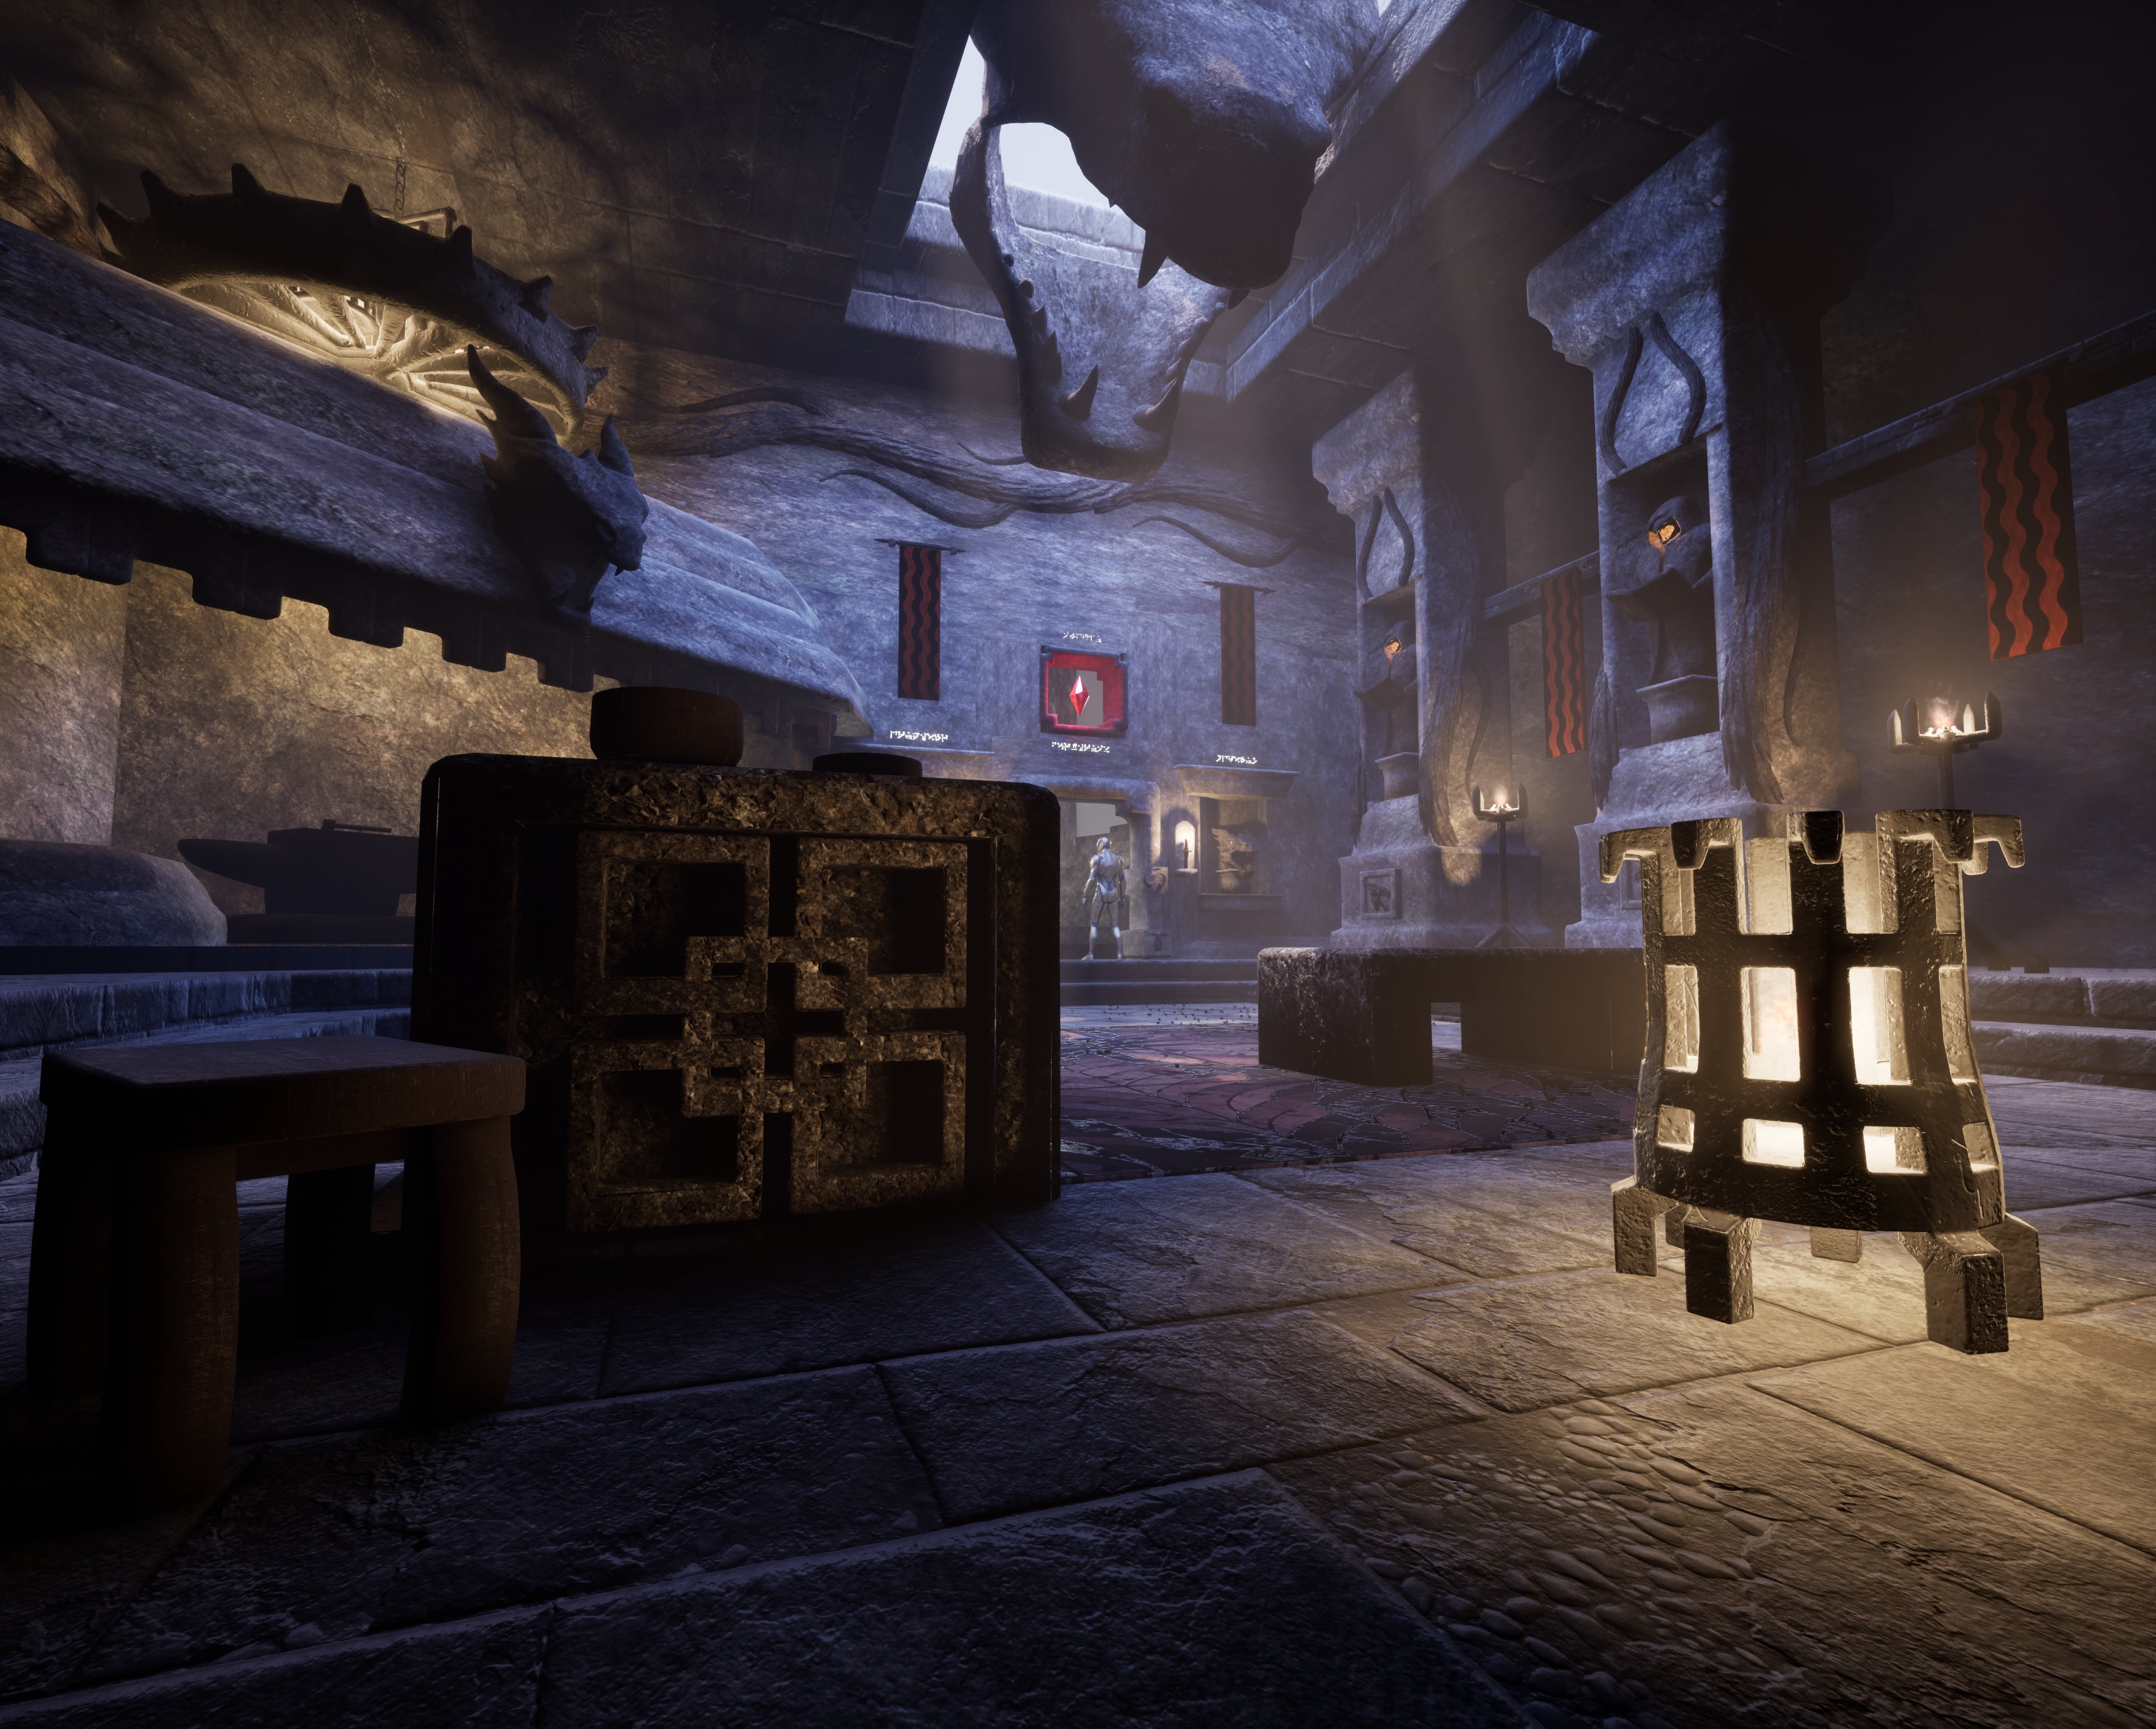
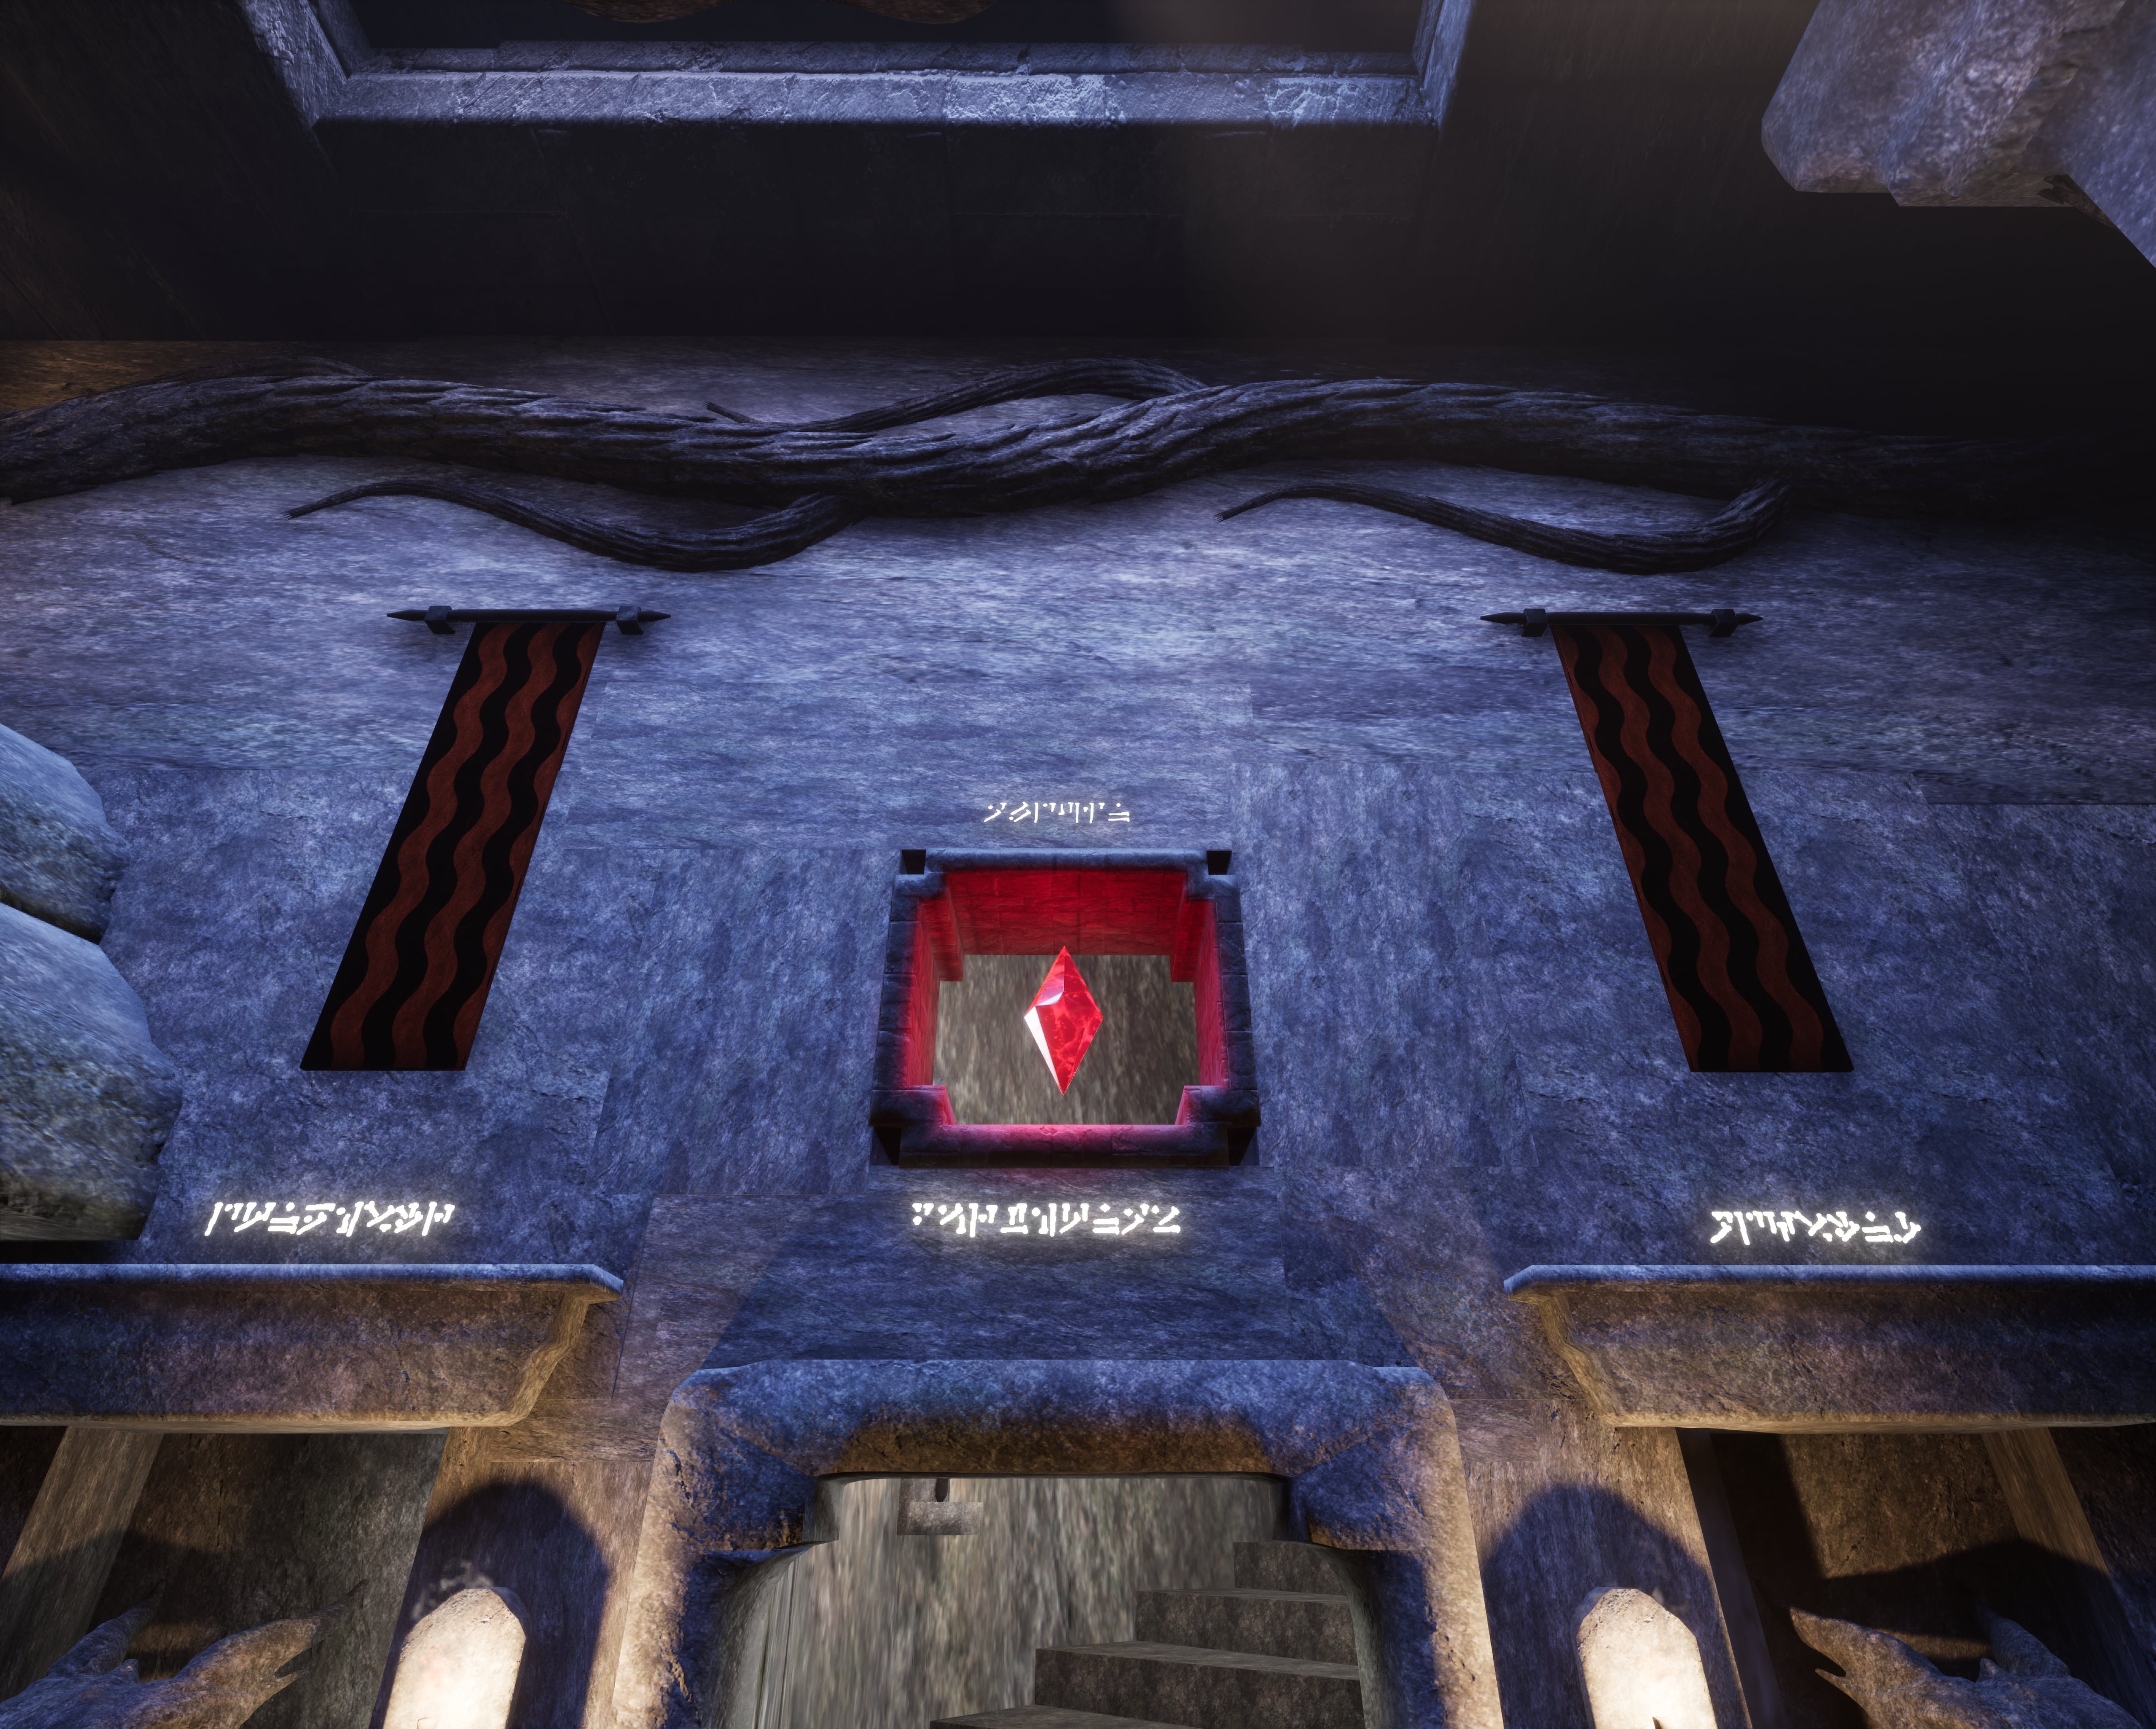
September–October Challenge Submission – Dragon Forge Environment
This concludes my entry for the September–October challenge. ![]()
I focused on creating a handcrafted environment and aimed to make the space my own while staying inspired by the provided concept.
I chose a dragon theme, a personal favorite, and pushed myself to sculpt, texture, and light the scene in a way that reflects ancient grandeur and mythic character.
This project came with challenges and learning moments along the way, but it was extremely rewarding to work on. I’m very proud of the result and grateful for the opportunity and inspiration. There were moments I had to rethink my approach and learn new tricks, but that’s what made this project fun. I’m very happy with how it turned out!
You may recognize the runes. It is from the game TES V Skyrim, the names of four main dragons: Alduin, Paarthurnax, Odahviing and Durnehviir. The ruby crystal in the center is inspired by more Elder Scrolls lore, the Amulet of Kings. ![]() The red and black banners, a little inspiration from house Targaryen.
The red and black banners, a little inspiration from house Targaryen. ![]()
I’d love to share the final piece on ArtStation, if allowed.
Thanks for a fantastic challenge! ![]() I'm always happy to improve, so if you spot anything that could be pushed further or refined, feel free to share feedback!
I'm always happy to improve, so if you spot anything that could be pushed further or refined, feel free to share feedback!



 Vastra
6 ·
[PAID] Clean up characters, segment into parts, create different poses and make 3D print ready.
🧩 Freelance 3D Character Artist – Modular Miniature Design for Tabletop Game
Project Overview
Hello! My name is Mat Nicholas, and I am a professional Game Designer with over 20 years of experience in the video games industry. In my spare time, I’m developing a new tabletop miniatures game built from the ground up to leverage 3D printing and modular customisation.
The game can be played both as a tabletop skirmish wargame and a narrative role-playing experience, set in a world composed of stolen realities—where past and future collide, evolution takes many paths, and the humanoid form emerges again and again in strange, diverse species.
I am looking for a freelance 3D artist to help prepare and expand the first character model.
🎨 What I am Looking For
You’ll be working from an existing 3D model (a female wolf warrior) and supporting the following key areas:
1. Mesh Cleanup
Remove artefacts, non-manifold geometry, or other printability issues.
2. Model Segmentation
Split the model into modular parts to allow post-print assembly and pose customisation.
Target segmentation includes:
Head (with ball joint)( a few different variations)
Torso
Left Arm (a few different poses)
Left Hand (Holding weapons, open fist)
Left Shoulder Pad
Right Arm
Right Hand (Holding weapons, open fist)
Right Shoulder Pad
Legs
Tail
Additional accessories (pouches, packs, weapons, etc.)
3. Modular Design Approach
Avoid pegs where possible—hobbyists are comfortable gluing parts.
Use rounded joint bases (e.g., head, torso) to allow flexible orientation and more natural posing.
Separate components such as shoulder pads, tails, and accessories for better kitbashing potential.
Consider the tail as a key expressive element—this may be the only part that benefits from a sturdy peg connector.
Models will be scaled to 40mm height with a 1-inch square base (to be tested and confirmed).
4. Pose and Part Variations
Create alternate versions of key parts (e.g., arms, hands, heads) to enable mix-and-match character building.
Example: open/closed fists, pointing hands, different arm bends or head tilts.
🧠 The Vision
The long-term goal is to develop a modular miniature range where components from one character can be reused and recombined with others—maximising variety and customisation. This is the first, but I plan to do many more and many more races with the same modular compatibility.
💼 What to Include in Your Application
Hourly rate and estimated time to complete the first model, and therefore your rate per character.
Portfolio or examples of relevant 3D work (especially modular or tabletop designs)
Any suggestions or considerations for optimising models for efficient printing and assembly
If you do not include this information I will not reply.
Kind regards,
Mat Nicholas
3 ·
The Bi-Monthly Environment Art Challenge | November - December (99)
Hello everyone and welcome to the 99th edition of the Bi-Monthly Environment Art Challenge for the months of November and December!
This challenge is a way for real-time 3D artists to test their skills and create a piece of work based on concepts provided. It's open to those of all skill levels and we do our best to provide meaningful feedback along the way so everyone can come away from the challenge with actionable points on which they can improve their craft!
- ENVIRONMENTS -
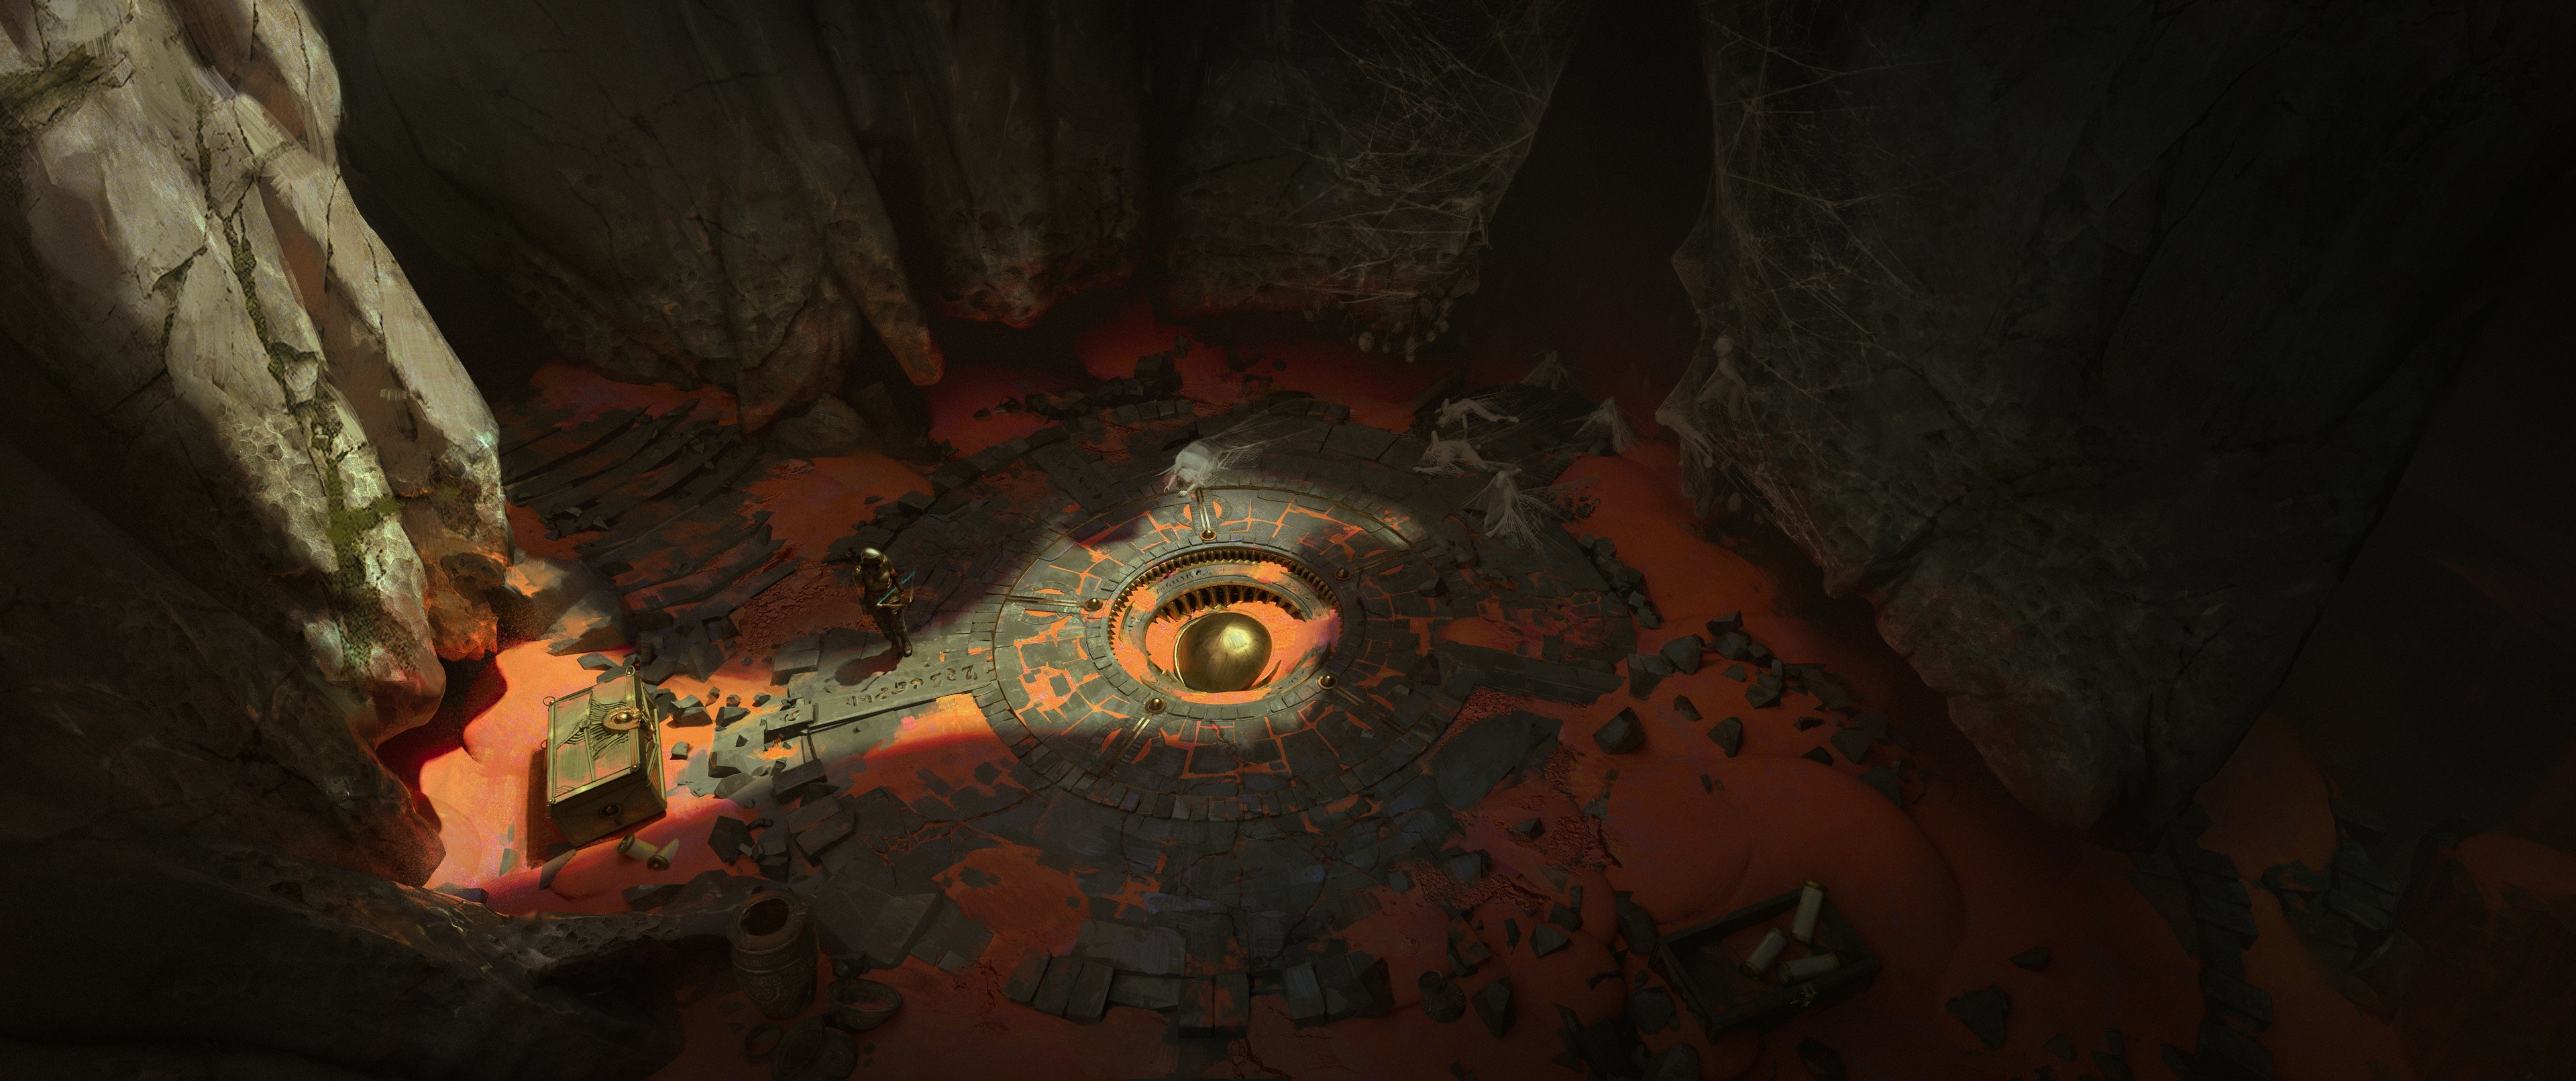
HARD SURFACE ENVIRONMENT:
Dungeon Stage - Foundations Course by Jose Vega
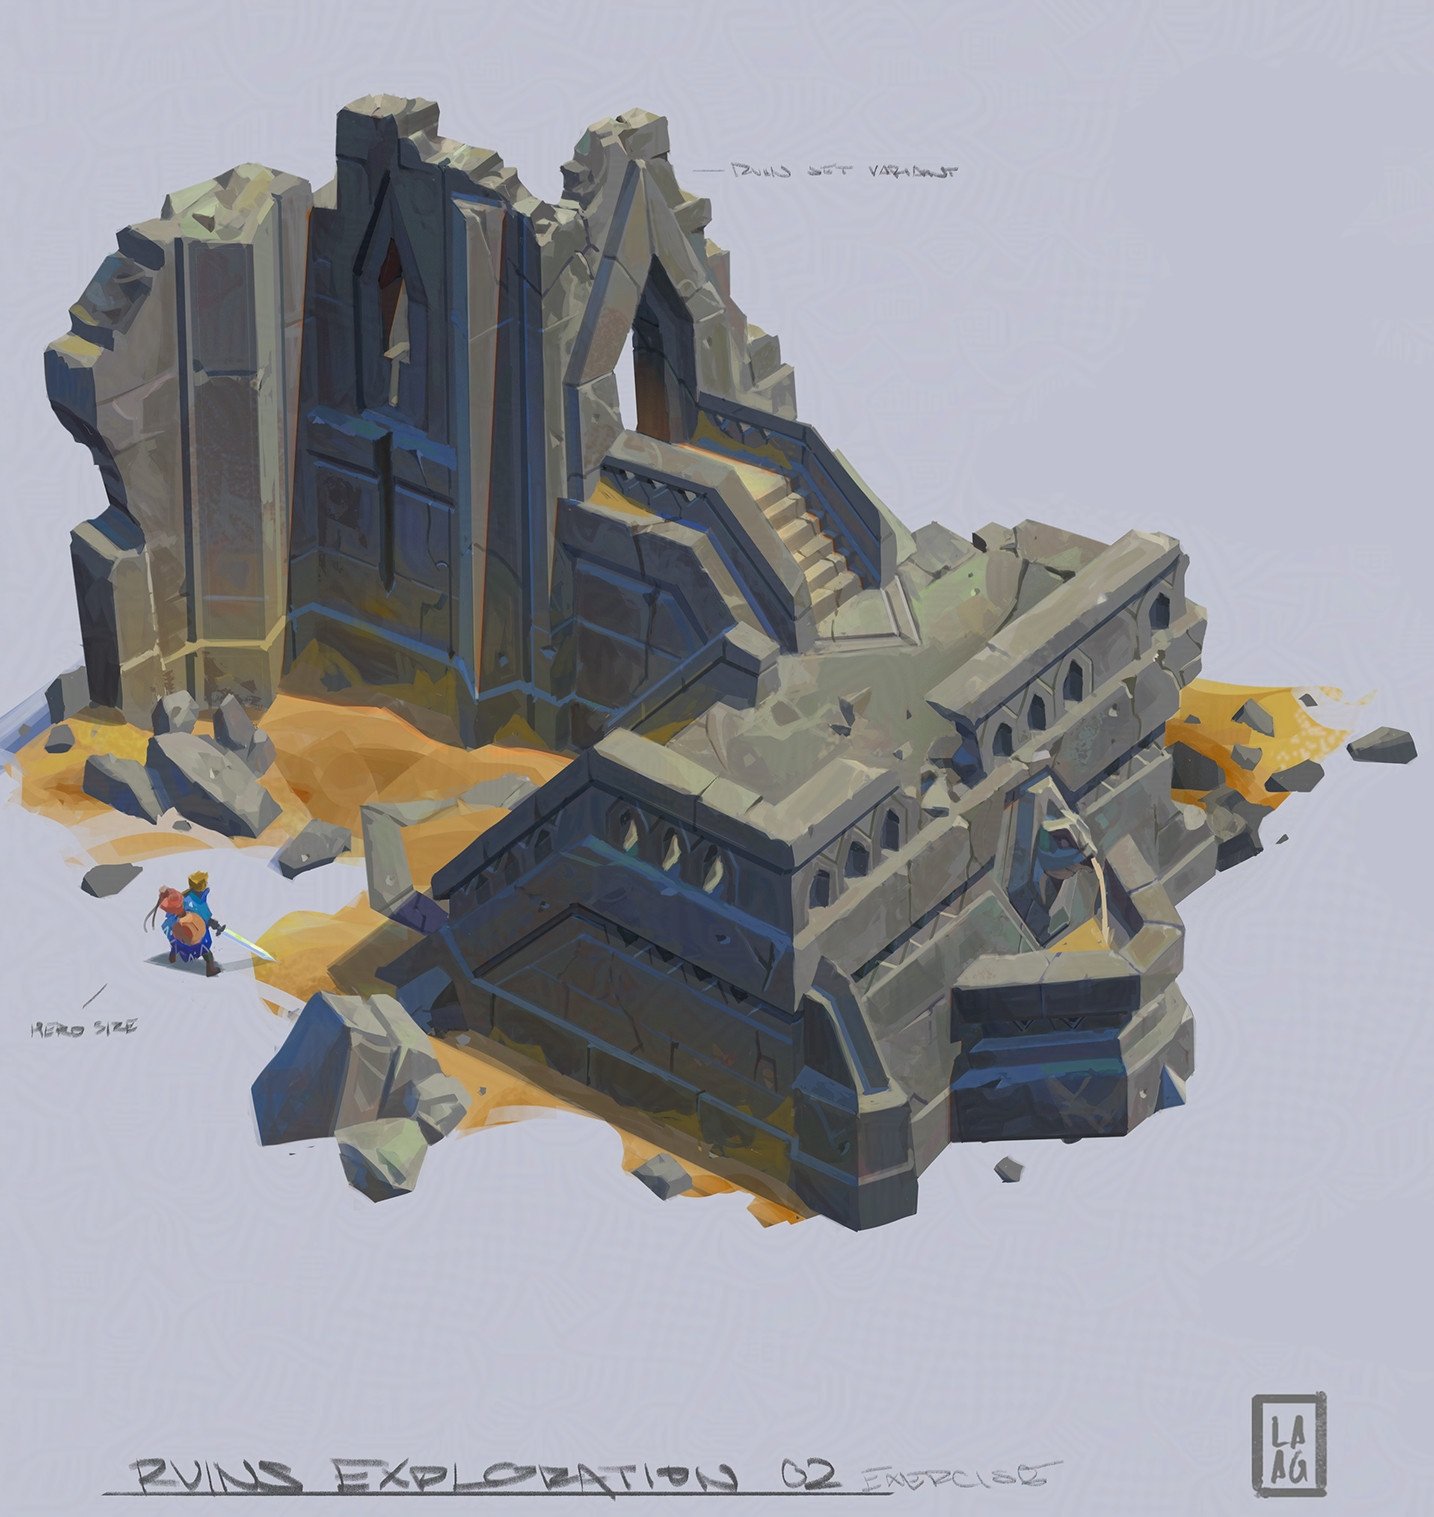
STYLIZED ENVIRONMENT:
Enviroment Art & Worldbuilding by Dardo Studios
- PROPS -
HARD SURFACE PROP:
Skyhaul - Karlsson house - chapter 01 by Daniele Gay
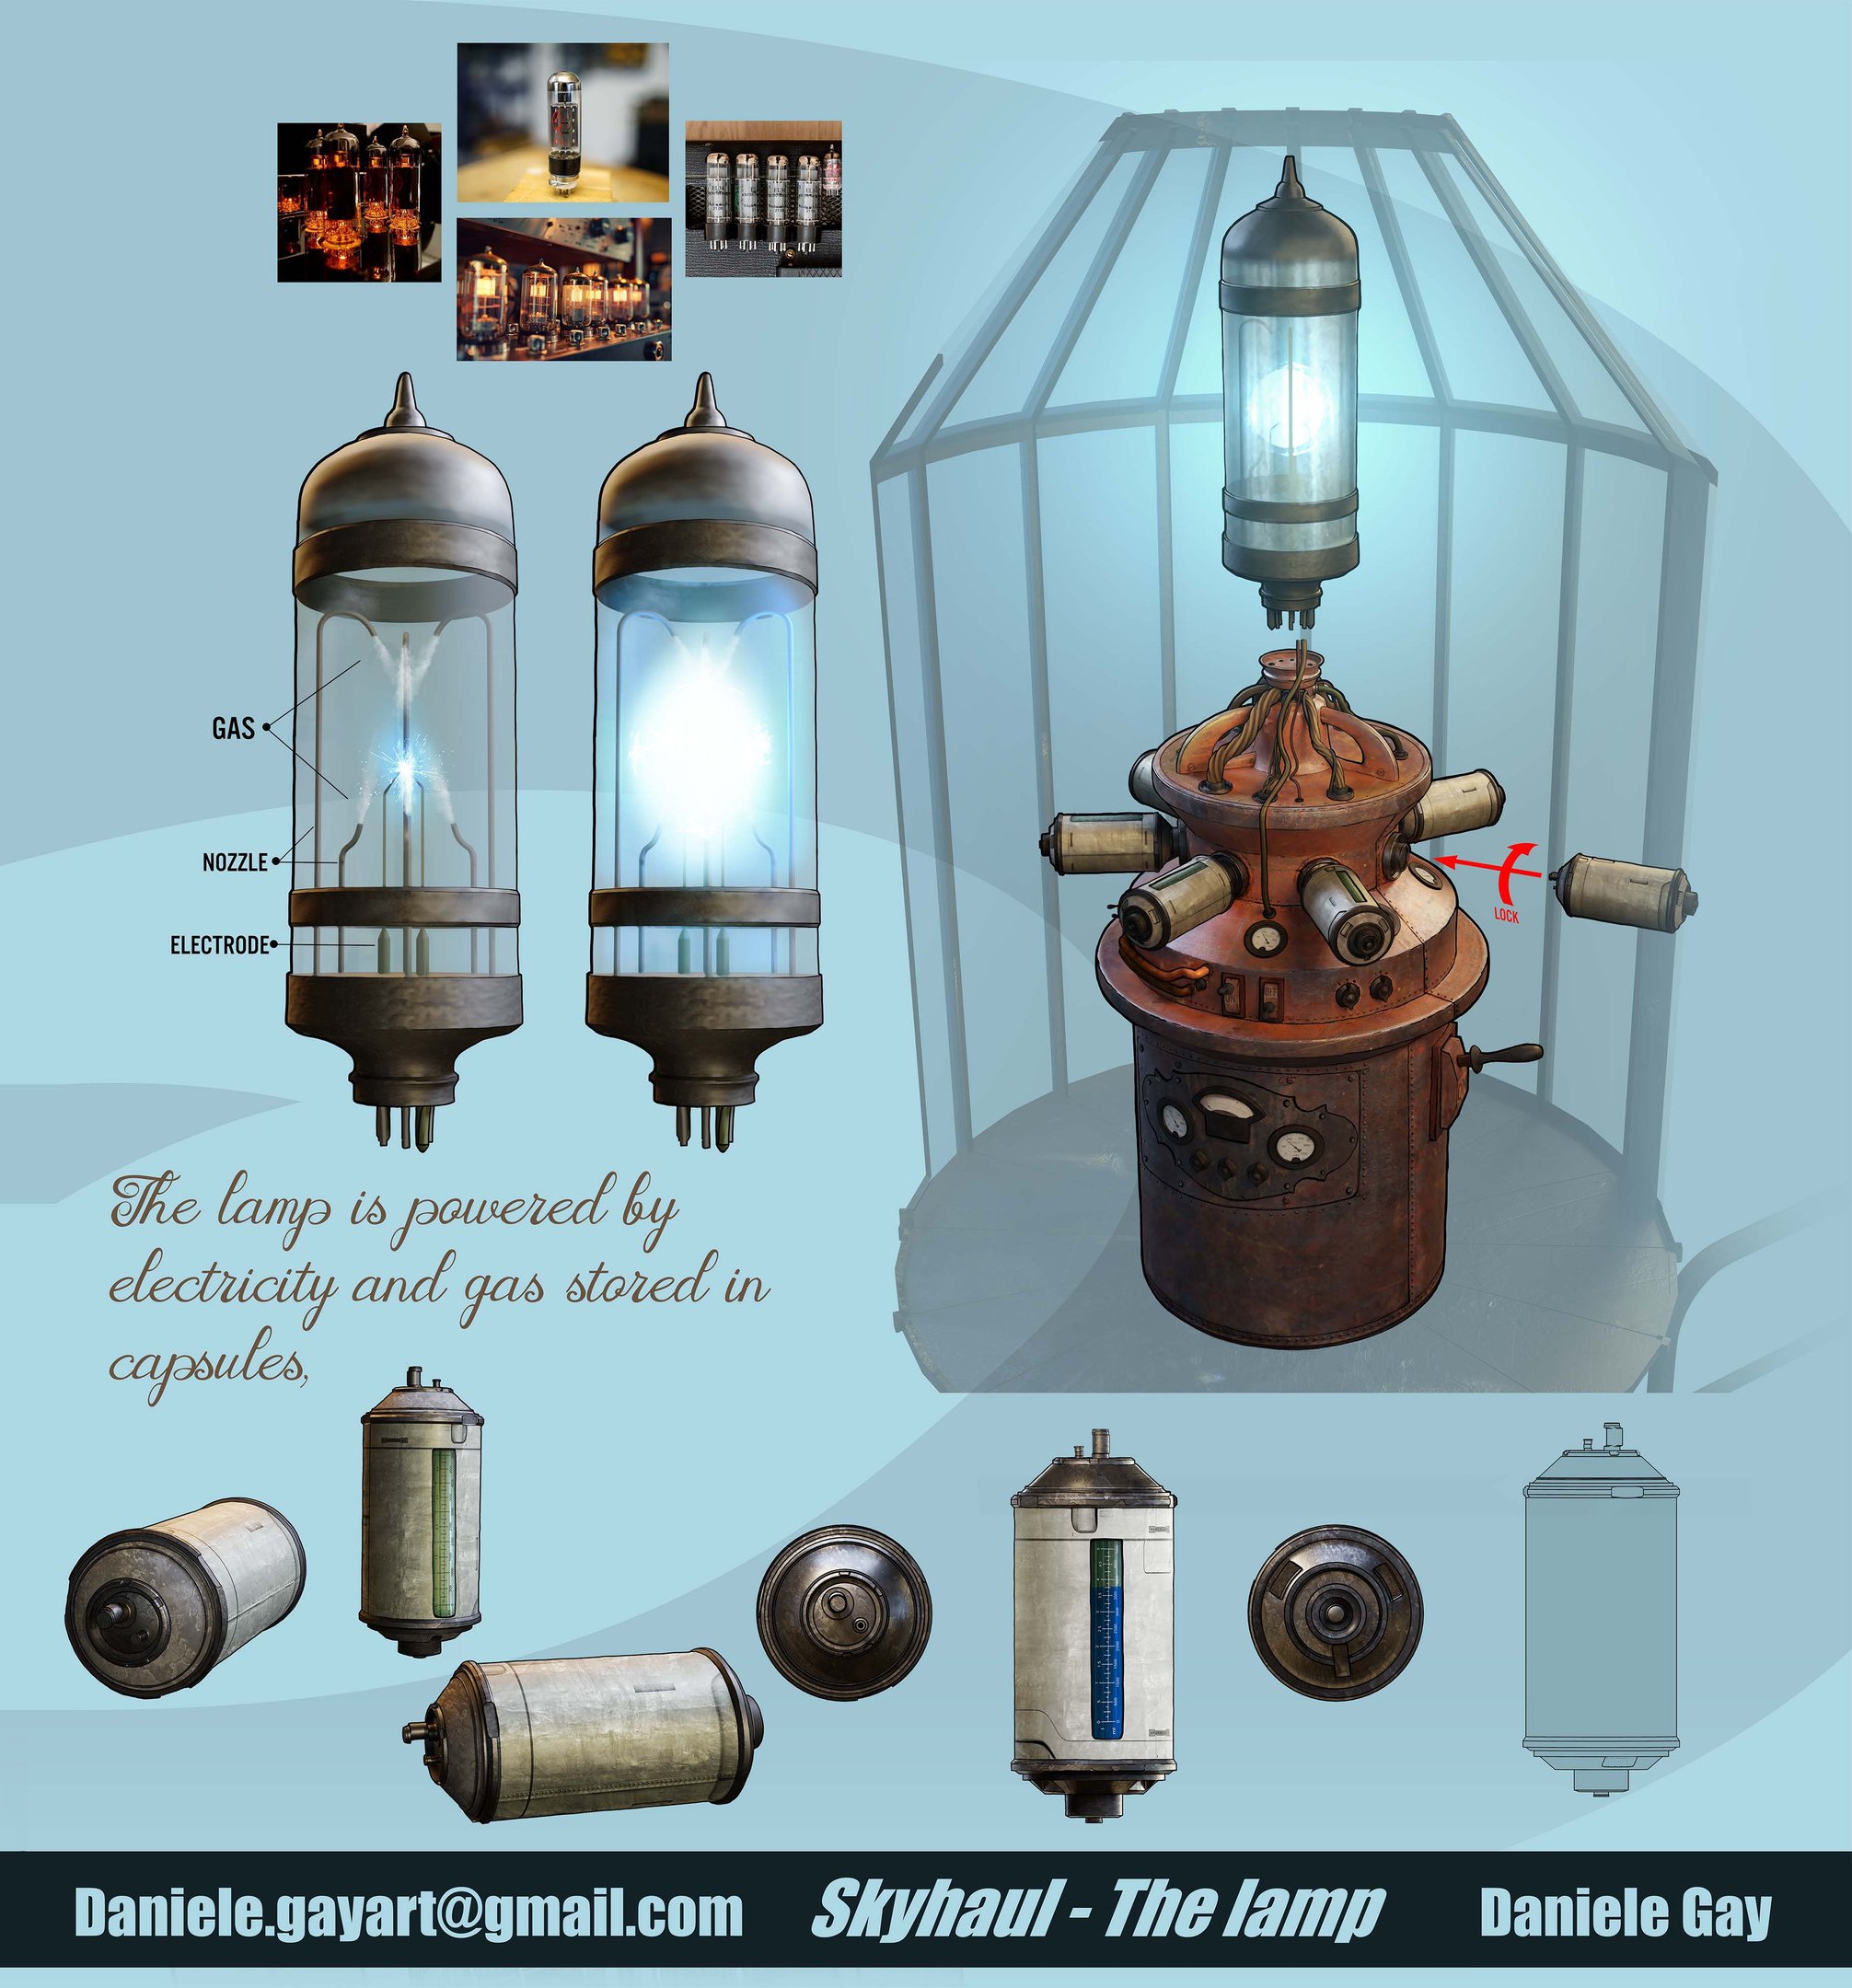
STYLIZED PROP:
Neo Cortex's Castle and the Toxic Tunnels concept art for Crash Bandicoot 4: It's About Time by Jeff Murchie
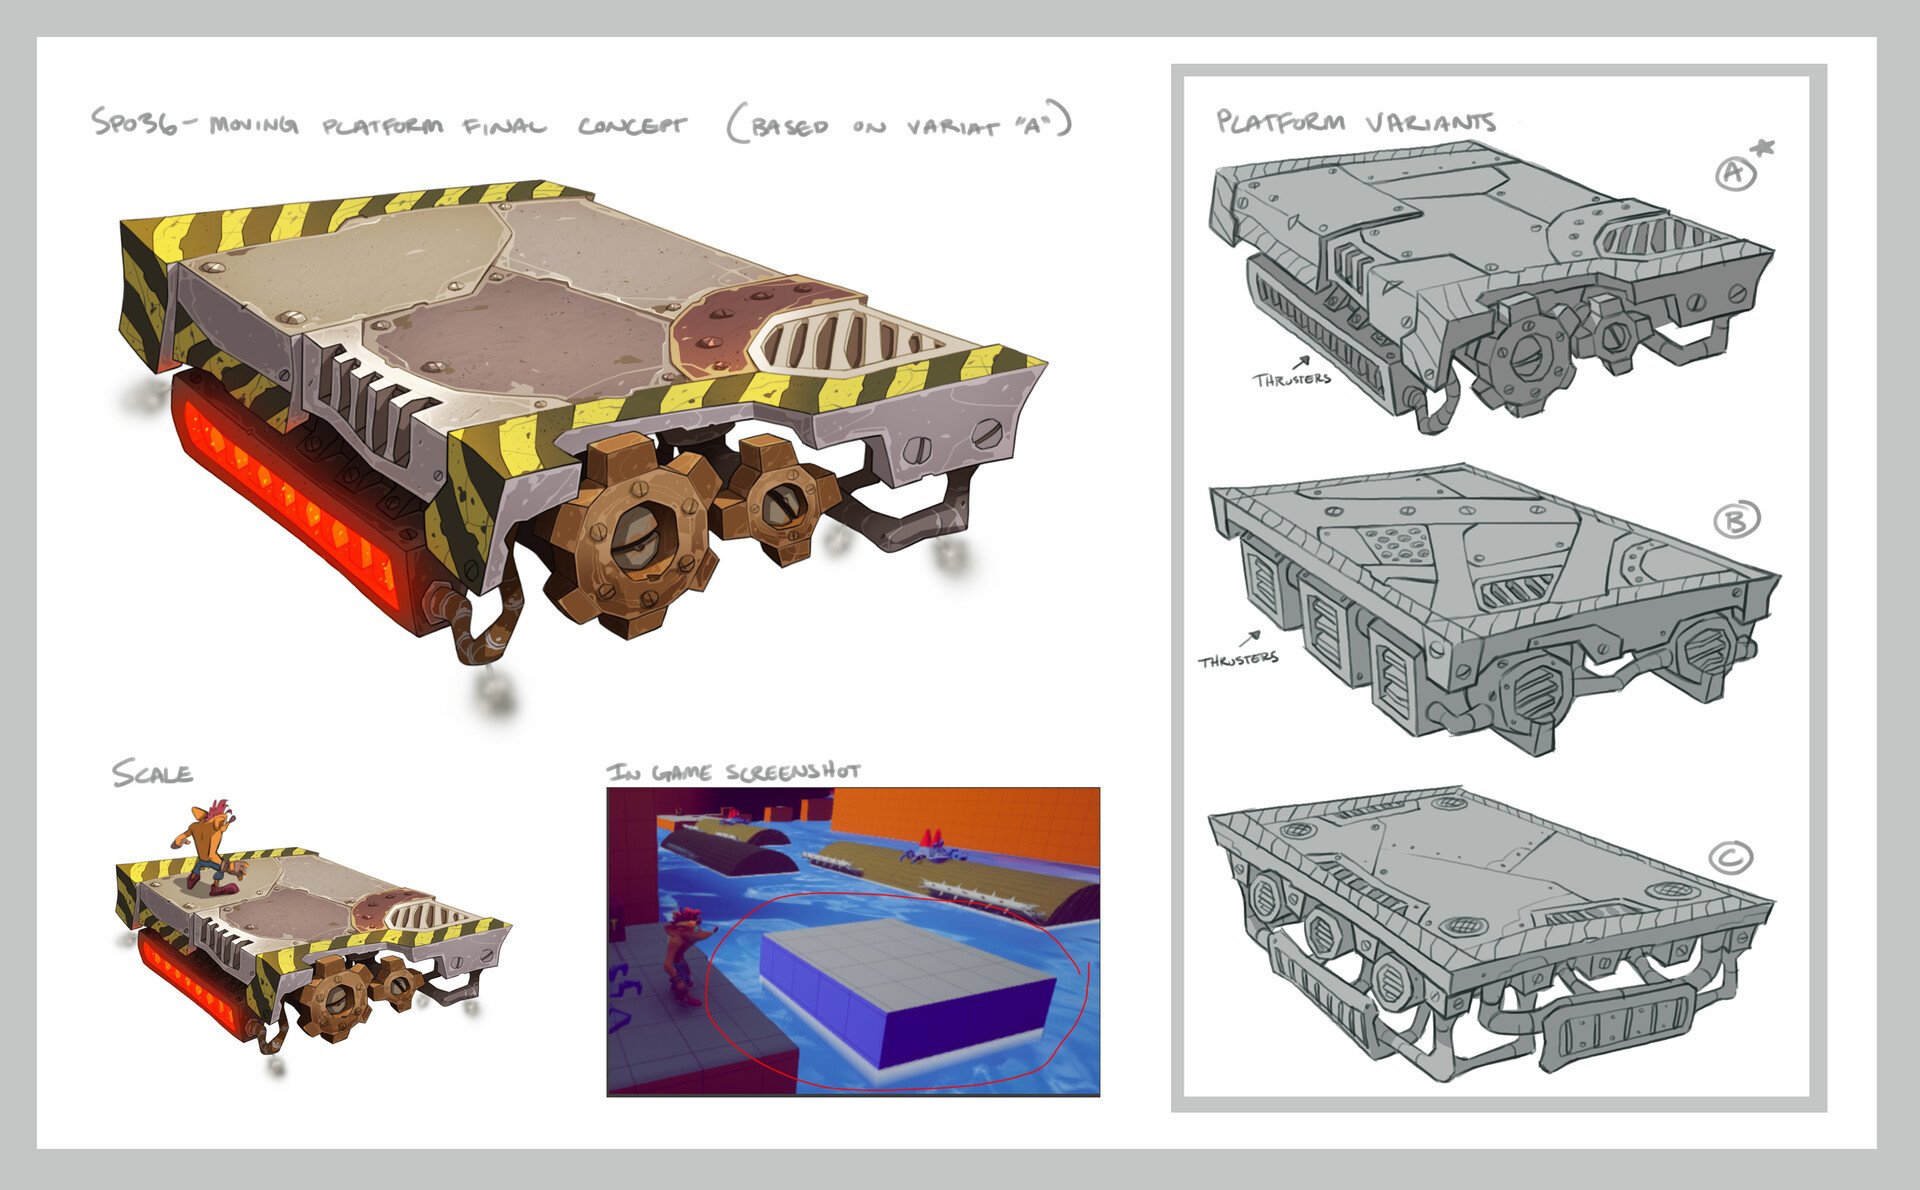
- RULES -
Please read all the rules before starting:- Try to post at least one critique for every post that you make. This will make for a better learning environment and help us all grow as artists.
- Try your best to finish as much as you can in the time frame provided, but remember even if you don't finish by the end of the challenge we encourage you to keep pushing and finish your piece!
- Post what you are working on in this thread so that way it's a more centralized place for advice and critique. Please avoid creating a new thread as we don't want to spam out the forums.
- It is recommended to use a game engine to present your work. Unreal Engine, Unity, and Godot are very common engines that can be used but feel free to use any alternatives that you want.
- 3D Viewers (Sketchfab, Marmoset Viewer, etc) are welcome, but please note that their contents can be stolen by those who know how. Please ensure you're comfortable with this potential before using one.
- Feel free to change up your chosen concept a bit if you want! Interpret these concepts to your liking, especially if your aim is to add storytelling elements.
- If you finish your project and decide to post it to something like Artstation, make sure you give credit to the concept artist in the form of a link to their profile. Additionally, it is recommended to ask a concept artist for their permission to post a 3D piece based on their work before doing so.
- RECOMMENDATIONS -
- When you are just starting out making a scene, it can seem complicated or imposing. Take your time planning and blocking out, it will set you up for success later on.
- Think about how you can re-use assets, re-use textures, break it down as simple as possible and plan it out. A lot of people will break it down in their own way when they start out their challenge. Gather some reference images as well for different parts of the scene, don't be afraid to make it your own.
- We strongly encourage you to go and look at other games and see how they make their assets as well as get concept art to give it your own feel.
- The goal is to learn and grow both artistically and in your ability to both give and receive critique, but don't stress about it and remember to have fun!
 Pinkfox
6 ·
Re: How The F*#% Do I Model This? - Reply for help with specific shapes - (Post attempt before asking)
I would just make a spline and extrude that to make the width of the tape. If you use less points, and use bezier knots to smooth it out, it will give you smoother curvature. Then look at it from an angle, and move points up/down to prevent interpenetrations.Arby said:Anyone have any idea how to model this tape pulled out of the cassette?
There are various "make wires" tools out there which will create a curved filament, after you make a series of points in space.
You could even try a physics sim to prevent it from interpenetrating itself. But it would be a lot less time-consuming just to draw a line, and extrude it.
 Eric Chadwick
4 ·
Re: Sketchbook: Eric Chadwick
Hiking a bit in the Columbia River gorge today, out near Portland Oregon.


 Eric Chadwick
3 ·

