Best Of
Re: WIP Stylised Fantasy Character
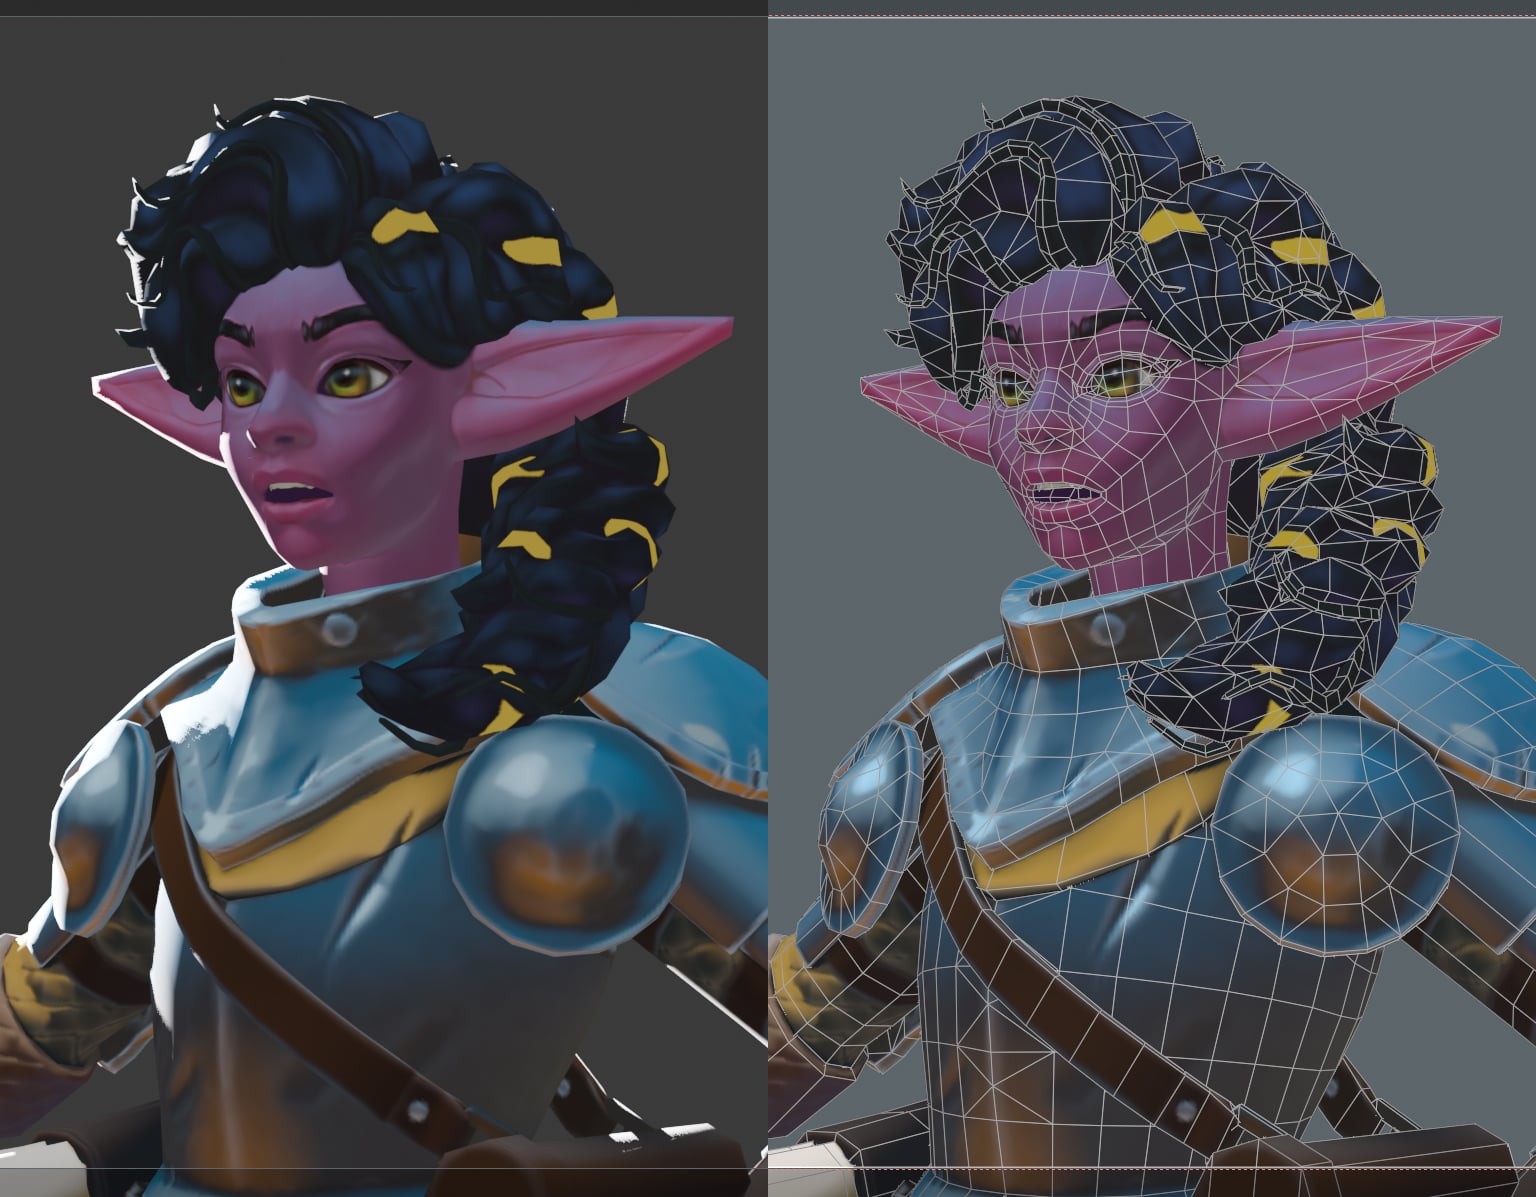
Some progress on the head and hair. Haven't touched the body since last update. Still plenty to do but if anyone wants to share their thoughts feel free!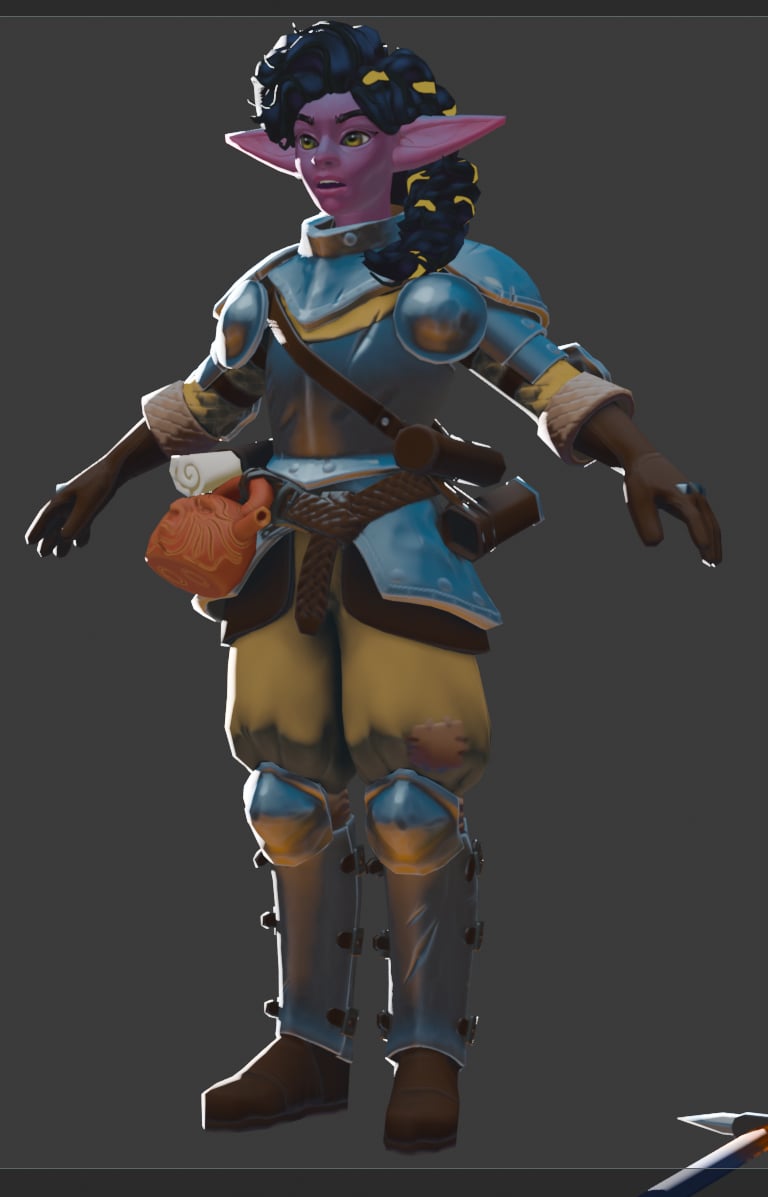


3 ·
Re: The Bi-Monthly Environment Art Challenge | March - April (101)
Nice blockout!
I would suggest choosing your rendering system first, then set up the ground shader to work within it. For example, in Unity I would use a layered shader, and paint a mask where the water would be on the concrete. And add some clumps of dirt as geometry.
I would suggest choosing your rendering system first, then set up the ground shader to work within it. For example, in Unity I would use a layered shader, and paint a mask where the water would be on the concrete. And add some clumps of dirt as geometry.
 Eric Chadwick
3 ·
Re: Is This How a Normal Map Should Look or Am I Doing Something Wrong?
Hello,
Of course you're probably not going to rework this model from the ground up now that you're that far in. But in the future I would strongly encourage you to look at things more from the angle of what is actually needed for a game, keeping the in-game model and textures in mind right from the start as opposed to spending too much time modeling infinite amount of CAD detail.
It may seem counter-intuitive but good game optimization doesn't happen in the end ; rather it is something that is thought about right from the beginning. For the case of this car for instance you could have taken a few days to build a game model directly at conservative specs, like 20k tris maximum and mostly continuous surface-wise ; then focus on modeling high-poly sources only for the parts that really need them, like the car body, while doing all the minor bevels with simple trim sheets, or by baking a round edge shader, or by simply giving them raw geo bevels. The whole thing would have taken you less than a week including baking and it would have granted you a lot of flexibility to edit/redo parts on the fly.
So going back to your question of "is this how a normal map should look", I would say yes but also not really. There is nothing inherently wrong with it, but outside of a showcase scene with just this one car on screen I have a hard time thinking of a fitting game context for it.
Besides all the technical details about baking well-covered above by @Fabi_G (as always !), I think you are going down a weird rabbit hole with this model.
It certainly looks very clean and detailed, but it also looks a lot like something that has been crafted with a CAD-like mindset of trying to put each and every little detail from the reference into the model ... but without many thoughts for the final game use. Which in turn leads you to the somewhat awkward practice of having to bake from and to essentially the same model just to capture hair-thin bevels, while also having to manage dozens and dozens of model parts, and having to pack things over two texture sheets, and yet still having issues capturing some details as seen in this thread.
The effort is admirable but IMHO it is also a bit absurd or even counter-productive as that means that as soon as your textures mip down (or slowly load) you'll end up with a very blurry looking surface - the kind that gamers may refer to as "something out of a PS2 game".
For the sake of comparison here is your car next to a hero boss model from a massive commercial game. Now admittedly MGS3 is about 15 years old by now but the models still hold up beautifully.
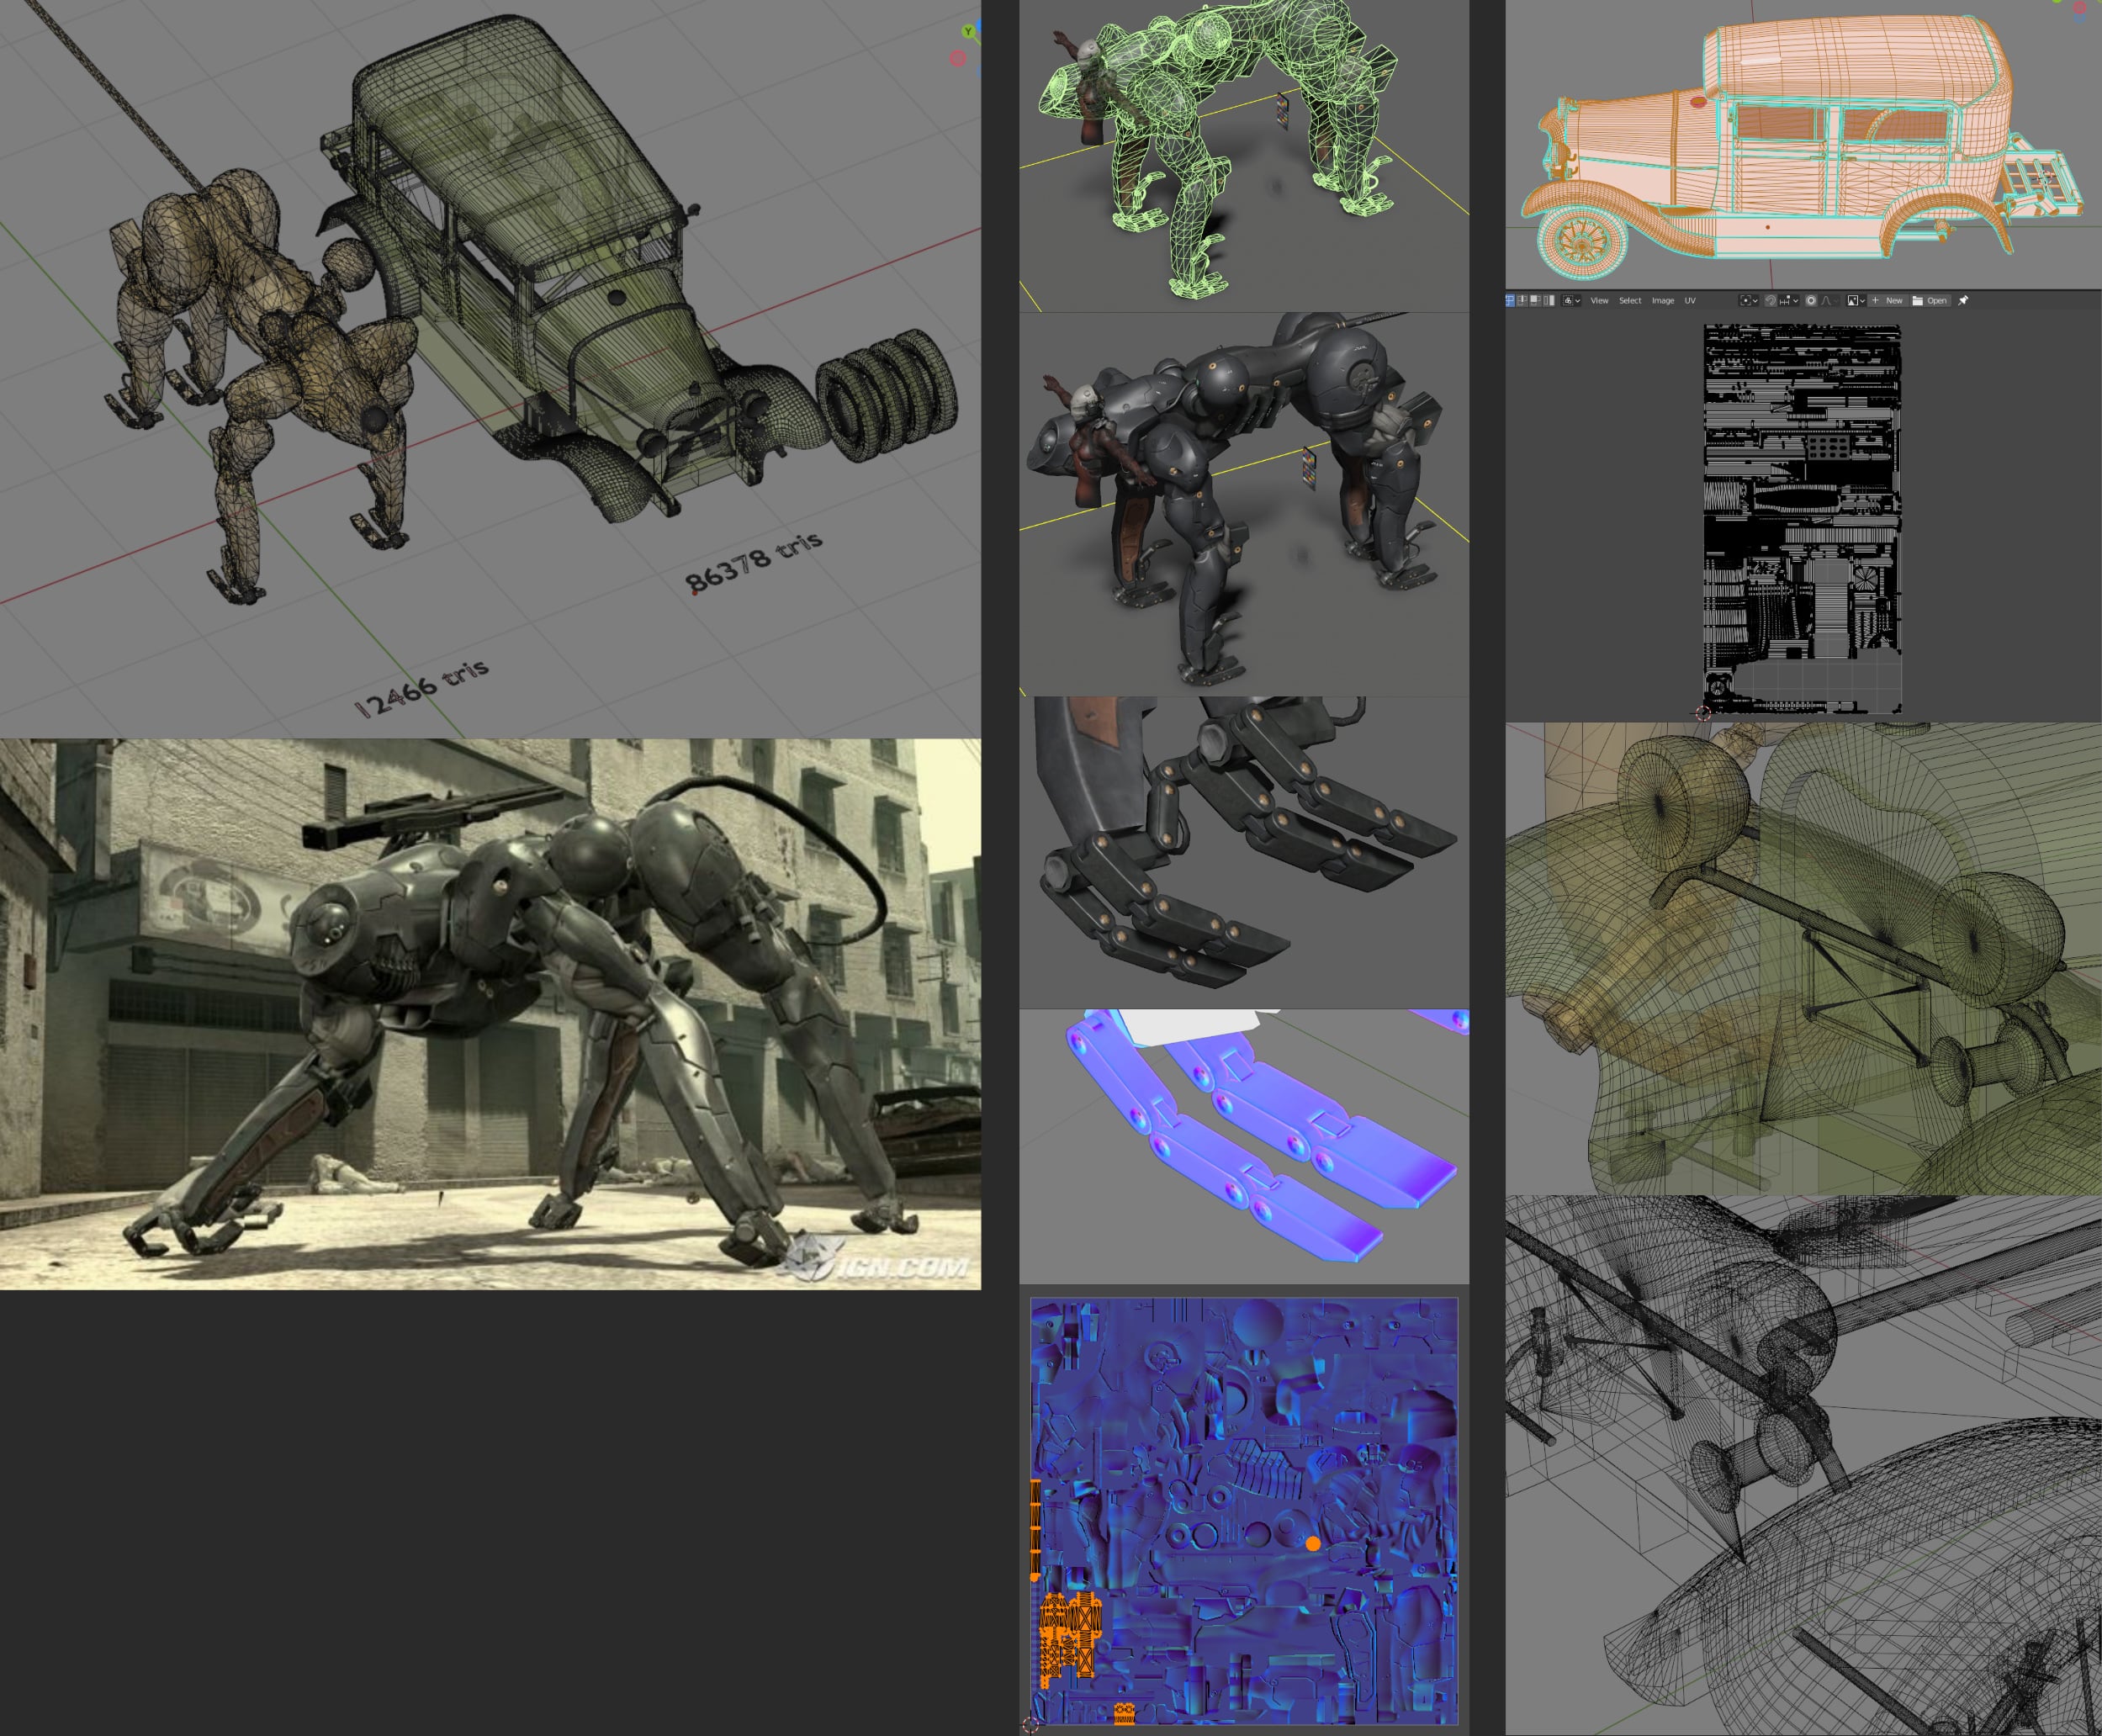

The main element of this AAA boss model only weights 12k tris and uses a single (!) 1024*1024 map. But still there is enough resolution to capture all the fine details of the outer shell, and enough UV density and juicy pixels to make the feet details look gorgeous (as highlighted in the bottom-left of the UVs).
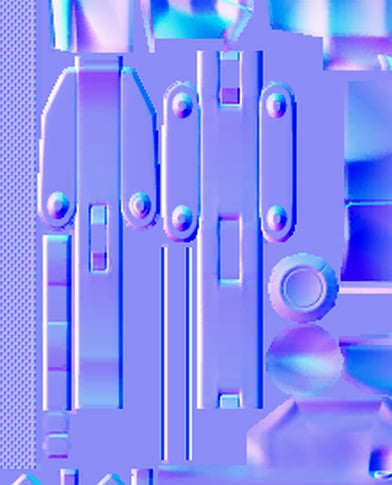

Whereas your car weights 86k tris, and uses two sheets that seem to require at least 2048*4096 or even 4096*4096 textures. That means that your indie model of a car is orders of magnitude more resource-intensive than a badass mecha wolf from a massive AAA game.
Here is how the UVs compare. I'm sure you can see that you'll need much, much, MUCH bigger textures than they did just because of the way your model is built.
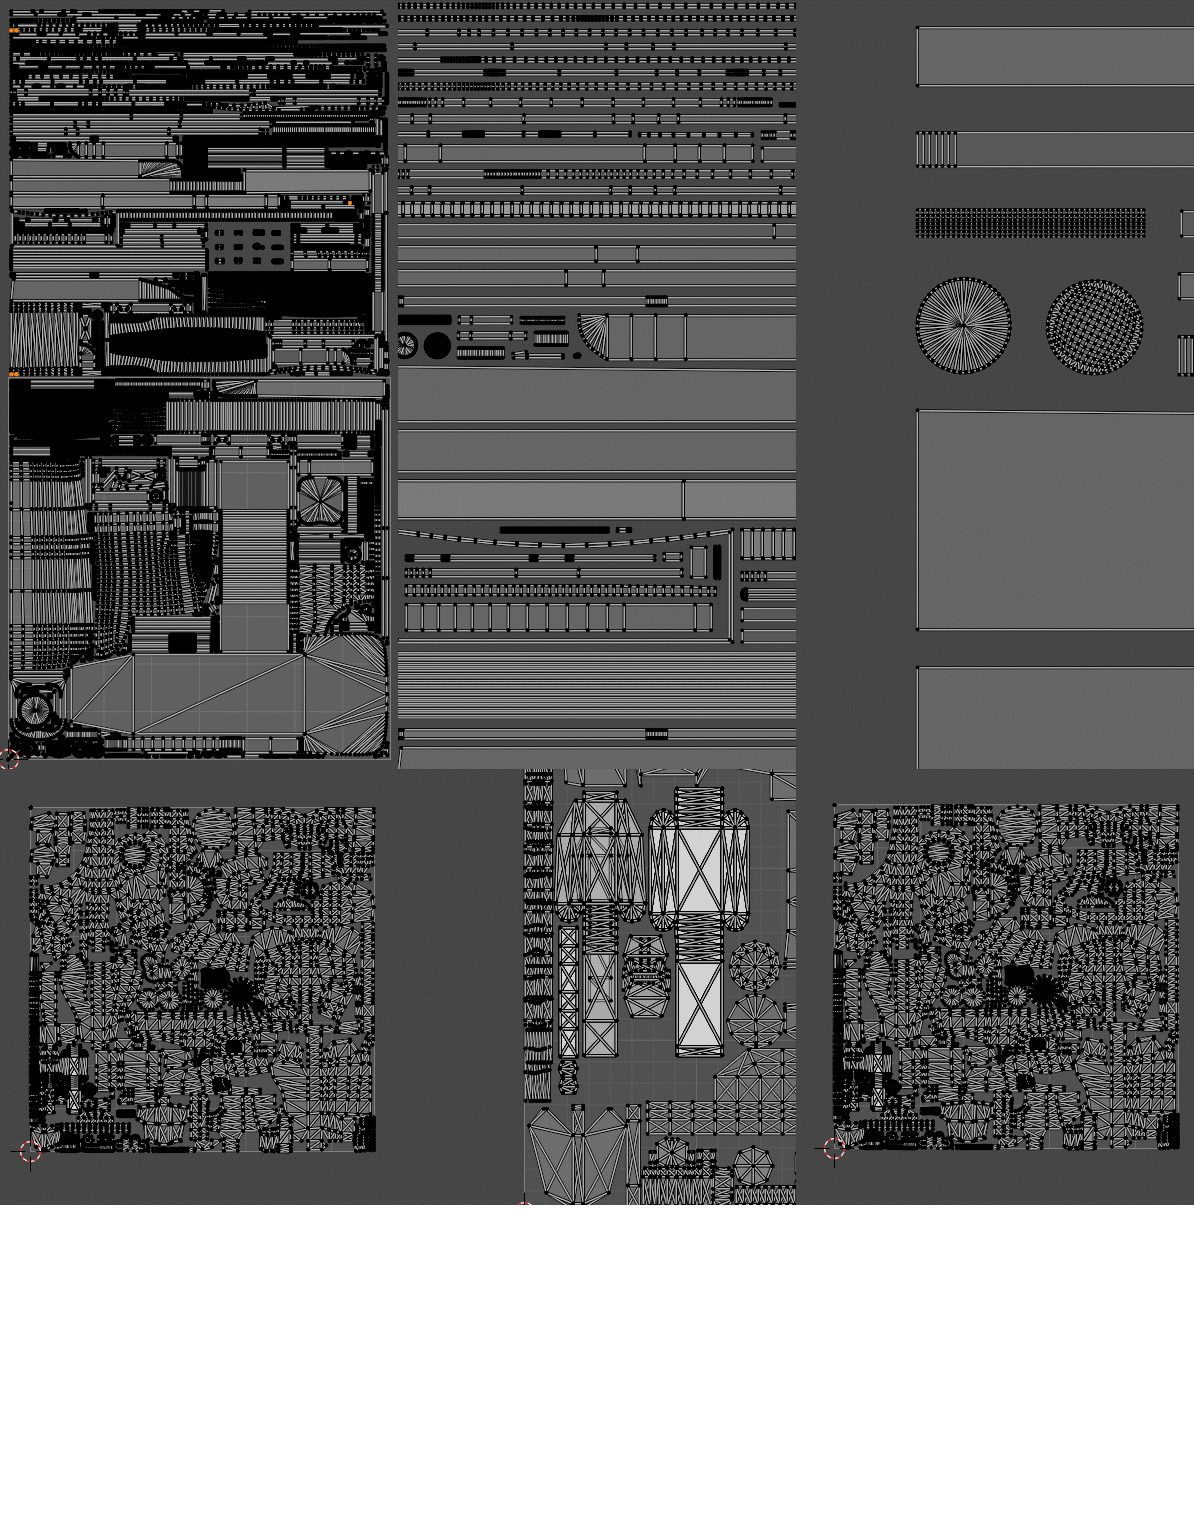
Here is how the UVs compare. I'm sure you can see that you'll need much, much, MUCH bigger textures than they did just because of the way your model is built.

Of course you're probably not going to rework this model from the ground up now that you're that far in. But in the future I would strongly encourage you to look at things more from the angle of what is actually needed for a game, keeping the in-game model and textures in mind right from the start as opposed to spending too much time modeling infinite amount of CAD detail.
It may seem counter-intuitive but good game optimization doesn't happen in the end ; rather it is something that is thought about right from the beginning. For the case of this car for instance you could have taken a few days to build a game model directly at conservative specs, like 20k tris maximum and mostly continuous surface-wise ; then focus on modeling high-poly sources only for the parts that really need them, like the car body, while doing all the minor bevels with simple trim sheets, or by baking a round edge shader, or by simply giving them raw geo bevels. The whole thing would have taken you less than a week including baking and it would have granted you a lot of flexibility to edit/redo parts on the fly.
So going back to your question of "is this how a normal map should look", I would say yes but also not really. There is nothing inherently wrong with it, but outside of a showcase scene with just this one car on screen I have a hard time thinking of a fitting game context for it.
All that said, good luck.
 pior
pior
4 ·
Re: [3D] How to unwrap spherical Visor so texture doesn't distort?
Have to agree with @Noren , @ZacD , and @pior : both the contiguous unwrap and compound curvature of the shape are contributing to the distortion in a way that's almost unavoidable with a [tiling] texture only approach.
Lot's of good advice on how to proceed with different approaches from everyone in this thread.
Lot's of good advice on how to proceed with different approaches from everyone in this thread.
As far as the shape itself goes: something to keep in mind is that, if the individual tiles are supposed to be perfectly flat, then fitting them over a curved surface produces a faceted shape. Not a continuous compound curve. If the shape is supposed to be a continuous compound curve with hexagonal cut outs then each side of those individual hexagons will follow the curvature of the underlying surface.
So even if they are modeled flat and projected or deformed onto the compound curvature of the visor's shape, there will still be some level of visible perspective distortion on every hexagon that's not viewed straight on. Especially towards the sides where the curve drops off rapidly.
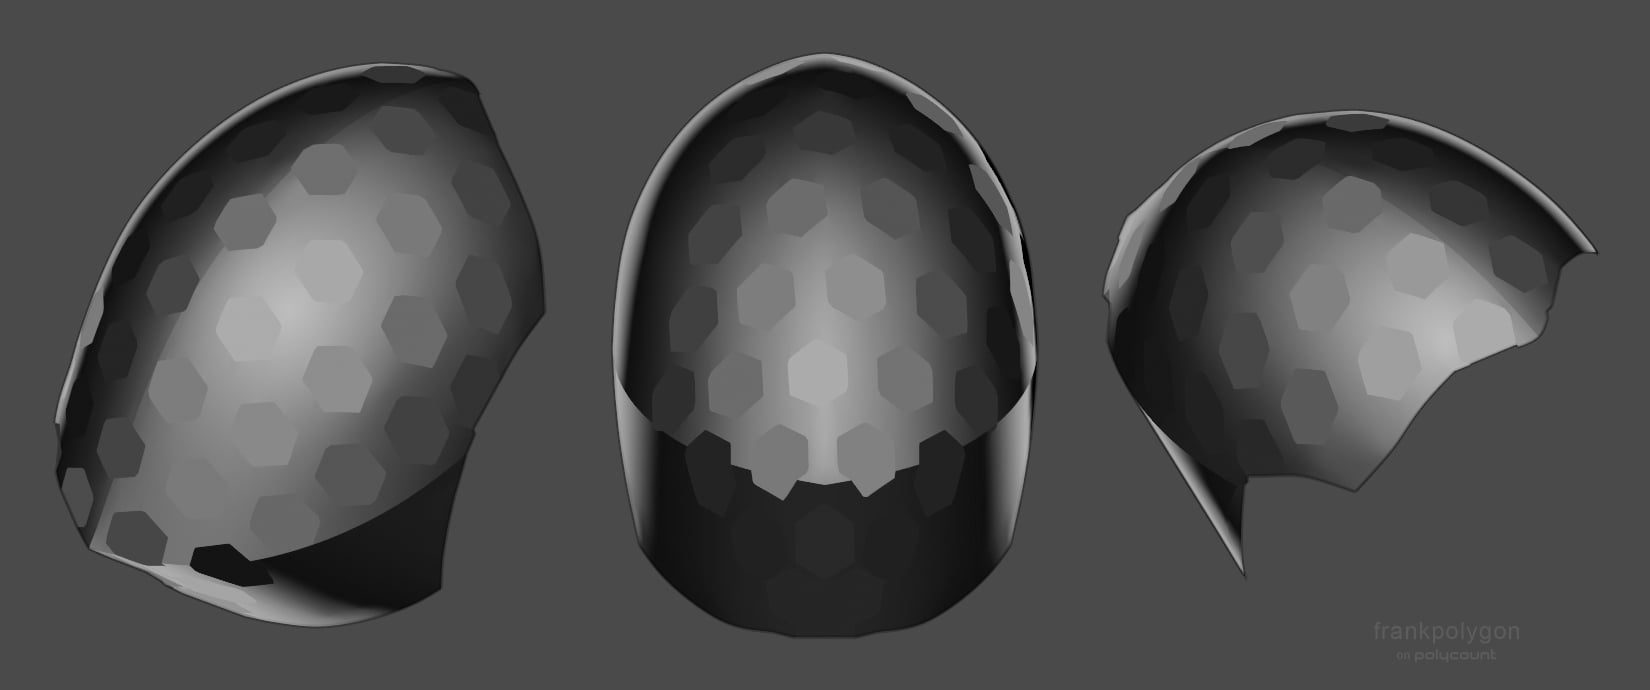
Here's a basic example of what it might look like when projecting the same hexagon shape, with equal rotation and spacing, from a central point towards the surface of the compound curves in the visor. The facets break up the surface and there's some subtle differences in each shape, as well as the spacing between the hexagons, even though the rotation angle from the origin point is the same for each of them.
Here's a basic example of what it might look like when projecting the same hexagon shape, with equal rotation and spacing, from a central point towards the surface of the compound curves in the visor. The facets break up the surface and there's some subtle differences in each shape, as well as the spacing between the hexagons, even though the rotation angle from the origin point is the same for each of them.
To build on what Noren has already suggested: one possible solution is to split the visor's UV island down the middle and conform it to a hexagonal shape that lines up with the tiling pattern. It's not perfect, there will be one or two diamond shaped filler pieces, but each hexagon is roughly the same size and there's minimal distortion given the shapes are projected onto a compound curve. Below is an example of what that could look like.
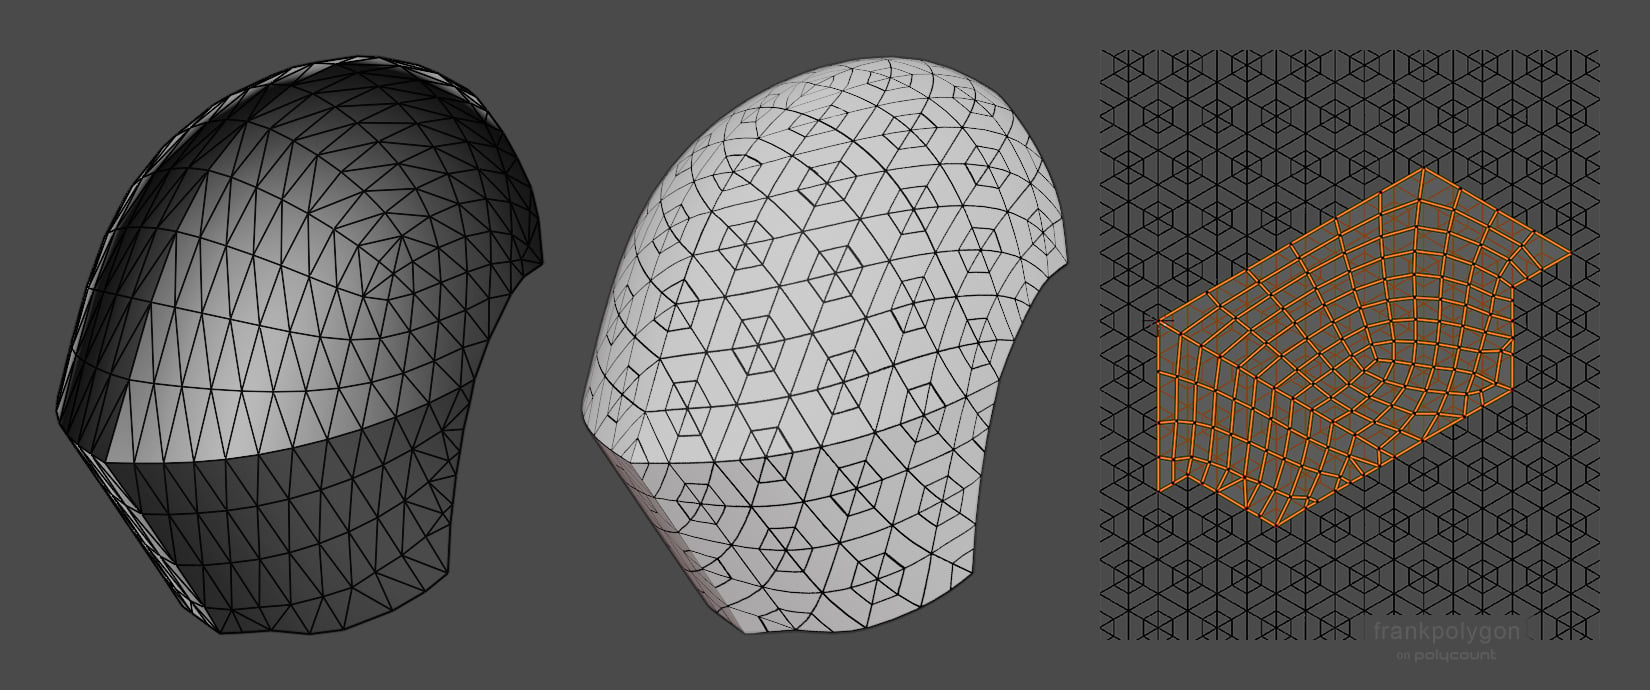
Where the filler segments fall and what shape they produce depends on how the unwrap is aligned with the hexagonal grid. Once the UVs are conformed to a hexagonal shape it should be possible to rotate it in 30° increments to alter the position of the tiling pattern.
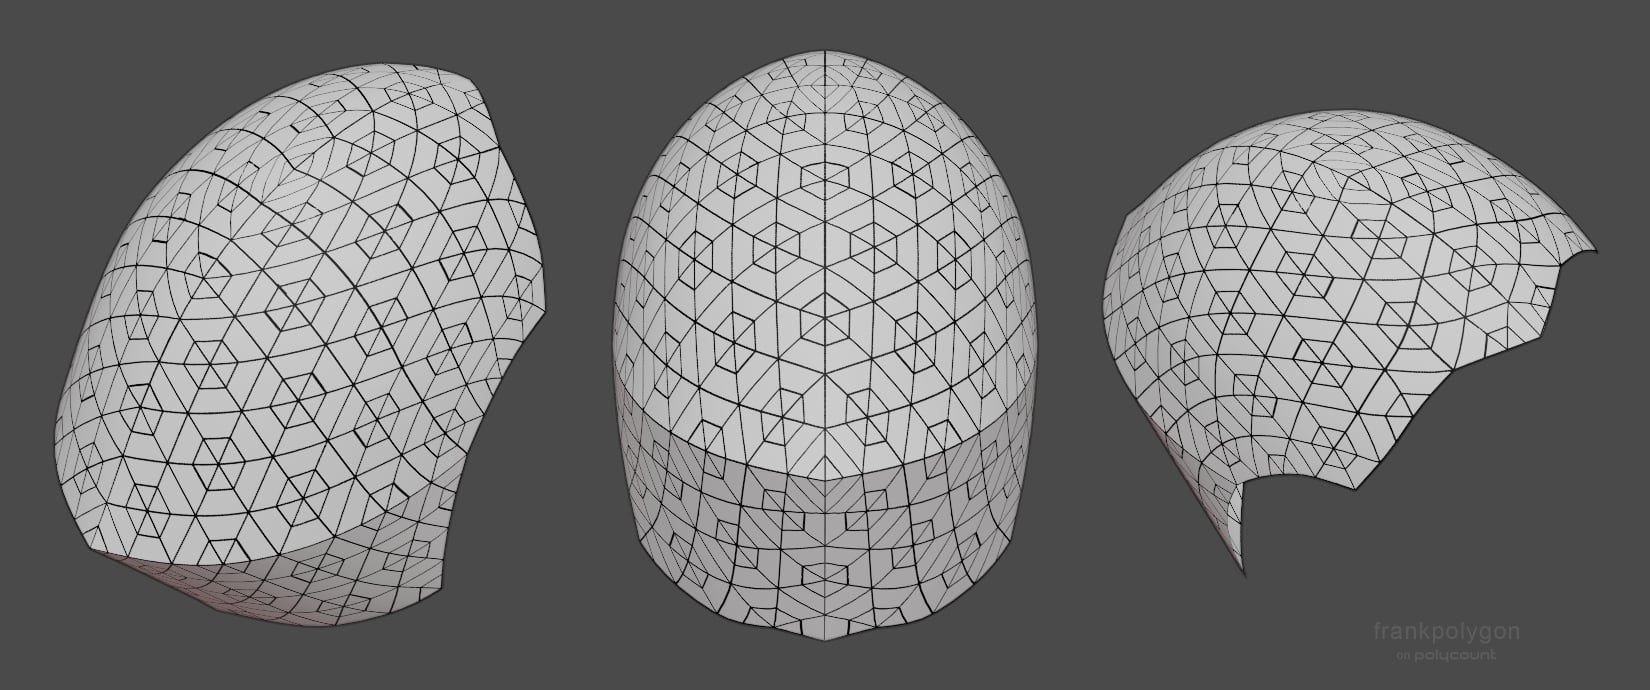
Here's a quick example of what the textures look like when the UVs are rotated. Some of the subtle distortion around the filler segment and outer edges could be adjusted out by sliding the verts around to re-shape the mesh and UVs. It's also fairly easy to scale things up and down once everything is conformed to the hexagonal grid. The only catch is the UVs scaling needs to line up with the pattern in the tiling texture.
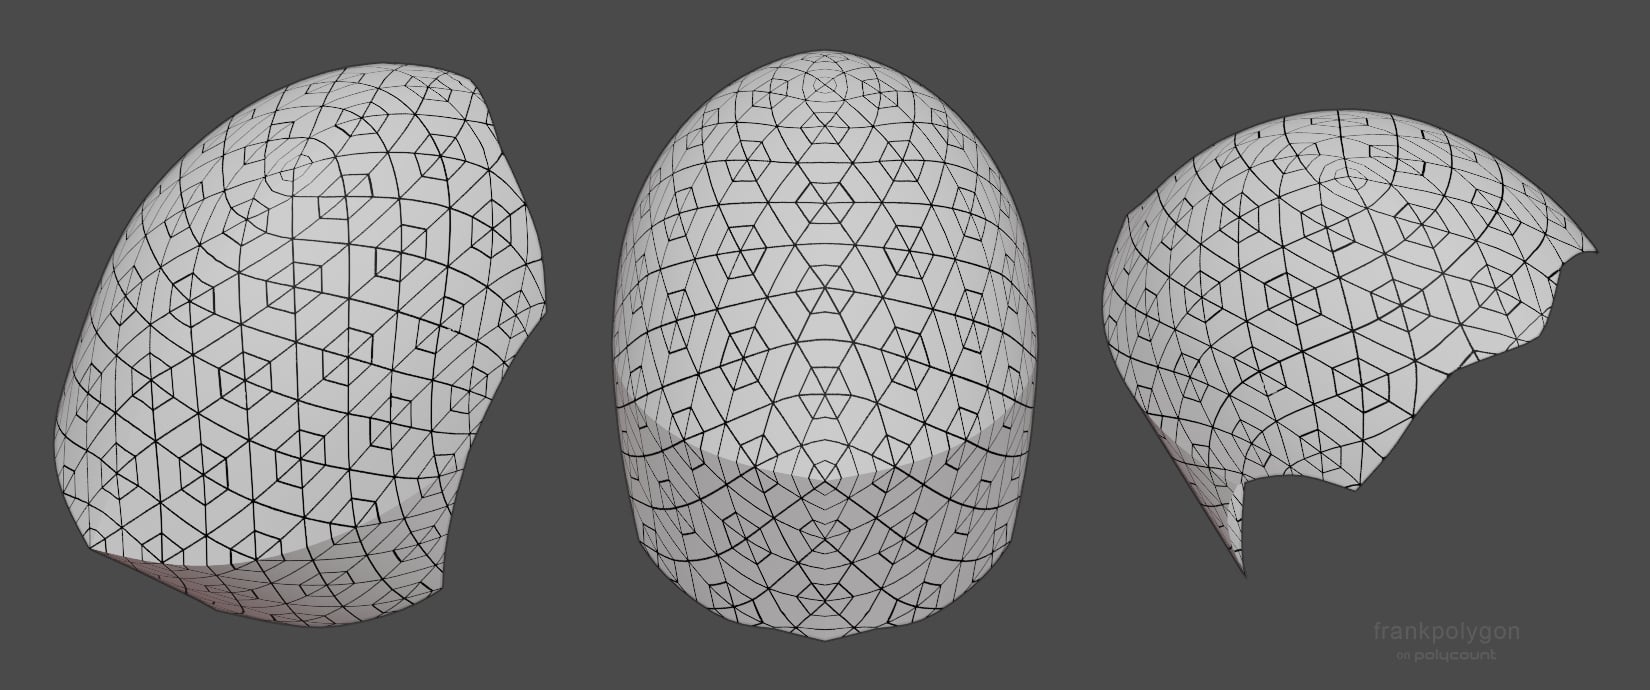
Projecting the actual shapes onto the mesh seems to produce more consistent results, independent of the UV unwrap, but then there's the challenge of getting everything in the model lined up to both the underlying surface and an evenly spaced hexagonal grid. So it kind of comes down to looking at the tradeoffs, between getting close enough with a better unwrap or accurately projecting the shapes onto a high poly, then deciding how much effort the whole thing is worth.
6 ·
Re: [3D] How to unwrap spherical Visor so texture doesn't distort?
Hello,
It is very likely that the flawless patterning that you are (loosely) visualizing in your minds eye isn't even possible given the nature of the surface your are dealing with here.
In practice, if this surface was to be covered with some sort of IRL tapestry/patterned fabric you'd need at least a seam on the sharp horizontal crest/convex line and also a few darts on the top rounded part. Therefore hoping to find some way to unwrap this visor without any distortion at all could very well be a dead end.
 pior
pior
3 ·
Re: Sketchbook: EricElwell
Inktober 2016 art dump below. Tried some new things. Limited myself to black ink only. Ran out of ink. Learned a lot.


 EricElwell
6 ·


