It starts May 12, and ends Oct 17. Let's see what you got!
https://polycount.com/discussion/237047/the-brawl²-tournament
Best Of
Re: [2D Art] When do you know it's time to, you know, give up?
no need to quit, do whatever it is that you need to do, and when you pick up the brush, you again will always be an artist.
 killnpc
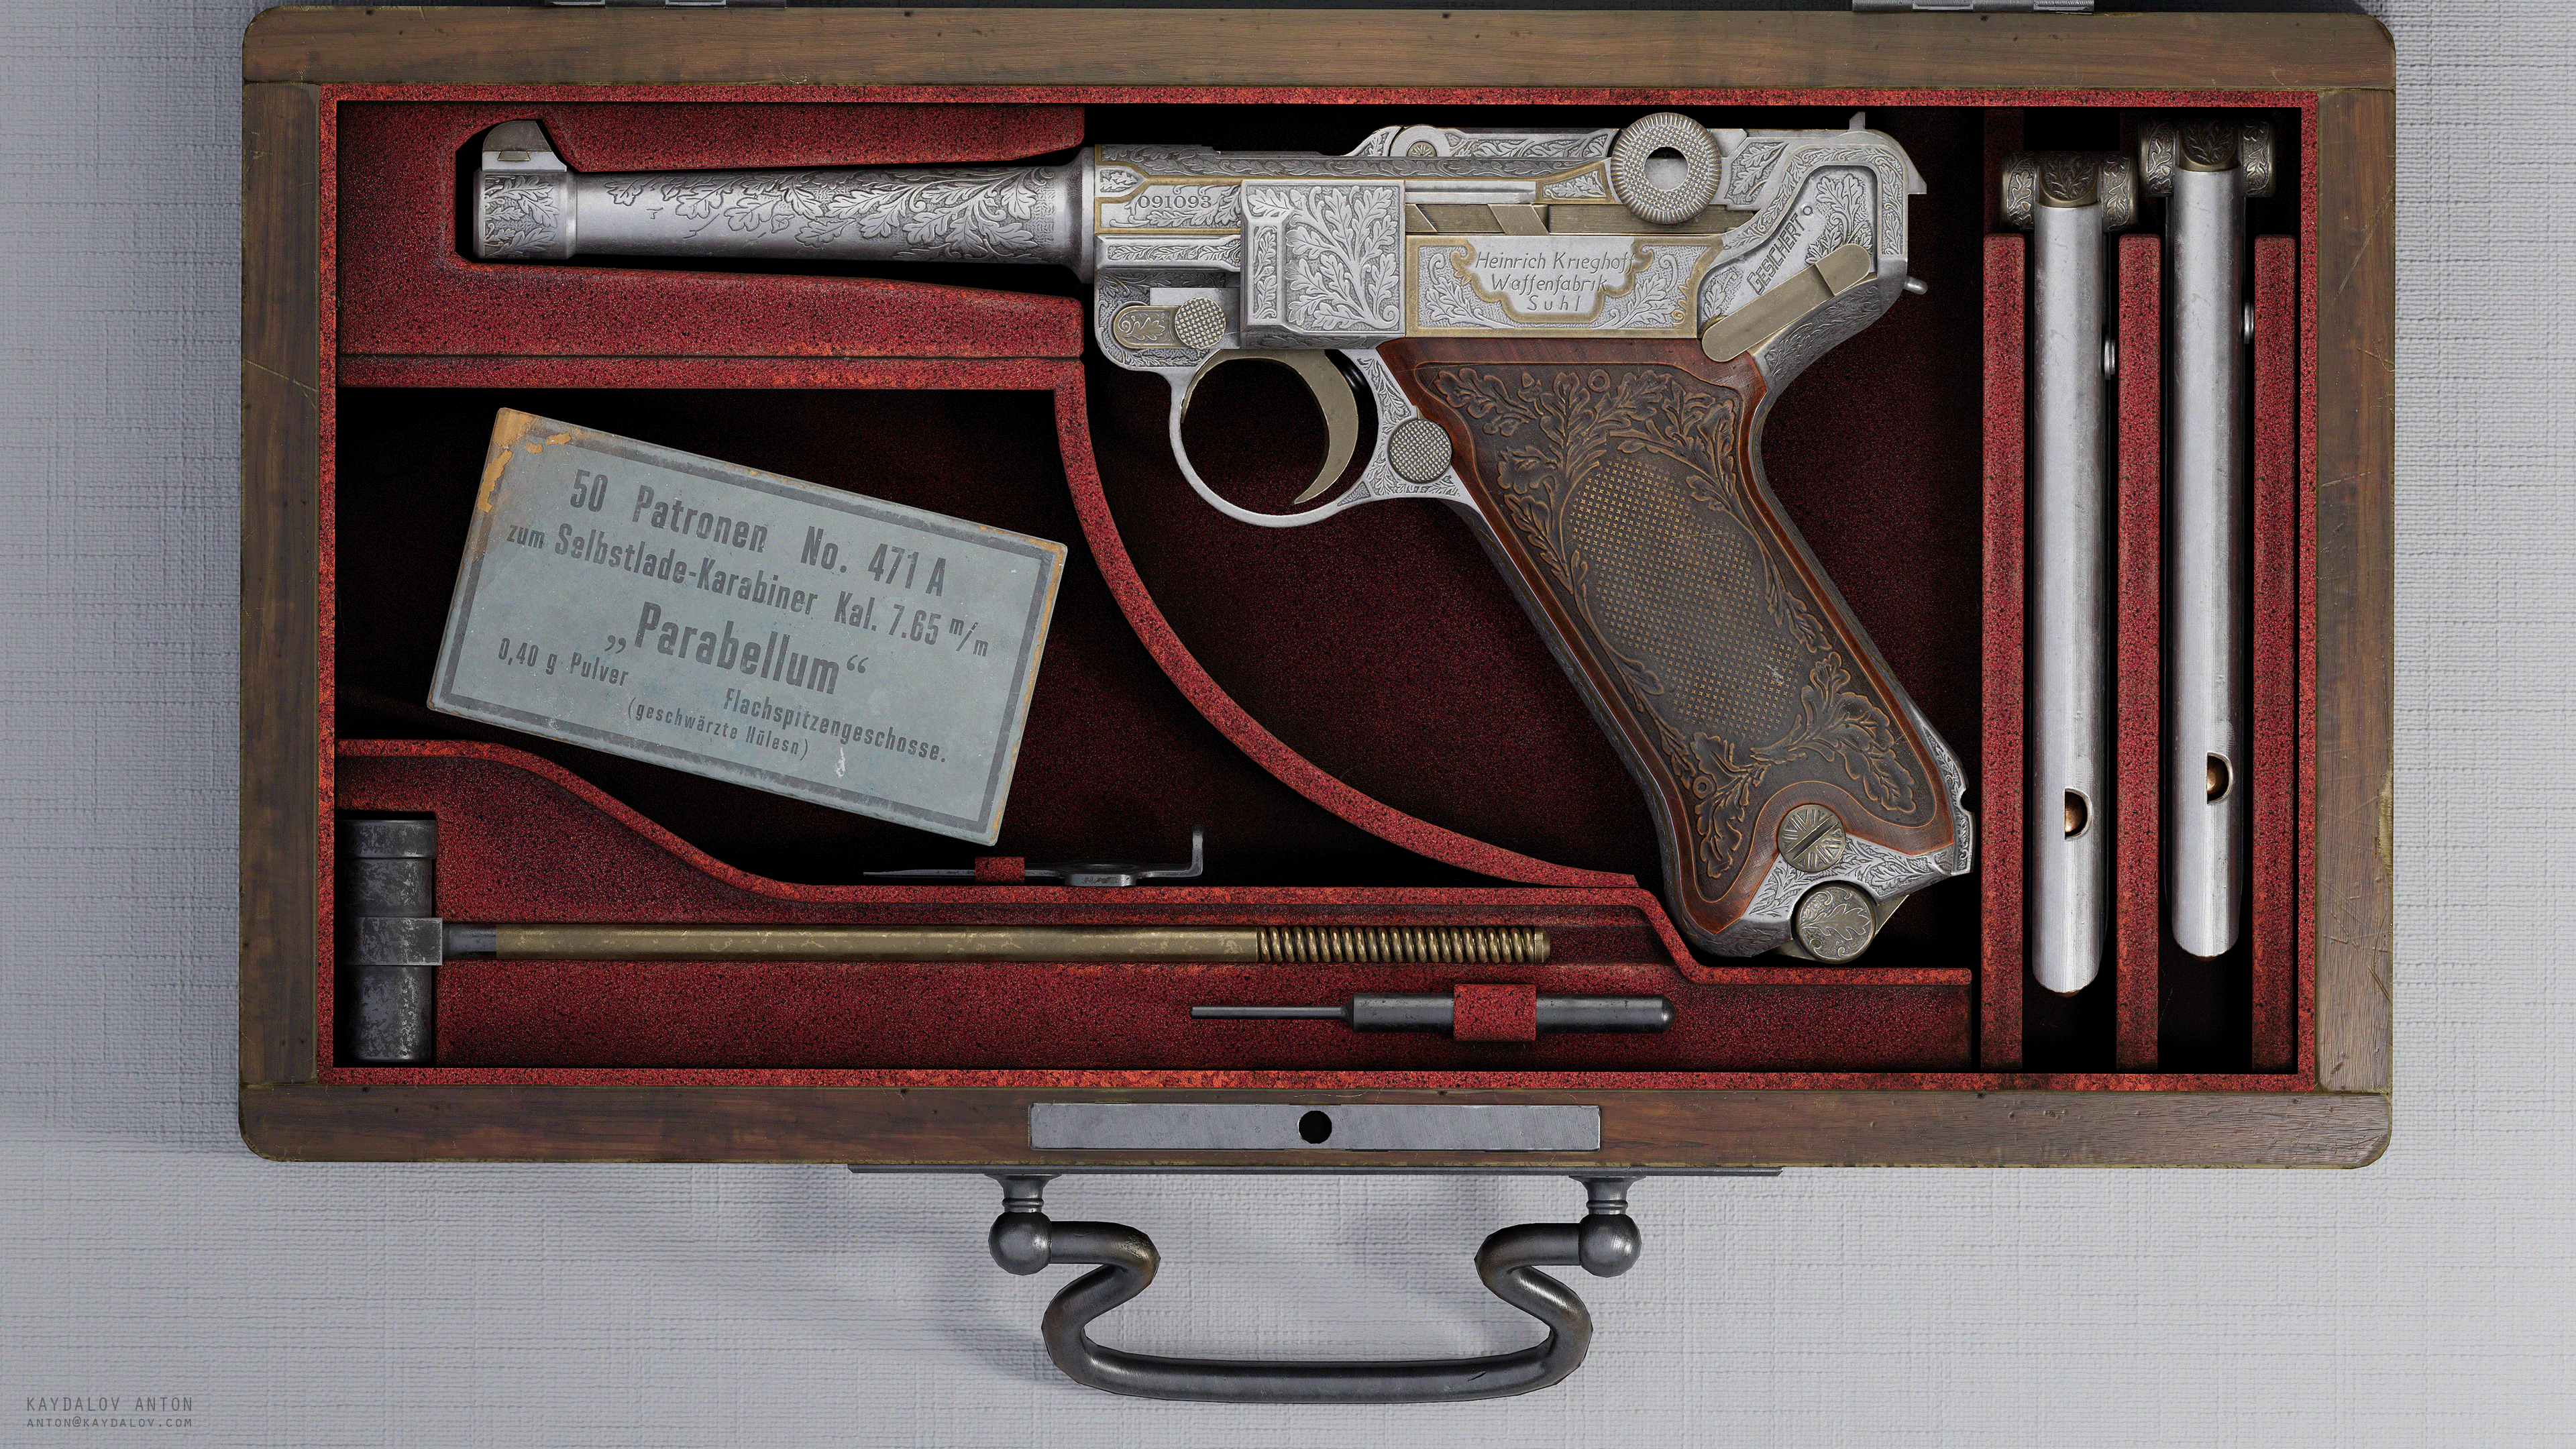
[Finished] Krieghoff Luger
Hello everyone!
I am very happy to show you my recent work. It was long and painful journey but I am super glad and happy to finish it! What most amazing is that I can finally show it!
This my personal project for practice and studying purpose. The main focus was to figure out how to do proper and good engraving. After 10 different method I did what you can see on screenshots. Also my practice goal was make all gun parts as possible.
The modeling part was done in Maya and Blender, texturing and whole engraving in Substance Painter.
I'll be glad for feedback and what do you think about it =)
More images here -- ArtStation - Krieghoff Luger, Anton Kaydalov


More images on art station page.
 kaydalord
Re: Texturing workflow technical help!
The difference in green channel value you are seing is probably coming from a confusion of terms.
"Bent" normals refers to a technique that fakes some extra shading by bending the normals in a way that is not just related to the surface of the high, but also to cavity information. That way when light shines down an object you get not only the shading based on the orientation of faces, but also some extra kick in the cracks.
https://docs.unrealengine.com/4.26/en-US/RenderingAndGraphics/Materials/BentNormalMaps/

Pretty neat stuff, especially since in UE4 an AO pass plugged into a material is ignored in many cases, as it requires a very specific setting in the level lighting settings to show up.
Now just like any normalmap bake, this special "bent" bake can be saved either as Tangent Space or as Object Space.
And then, there is the completely unrelated fact that an OS normalmap very cleanly isolates the up/down surface orientation of an object in its green channel.
So, the pass shown in the top right of the first image of that tutorial breakdown is not just a "bent normals" pass ; it's a bent normals pass saved as Object Space. But unfortunately for the sake of dumbed-down simplicity (and probably after some requests coming from artists who didn't understand what bent normals actually meant in the first place), some baking apps started calling this combined pass saved as OS a "Bent Normals pass", even though the part that most people are interested in is the top-down shading aspect of the OS bake, not the bent aspect.
And IIRC very ironically as @Neox pointed out, some baking apps even started to label "Bent Normals" an OS bake without even any bending whatsoever :D IMHO a perfect example of how "simplifying things for the user" just ends up causing confusions and errors. I am actually 99% sure that this is exactly what is going on in the tutorial breakdown.
Therefore, the pass from the tutorial (green channel of an OS-saved normals pass, probably without bending) will logically look very different from the green channel of an actual TS-saved bent normals pass, for two unrelated reasons.
(... and of course the difference you are getting could also come from somewhere else too :D )
 pior
pior
Re: Please review my portfolio.
To show that I am working on the advice given I have a couple pics:
Old textures and uvs for the boats on the Pirate ship:


New textures and uvs for the away boats on the Pirate ship:

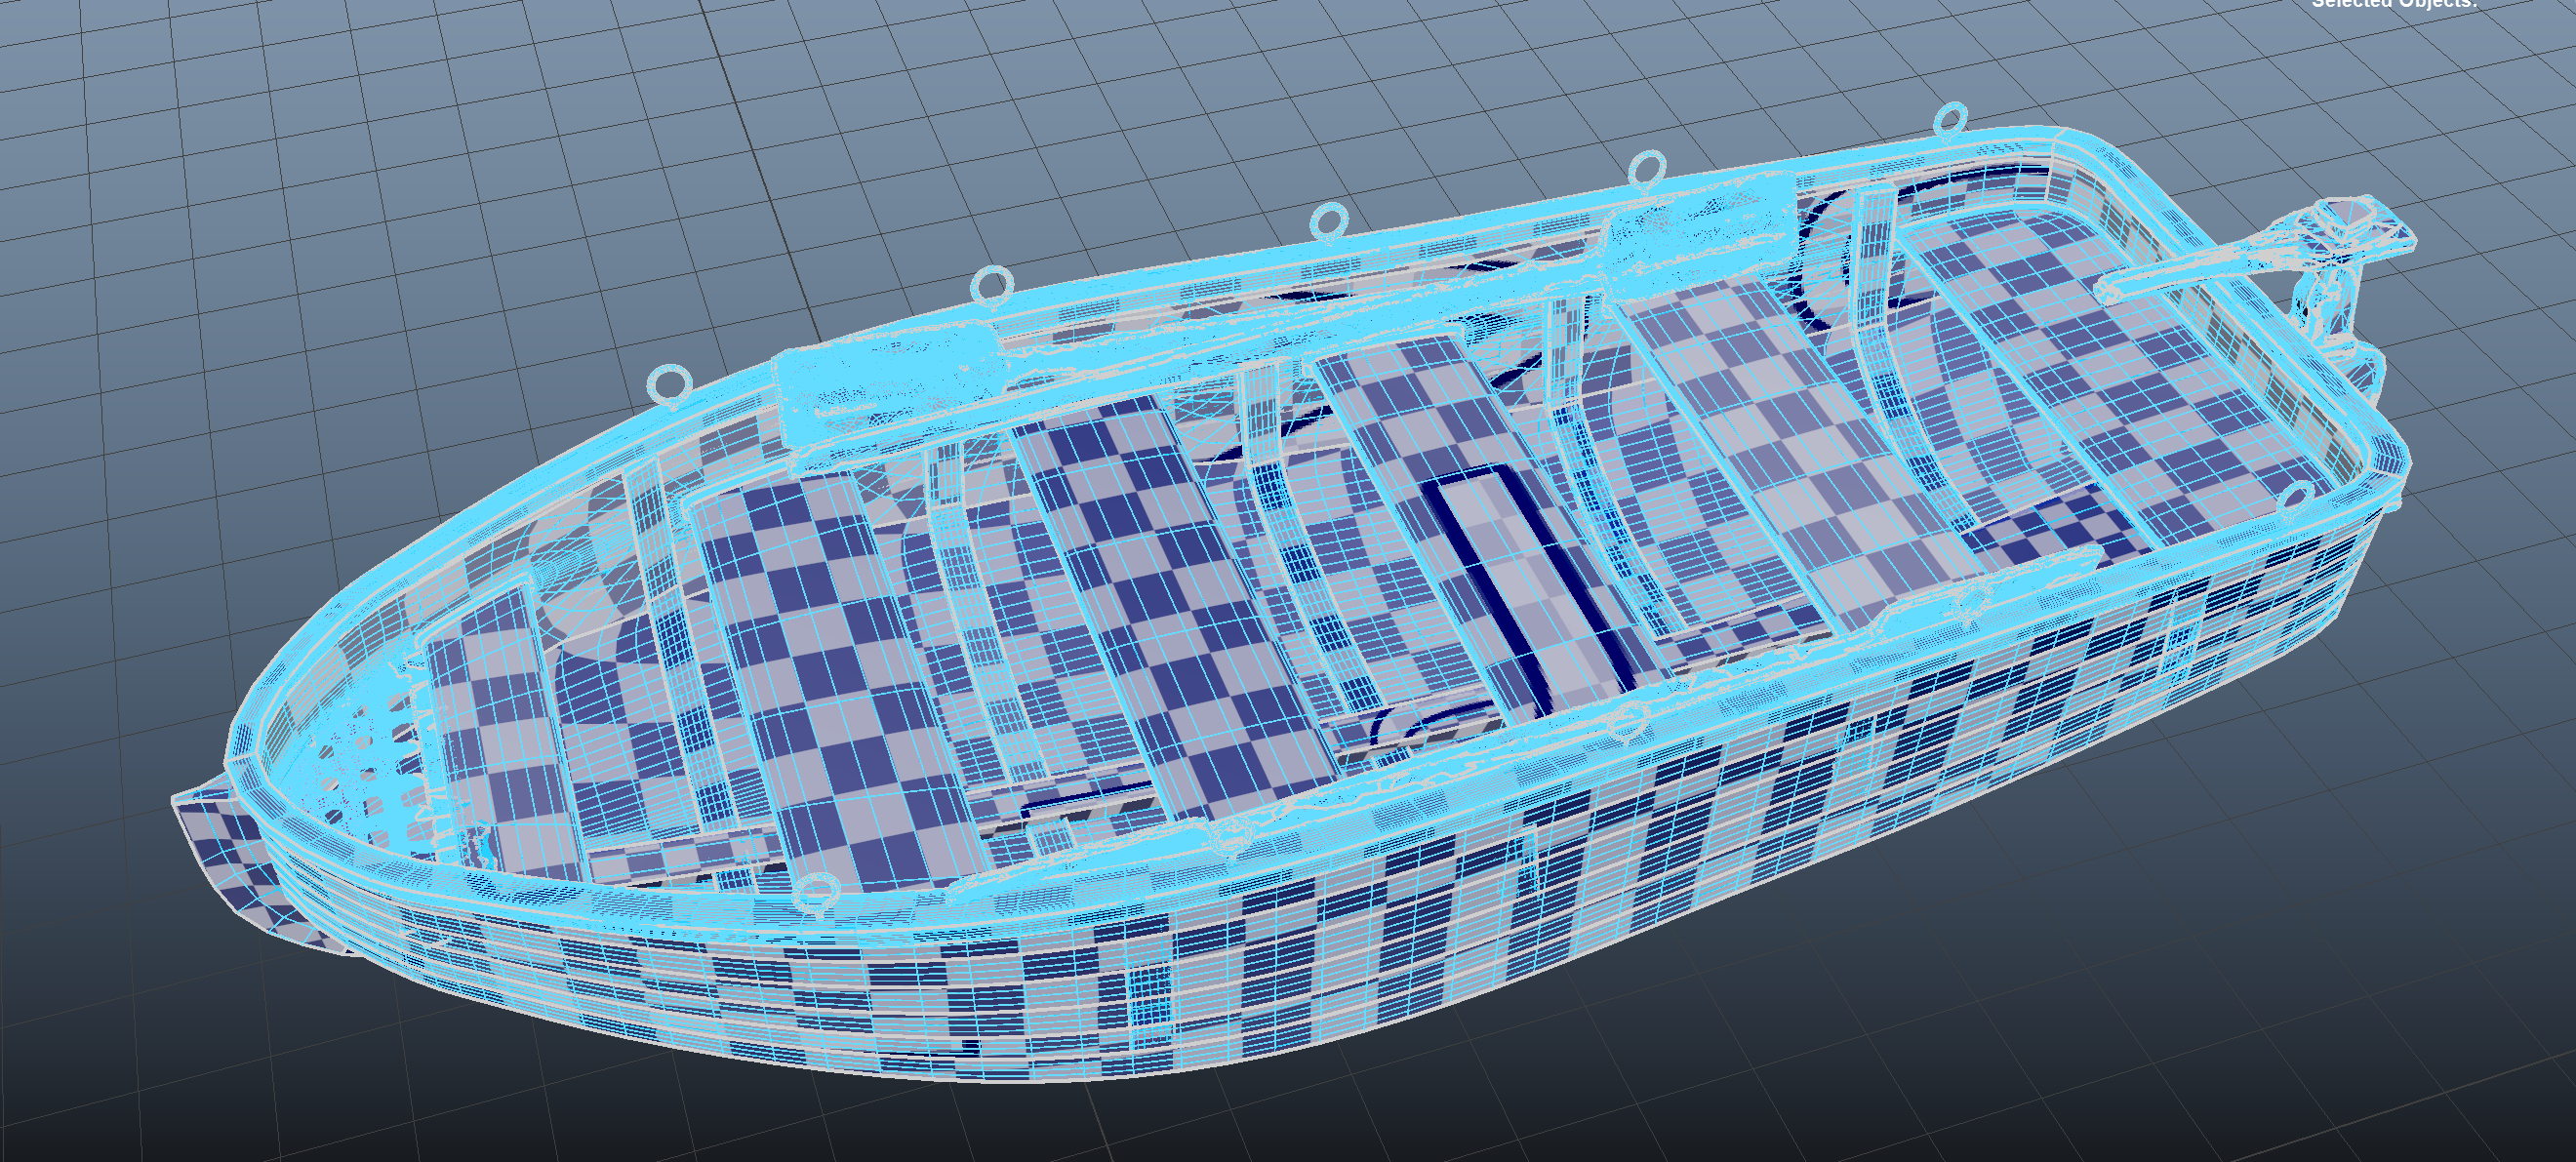
Trying to make all the textures much less "noisy" as Ashervisalis said to and fix all the uvs which I had no real knowledge of before.
The outside hull is actually made of separate planks. I look back on a lot of my design decisions and regret them and would do a ton of things differently. I'm tempted to actually redo the entire boat.
The most annoying thing is Mayas frequent crashes, even on small scenes. But this scene has a lot of poly's so it takes quite a while to load after a crash and even to save. I try to move assets from the main scene to a separate file and work on it there which has mitigated a fair bit of the problems. Also, this endeavor is very useful for gaining substance painter knowledge.
 nexussim
Re: Sketchbook: Frank Polygon
Modeling breakdown
This write-up is a summary of the different modeling processes and the reasons they were used to create specific parts of the models. The amount of planning and research required varies based on the complexity of the project. Creating a rough outline of the intended workflow can help evaluate how technical constraints may affect the individual processes. Thinking about how the asset will be used in-game, along with the art style and technical constraints, will help determine how accurate the model and textures need to be.
Objectives for this project are relatively straightforward: Since the asset will be used in a simulation the model and textures will need to look fairly realistic. It will also fill the screen when the player is reading the dial and sighting landmarks but the model and textures will need to be optimized to fit within allotted resource footprint. The ideal poly budget is between 10,000-12,000 triangles with a maximum of two materials. One set of textures for transparent materials and the other for opaque materials. Dimensional accuracy is also important because the linear graduation marks on the side of the base can be used to measure distance on in-game maps.
The accuracy of a model's details tends to be limited by the quality of the reference material. Physical access, scan data and detailed drawings are ideal reference sources for real objects. These types of references can be measured directly and that makes it a lot easier to establish real world scale. Which helps create a model with accurate proportions. Photographs and illustrations can also be used as references but require a bit more effort to use effectively. Collect, compare, cross check and cull the reference images until there's a set that accurately represents the subject.
Reference images of key angles (Top, front, side, etc.) can be aligned and overlapped to create a reference sheet. The object's overall dimensions can then be used to estimate the size of key features on the reference sheet. Following the reference sheet while also using these dimensions and incremental snapping (In real world units.) should produce a model that's built close to scale with fairly accurate proportions.
Obscure topics tend to be more difficult to research but there's usually a lot of usable reference material for most objects. It's often helpful to start the search with broad terms then refine the keywords as the terminology used to describe the components becomes more familiar. Collector or enthusiast communities can be great resources for reference material and specialized information. Locating useful reference sources just takes a bit of effort and persistent searching.
A few quick tests with primitive shapes can be used to evaluate the optimal number of segments for the low poly model and verify the dimensional accuracy of key features. Small scale samples like this can be used to identify potential issues, isolate specific variables and test different solutions. The simplicity of these test models also makes it a lot easier to resolve proportion and topology issues with the major forms, without having to invest a significant amount of time.

The initial block out just establishes the overall scale and proportions of the basic shapes. These shapes are then used as a base for the detailed block out. Individual features are added to the model in a series of iterative detail passes. Boolean operations are used to join the individual mesh components and modifiers are used to generate precise curves, bevels and copies of repetitive shapes. This helps keep the individual mesh components fairly simple. Which makes it a lot easier to make major changes without having to manually re-work large sections of the model.

Both halves of the model were blocked out at the same time. It's just easier to show progress on each half separately.

The first couple of detail passes are focused solely on blocking out the larger components. Smaller details will be added in subsequent passes. Deciding which details get added to a specific stage of the block out comes down to two basic factors: context and consistency. Context means looking at decisions in relative terms that relate to things like scale, in-game usage, workflow, etc. Consistency means looking at the overall goals for the project and previous decisions then applying the same logic in a uniform way.
E.g. adding all of the text to the base mesh would easily push the model beyond the resource budget for the low poly but adding the linear gradation marks may be necessary to increase the accuracy of the map readings. Especially for users with lower end systems that can't display textures at full resolution. This is where using modifiers to generate certain features provides a lot of flexibility that hedges future change requests.

Updating complex details or toggling them on and off with the modifier stack means that both the high poly and low poly models can be generated from the same base mesh. Which can help streamline a lot of the high poly to low poly workflow and allows for a more pragmatic approach towards high poly modeling. This block out strategy is generally compatible with both subdivision modeling and boolean re-meshing workflows.
E.g. there's a lot of text and repetitive surface details on the larger components and it's easier to run those parts through a boolean re-meshing and polishing workflow in ZBrush. The rest of the smaller components are fairly simple shapes. So, it makes more sense to use a subdivision modeling workflow with a mix of floating and solid geometry to create those parts.
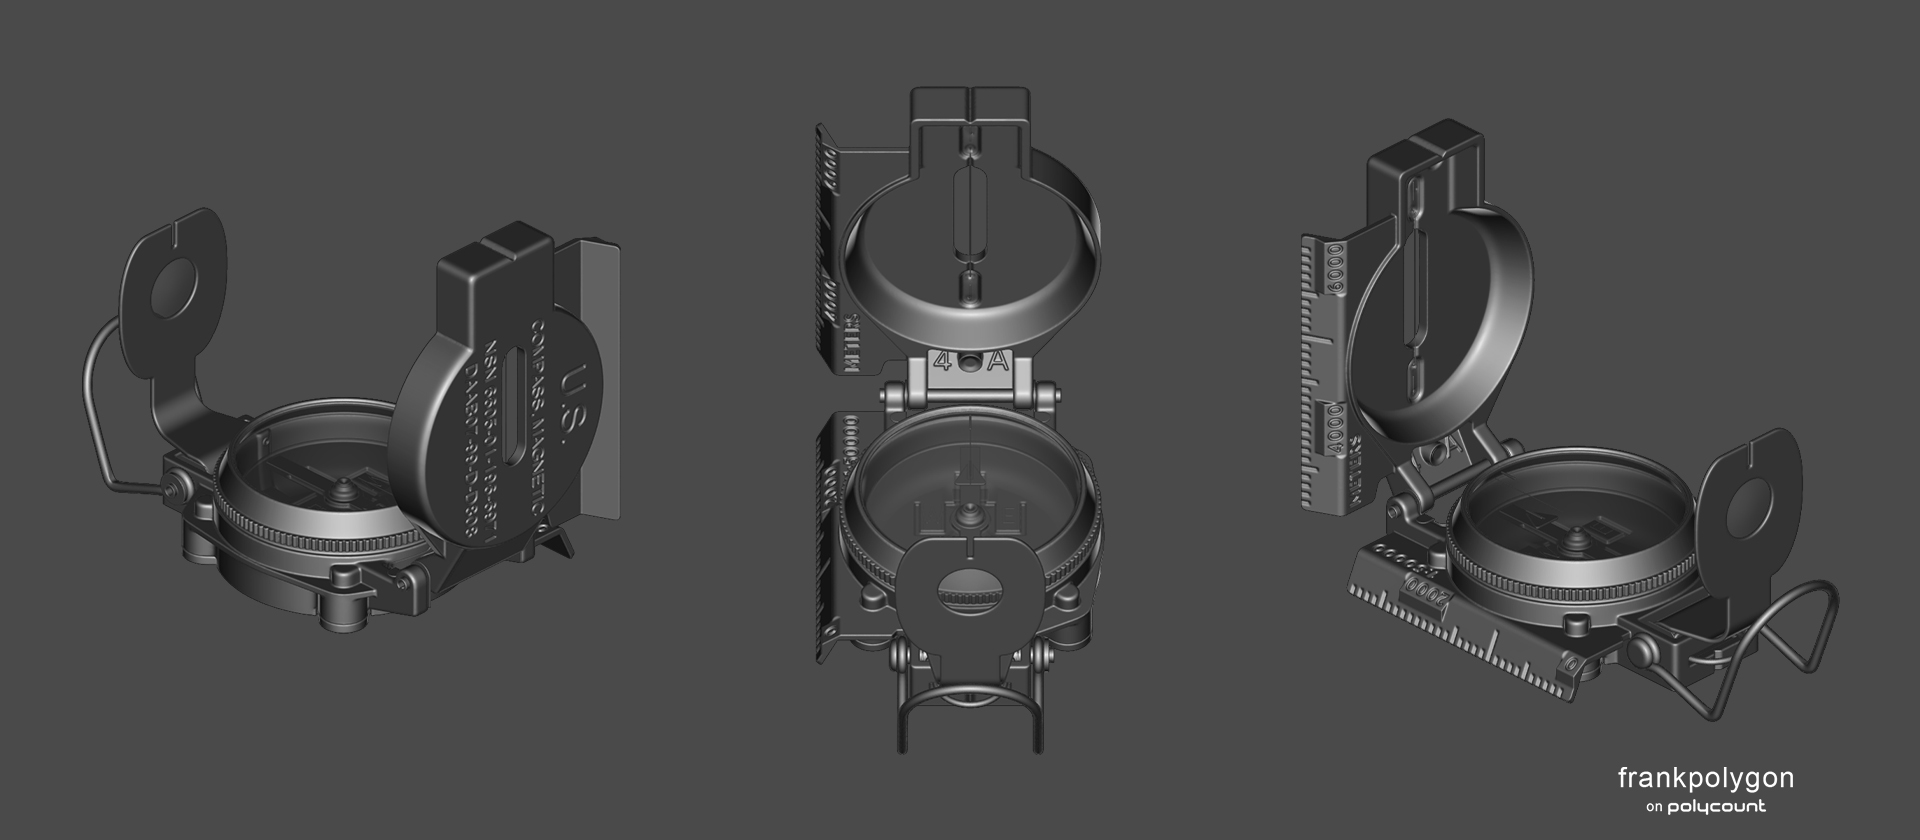
It's also important to keep things organized. Logical and consistent naming conventions will make it easier to locate files. Notes with the settings used for different modeling operations, like the various re-meshing and polishing steps, will make it easier to update the model after making changes. General process notes will also be helpful for handing off project files or when revising a project that needs adjustments 6-12 months down the road.
Below is a visual outline of the basic workflow for this asset and a brief description of the modeling techniques used during each stage of the process.
- Block out: basic poly modeling with numerous booleans and modifiers.
- Base model: poly modeling with modifiers for edge bevels and round overs.
- High poly model: re-meshing with edge polishing pass and basic subdivision with modifiers.
- Low poly model: basic poly modeling.
Certain parts of this workflow could have been simplified further. Mainly the high poly re-meshing and polishing but trading a small increase in speed just isn't worth the reduced flexibility. The primary advantage of this workflow is only having to build the base mesh once and being able to use that one mesh to generate both the high poly and low poly model. Which makes it a lot easier to push any last minute changes through without having to do a lot of re-work.

Low poly optimization is pretty straightforward: turn off the modifiers used to generate the edge and surface details. Setup the mesh smoothing groups then unwrap and pack the UVs. Adjust the split placement and re-pack as needed to maximize the quality. Run several test bakes before accepting a layout.
Hard edges [edge splits] are placed to control the smoothing behavior on the low poly. If the mesh shading and normal bakes look good then it's generally acceptable to have larger smoothing groups and some gradation in the normal map. Each new UV island increases the amount of texture space lost to padding. So, unnecessary hard edges effectively reduce the overall textel density of a model.
UV splits can be placed at the same time to back the hard edges and control the UV unwrap. Hiding splits and seams along the natural breaks in the shapes can help reduce the visibility of any minor artifacts that may appear along the split edges. It may also be necessary to adjust the scale of the UV islands, based on their distance from the players camera, to optimize the textel density for the mesh's size on screen and visibility. The goal here is to use an appropriate number of seams, placed in a way that balances straightening the UVs with minimizing any noticeable distortion and limiting the total number of UV islands.

In the end, adding the linear graduation marks and lettering with texture masks would have simplified the high poly process. The base model could have just been left blank and used to create a subdivision high poly where the edge loops are generated with a bevel / chamfer modifier. Once again, the tradeoff in time saved just wasn't worth the headache of solving potential accuracy issues with the linear graduation marks and this would have also made it extremely difficult to pivot to a fully modeled low poly if the project required it.
Alternately: a full sculpt pass could have been done on the high poly model but much of the damage was fairly shallow. So it made more sense to just paint the texture masks and use the height values to generate the changes in the normal maps. This also made it easier to gradually reveal the different layers in the materials and turn specific types of damage on or off based on the different wear states. Much faster than manually sculpting these details.

Some additional write-ups on related topics:
Block outs and incremental progression.
https://polycount.com/discussion/comment/2751240/#Comment_2751240
Mesh complexity and shape accuracy
https://polycount.com/discussion/comment/2751340/#Comment_2751340
Isolating variables and iterating to solve complex problems.
https://polycount.com/discussion/comment/2760744/#Comment_2760744
Re: Stylized Fridge Prop - Critique Appreciated
its not bad, but its also not great. a bit boring overal as its just a chamfered box with pretty simple texturing right now.
there are a few things you could do to improve it directly. for one, i would drop the dirt noise/grunge map and make that dirt by hand, atm its everywhere and almost distributed the same way. think about where the grime would gather. what kind of dirt and wear to be expected.
I agree, the handles look pretty much untextured. also the roughness looks pretty plain and doesnt have the variety you have in the diffuse. fingerprints are shinier, dust could be more matte, scratches could reveal some more metalness.
the "outlines" you have in the diffuse, i would break up more. atm it looks very filtered, you have the same slightly lighter outline around all edges, looks like a filter, not natural
I dont quite understand you metalnes map to be honest. it all feels like the same material in the rendering. are you sure its AO/R/M not AO/M/R? either way, its all too samey. why is the paint more or less the same value as the handles, is your shader even using those maps right now?
then i would use that empty UV space you have and work on stuff like say, some feet it stands on, tack on some more notes, magnets, etc on that fridge, maybe a calendar with weekly chores or whatever. maybe put some stuff on top, a small potted plant. just things to give it more life. If you wanna go all in give it a proper fridge back side, maybe open one door a bit and show the inside, there are many things you can do to improve this piece, many of them are pretty quick, it will certainly not hurt to invest more time.
Re: [DONE] Poisen Ivy by Roanna Peroz
Small update on the project she got eyes now and made the hair color


 Sora123

Re: [Vehicle] Chevrolet S10 Pickup Truck


61,966 Tris
3x2048 Maps (Exterior, Interior, Undercarriage)
1x1024 Map (Windows)
 ZombieDawgs
The Bi-Monthly Environment Art Challenge | March - April (77)
Happy New Year everyone and welcome to the 77th Bi-Monthly Environment Art Challenge for the months of March and April!
The challenge is a way for real-time 3D artists to test their skills and create a piece of work based on concepts provided. It's open to those of all skill levels and we do our best to provide meaningful feedback along the way so everyone can come away from the challenge with actionable points on which they can improve their craft!
Anyone is welcome in this challenge no matter your skill level! It's a test of your own ability not a competition between members. We're all here to improve as artists and learn from each other.
- ENVIRONMENTS -
HARD SURFACE ENVIRONMENT:
Watch Out! by Verena Lehner-Dittenberger
https://www.artstation.com/artwork/vJDDBY

STYLIZED ENVIRONMENT:
伊甸启示录-背景图2 by Kalen Tang
https://www.artstation.com/artwork/zDX8ZZ

- PROPS -
HARD SURFACE PROP:
Typewriter by Jean-Luc Sabourin
https://www.artstation.com/artwork/vJ42lE (Additional images available here)

STYLIZED PROP:
Stump by Dmitriy Stankov
https://www.artstation.com/artwork/oAxv5O

- RULES -
Please read all the rules before starting:
- Try to post at least one critique for every post that you make. This will make for a better learning environment and help us all grow as artists.
- Try your best to finish as much as you can in the time frame provided, but remember even if you don't finish by the end of the challenge we encourage you to keep pushing and finish your piece!
- Post what you are working on in this thread so that way it's a more centralized place for advice and critique. Please avoid creating a new thread as we don't want to spam out the forums.
- It is recommended to use a game engine to present your work. Unreal Engine, Unity, and CryEngine are very common engines that can be used but feel free to use any alternatives that you want. (Marmoset Toolbag for example.)
- Feel free to change up your chosen concept a bit if you want! Interpret these concepts to your liking, especially if your aim is to add storytelling elements.
- If you finish your project and decide to post it to Artstation, make sure you give credit to the concept artist in the form of a link to their profile. Additionally, it is recommended to ask a concept artist for their permission to post a 3D piece based on their work before doing so.
- RECOMMENDATIONS -
- When you are just starting out making a scene, it can seem complicated or imposing. Take your time planning and blocking out, it will set you up for success later on.
- Think about how you can re-use assets, re-use textures, break it down as simple as possible and plan it out. A lot of people will break it down in their own way when they start out their challenge. Gather some reference images as well for different parts of the scene, don't be afraid to make it your own.
- We strongly encourage you to go and look at other games and see how they make their assets as well as get concept art to give it your own feel.
The goal is to learn and grow both artistically and in your ability to both give and receive critique, but don't stress about it and remember to have fun!
Good luck!
 Pinkfox