Best Of
Re: What Are You Working On? (3D) 2022

Just finished my personal project JagdKommando Knife.
enjoyed working on it.
Re: What Are You Working On? (3D) 2022
Shameless crosspost https://polycount.com/discussion/231802/john-mcclane-real-time-character/p1
I've been working on this character for quite some time in between jobs, mentorship and other personal projects, but now it's finally done.
Here's my take on Bruce Willis as John McClane in Die Hard 4(Live free or die hard). Thank you all who've been supportive on stream while I've worked on this and let's move on to a new one.
As usual textured and rendered in Marmoset Toolbag.
The whole process was streamed on Twitch and will be available on my Patreon
https://www.twitch.tv/nimlot26
https://www.patreon.com/nimlot
More images and videos here: https://www.artstation.com/artwork/QnvKzB
Cheers!

 nimlot26
Re: How The F*#% Do I Model This? - Reply for help with specific shapes - (Post attempt before asking)
@hututuzhang The distortion is caused by reducing the loops instead of carrying them across the shape.
While it is generally possible to manually compensate for this type of shape distortion, some broader context is also required. Catmull-Clark subdivision smooths by averaging the existing vertices. This recursive smoothing tends to be visually appealing but can also reduce the accuracy of the shape once it's been smoothed.
If a high level of accuracy is required then the starting geometry of a subdivision model will generally need to be quite dense. Which can be difficult to work with when using poly modeling tools. This is why it's generally easier and more efficient to work with parametric modeling tools, like NURBs or other surfacing tools in CAD applications, for these kinds of tasks.
Most game and VFX models don't require this high level of surface accuracy and the relatively minor accuracy issues inherent to subdivision modeling are generally acceptable. Softer shape transitions aren't necessarily a bad thing either. Sharp corners that are exposed tend to be knocked down or chipped off during general use. Since the shape distortion in this example is constrained to a very small section at the top of the bore and is relatively subtle, it's actually a fair representation of a visually realistic surface.
The example below shows how this type of subtle deformation is generally constrained to the area between the two support loops. An easy way to resolve this unintended shape deformation is to move or scale the corner vertex outwards. Which will compensate for the smoothing stress that's pulling it backwards. Keep as many of the existing surfaces co-planar as possible when making these kinds of manual adjustments. This will help prevent creating any additional smoothing artifacts.

Most models won't be viewed from strictly isometric viewpoints either. Which is why it's important to consider the player's average view distance when making decisions about the width of support loops and whether or not minor smoothing inaccuracies are worth resolving. The flip side to all of this is that once the edge sharpness drops below a certain size, relative to the overall scale of the model, subdivision modeling starts to make less technical sense.
The example below shows how narrower support loops concentrate the additional geometry in a smaller area. Requiring more work to resolve the shape inconsistencies caused by disrupting the segment spacing of the intersecting cylinder and potentially introducing other types of shading artifacts.
If this level of deformation is unacceptable, especially with this tight of an edge highlight, it may make sense to increase the amount of geometry in the base shapes or if surface accuracy is more important than visual readability then it may make sense to look at alternate modeling workflows that don't smooth the shapes by averaging the existing vertices.

Re: Airbørn
THis took a tiny bit longer than expected... as usual hehe
well it's post gamescom isnt it?
https://www.artstation.com/airbornstudios/albums/6869014
artstation just released our art blast, where you can find tons of highres images and some making of material.
if you have any questions, just shoot! :)
Unlike most of our projects, here we can break down anything, and are willing to do so!
Re: Airbørn
the fuzz was something we experimented quite a bit with. while i am not perfectly happy with what we have in the end, i am pretty happy overall.
we thought about doing it similar to how we did fur on crash bandicoot. with planes placed by hand, transferring normals and UVs. but with that you usually have these weird spots where you can look flat on the plane, which i didnt wanna have here. you can do the best job in the world placing these, but you will always have these moments where the illusion breaks, no matter how much time has been spent
like here on the chest of crash:

So i thought it would be nicer to have this done with particles. It was a bit tricky to set up the shaders but @katzeimsack found the solution for it.
So what we do is spawn 3 different particles on the mesh, based on a RGB mask that tells the particle system "spawn particle A here, B here and C there"

I used to paint these masks but turned out, some randomized camo patterns work just as well.
then we grab the normals, roughness, metalness etc from the mesh it spawns on and apply this to the particle


blend them into the mesh using dithered pixel depth offset (like the moss above)

after that we apply one of the 3 different alphas to the particle UVs, randomize rotation and scale within some boundaries and

the result is this:

the downside is, the particles are spawned at random locations. An alternative would be placing them by hand in your dcc like the fur but orienting them to the camera like the particles in unreal. so we have perfect control over placement. but yeah, lot of manual work for that :)

for the future i would limit the random rotation as well so we do not have occasions like above where a shape floats on top. but it was good enough and we are never thaaaat close.
Re: How would you land your first 3D job TODAY?
Tbh.
Make avatars for pay for VChat and VTubers

Re: The Bi-Monthly Environment Art Challenge | November - December (81)
Hello everyone,
Here's a quick WIP. I've decided to challenge myself with the hard surface environment. Today I finished working on the geo, which is currently a combination of final lowpoly and some mid-poly for sculpting. I'm planning on sculpting mostly everything. Most of the objects will have bespoke textures. I'll use trim sheets with some parts, like the wood or metal beams. I'll see if I can get away with 3 materials for the walls and the tower.
I'd love to hear your feedback!
Thanks!


 YairMorr
Re: How The F*#% Do I Model This? - Reply for help with specific shapes - (Post attempt before asking)
@solitudevibes There's a couple of different ways to approach modeling a lighter hood. A direct approach would be to block out the major forms with a simple quad grid then subdivide to create the necessary support geometry for the holes.
@wirrexx explains this modeling process, with a great visual example, in another thread. Though the shape of that hood is slightly different, the same basic principles can still be applied here.
It's also possible to model the shape using floaters or boolean operations. Which approach makes the most sense really depends on the technical requirements for the final model. There's a few recent examples of how to add details to curved surfaces using these modeling strategies. So, it's probably worth taking a look at some of the previous pages in this thread and finding some write-ups that show how to add circular cut outs to curved shapes.
For the hand guard: When modeling objects with complex shape intersections, it can be helpful to start the block out by analyzing the references and color coding the major forms and important shape transitions. Finding and studying reference material, like drawings, images, videos, etc., is an important part of the modeling process. Gather enough reference material to develop a working understanding of the relationship between the shapes that make up the key features and the shape transitions between the major surface planes.
Keep the initial block out relatively simple. Focus on creating the larger forms first then start adding smaller details. Maintain co-planar geometry for all of the individual surface planes that were identified previously. Continue working through all of the forms in the references. Try to resolve most of the major topology flow issues by matching the segments of intersecting shapes. Additional edge loops and final support loops can be added once the block out is complete.
Below is an example of what this process could look like when using booleans to create the primary features and bevel / chamfer operations to generate the curved shape transitions. The top cover and a few shapes on the inside have been omitted for simplicity.

Analyzing the reference images, identifying the shapes that make up key surface features then constructing the surface planes and generating consistent transitions between the shapes is a large part of hard surface modeling. As long as the geometry that defines the shapes remains relatively uniform the shapes themselves should define most of the loop flow. Which is why time spent gathering references and working through multiple iterations of the block out phase is usually paid back later in the modeling process.

While some shapes are relatively obvious, it can be helpful to get a second set of eyes on the references, shape analysis and block outs. Posting shaded and wireframe images of previous modeling attempts makes it easier to provide focused feedback. Which is an important part of working through difficult shapes that aren't turning out as expected. Though often much slower, it's also helpful to look back at previous attempts and break down the process to find what worked and what didn't. This sort of self reflection isn't always fun or easy to do but it's a significant part of growing as an artist.
@hututuzhang @bittermelon Welcome to Polycount. Consider checking out the forum information and introduction thread.
@hututuzhang There's a write-up on the previous page that covers a similar shape. This thread has a lot of great examples of different approaches to modeling. While some of the examples won't match any given question exactly, most of the basic modeling principles are the same and the order of operations can usually be modified to fit a specific 3D DCC. So, it's generally worth the time to take a look back and try to find a discussion about similar shapes or topology problems.
@bittermelon A few recent discussions in this thread have touched on cutting shapes into spheres and hemispheres but one of the simpler answers is to use a pair of perpendicular support loops that run around the perimeter of the shape and cross near the corners. Moving these support loops closer to the edge of the cut out will tend to sharpen it. Below is a basic example of what this could look like. Other, application specific, approaches like creases could also be an option but may not work well for certain types of modeling workflows.

Sketchfab Spotlight | November 2022

A collection of the latest and greatest pieces from Sketchfab users
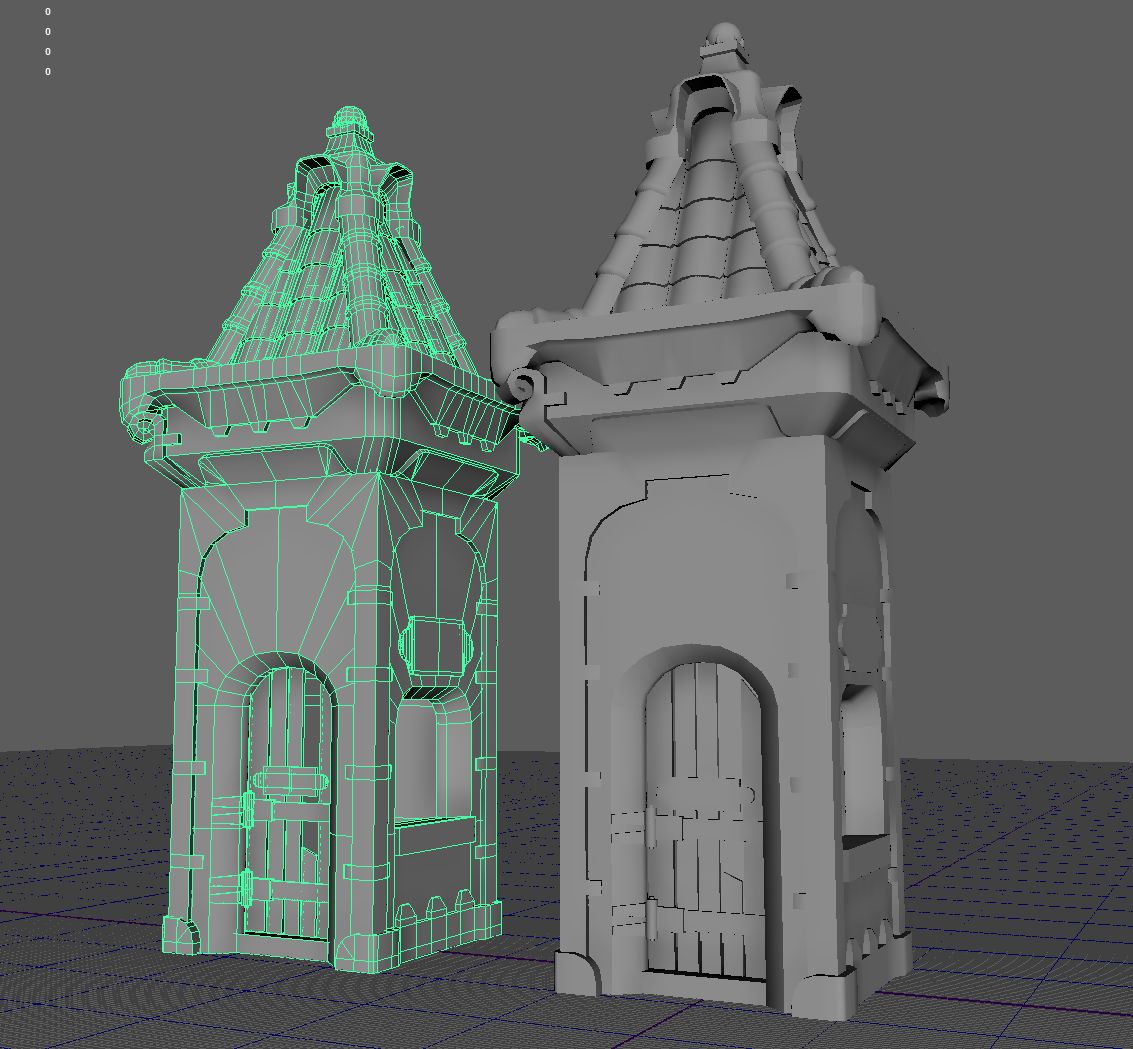
Re: How The F*#% Do I Model This? - Reply for help with specific shapes - (Post attempt before asking)
@Deqa Automotive modeling is it's own specialist discipline but most of the basic principles of subdivision modeling are still relevant. @sacboi has provided some helpful guidance and links to some great write-ups about car modeling in a recent discussion.
It's often helpful to block out the larger shapes first then confirm that the mesh subdivides cleanly before adding secondary details, like cutouts for the doors and windows. Below is an example of what the modeling process could look like.
Break down the shape of the cab into individual planes then round over the transitions. Keep the geometry relatively consistent yet simple. Edge loops can be cut in and dissolved as required but flat surfaces should be kept co-planar and curved surfaces should have uniform segment spacing whenever possible.

Since these types of trucks tend to have a lot of flat surfaces, the same sort of block out process can be used to create a variety of different cab shapes. The important thing is to focus on creating accurate surfaces that are co-planar and consistent transitions that are fairly smooth. Keeping things relatively simple during the block out will also make it easier to solve shape and topology flow problems.
