Search
-
Re: 3ds max vs maya ( again! :( )
 I'm going to get all sweary, don't take it personally, I don't have time to clean it up and think of proper verbiage, plus it's how polycount used to be. My personal usage history: I've used Max more than any other program, but that means I'm more intimately acquainted with it's warts =P I currently use Maya for animation…
 -
Re: [UDK] Zelda Water Shader Help
 What is the bit of code in the custom node doing? I don't quiet understand. How is it bending the U and V into a radial? Can you break down what each part of the equation is for? I'm mostly curious as to what the atan2 is.
 -
Re: Cel Shading
 Shader Forge has an outline mode built-in to the shader editor, worth a look if you go back to this. Shader Forge is really very easy to use, if you've ever used any node-based editors, like Hypershade.
 -
Re: Autodesk Maya 2016
 nope sadly not :( we don't use any modelling nodes on these, just mesh and texture applied and assets put in layers sometimes the layer disappear, sometimes the materials, sometimes the meshes, sometimes combinations and sometimes all of it alltogether. It is horrible.
 -
Re: Distorting Procedural Textures in Blender
 Ohh i didn't looked too deep into the nodes.. after seeing the missing coordinates.. and additionally to what @Michael Knubben said.. using a value and/or a vector and then mix using any color modification node (linear ligth, color ramp) might be a not so clever idea.. better use any Math node or Converter -> Float…
 -
Need help using the Simple_Hair_UV script for creating hair uvs
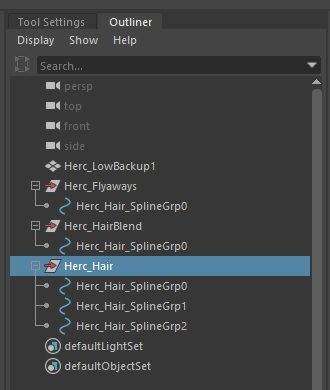
 Im using the Simple_Hair_UV script found in the Xgen UE documentation however when i imported my IGS alembic file that i exported, it has 3 different description and multiple splinegrp . How do i add multiple groups and curves in the script? Tried using " ; " and " , " in between each group and it doesn’t work.…
 -
Need help using the Simple_Hair_UV script for creating hair uvs
Im using the Simple_Hair_UV script found in the Xgen UE documentation however when i imported my IGS alembic file that i exported, it has 3 different description and multiple splinegrp . How do i add multiple groups and curves in the script? Tried using " ; " and " , " in between each group and it doesn’t work.… -
Re: Blender 2.5 Crash Course (Not For Retards)
 That was a great video! I actually took some notes! I have a couple points I want to add on to your video: Multiple Component Selecting Mode- you can press Shift and select multiple component modes, like Shift select both Face and Vertex mode, or all 3. (similar for the transform widgets rotate, scale and translate) You…
 -
How good generative Ai in Sampler ? New features in Designer/ Painter ?
 Does anyone use it really? Any improving in photo to normal map generation? From what I saw in youtube videos it looks like it generates small 1x1m pieces , repeating like hell and not much of a help. Am I wrong . Same reason I hardly use megascan textures. What about crispness of normal and height map? Looks a bit blurry…
 -
Re: Maya fbx import only wireframe visible
 That is typically a good way to clean up a mesh. :) Models also have a Drawing Overrides section in the attribute editor for both the transform and shape nodes, this was probably set to Template mode. Something to check out if you run into this again later.
>37255 results