Insomniac Spiderman Retopo (Help)
triangle
My question is very confusing, so I will do my best to word it. This is the Spider-Man model from Insomniac Games Marvel Spider-Man 2. The only model that is from Spider-Man 1 is the photo taken in Maya (blue wireframe). During the 2018 ZBrush Summit, the modeler for Spider-Man at the time (Leroy Chen) said that he cut the logo and piping directly into the model, as you can see in the photo. (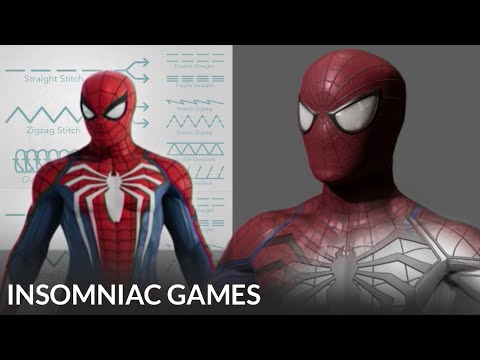 https://www.youtube.com/watch?v=6hXiCnJjV7M 19:21) He wasn't the same modeler for SM2, but I am sure they used the same method, which is what I can't figure out. In the photo that I drew on, the orange lines are the spider logo and the blue lines are the edge-flow of the muscles, you can clearly see that it was cut on, rather being built around retopo-wise.
My question is how? More specifically, I'm talking about how the base mesh topology was kept while still having the pieces connected geometrically WITH the base mesh topology still on those parts. Is it possible that multi-cut was used to simply cut the pieces and then snapped to the faces of the high poly? Leroy Chen saying "cut in details" makes me think the Multi-Cut tool, but someone told me "you don't cut in something like that" which I find to be BS tbh. I'll even throw one more image in here with the blue being the base mesh and the orange being the "cut".
All help is appreciated .
.


https://www.youtube.com/watch?v=6hXiCnJjV7M 19:21) He wasn't the same modeler for SM2, but I am sure they used the same method, which is what I can't figure out. In the photo that I drew on, the orange lines are the spider logo and the blue lines are the edge-flow of the muscles, you can clearly see that it was cut on, rather being built around retopo-wise.My question is how? More specifically, I'm talking about how the base mesh topology was kept while still having the pieces connected geometrically WITH the base mesh topology still on those parts. Is it possible that multi-cut was used to simply cut the pieces and then snapped to the faces of the high poly? Leroy Chen saying "cut in details" makes me think the Multi-Cut tool, but someone told me "you don't cut in something like that" which I find to be BS tbh. I'll even throw one more image in here with the blue being the base mesh and the orange being the "cut".
All help is appreciated
.
Replies
Why not ? Just cut in manually along a reference for the logo (for instance by texturing it temporarily on the model), or project the outline with whatever dedicated tool is available ; then bevel/extrude to add the needed pipe detail. All that while also making the topology land nicely (avoiding any tiny triangles). It's actually really qute simple, just a bit tedious but that's part of the job.
Hope this helps!
The work of the Spider-Man games have been a great inspiration for me as a 3D Artist, so really, thank you.
Another question not as related to the retopo process. How were you able to create the tendrils for the symbiote stuff? Like the suit transformation for example:
I see that there is some sort of external mesh that goes over to reveal the symbiote suit, but I don't understand how to make that for a game, let alone make it in a software. To me it looks like some kind of curve, I don't know if it was done by nodes or something else. If you would be able to share some info on this, I would be over the moon. I have always wondered how to do this.
And the custom curve, was that something done in Maya or Houdini or in engine? Also, in theory would it be possible to make it as a texture for optimization purpose?
It looks like it has a burst of tendrils, and then a silhouette of the surge suit appears, and then it slowly disappears to the actual suit. Is that correct?
But maybe take the info you already have from your various threads and put those into something you finish before you go further down the rabbit hole?
Solve one thing at a time, finish your Kratos maybe?
Sorry if it seemed like I was going at you, the Kratos thing just isn't my priority atm
I know its exciting and there is so much one could do and learn and experience and all. But calm down, one step at a time.. all of this is mighty complex and there is soooooo much one can learn, at any given time. I'd suggest you to finish what you started and go from there
But
It doesn't matter what thing, just finish it. And yeah there is always gonna be a thing you do not know.... Yet