Home 3D Art Showcase & Critiques

The Bi-Monthly ENVIRONMENT ART Challenge | January - February (64)

134
interpolator
Offline / Send Message
alytlebird interpolator
Welcome, all! Happy New Year, and welcome to a new decade! Time to kick off the first Monthly Environment & Prop Challenge for 2020!

A very special repeated thank you to @kadeschui for running these challenges for the past few years! 

Remember if you don't finish in the time allotted, just keep plugging away and post when your work is finished. There's always some good progress that falls off the radar - we want to see your work! So keep going and finish those pieces!

Without further ado, here are our official options for Challenge 64:

- ENVIRONMENTS -

HARD SURFACE CATEGORY:

Artist: https://www.artstation.com/asim

HAND PAINTED CATEGORY:

Artist: https://www.artstation.com/nhenderson

- PROPS -HAND PAINTED CATEGORY:

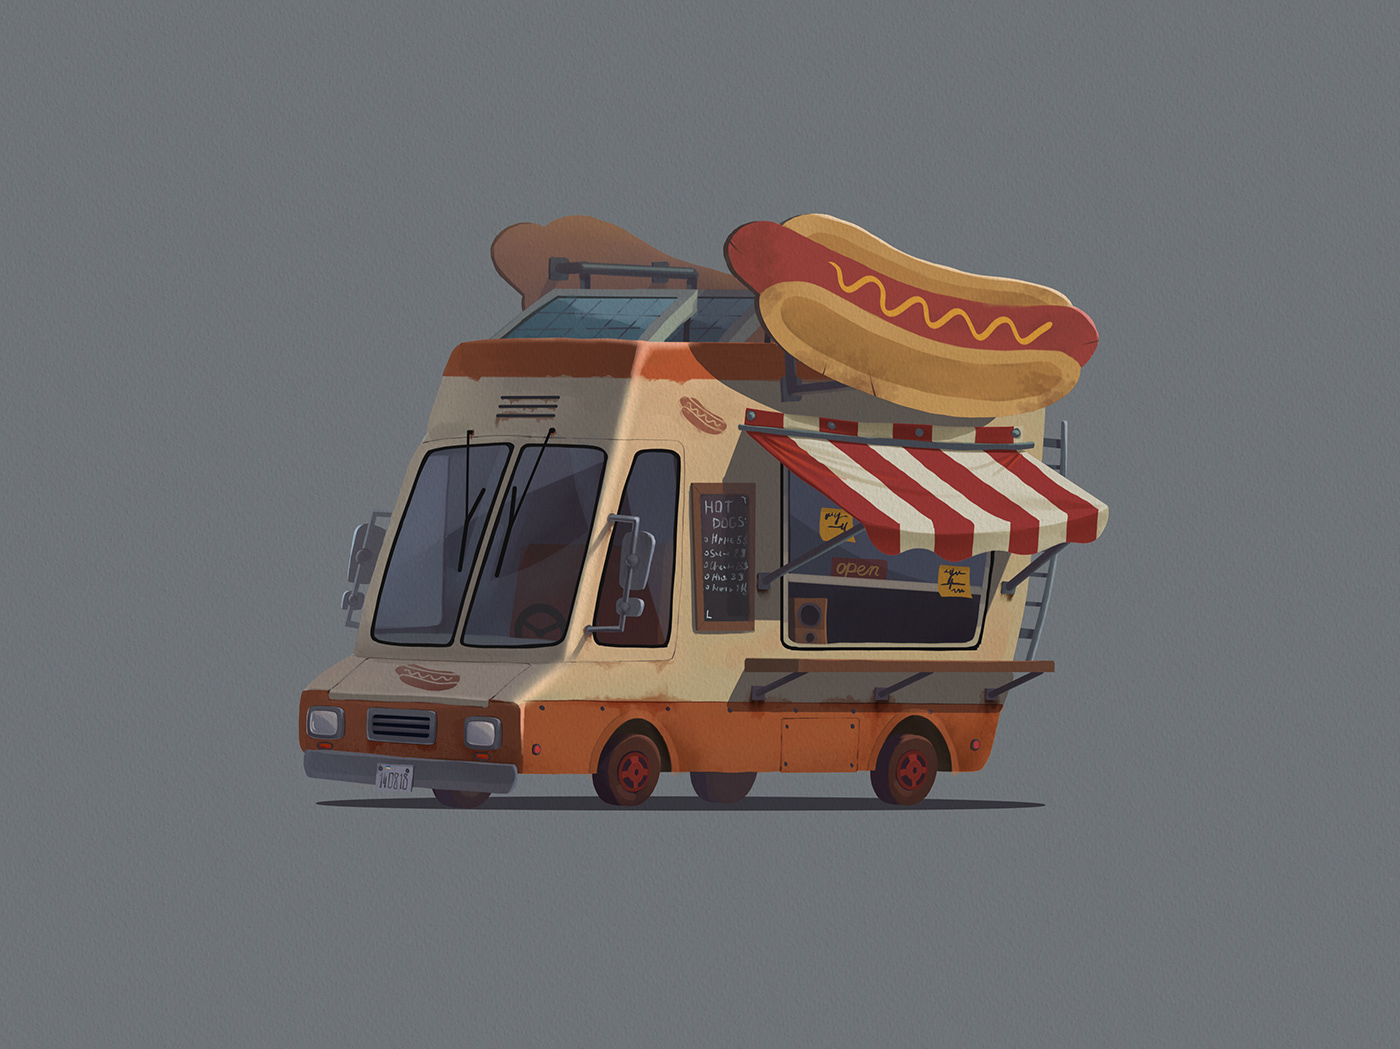
Artist: https://www.behance.net/YanaBlyzniuk

HARD SURFACE CATEGORY:

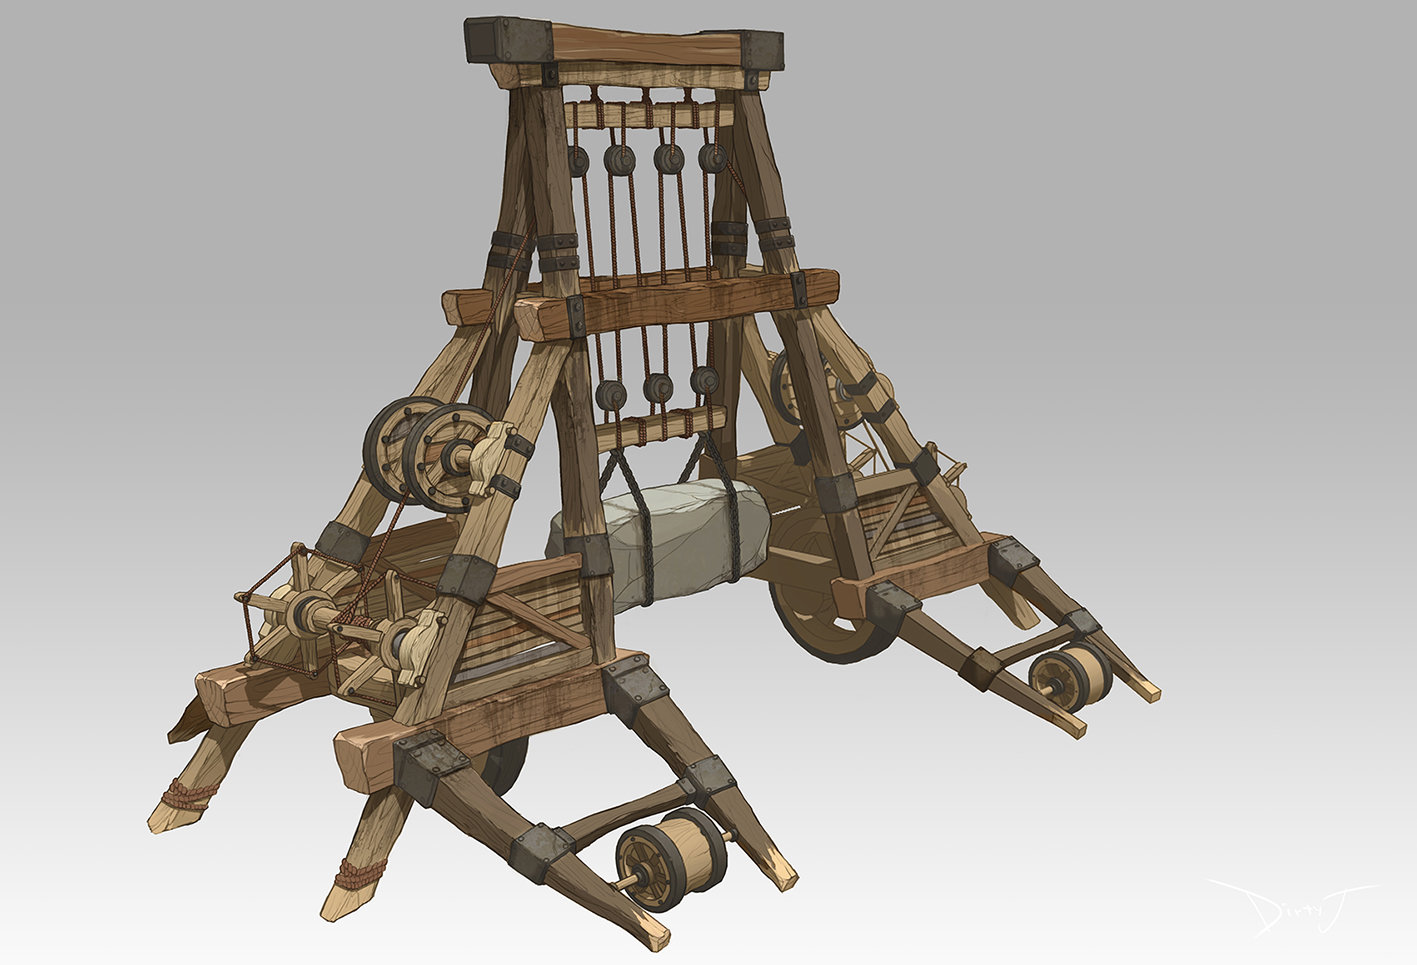
Artist: https://www.artstation.com/dirty_j


If you want to change up either concept a bit, as some people wanted, then feel free. Interpret these concepts to your liking.


Please read all the rules before starting.

When you are just starting out making a scene, it can seem complicated or imposing, so take the time to break it down. 

Think about how you can re-use assets, re-use textures, break it down as simple as possible and plan it out. A lot of people will break it down in their own way when they start out their challenge. Gather some reference images as well for different parts of the scene, maybe gather some refs and make it your own.

Take your time planning and blocking out, it will set you up for success later on.

Here are some specifics.
  • Try to post one critique for every post that you make. This will make for a better learning environment and help us all grow as artists.
  • It is recommended to use a game engine to present your work. Unreal Engine and CryEngine are very common engines that can be used but feel free to use any alternatives that you want. (Marmoset Toolbag is allowed as well)
  • Try your best and finish as much as you can in the time frame provided.
  • Post what you are working on in this thread so that way it's a more centralized place for advice and critique. We don't need to have 1000 disjointed threads littering the forums. 
  • I would strongly encourage you to go and look at other games and see how they make their assets as well as get concept art to give it your own feel, but it must stay very close to the concept, if not super close. 
  • Well, that's about it. If you think that any rules should be changed, or there should be new additions to the rules, please let me know. As always, please feel free to provide feedback / suggestions in this thread or by messaging me directly.
All that matters is that you learn while being able to effectively critique others, as well as accept critiques on your own work. Remember to have fun!
Let's roll!

Replies

  • zachagreg
    Offline / Send Message
    zachagreg ngon master
    Got an early start on this this morning to ring in the New Year. Happy new year everyone!


  • kelly_caroline
    Offline / Send Message
    kelly_caroline polycounter lvl 3
    Hello everyone! I've also decided to work on the hard surface prop for this challenge. 
    I'm still working on adding some parts. 

    I'm still learning the ins and outs of the model -> texturing progress, and was wondering if anyone can tell me how I should/how they usually organize their models? When I move to texturing should it be a solid combined mesh, or do you leave parts with different material finishes as separate pieces? For example, right now the metal accents are separate meshes, and all the wood pieces are not "connected" but are combined as a single mesh object
  • jntucson
    Can’t wait to start. This will be my first art challenge! I’ll be doing the hard surface environment. 
  • icegodofhungary
    Offline / Send Message
    icegodofhungary interpolator
    I'm going to do the hard surface environment. Did the block-out for the scene and started planning my textures.
    Depends on the technique and software you're using. If you're going to bake everything, you separate your meshes as needed to get a clean bake. If you're using a trim texture and not doing unique bakes, you separate as needed to get the lowpoly mesh textured how you want it. If you're using something like Substance Painter, you need to separate to get clean bakes (and make sure you name the meshes properly for bake by name to work). Something like xnormal may not need to be broken up at all or it may need to be broken up into individual meshes and baked separately then rejoined in your modeling software. It's really a matter of picking a workflow that you like and then working within that. It's hard to give a definite answer because there's multiple approaches.

  • zachagreg
    Offline / Send Message
    zachagreg ngon master
    Hey @kelly_caroline it depends on how you want to texture your model. For instance if you plan to do it all as a unique mesh you could split realistically put all the objects together but just do one quarter of it since the model is symmetrical from front to back and left to right. I'd probably make the ropes a different materials just because youll get a lot of long skinny UV islands that might get in the way of keeping things the same relative size in UVs.

    There are a plethora of different ways to approach this model in terms of texturing. It mainly depends on which one you want to go for, are you thinking about doing a highpoly for this or just the low poly and texturing?
  • kelly_caroline
    Offline / Send Message
    kelly_caroline polycounter lvl 3
    @icegodofhungary @zachagreg
    Hey Guys, thanks for the replies!
    I'd really like to get this into zbrush and do some nice sculpting for the wood and then bring it into substance painter. I've never really done a multi-material mesh that way before, but I want to try it out! So it sounds like I will want to keep them separate for the sake of baking? And definitely make the ropes their own object. 

    Looking forward to seeing how you both progress your pieces!
  • engelmanna
    Offline / Send Message
    engelmanna polycounter lvl 16
    All of these concepts are very inspiring! I've decided to take stab at the ship interior environment. I've completed the block out, and am working on some rough tiling textures for the walls and floors:


  • danielrobnik
    Offline / Send Message
    danielrobnik polycounter lvl 8
    I'm in the same boat @blot12345, I'm finding them all inspiring. For me it's a matter of turning that inspiration and motivation into the discipline needed to actually finish something.

    So I've opted to try the hardsurface environment with the aim of finishing at least one prop each evening. That way I will generally have something that I can work on depending on how much time I get. So far I have my blockout.


  • kohg
    Offline / Send Message
    kohg polycounter lvl 8
    @blot12345

    Looking really promising already.

    I went with the hotdog truck, finished the highpoly. Taking it to zbrush for further detail and edge polish. Stil debating wether i should work on the interior or not, and make opaque windows.


  • engelmanna
    Offline / Send Message
    engelmanna polycounter lvl 16
    @kohg - You should definitely do an interior. Even if it's a simple one, I think it'll add a lot to the final model.

    Overall your model looks pretty close the concept. However, I'd think about doing a quick pass over your base shapes before detailing to really nail the concept's shapes. Specifically, I'd try and unstraighten some of your edges on your model. In the concept, it feels like all the surfaces slightly bow out like the interior of the car has been pressurized. In addition, there a few spots on your model where you may want to askew some parallel lines. I did a quick paint over to hopefully illustrate what I'm seeing.

    I'd also try and shrink your hubcaps a bit to make the wheels have the same caricatured shapes that the rest of the vehicle has. Right now the wheels feel too real-world.

    Overall, really great start especially considering it's only a few days in!


  • alytlebird
    Offline / Send Message
    alytlebird interpolator
    Some really fantastic work already guys :) Love seeing all the concepts getting attention.

    I plan on participating as well, doing the hard surface environment, but I won't be able to start for about a week. My wife and I are moving across the country to San Diego. I'll be keeping an eye on the thread but you probably won't hear much from me for a while.
  • kohg
    Offline / Send Message
    kohg polycounter lvl 8
    blot12345 

    Thank you for the detailed feedback. I've already done some of the changes you suggested, curving the overall shape of the truck, some curves/bents however don't translate as well into 3D. Also the curved solar panels and some other pieces will be bent on the lowpoly instead. Rather bake them straight.

  • lesbethart
    Offline / Send Message
    lesbethart polycounter lvl 2
    Hello! I'm attempting the hard surface environment this month. Really impressed with the speed of other blockouts here already. =)

    I'd love some feedback on the scale and proportions of my blockout, it's something I'm aware I struggle with. Things look okay in the editor but when I pop into first person view in Unreal things look very cramped to me and I'm not sure what to do about it? I've learned to be suspicious of my own judgement as I'm 5'1 and that really skews the scale I build first-person scenes at. I'm hoping to improve my spatial skills with this project. Thanks all! <3


  • icegodofhungary
    Offline / Send Message
    icegodofhungary interpolator
    @icegodofhungary @zachagreg
    Hey Guys, thanks for the replies!
    I'd really like to get this into zbrush and do some nice sculpting for the wood and then bring it into substance painter. I've never really done a multi-material mesh that way before, but I want to try it out! So it sounds like I will want to keep them separate for the sake of baking? And definitely make the ropes their own object. 

    Looking forward to seeing how you both progress your pieces!

    Keep them as separate meshes in your modeling program. Name the meshes (not the file names, the meshes within the program) with _high or _low after the name. Make sure they all have the same pivot and it's on the origin of the grid. Then export each piece separately for zbrush. Name the files something like a.obj, b.obj, etc. Import one piece into zbrush and use subtool master to multi-append the rest of the pieces as subtools. Now you can freely sculpt them and all that. Then highlight all the lowpoly meshes in your modeling program and export them as one .fbx file. The .fbx extension will make it one mesh but keep the sub-mesh names you gave them. Import that .fbx file into Painter. When you go to bake your maps, make sure you have the "by mesh name" option selected on one of the little drop down menus. It will use the _low and _high name suffixes to bake each piece separately and not cause issues.
  • Taas
    Offline / Send Message
    Taas polycounter lvl 10
    Happy New Year everyone!

    This is my first challenge on Polycount - been a lurker for a long time. It is very inspiring to see everyone's blockouts coming along so nicely!

    I decided to go with the Hard Surface Prop; lots of wood sculpting that looks super fun.

    So far I have the blockout done - next is figuring out how many unique/repeating pieces I'd like to do. And then deciding on whether to stick with the rock as the weight being lifted, or something more....interesting? Not sure yet.

    Great tips @icegodofhungary - I also like to explode my model before baking in Painter. It is totally precautionary, but in case things bake weird it's definitely saved my ass being able to zero in on where the issues pop up.  


  • KirilZangagolev
  • GabrielGray
    This is my first time doing this challenge, and my first time making a room block out like this. Hopefully, I can learn a lot from this challenge. I'm doing the hard surface environment.

  • FuryAndMadness
    Offline / Send Message
    FuryAndMadness polycounter lvl 8

    Hmm, what is it?
  • kohg
    Offline / Send Message
    kohg polycounter lvl 8
    FuryAndMadness at first i thought it was a wall radiator, but now looking closer, i'm not really sure to be honest.
  • GabrielGray
    @FuryAndMadness I'm pretty sure it is a radiator. I think it just looks a little off because of the perspective
  • Alahyla
    Offline / Send Message
    Alahyla polycounter lvl 6
    Hi everyone it been long since i participated in the polycount challenges. I decided to go with the hand painted concept. This is what i have for now just a block out of the scene. Feedback are always welcome. Thanks! :)  

  • pixelit_studio
    Offline / Send Message
    pixelit_studio polycounter lvl 3
    Hey guys, just entering in my first challenge here :) this is what I did for now
  • laurens.tjong
    Offline / Send Message
    laurens.tjong polycounter lvl 8
    Hi there,

    Im trying out the Boat house interior concept.

    First thing I did was a small breakdown of the type of shading the concept artist was using. Because I want to try and preserve the style by the artists (including outlines):


    After this i setup my unity project and tinkered a bit with Shadergraph to know if would be able to get a satisfying result. I made a cube with grainy outlines and inlines using a simple inverted normal mesh, combined with a noisy fresnel and some custom inline geometry on top of the model:


    Together with some AA post-processing and a bit of texturing i was fairly confident that this was heading in the right direction and that any changes to the shader could be made a a later stage.

    Here is a screen of the Unity Shadergraph:


    Currently it uses a generated noise which eventually i might replace with a custom texture. But I didnt want to tweak it to much because i want to test how it looks on some proper models first. But... at least I have a general directon. So I headed on to setting up a scene to see what kind of lighting setup I would use. 

    The lighting the concept is completely indirect, so I was pretty sure that it would involve some light baking because i wanted to stay away from realtime GI for now and not waste to much time on research. My initial idea was to have the props in the scene be lit by sampling lightprobes, but this did not give me the right results at this time, so for now I just simply bake everything.


    Lighting is mostly some planes behind the window with an HDR emissive material on it and a littlebit of ambient color to light on the edges of the floors etc. I also cut a hole in the roof right were those test cubes are (also with an emissive plane above it). I had to turn the bloom effect way down not to have the visible white planes burn out to much because i had to crank up the strength of the emmission pretty high to be able to light the whole interior. Also I tried disabling the bloom entirely, but I kind of liked the effect around the window... and it looks kind of like the concept artists intended the same thing. The roof and the back facing wall are turned to only render gi and not be visible.

    What I got out of this test is a couple of color values that work with the lighting and can be used as a starting point for final textures and also a good idea of how the final scene will be lit. Next Step is to create a proper layout of the room and create some proper models to see if the shading holds up.

    Cheers and great work everybody!


  • engelmanna
    Offline / Send Message
    engelmanna polycounter lvl 16
    @laurens.tjong woah, I really like the shader you have going there. I'm doing the boat interior as well, was also wondering how to transfer the magic of the 2D concept into 3D. I think your shader is a great idea, and I can't wait to see the final version.

    Here is my update: I took the refrigerator to 80-90% complete to flesh out how I was going to stylize the rest of the assets. Right now I'm not sure if I want to keep this style, or make it more painterly. I'll probably end up sticking with this route due to the limited amount of time I have to work on it. I think some of the magic of the concept is lost into 3D, but hopefully I can recapture some of it with a final polish pass and refined lighting later.


  • laurens.tjong
    Offline / Send Message
    laurens.tjong polycounter lvl 8
    @blot12345 And I wish i could pump out detailed meshes like that! Keep it up. Maybe get back a bit of the playfullness by placing the objects a bit more slanted etc. Maybe exegerate some of the sizes here and there?


    Cheers! 
  • MeshMuti
    Offline / Send Message
    MeshMuti polycounter lvl 2
    Hi guys, I'm taking a stab at the hard surface environment.
    The image is a bit difficult to pin down in terms of scale (the table legs look a litte short, the chest closest to the window a little small etc.) but I tried to set a 1x1m grid for the scene to help with a modular approach going forward:

    In the end I scaled it up a little bit, addint 1m in each direction and expanding the window recess area, this is my final grid:

    I still think th 45deg. cuts are too small and might need adjustments.
    This is the block-out in UE4, with an initial lighting pass to halp pin down the scale. Also, despite the noises from my poor 1060, I'm attempting this scene with raytraced realtime ligting and GI.

    Blockout so far:
    The bookcase needs to be bigger though.

  • MagicTurtle
    Offline / Send Message
    MagicTurtle triangle
    Hello, I too decided to join this challenge, this is my progress so far, I'm trying to blockout the whole scene and nail down the proportions.


    It feels a bit off in some places but I feel like I'm getting there. The only thing I'm having a hard time to figure out is the pile of objects in the upper right corner. I guess it's a pile of copper pots with some wood and metal debris?

    @MeshMuti I got a very similar result, the width of my scene is 6m and the walls measure 3.30m in height, which is a bit of an odd number but matches the concept pretty well. The big bookshelf is quite tricky too if we consider the biggest book to be 40cm in height, which is quite a lot for a book, the whole thing should not be taller than 2.5m. I really like the mood of your last screen btw!

    I don't know if this can help other people, but I also found a focal length of 30mm to be quite close to the one "used" in the concept.
  • kohg
    Offline / Send Message
    kohg polycounter lvl 8
    @blot12345 
    That's one good looking fridge, honestly, i can see a more realistic approach to that concept quite easily, it might even surprass the original in my opinion.
  • Democles
    Offline / Send Message
    Democles polycounter lvl 7
    Everyone's stuff is looking great so far! Been a while since I've done one of these, figured I'd give it another go with the new decade. Got the blockout done for the room and the bigger props. Like everyone else, having a tricky time with the scale and spacing of the bookshelves and table. 
  • Orkney
    Offline / Send Message
    Orkney polycounter lvl 2
    Have never done one of these in fact this is my first post, here is my blockout so far. I wanted to ask, I understand we need to get close to reference image, but do we have to match it exactly in order to win the challenge? I would like to change lighting very slightly. The concept is brilliant though.

  • GabrielGray
    I started making some of the models for the scene, the windows on the wall and two of the chests (the octagonal one in the far corner and the one against the diagonal wall)

    I'm trying to decide if the chest against the wall should be curved or straight (since it seems ambiguous to me in the image).

    The octagonal chest from the corner 

    Any feedback is appreciated!
  • laurens.tjong
    Offline / Send Message
    laurens.tjong polycounter lvl 8
    Hey there,

    I made a more detailed object with the shader I set up earlier:


    It's Using a 256x256 texture With some simple lines and dirt layers. I really want to focus for this scene not on the detail of the individual objects but of the scene in it's entriety. After I created this first object, I realised I could reuse texture space a bit better by mirroring some elements and not have the texture rotated. But I made kind of a poor mistake by wanting to reuse the Texturemap UV's for the Lightmap UVs. While once you have texture map uv's It's pretty easy to copy the uv's and do a small layout adjustment.


    So for the next object I did just that. and stopped working on the 3D outlines for now because I felt that would be a pass i could make once i have all the objects in the scenes uved and with a first texture pass. After this I went ahead and did some more objects and adjusted the scene slightly after more objects started to come in.


    On it goes. Objects are made pretty quick for now... once I have everything ill do a pass over them for extra detail. Most of the objects are using a 256x256 texture.
      
  • engelmanna
    Offline / Send Message
    engelmanna polycounter lvl 16
    @Orkney - You can stray as little as much as you want. This isn't a challenge to win, it's just a way to get a group of people together to work off the same concepts.

    @GabrielGray the concept looks more straight than curved. Keeping it straight would also match the design language of the rest of the furniture. Also, I'm not sure how close you are trying to follow the concept, however if you are trying to match it closely, I'd take a closer look at the proportions of the octagonal table in the corner. The concept looks shorter and wider than your 3D model.

    @laurens.tjong Out of curiosity, are you building this to be a final  overhead view, or will you build enough detail to support a 1st person view? It'd be cool to be able to walk through an 'hand-drawn' world.

    I've made little progress in the past few days. Got some boxes in, and started a stove sculpt. For the fridge, I sculpted/baked large scale deformations (FFD deformation, and slight bulge to shapes). For the stove, I'm going to try and bake it straight and do the deformation on the low poly after the bake. Is that a normal practice? or will normal map artifacts pop up if I start deforming the mesh after baking?


  • laurens.tjong
    Offline / Send Message
    laurens.tjong polycounter lvl 8
    @blot12345 Things are looking cool! I don't see issues deforming the model after it's being baked... because distorted meshes would also have staight UV's to be able to minimise pixel artifacts... So unless you need the deformation as a guide for creases or something than there is no issue as far as I can think of. I do intend to deform the models after i've made them all staight. Just so the mesh is easier to UV.

    I intended this scene more like a scene from a point and click adventure than a first person game. Altough i'd like the idea of walking trough a hand painted scene... for me it's more about getting at an end result fast and tweaking the scene while everything is there. Like maybe add a different lighting setting. Doing some effects and small animation etc.
  • Klawd
    Offline / Send Message
    Klawd polycounter lvl 7
    What a great 2020 start! I'm ecstatically following this thread. You guys are all doing killer work here. Gj all. 
  • pixelit_studio
    Offline / Send Message
    pixelit_studio polycounter lvl 3
    Small update with some colors :)

  • kohg
    Offline / Send Message
    kohg polycounter lvl 8
    @pixelit_studio
    Looking great, much more faithful to the original concept than my iteration, mine's ending up with a more realistic look.
    Only thing i'd change is the roundness/chamfer of the window corners.
  • GabrielGray
    Made the jar on the chest and the mortar and pestle by the window today.


  • GabrielGray
    @blot12345 How do you get the edges of the model to be so smooth and defined? I've never been able to figure out how to make it look like that.
  • engelmanna
    Offline / Send Message
    engelmanna polycounter lvl 16
    @blot12345 How do you get the edges of the model to be so smooth and defined? I've never been able to figure out how to make it look like that.
    @GabrielGray what do you mean exactly? 
  • GabrielGray
    @blot12345 It looks like it was smoothed, but the shapes are still distinct
  • engelmanna
    Offline / Send Message
    engelmanna polycounter lvl 16
    Most of the time I start with a smoothed object and then lightly chip away at the corners with the trimDynamic brush. This gives me a balance between a smooth shape, and defined planes which I feel helps sell the definition of the shape.
  • zachagreg
    Offline / Send Message
    zachagreg ngon master
    Had more time and expecting to get into highpoly tonight for this. Going off script because the construction of this thing was peeving me a bit so gussied up some areas and made it more structurally sound. Also wanted to make it a little fancy for the pulleys. Planning to layout some rudimentary uvs just for use in Zbrush for noise and such. Can't decide yet how much im going to leave to mirroring


  • zachagreg
    Offline / Send Message
    zachagreg ngon master
    blot12345 said:
    @laurens.tjong woah, I really like the shader you have going there. I'm doing the boat interior as well, was also wondering how to transfer the magic of the 2D concept into 3D. I think your shader is a great idea, and I can't wait to see the final version.

    Here is my update: I took the refrigerator to 80-90% complete to flesh out how I was going to stylize the rest of the assets. Right now I'm not sure if I want to keep this style, or make it more painterly. I'll probably end up sticking with this route due to the limited amount of time I have to work on it. I think some of the magic of the concept is lost into 3D, but hopefully I can recapture some of it with a final polish pass and refined lighting later.


    What engine are you using for your scene?

    @GabrielGray I believe he still has bevels on the low poly, so it is smoothed. Most of the time this is fine as they get LOD'd quick with the normal map to still hold that bevel at a farther distance.
  • Alahyla
    Offline / Send Message
    Alahyla polycounter lvl 6
    Hi, This is what i got for now. Feedback are always welcome ! :)  I still need to fix the light and the colors because i think now it coming with too much saturation 
    @laurens.tjong i really like the shader you made for the environment it looking awesome. 
    @blot12345 i really like how the scene is coming! i really like the texture of the fridge.

  • PastyPict
    Offline / Send Message
    PastyPict polycounter lvl 4
    I've chosen to do the Hard Surface Environment category. Here is my greybox so far. I'm exeperiencing the same challenge as @MeshMuti in regards to pinning down the scale of the scene. I've gone with a similar modular approach, however I've gone with a 2m x 2m floor tile pieces and the walls with a height of 5.5m got me close to a scale that I happy with, at least going off of the first person camera feature in Blender where I can walk around and see how the scale of everything feels.
    I might make the ground tiles into a single flat mesh since it's a unique asset anyway, but not sure yet.


    Before settling on this scale I tried 4x4 tiles and a wall height of 6m, and looking at them side by side, I think the smaller scale I mentioned before feels more accurate. In the larger scale, everything is more spread out and feels kind of emtpy.


  • PastyPict
    Offline / Send Message
    PastyPict polycounter lvl 4
    Also, does anyone know what this thing is on top of the book shelf?
    Also the thing on the table where the pots are? It looks kind of like the handles of an old fireplace bellow, but I can't tell.
  • jntucson
    Finally done with my block out phase. Some more detailed objects I’d rather just do the whole thing so that’s why some stuff is missing, just personal workflow. I’m loving everyone’s results as well! 👍🏻 

  • jntucson
    The thing on the table I’m not sure but the thing on the book case my guess was a painting 🤷🏻‍♂️ the thing throwing me off is the one next to it, all I can think of is some herb of some kind in a clear glass case 🤷🏻‍♂️
    PastyPict said:
    Also, does anyone know what this thing is on top of the book shelf?
    Also the thing on the table where the pots are? It looks kind of like the handles of an old fireplace bellow, but I can't tell.

  • danielrobnik
    Offline / Send Message
    danielrobnik polycounter lvl 8
    Love the progress everyone is making!

    Spent some time tonight making this chair that I've slapped a default substance on it just to give it some texture. Once I get a handful of objects into the scene I plan to start putting some original materials together.


134
Sign In or Register to comment.