Home 3D Art Showcase & Critiques

Audi Quattro 1980/81

Offline / Send Message
Pinned


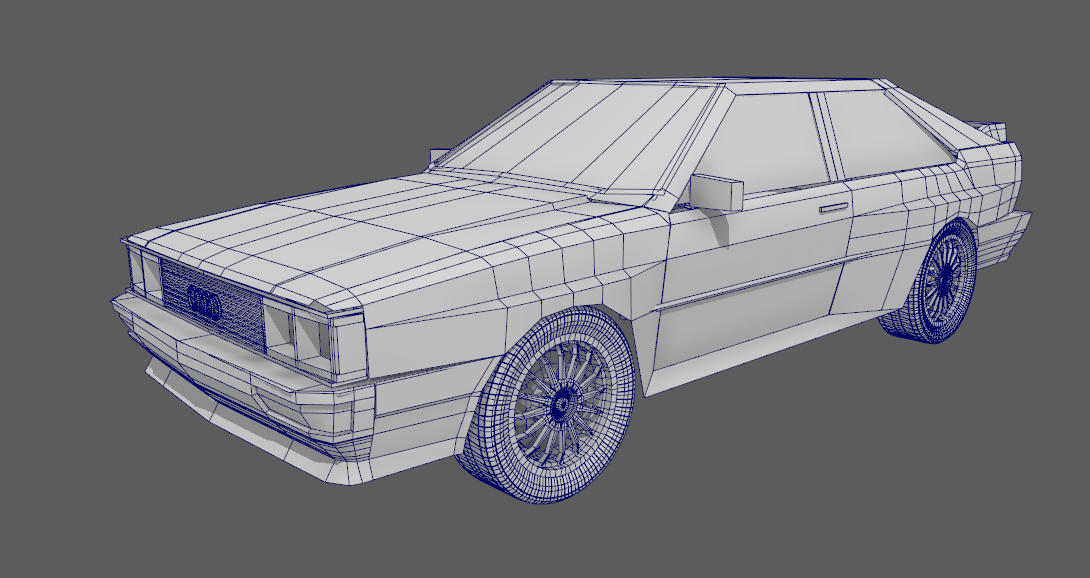
I am currently working in Maya to create a high poly recreation of an Audi Quattro, and need some help when it comes to practicing good workflow. I have collected references, found a blueprint, and blocked it out. I have started working on the wheels, but I think that I need to focus more on creating good topology to start turning it into a high poly (I do not currently intend on creating the inside). I will update this thread as I continue to work, but any advice would be greatly appreciated.

Replies

  • RobertDoman
    After talking with one of my lecturers about how they have modeled cars, we came to the conclusion that I should consider using NURBS/curves. This is also mentioned by Karol Miklas in a 80 level article. Due to this I have begun remodeling the panels using curves. I then plan to either convert the surfaces to polys, or quad draw on top. 


    The problems I am now encountering are with keeping consistent edge flow on the more complex parts of the car such as the wheel arches. I am also not accustomed to knowing where to put breaks in the surface. I hope that by using curves, the realism of my vehicles increases.
  • lluc21
    Offline / Send Message
    lluc21 polycounter lvl 5
    My advice would be to model the whole "shell" of the car in one piece instead of doing each part separately, keeping in mind the position of the edge loops (doors, panel gaps and so on). This way you will have proper edge flow and reflections. 
    When you're done with the main shape you start adding loop cuts giving it a better silhouette and adding details like handles and so on.

    This is what I'd try to achieve first. Notice how the loops try to follow the shapes of the car and the cut on the door. It's still connected to everything else in order to keep good flow when it comes to separating it.
  • RobertDoman
    Thank you so much! This is a very useful tip that I hadn't really considered! I will definitely start doing this!
  • RobertDoman

    Today I sat down and thought about the flow and started bringing the shell together. Thanks to lluc21 for suggesting it to do it like this. It's much easier to see where I am and where it is going.
  • RobertDoman
    Today I had enough time to add some extra details to the model. I've slowly added extra edge loops for making it high poly. My next step will be to extrude the shell, create a low-poly interior then UV unwrap.
    The windows are place holder for now. I have learnt so much from this already, I can't wait to do it again!
  • lluc21
    Offline / Send Message
    lluc21 polycounter lvl 5
    This is looking pretty nice already. A few things I'd recommend for future projects would be to keep the polycount lower overall, even if it is for sub-d. You don't need that amount of small squares on an almost flat surface like the roof and the hood, specially prior to applying the sub-d. If you have a lower polycount it'll be easier to fix some proportions or shapes that you didn't notice the first time.
    I'd also try to make the topology be a full loop around wheel arches and round elements, just like you have in the corner of your C pillar, even if it is a separate piece, it will help with reflection consistency.
    It will be easier to see reflection imperfections if you use a glossy material while modelling.
  • RobertDoman
    Thank you for your response again! I've looked at the Honda you have on Artstation and I can see you're using some optimization techniques that I haven't yet mastered. I have learnt a lot from this already and your advice is extremely useful. I will definitely aim for a lower polycount next time and think about edge flow around corners more efficiently. Thank you again!
  • RobertDoman
    Still moving forward. I'm starting to really like how it's turning out. I am now looking to block out the inside. Problem is, I don't know the best technique for this. I will also try and combine and render it next week. After that I will iron out the kinks and work on texturing.

  • defragger
    Offline / Send Message
    defragger sublime tool
    it's getting better and better!
    There is still a lot of unused geo which makes it difficult to work on. You should try to get rid of some loops. Also as mentioned before you should use a dark material with high specular to see the surface properly. Makes it a lot easier to spot issues.

    With the interior just remember to model things separately that are separate in real life. When I first started modeling car interiors I mushed up the whole interior into one blobb. Don't do that.
    Look for reference pictures of the seat, steering, dashboard and model everything one by one.

    Good luck!
  • Temppe
    Offline / Send Message
    Temppe polycounter lvl 12
    I have another suggestion, though it may be too late to try it on this vehicle.

    Consider starting with the windows - especially the front windscreen. The reason I say this is that in the past, I've invested a lot of time modeling the body of a car, then started the windscreen only to find that the window was impossibly curved (I made a mistake on the window frame). Then I had to redo the bonnet/hood. Like the others have suggested, you won't notice the mistakes until you put a reflective material on it.

    If you want perfect reflections, NURBS are the way to go. But 100% perfect reflections are usually not needed for game models.
  • RobertDoman
    Thanks guys, these points are very useful. I have pretty much completed this now and I have found issues with the windscreen like you said. I will definitely model the interior in pieces using reference images. Next time I will use a darker material and use less edge-loops. Do you have any advice for unwrapping? I intend to add sponsor logos and possibly dirt build-up. What's the best way for doing this on a car?
  • defragger
    Offline / Send Message
    defragger sublime tool
    not a big fan of the "next time it will be better" thing to be honest.
    Why not fix stuff now while you are still at it and improve?

    Getting attached to your work and not willing to change stuff is a giant red flag in this industry.
    Usually tons of iterations are done. If there is an error, we fix it. There is nothing gained by looking the other way.

    It's of course up to you and I will not go on about this.

    Regarding UV and texturing, is it a game model? Do you want to do a race livery or just paint-shader + decals? Can you share any reference images?
  • RobertDoman
    I have chosen to do this for a University project so I have limited time. I know that isn't really an excuse but I will write a reflective essay on this in the end. I would love to start again but I think it is important to address all the aspects of creating a vehicle before going back and doing it all again although I would like to.

    My aim with this is to create a high poly for rendering. I have done something like a shader and decals before, so I am looking to make a race livery. Looking at this sketchfab example, I will separate the maps into different sets and give pieces equal UV space. Is this fair to say? I intend on putting it in an Unreal scene to render it.

    I intend on using this model website's version:
    It also has the colours on the website I can use. 
  • defragger
    Offline / Send Message
    defragger sublime tool
    no one said you should start again. We are talking about identifying issues and fixing them.

    With the racing livery you basically need a full UV unwrap with even resolution across the car. Inside the wheel arches and stuff like that can be scaled down to give more resolution where you need it but don't go overboard with the scaling. Put UV seams where the panel gaps are. Watch out for shells beeing flipped or upside down when working in photoshop. It's confusing to put text upside down or flipped. Doesn't really matter if you are using Substance Painter though.
  • RobertDoman
    Okay thank you for the advice. I'll be using substance painter
    I will address issues as they arise but I don't think that redoing my topology is currently an issue.

    Today I have tested it in Unreal to see what aspects I need to address before unwrapping. 

  • RobertDoman
    I have taken the model into Substance painter and started with the design after cleaning up the outside. I unfortunately struggled with this initially so I will plan to make an ID map in Photoshop. I have also started testing it in a more fleshed out scene. I used megascans and an automotive material pack to get these images.


    After some research, I have decided that I will add dirt to the car in-engine using vertex painting. This is so I can add or remove it dependent on the render.
  • defragger
    Offline / Send Message
    defragger sublime tool
    don't make an ID map in Photoshop. It's a lot easier to bake it from Materials.

    What do you mean by "after cleaning up the outside"?
  • RobertDoman
    The problem I was having was drawing the geometric shapes using substances' tools so I thought that making an ID map in photoshop would help me to apply the colours when I apply the ID map in Substance. What do you mean by baking from materials? Do you mean putting the colours on the highpoly I'm baking down onto it? If so, that is a good idea!

    I unwrapped the shell and removed the parts you couldn't see. I still need to optimise the topology of the shell for the final version by removing unneeded edgeloops. I have recreated the wheels which are going to be a bake of the previous high poly.
  • defragger
    Offline / Send Message
    defragger sublime tool
    you can make an ID map from whatever mesh you have. You can bake it in Substance or render it in your 3d app with render to texture.

    When you are finished with the mesh and have your UVs ready, just make a clone and cut with a slice plane where the different base colors should be. Render to texture the diffuse channel without lighting and you have a perfect ID map for use in substance with the original uncut mesh.


    Only problem with this method is, when you modify your mesh UVs afterwards you will have to redo all these steps because it will not match your previous ID map.

    Baking from a high-poly you could not only change the topology of your low-poly but also UVs and simply rebake. Thats why we usually do that instead.

    Therefore I suggest to import the cloned and cut mesh with material IDs as "high-poly" into Substance and bake the ID map in Substance.
  • RobertDoman
    Thank you so much! I will definitely cut and slice to build the areas I want to paint for the ID map. A very useful gif too! 
    I will be working on this today so I will post my progress.
  • RobertDoman
    One question. Since I want to get the best possible render and it isn't intended to be game ready, should I use the high poly? My fear with this is that it will be so high poly it would seem crazy (more than 100,000k overall).


    (The shell alone is 93k tris alone)

    Or is this okay since I want it to be a really high detail render?

    I could also have 2 versions: One high poly and the other optimised.
  • defragger
    Offline / Send Message
    defragger sublime tool
    usually the shell would be less dense and a lot of polygons are spent on headlights, wheels, interior and stuff instead.
    But in this case it should be no problem since it's not a game model.

    Just keep in mind: more polygons ≠ better !
  • RobertDoman
    You have been extremely helpful, thank you so much. That is a very important thing to remember.
    I have decided to use the lower poly model to render and use the high poly shell for baking. 
    I will only unwrap the painted area and use shaders for the plastics and other details. 
    Unwrapping has taken me a while today as I am trying to make sure I get everything right.
  • RobertDoman
    It took all day, but I took my time and am really happy with the UVs. I can increase some space for the lower importance items as they are currently at a lower texel density and there is some free space, but otherwise I think they will work well. 


    I spent the morning creating the high poly shell with colours for the ID map, so next I can pull it into Substance. I will also need to mock up the logos and text for using in Substance.

    I feel this is finally gaining traction so I will devote as much time to it as I can before I leave for Christmas.
  • RobertDoman
    I have been working in Substance Painter this evening and have managed to use the ID map for painting. I also created all the brand logos for stamping in Substance in Photoshop by using online images.


    As you might see, there are some issues I need to fix with the paint around edges. I also need to cut in the exhaust to the rear and add the spoiler to the painted shell. I also need to clean up some awkward hard edges around the car. I am also thinking of modelling fender flares, but I'm not sure it's necessary. 

    I will then UV unwrap the details. I also want to create a tiling texture for the lights but that might have to be a push goal.

    I am also searching for an image to recreate for rendering.

    For now I am happy with my progress and can't wait to see the finished piece!
  • RobertDoman
    Right, I cleaned up the paint, modeled the exhausts and remade the spoiler properly. 
    Since I can't download Megascans on Uni computers (different version of Unreal), I will continue that at home. For now I have put it into the free Unreal studio scene from the learn part of Unreal Marketplace and moved some lights to properly illuminate the car.

    There are still clearly some major issues I want to address after the deadline. Considering the shell, I feel as though I have learnt a lot and am happy with the outcome.

    Please tell me what you think. I've been looking at this for so long.
    Some issues I already want to fix: Inside the wheels/underside detail, details (wheel bolts, fuel cap, windscreen wipers, number plates, lights) and shadows.


  • Ashervisalis
    Offline / Send Message
    Ashervisalis grand marshal polycounter
    Ya got baking errors. Might be a good idea to straighten the UVs of this part in order to get rid of this.


    Also, the aliasing on the paint in spots like this need to be fixed, I'd say.


    Also, I'm not understanding what this piece is. I know it's to attach the headlights, but I've never seen a part like this. Do you have a reference for this part?


    Cars looking sick btw. I think it needs more work before it would be a portfolio piece though.
  • RobertDoman
    Good point about the baking issues. I had issues with those paint lines, they come from the ID map, I'll have to take another look at that. 

    I basically guessed those little parts. This is the best image I had, and I couldn't really work out how they were actually attached.
    Any help with this would be appreciated! How are they attached to other cars?

    I'm going to re-render it today in Substance, Unreal again and possibly marmoset.
  • RobertDoman
    Removed all the lighting from the Unreal studio scene and added my own movable lights to take these real-time renders. I think the shadows help capture the vehicle better. I am currently finishing a retrospective and breakdown on my website.


    I also rendered it in Substance Painter.


    Please tell me what you think. I plan to continue working on this. Does it come together overall? Is it believable? Thank you for everyone's feedback so far, it has helped me immeasurably!

    The model is also on Sketchfab for you to inspect.

    It is also on Artstation!
  • DanikaPuzdrowski
    Offline / Send Message
    DanikaPuzdrowski polycounter lvl 2
    I think it's looking good, the thing that stands out to me the most though is the lights, I think that they could do with a bit more love 
  • RobertDoman
    @DanikaPuzdrowski do you mean the lights on the car, or the lights in the scene? 
  • Ashervisalis
    Offline / Send Message
    Ashervisalis grand marshal polycounter
    You've got weird repetition here. In your earlier images I was thinking it was the lighting or shadows or something, but kind of looks like baking errors as well. Also, right below the front right yellow headlight there are more baking errors.


    Regarding the headlamps, if you google for reference images, use search terms such as "rally headlights". Competition is fierce when it comes to modeling cars, don't make up how something works. People will spot that from a mile away! Take your time to learn how things attach properly, it'll bring your stuff to the next level.


  • defragger
    Offline / Send Message
    defragger sublime tool
    your UV's are packed to tight. The small shells need padding as well. A lot of the shells could be straightened out to avoid aliasing issues.

    You could make the headlight mounting brackets like this. Basically a "triangular" metal piece with holes in it for weight reduction. There are two black clamps on each light at the top and bottom which are mounted to the metal frame with a bolt.


  • RobertDoman
    Amazing! Thank you so much! This is perfect! 
    Yeah, I focused too much on the shell and didn't give enough time for the details. 
    I realised with this project how important using reference is for making a car look believable.
Sign In or Register to comment.