RGCA - Best One-Minute Movie/Best Use of iClone - Adolf

vertex
Hi there!
My name is Adolf Navarro and I want to share this project with you. I used iClone6 Pro and Sony Vegas Pro 12 in order to make the animations and the Video editing, but eventually I also used Photoshop Elements, Substance Player, 3DStudio Max 2011 and iClone 3DXchange 5.5 Pipeline in order to prepare some of the props, characters and textures used in the animations.
The environment
I imagined a Fantasy world, an alien planet called Auria because of the golden light provided for its star. The planet was colonized for humans long time ago, but after thousands of years of isolation, it's been a cultural involution and finally they developed their own kind of medieval civilization.
I imagined two main characters for the plot, a couple of warrior comrades, veterans of the recent wars with a kind of ogre's civilization, one of the original intelligent species that inhabited the world before the humans arrived. The peace has been signed between the ogres and the humans, so our heroes try to make their living as civilians in this new fragile status, but after to be submitted by the Queen of one of the realms, they quickly will get involved in a quest to find an ancient source of huge knowledge and power that, according to the legends of Auria, lays hidden in a remote and unexplored place of this world.
The actors
OK! Once situated... First things first... I needed two fierce warriors for the casting and I choose Percy and Heracles. A nice Daz Genesis characters that suited perfectly for my purposes. However, they had some disadvantages as they were not standard human characters for iClone, so their use becomes restricted because I can't change nor their facial properties neither their clothes. Also, their facial expressions are harder to get, so I decided to convert them in standard G5 iClone characters.
In order to do that I used 3DStudio Max 2011 because Reallusion provides two standard biped templates, (one male and one female), with all the appropriate riggings and skins, plus the export plug-in to convert the modified characters in a fully standard G5 character.
First I exported the original Daz characters as OBJ, then I loaded the Reallusion man's template in 3DStudio and merged the OBJ file to the project. After converting it in an "editable poly" I detached all the clothes and armor elements in order to adapt them to the iClone character.
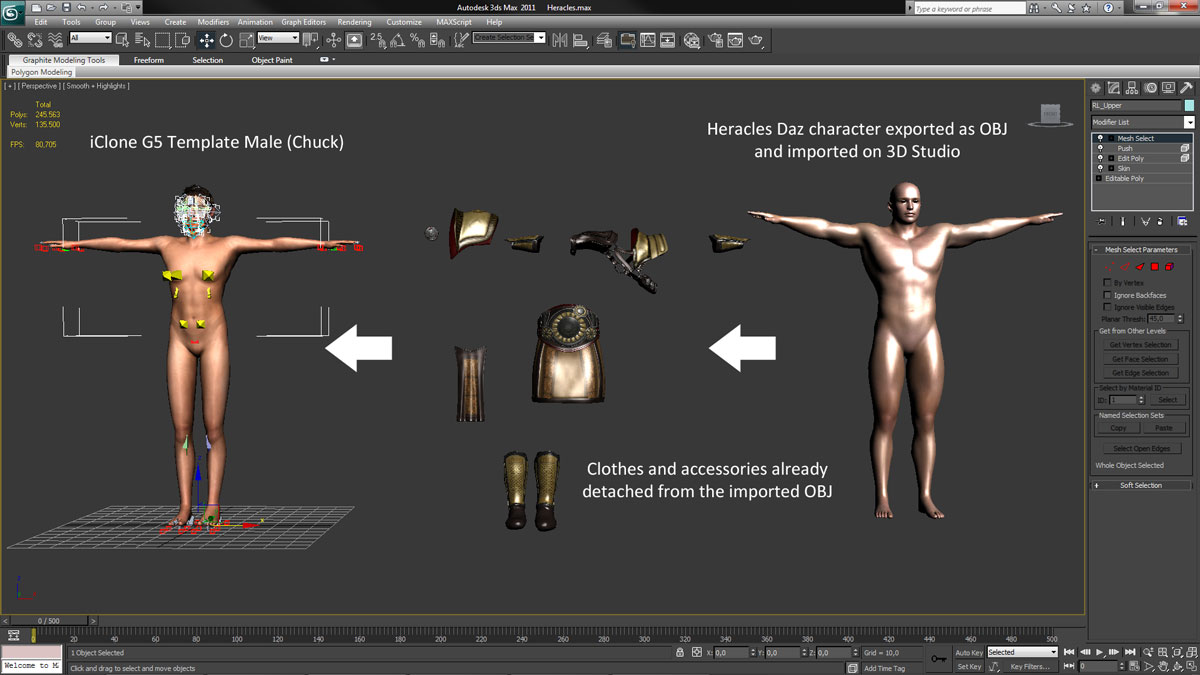
I converted the clothes and leather strips that have to move rhythmically with the character to skin, while I exported the armor plates and shields that have to remain "rigid" while the character is moving, as accessories.
How the original Heracles is far more body built than the iClone standard character I had to adapt the shapes manipulating the vertex of detached meshes.
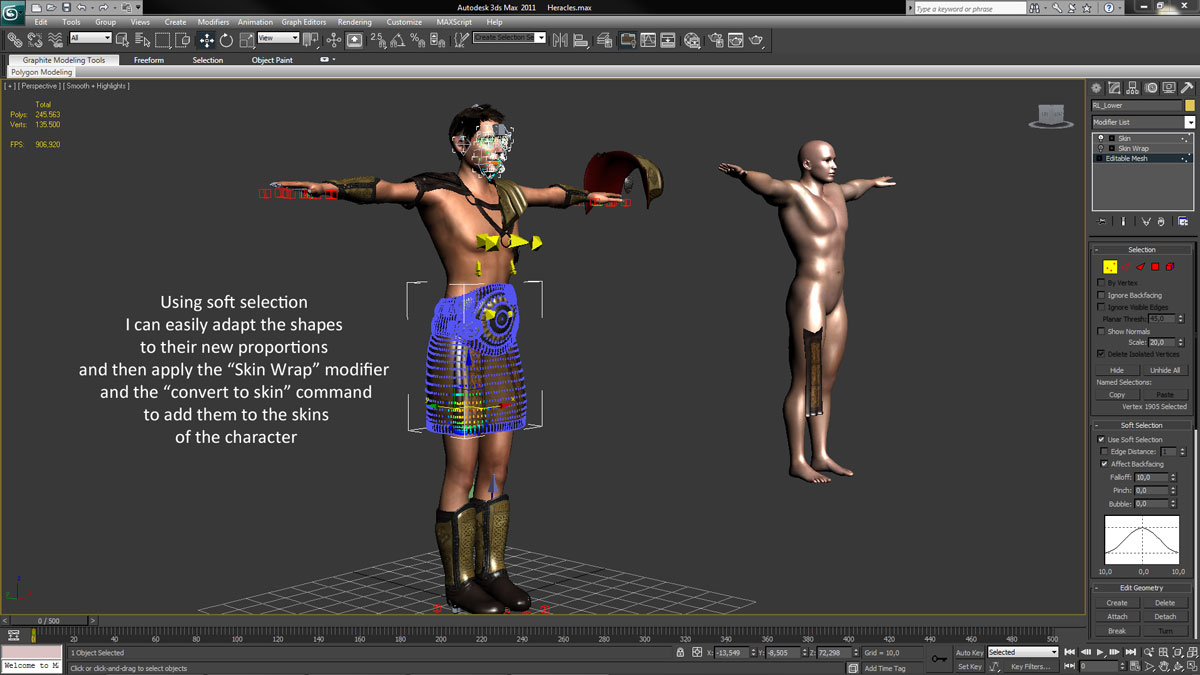
Then I applied the "Skin Wrap" modifier to "attach" the clothes to the template skins provided by Reallusion and converted them as well in a skin. I repeated the process for the RL_Upper, RL_Lower and RL_Shoes skins of the template. (Remembering that the name of the shapes that are going to be "skinned" have to match these names).
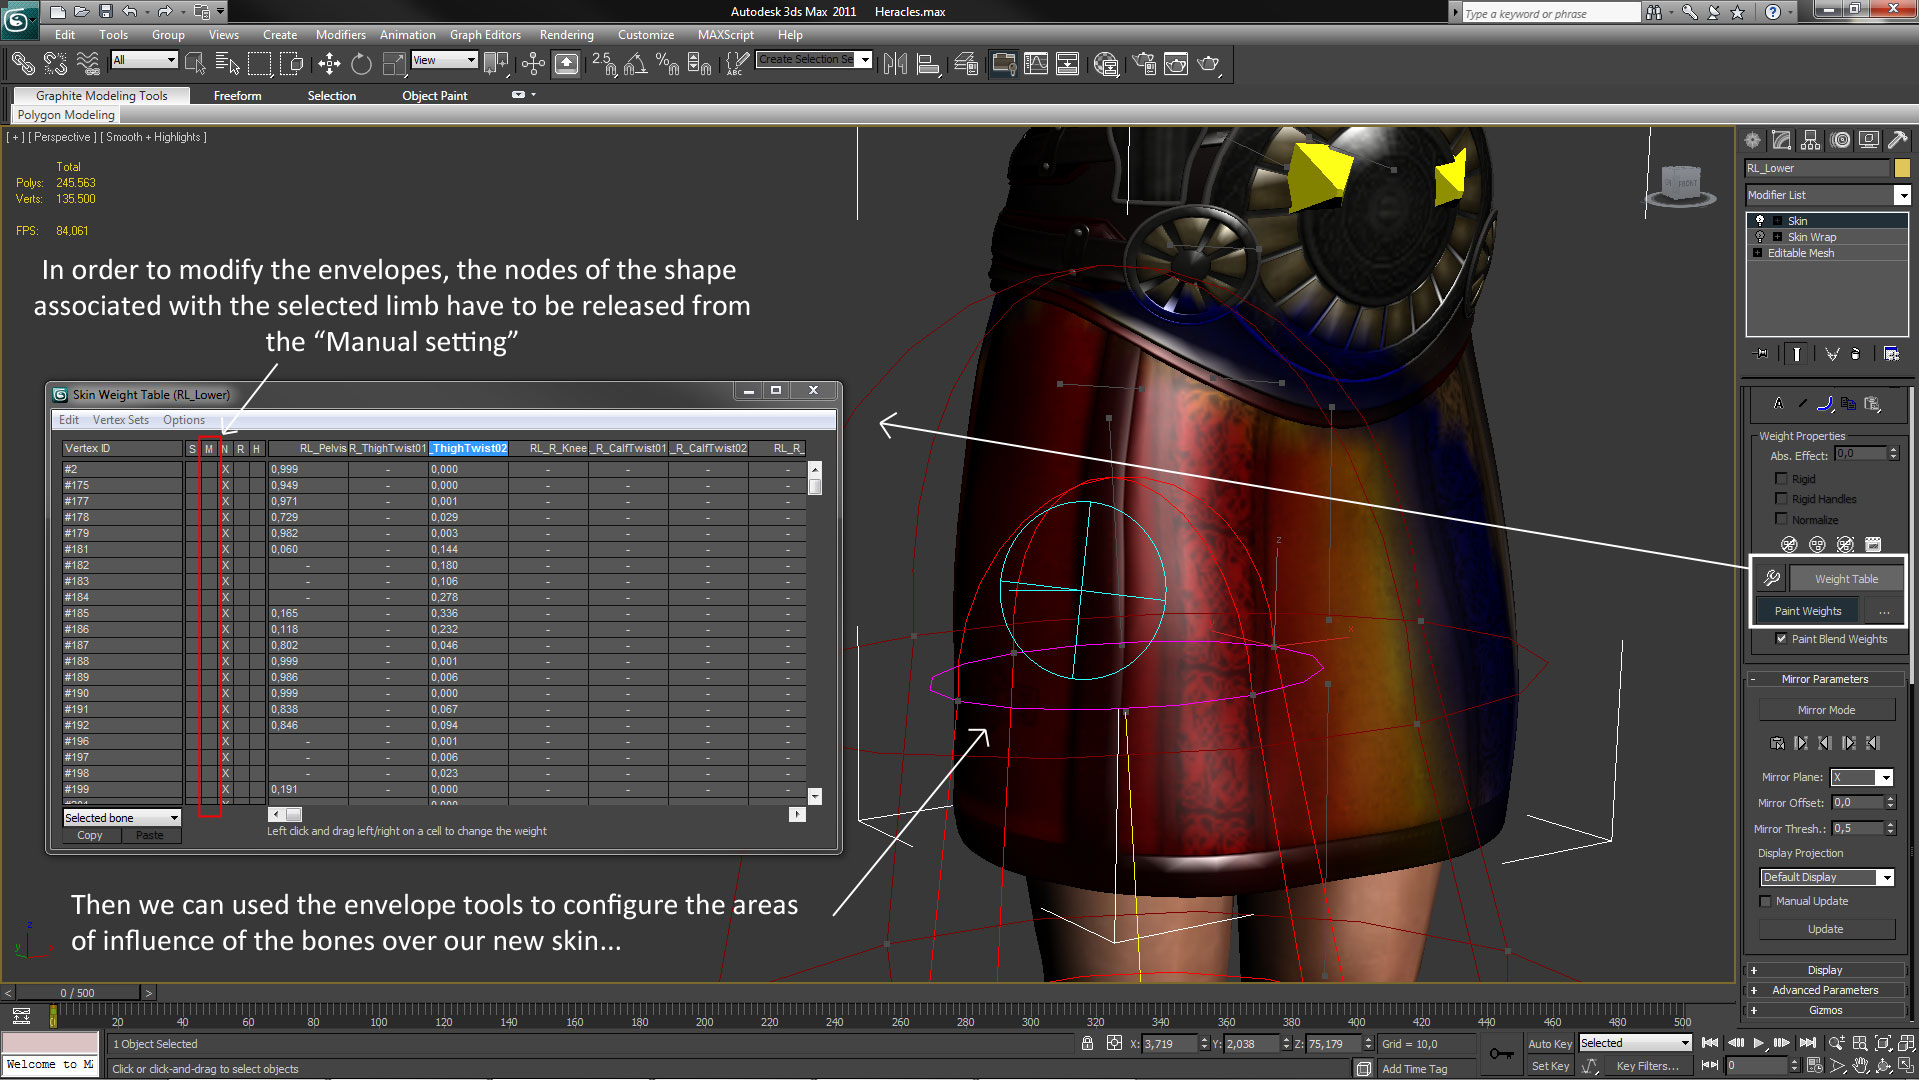
But the envelopes for the bones provided by Reallusion are intended to be used with trousers, so when the character uses a skirt, it reacts awkwardly when the character moves... so I had to modify these envelopes...
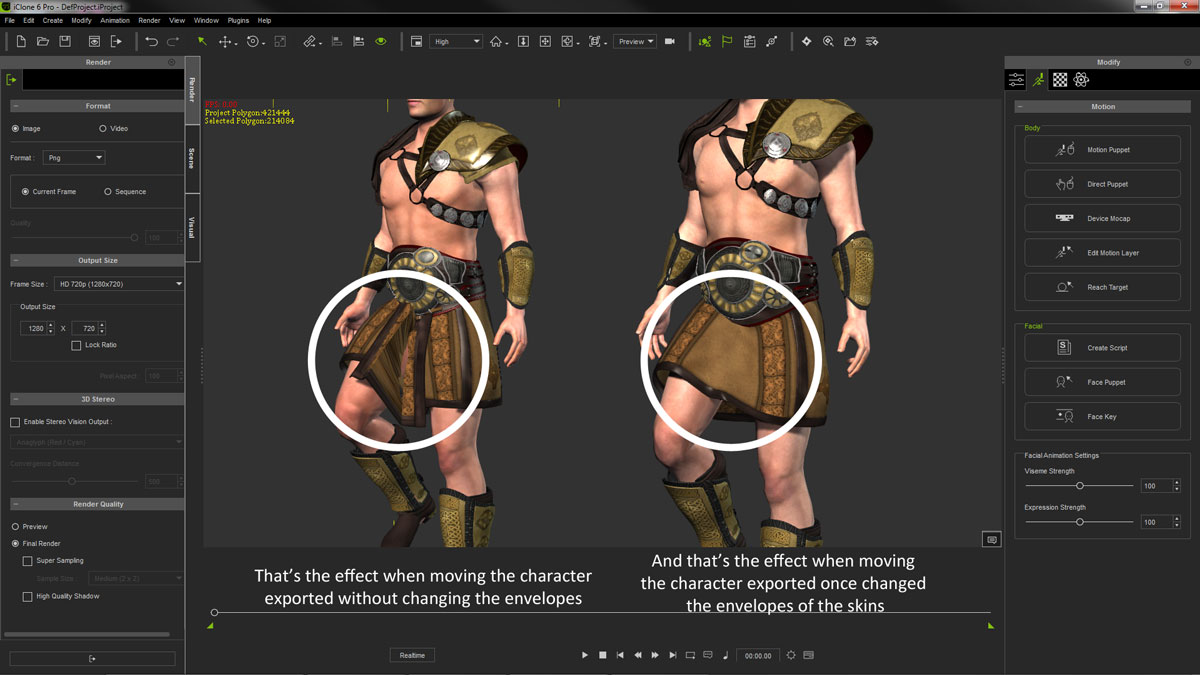
And that operation is tricky because the envelopes in the template provided by Reallusion are set to "Manual" that means that the nodes cannot be modified using the common tools provided by 3D Studio. So, first thing I had to do, was to release all the nodes of the affected bones from their "Manual" condition using the "Weight Table" tool in 3DS, and then I used the "Paint Weights" tool to create the new areas of influence of the skins.
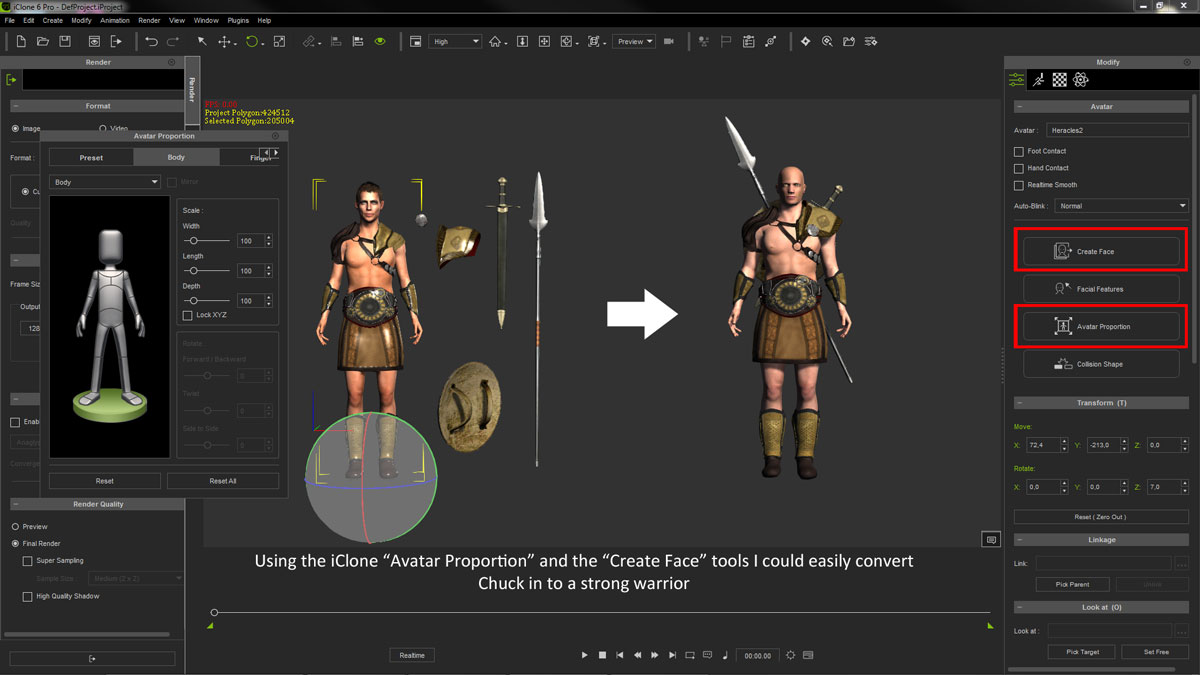
Once the Character was exported as a standard G5 avatar using the Reallusion plug-in installed on 3DS, I loaded it on iClone and attached the accessories exported individually as rigid props. The character look great but not really impressive as a warrior, so I needed him to "work out" a little in order to gain muscular mass. It was easy using iClone's "Avatar Proportion" tool, then a replaced Chuck's face for a more scary one using iClone's "Create Face" tool and finally I added a nice sword, a Shield and a spear to the accessories that the new Heracles was going to carry.
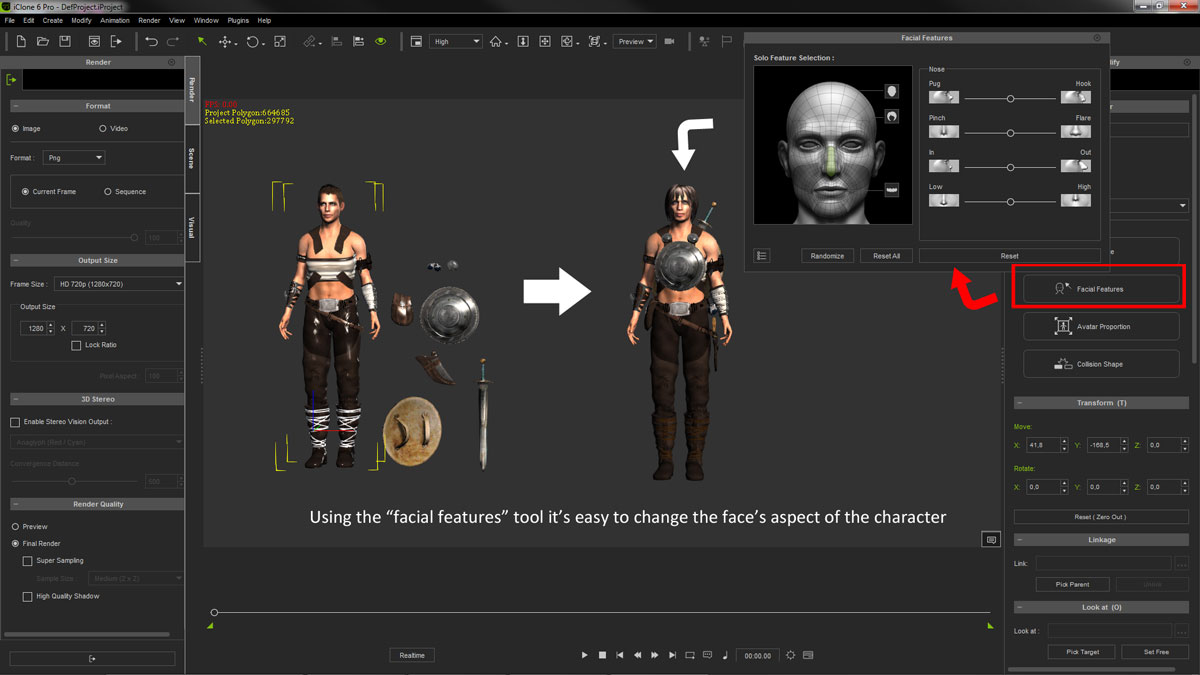
I repeated the same process with Percy, the other DAZ character, but this time I didn't have to modify the skin envelopes of the template as they were already perfect for a character that was wearing trousers. Also, I wanted to keep Chuck's face, just slightly modified in order to appear a little more fierce. So this time I used the iClone's "Facial Features" tool in order to change the details of his face without to create an entire new one. I added a hair to the avatar and my second hero was ready for adventures.
Then, I needed "extras" for my sequences, some had to be humans and some had to represent the native species of Auria that have been clashing with the human settlements since long ago. For the human extras, I used an ancient Rome Daz character's pack mixed with some "non Roman" accessories. For the alien beings, I used a standard G3 iClone character that allowed me to change proportions and faces in order to obtain several individuals of the same species but with a slightly different look.
I didn't pay too much attention to the details of these characters as they were going to appear only in the background filling the scene.

My name is Adolf Navarro and I want to share this project with you. I used iClone6 Pro and Sony Vegas Pro 12 in order to make the animations and the Video editing, but eventually I also used Photoshop Elements, Substance Player, 3DStudio Max 2011 and iClone 3DXchange 5.5 Pipeline in order to prepare some of the props, characters and textures used in the animations.
The environment
I imagined a Fantasy world, an alien planet called Auria because of the golden light provided for its star. The planet was colonized for humans long time ago, but after thousands of years of isolation, it's been a cultural involution and finally they developed their own kind of medieval civilization.
I imagined two main characters for the plot, a couple of warrior comrades, veterans of the recent wars with a kind of ogre's civilization, one of the original intelligent species that inhabited the world before the humans arrived. The peace has been signed between the ogres and the humans, so our heroes try to make their living as civilians in this new fragile status, but after to be submitted by the Queen of one of the realms, they quickly will get involved in a quest to find an ancient source of huge knowledge and power that, according to the legends of Auria, lays hidden in a remote and unexplored place of this world.
The actors
OK! Once situated... First things first... I needed two fierce warriors for the casting and I choose Percy and Heracles. A nice Daz Genesis characters that suited perfectly for my purposes. However, they had some disadvantages as they were not standard human characters for iClone, so their use becomes restricted because I can't change nor their facial properties neither their clothes. Also, their facial expressions are harder to get, so I decided to convert them in standard G5 iClone characters.
In order to do that I used 3DStudio Max 2011 because Reallusion provides two standard biped templates, (one male and one female), with all the appropriate riggings and skins, plus the export plug-in to convert the modified characters in a fully standard G5 character.
First I exported the original Daz characters as OBJ, then I loaded the Reallusion man's template in 3DStudio and merged the OBJ file to the project. After converting it in an "editable poly" I detached all the clothes and armor elements in order to adapt them to the iClone character.
I converted the clothes and leather strips that have to move rhythmically with the character to skin, while I exported the armor plates and shields that have to remain "rigid" while the character is moving, as accessories.
How the original Heracles is far more body built than the iClone standard character I had to adapt the shapes manipulating the vertex of detached meshes.
Then I applied the "Skin Wrap" modifier to "attach" the clothes to the template skins provided by Reallusion and converted them as well in a skin. I repeated the process for the RL_Upper, RL_Lower and RL_Shoes skins of the template. (Remembering that the name of the shapes that are going to be "skinned" have to match these names).
But the envelopes for the bones provided by Reallusion are intended to be used with trousers, so when the character uses a skirt, it reacts awkwardly when the character moves... so I had to modify these envelopes...
And that operation is tricky because the envelopes in the template provided by Reallusion are set to "Manual" that means that the nodes cannot be modified using the common tools provided by 3D Studio. So, first thing I had to do, was to release all the nodes of the affected bones from their "Manual" condition using the "Weight Table" tool in 3DS, and then I used the "Paint Weights" tool to create the new areas of influence of the skins.
Once the Character was exported as a standard G5 avatar using the Reallusion plug-in installed on 3DS, I loaded it on iClone and attached the accessories exported individually as rigid props. The character look great but not really impressive as a warrior, so I needed him to "work out" a little in order to gain muscular mass. It was easy using iClone's "Avatar Proportion" tool, then a replaced Chuck's face for a more scary one using iClone's "Create Face" tool and finally I added a nice sword, a Shield and a spear to the accessories that the new Heracles was going to carry.
I repeated the same process with Percy, the other DAZ character, but this time I didn't have to modify the skin envelopes of the template as they were already perfect for a character that was wearing trousers. Also, I wanted to keep Chuck's face, just slightly modified in order to appear a little more fierce. So this time I used the iClone's "Facial Features" tool in order to change the details of his face without to create an entire new one. I added a hair to the avatar and my second hero was ready for adventures.
Then, I needed "extras" for my sequences, some had to be humans and some had to represent the native species of Auria that have been clashing with the human settlements since long ago. For the human extras, I used an ancient Rome Daz character's pack mixed with some "non Roman" accessories. For the alien beings, I used a standard G3 iClone character that allowed me to change proportions and faces in order to obtain several individuals of the same species but with a slightly different look.
I didn't pay too much attention to the details of these characters as they were going to appear only in the background filling the scene.
Replies
I'm proud to count with the help of a talented musician, Cristian Parras that composed a beautiful epic musical theme for the clip. Once I received the audio file I started looking for the real footage to be placed as background for every scene that was accommodated to the music transitions on Sony Vegas. It gave me an idea of the duration that every scene had to have on the iClone projects.
I wanted to make clear from the beginning that Auria was nor the Earth, neither something as the Middle Earth or Westeros, but an alien place, were the descendants of a human colony were developing their own civilization. So, several of the video backgrounds were modified to show a planet with rings, Saturn style, from where Auria would be actually a moon.
I did it on Sony Vegas creating the background videos that I was going to use in the iClone sequences. Some of them were showing the ring planet, while some of them did not...
And here we are... I'll comment some special aspects that made every sequence a little challenge...
Scene 01 - The opening Sequence
Here, I wanted to create a crowded military force while they were in some kind of expedition. I couldn't place so many characters in a single project, so a created four projects of single rows of three walking soldiers on each project, showing their back to the camera. I rendered the walking sequences twice on iClone6, one as Video MP4 at maximum quality and then, I rendered again but just the alpha video mask.
I obtained two Video files that I applied as Diffuse and Opacity maps over simple walls I placed on the project. I created 4 different walking rows that I mixed in the scene in order to avoid repeated movements. I also flipped horizontally some of the walls obtaining a pretty good effect of a marching crowd.
The soldier waiting on the left of the path, the "Centurion" riding the horse and the horse itself, are actually the only real characters on the scene while the rest are just walls "texturized" as marching soldiers.
But before to put the walls and the rest of the props on place, I synchronized the camera movement on the project with the panning background video sequence, so I placed a floor prop with the same texture than the path in the video background, (With a gradient opacity map to facilitate the integration on the scene). And used dummy poles to make the camera traveling match the video footage. Then I locked the camera, removed the dummies and placed the props and particle effects. Finally I worked with the lights of the scene to make the render as convincing as possible.
iClone allows to put a video background in the project, so I used it as a reference, facilitating a lot the integration of the elements on the scene as well as the light properties. But I deactivated the background when rendering, obtaining a numbered sequence of PNGs with alpha channel that Sony Vegas integrated in a masked Video Track
The Scene mounted in Sony Vegas had two tracks, one with the Background video prepared before and the iClone scene rendered with the alpha channel. Both tracks were a composite child of a parent track where I applied the light effects. So the effects will affect simultaneously all the children tracks.
I created a Golden "Gradient Map" in order to simulate the special golden light of Auria, as well as a slightly "glowing" effect that facilitated the integration of the iClone render with the video background and a subtle "light rays" effect that acted as a kind of motion blur.
The wagons and the assault towers came from a wonderful Unity pack while I downloaded a simplified version of the war balloons from Google Warehouse and then worked them on 3DStudio before to use iClone 3Dxchange to convert them in iClone props with independent animated propellers, (not used in this sequence), and other props attached to the canopy.
I also used a cool new feature of iClone6 called "Soft Cloth" to the ropes hanging from the balloons and on the banners attached to the wagons that added automatic physic cloth properties to these props. Their movement was also affected for the wind conditions I set and it looked really cool adding a "real" dramatic touch to the scene.
This sequence also uses the Billboards to create a big Ogres army that otherwise will be impossible to handle using characters. I created 7 different ogres and 7 motion clips that I mixed in three different panels that were rendered twice, one for the diffuse map and the other for the Opacity map.
Then I placed the billboards and the props in the scene and added the Grass from the Reallusion Botanic pack for iClone6 that includes tons of very realistic trees , bushes and grass.
I adjusted the automatic wind parameters to obtain a very natural movement, but also, the grass was covering the ground, hiding the video background in the areas I didn't want it showed. But I ended putting a floor with a texture obtained from the background video because the grass showed some "holes" exposing the trick.
This is the aspect of the project on iClone6...
I adapted the iClone camera traveling to match the background video and I rendered the scene and started working on Sony Vegas.
As in the previous scene, I created a parent track where I attached two child tracks. One with the original background video and the other with the iClone Render PNG's sequence with alpha channel. I applied the Gradient Map to the parent track in order to obtain the golden light of Auria but this time was not enough so I generated a Yellow Color Gradient with Sony Vegas in the parent track that colored the passing clouds.
I finally applied a strong "rays" effect on the parent track to simulate the sun light passing through the clouds and a slightly "Light Rays" effect that added a little motion blur to the scene.
In this scene I used the new iClone6 physics engine to create a catapult that actually worked and it was able to throw "virtual" stones to some kind of enemy.
So, first I needed to take the model from the Unity pack and break it in the pieces that should be articulate in iClone. I exported the original model in OBJ format and loaded it into 3DStudio Max. There, I converted the model in a "editable poly" and detached the parts that should have some kind of motion.
On iClone6, I assembled the parts again, linking them together but I changed the bag where the stone was placed, by a rigid container that will make things easier. Then, I applied dynamic physic properties to the elements adding hinge constrains to the counterweight and the lever.
I set the mass of the counterweight to 40, while I kept the rest of the elements equal to 1. I set the bounding mesh of the container to "self mesh" and the collision margin to 0,20 and I kept these values for the stones than should be thrown away, but I set the stones physics properties to "frozen", so they will rest in the place until they would be "pushed" by the container as a result of the constrained movement of the counterweight and the lever.
To complete the visual effect, I attached two "soft-cloth" ropes to the lever that moved as "real" ropes when the catapult was released.
I didn't want all the catapults throwing the stones at the same time, so I needed some element that triggered the action sequentially. To do that I added dummy rectangles with "Kynematic" physic properties just down the counterweights preventing them to fall down when the animation started. I applied a transform key to the dummies that moved them from left to right, so when the counterweights were no blocked anymore by the dummies, they started going down pushed by the virtual gravity, triggering all the constrain movements in the catapults.
I also needed a full terrain for the ground as the original video footage showed a lake in its place that should be obviously hidden. I used the iClone "Hill" height map, flattening it and replacing the original textures with maps obtained from the background video in order to integrate the ground and the background as much as possible.
Finally I added the usual filters in Sony Vegas, plus a "Gradient map" from down to up to create an slightly mist effect in the closer characters, and a "Fill Light" filter to make the darker zones of the scene a little brighter without losing contrast.
In this sequence I just used the horse characters and the motions included in the knight pack. I released the horses from most of their armors in 3Dxchange, and used paths in iClone6 to make the movement more natural and not straight. I created a particle system to simulate the ground and dust expelled by the horses when galloping and used the new iClone6 grass from the Botanic pack with a strong wind and gust effect. It added realism and hid the ground of the video footage. I also added the citadel in the back with a slightly fog effect created by iClone in order to blur the details as it must look far away.
The "Gradient Map" and the "Rays" effect did the work on Sony Vegas to create the final aspect of the sequence.
For this scene I wanted to include individual flying machines that could look integrated with the shocking video background. I imported on iClone 3Dxchange one model of the Da Vinci flying machine from Google 3D Warehouse, and then I exported it as OBJ to be opened in 3D Studio Max.
In 3D Studio Max, I added some elements to the original gliders, as an aerodynamic head, a gas balloon that would explain how the gliders can achieve long distances when flying and the hanging bags that supported the pilots.
I applied the materials directly on iClone and attached some "Soft-Cloth" stripes to the tails, applying a strong wind effect in order to reinforce the feeling that the machines were traveling very fast.
Just as in the previous scene I created two paths in where each glider were moving, and played with the camera until the glider's motions matched with the Background video.
Once rendered as a PNG image's sequence with alpha channel I mixed the resultant clip with the background video in Sony Vegas parenting these tracks to a parent track where I applied the usual effects... The "Gradient Map" for the peculiar Auria light, the "Rays" effect for the shinning light coming trough the clouds and the "Light Rays" effect that in this sequence was a little stronger to simulate a higher motion blur due to the speed of the objects involved.
The most complicated in this scene was to match the camera movement on iClone with the one in the video background. The real footage used as background, had been recorded using a fish eye lens that distorted the image edges, so I had to do the same with the iClone camera, but no matter how many times I tried, I couldn't obtain a decent integration with the characters. In addition, the dragon used and its motion clip, looked too far and small at the beginning of the sequence if I used the proper size proportion, so I finally decided to cheat a little and I rotated the two heroes as well as the iClone camera. Also I changed the dragon proportions in order to obtain the proper look. Hope you don't mind
The editing on Sony Vegas was easy, just applying the same filters than in the rest of the sequences.
Here, all the attention is for the new iClone G6 character. I used Heidi, the female character that come with iClone6 as it's far more realistic than the previous G5 characters, specially the hair that moves automatically with the breeze. At this moment we can't create clothes or change the faces of these kind of characters, so I just changed the texture of her standard gown and added the cloak, the belt, the crown and the jewelry as accessories.
I activated the "Deep of field" feature in the iClone camera to blur the columns and the guards in the background enhancing the queen's image. Then I changed the light color to match the golden sunset of Auria and, in this case, I included the background animation in the iClone render. (So no alpha channel was needed).
On Sony Vegas I forced the "Light Rays" effect and slowed the motion to obtain this "dreamlike" atmosphere.
This sequence should have been easy to create but ended being really complicated. The background video showed a slightly traveling as recorded from a flying airplane and curiously it was much harder to synchronize with the iClone camera movement than the previous sequences.
After a lot of unsuccessful attempts trying to integrate the building to the landscape and the camera movement, I finally decided to add a billboard in iClone with a masked PNG of the vegetation of the bottom as a texture and added several trees to the base of the building to blend it with the vegetation panel.
As in the previous scenes, the Soft-Cloth elements like the ropes hanging from the balloons and the flags on the buildings added an extra natural aspect to the scene, accentuated too with the atmospheric effects added in Sony Vegas.
This sequence proposed an interesting challenge as I had to integrate a ship in the water showed in the video background. I used a Greek ancient boat model, but previously, I removed the oars in 3DStudio before to export the rest as an iClone prop.
I created a simple path that I used to move the boat and a dummy box that was the parent of a floor prop I used to hide the part of the boat's keel that was "under the water". I also used a "Magic Fountain" iCLone's particle system that simulated the waves breaking on the ship's bow that I also linked to the dummy box.
I created a video texture from the background video that only showed part of the waves and I applied it as a diffuse map to the floor that partially hid the boat's keel. To facilitate the integration of this floor with the background, I applied an opacity map that blurred the edges of the prop. I also used the "Waterfall" particle system of iClone to simulate the foam and the trail of the boat on the water and I linked it as well to the dummy box, so all the elements were moving together along the path.
As the boat emerges from behind the rock on the left, I created a wall in iClone, where I applied a diffuse texture map created from a PNG with alpha channel containing the masked rock. But It couldn't cover the bottom because of the moving water that was splashing against the rock.
After rendering and mixing the scene in Sony Vegas, I realized that the camera of the background video had a subtle movement that made evident the masked wall representing the rock on the left, so I finally had to add another wall with the whole video background as a texture but masked over the horizon line. This wall covered the water of the video background and remained still attached to the wall representing the rock.
Once the boat was integrated with the sea background, I created a weight map to be applied on the sails and the ropes that crossed the sails, converting them in Soft-Cloth physic's objects, that reproduced a convincing movement of fabric pushed by the wind.
Finally, I added the characters aboard the ship and I linked them to the boat. I also put a little pier and a soldier watching the ship's departure in order to fill the bottom right of the screen. Once rendered, I mixed it with the video background in Sony Vegas. I Applied the usual filters and the scene was complete.
Here, I repeated the process used in the Scene 04, (The Grasslands) but with the characters walking instead of riding the horses.
Here, the only difference was that I had to change the color of the light in the project during the scene in order to make it match with the color of the light in the background video that also changed.
This one was similar to the scene 10, (The ship) except that in this case, the boat didn't appear from behind any object and due its small size it was not making a big trail or splashing waves.
In order to place the castle behind the coast line I put a wall with a diffuse map, that I made using a still PNG image with alpha channel obtained from one frame of the background video. In order to create the proper atmosphere, I also needed to put on the scene another prop that acted as a cloud and left the castle partially in shadows.
I made three different windmills that rotated at different speed and scattered them all around to create a kind of wind farm and I applied a slightly floating movement to the lookout balloons attached to the towers using Soft-cloth props.
The usual filters were applied on Sony Vegas to get the characteristic Auria light.
For this scene I actually needed two iClone projects. In the first one I placed the background pyramids from the fabulous Mayan world set and I rendered a single frame in PNG format with a transparent background.
Then, I made a second project with the terrace and the building where I put the actors and a distant ship heading port.
I rendered this project in a sequence of PNGs with alpha channel as usual and then, the fun started in Sony Vegas... where I made four Video tracks to put the appropriate elements in each layer as you can see in the image below...
I used the background video twice, first in the track 5, leaving it untouched and then in the track 3. But here I applied a blue chroma key to hide most of the sky and the sea of this track.
As I inserted the still PNG image with the pyramids in the middle of those tracks, (track 4), it resulted that the pyramid's image appeared to be in front of the sky background but behind the jungle trees and the white water splashes. Even the breakwater structure seemed to be behind the splashes. ;-)
Over these tracks I placed the animated scene from iClone, (track 2) and then I made all these tracks children of the parent track 1 were I applied the light filters to obtain the golden gloom of Auria.
This project is trickier than it seems because, at the moment, Reallusion has not included the "drop shadow" feature in iClone6, so I cannot put props over a background image and project simulated shadows over this background.
So I should put a floor prop that received the shadows and merged it with the background video, but as I was just interested in the shadows I applied a plain blue color to the floor making it ready to be chroma-keyed on Sony Vegas.
So I ended making several layers...
First one, the Background Video previously generated with the Ring planet and the clouds moving over it.
Over this one I put a sequence of PNG images with alpha channel rendered on iClone with the castle and its moving flags.
Over this one I put a single PNG image masked and slightly modified in order to show a kind of path where the wagons were moving through at the time it hid the castle foundations.
Over this one, I put the rendered sequence on iClone with the blue path that receive the shadows...
And finally I added another layer with the same animation without the path but with the dust particle systems activated...
On Sony Vegas I applied a blue chroma key effect to hide the path, but I had to change the whole track to Black&White to convert the bluish shadow that remained in a perfect black shadow. All looked good except that iClone doesn't apply shadows over particle systems, so the dust coming out the wagons looked oddly bright.
I solved the problem copying the path shadowed track, (with tall its effects -> chroma key + Black&White), on the parent layer on the top, and adjusting its global transparency until it looked good.
Finally, on the parent track I applied the usual filters to obtain the Auria's atmosphere.
I placed some iClone plants and stones from the Reallusion Botanic pack, covering the slope of the hill that appears on the closer area of the background video, and I defined two paths were the heroes were moving into. I applied the motion clips to the characters and added them facial expressions that showed the urgency of the moment.
I created two paths more for the raptors and also applied seamless running motion clips to them. I edited the keys in the paths until the motions matched with the background video and looked good on the camera view. Finally I included a little balloon driven by two pilots that was also pursuing our heroes.
I mixed the rendered sequence with the background video in Sony Vegas, then I applied the usual filters to get the golden light of Auria and the sequence was ready.
This scene is one of my favorites because it presented a big challenge as I needed to integrate the movement of the camera with the movement of the running characters into the video background traveling. In addition, I had to made visible the shadows over the background video.
So I used again a blue path to cast the shadows. This path, was later chroma-keyed on Sony Vegas but it was also useful to match the movement of the virtual camera on iCLone, with the traveling movement showed in the video footage.
I used two wonderful and exotic lions dressed to be ridden that came with a nice running seamless motion clip. The problem was they didn't have the motion clip for the riders, so I had to squeeze my brain a little. The solution came using a great feature present on iClone, the "reach target" tool.
So I created several dummy cubes, one for each hand and foot of the human characters, and two, let's call them, "main dummy cubes" to command the movement of every pair human-lion on the scene.
I started linking each character riding the lion to the lion spine and then the lion to the "main dummy". At this moment, I used the "reach target" tool on each pair lion-rider, to link the hands and feet of the human character to their respective cubes. Then I moved the cubes on their place over the lion and I linked the two cubes reached by the hands to the lion's head, while I linked the cubes reached by the feed to the "main dummy". I finally linked the particle system that simulated the dust trail to the "main dummy" too.
Then I just had to move the "main dummy" on the time line to obtain a wonderful and synchronized running motion of the lions and their riders.
After the project was ready, I rendered it twice. First, with the blue floor with the particle systems deactivated, and then, without the blue floor and the particle system activated.
On Sony Vegas I applied a chroma key and a Black&White effect to the track with the blue floor obtaining a nice shadow projected over the canyon floor.
Finally, I applied the usual Gradient Maps filters to recreate Auria's atmosphere and... It was done!
Although this sequence is very short in the clip, I incorporated two tends with a quite complicated "weight maps" that made them move as affected by a strong wind. In order to integrate the characters and the props to the background, I created a texture with the sand from the background video footage that I applied to several floor panels I put on the places where it should be "foot contact" with some character or where the props where half buried on the ground.
There are two particle systems on the scene. One linked to the running horse to simulate the dust raised when galloping and a big "sand storm" particle effect that mixed with the video background created the impression that a big sand storm was coming.
But when I mixed the render obtained from iClone with the video background on Sony Vegas, I realized that the "sand storm" particle system affected the patched floors in a different way that in the places were the render was transparent, making the "holes" too evident.
To solve that problem, I had to render the scene without the "sand storm" particle system and after that, I rendered just the particle system. Later, I mixed both sequences on Sony Vegas.
On this scene I wanted to create a flock of dragons flying around the tower. To do that I used three dragons animated with a seamless flying motion clip linked to three intricate paths that come with iClone. In particular, I used the Helix and the Orbit paths that I stretched and deformed until I obtained the desired effect.
I added two Torch lights that came with iClone to create a more mysterious atmosphere and I adapted the ambient lights to the background video. At this point, the scene was ready to be rendered.
As the video background was a motion capture video, the clouds on the sky moved faster than usually and I really liked that effect, but the waves on the sea also moved very quickly and it doesn't look right to me, so working on Sony Vegas I copied the track containing the original background video footage and applied a mask to the new track in order to show just the sea. Then I used the slow motion effect to slow down the movement of the waves...
Now the clouds were moving fast, while the sea waves were moving slow. I applied the usual filters and the scene looked mysterious enough to make a good ending for the clip.
And that's all guys!... I hope you liked my video and all my explanations. Please don't hesitate to contact me if you have further doubts or questions. This is my e-mail: adolf@antareus.com
Cheers!
Adolf
We already have submitted the final video to the Reallusion page, but still, it is not visible in the Entries Tab. I suppose it must be checked before.
We'll keep track of it.
http://www.reallusion.com/iclone/event/2015-contest/entries.aspx
Hope you like it!
That is really impressive work. It's very interesting to see, haow you did all those scenes. It never came across my mind to use rear projection and green screnn in iClone. But why not. As we can see here, there is much quality in all of your scenes.
You know, while I watched your trailer I always felt a bit uncomfortable, because all those background videos are still videos. Real footage - combined with the iClone characters. That's the thing that distracted me, because it always will look fake. Those 3D characters won't fit a bit with real footage. That's the only thing I have to complain about, but it's only my thoughts.
The animation, the camera work and the lighting is wonderful and all those scenes are very good composed. I'm glad you joined the competition and I hope to see more of your work ...
Direx
It's hard to imagine how anybody could improve on something this close to perfection, and you obviously don't need to, but if you're still working on the full version, have you considered tweaking the standard gallop motion from the iClone horse? Because I've found that if you widen the stance of the hind legs in the first frame of a gallop using 'edit motion layer" it's possible to get a much more realistic movement - especially if you also export the motion to 3DXhange, add the motion to the performance and "Modify" it by leaning the horse's head n neck forward a little more during the stretch-n-reach frame of the gallop, and back a little during the 'collection' (when all 4 feet are off the ground)... but when you're editing at this skill level, I guess you're probably already in the midst of nailing that too... LOL...
Mannn, I really want to see this one when it's done
I wanted to explore the complications mixing real footage with CG using iClone, having in mind the possibility to use these tools to develop an animated TV series. I have worked too using green screens including real people in iClone sets and it also shows a lot of possibilities.
Bleetz... I totally agree with you. The horse's gallop motion loop looks stiff and not natural. Curiously, when played at slow motion it looked pretty good, but in real time, it looks mechanical and repetitive. I could have dedicated more time refining the motion but in that moment, I had to make still a lot of scenes, so I moved on. But I take note of your advices. Thanks Bleetz, I appreciate it.
If I have time this month, I'll refine it, but now I'm developing a second clip based on a Sci-Fi plot I had in mind since long time ago. In this one I want to include dialogs and to work with the facial expressions of the characters. Let's see If I have time to post it too.
Also, I have to finish the fourth installment of my graphic novel "The Zurvan Club", (Made with iClone too), so... It's going to be an interesting summer... he he... By the way you can download the graphic novel in http://www.zurvanclub.com it's free.
Now, I'm finishing a new clip for a Sci-Fi story. I hope is going to be ready at time to be included in the contest too.
I'll open a new Thread and keep you posted.
Rowan