Tutorial - Gradient Mapping & UDK
polycounter lvl 17
This week on Idol Gives Back 
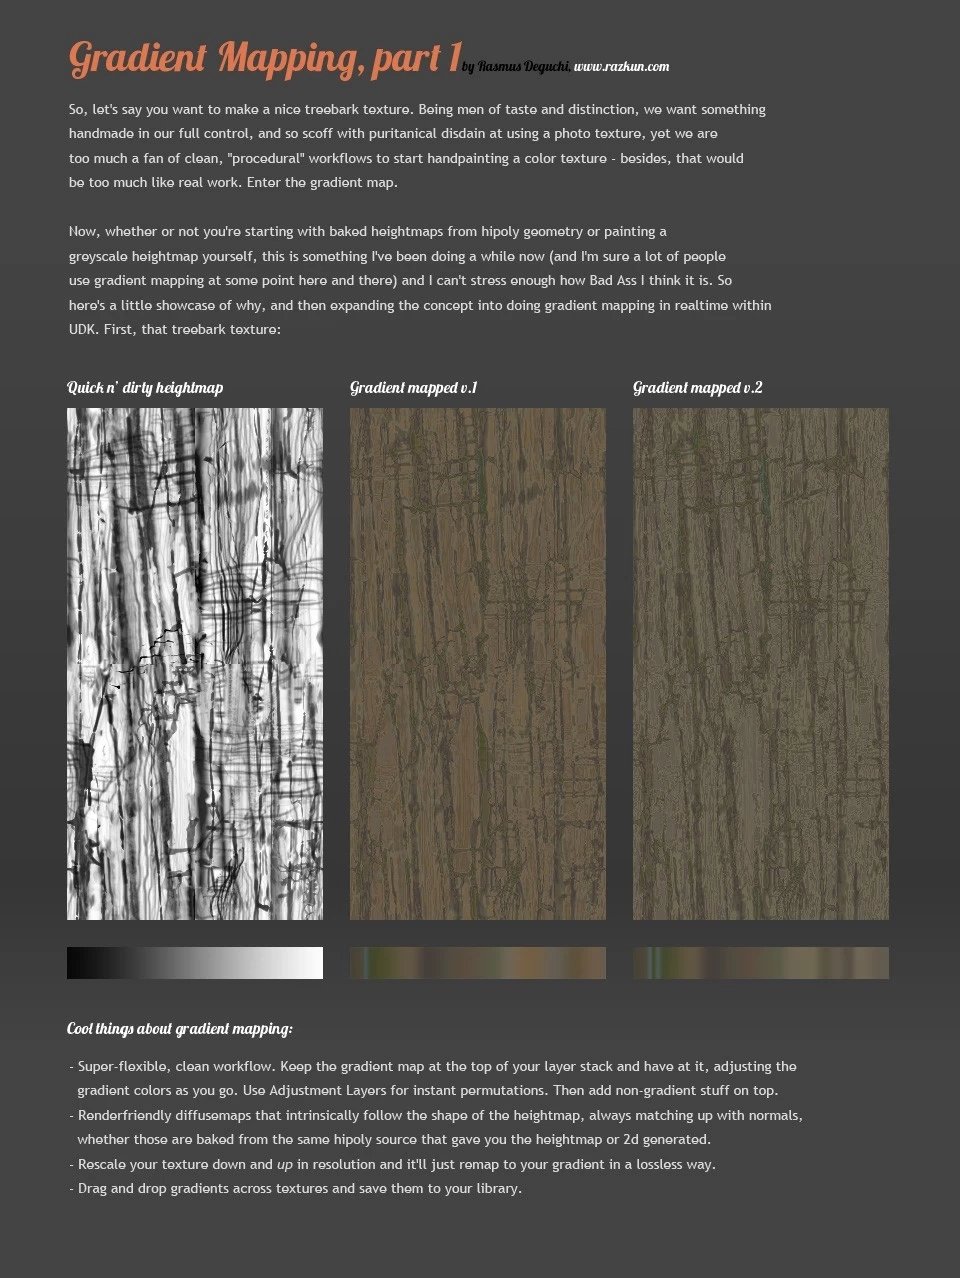
Part 1: Generating color textures from heightmaps in PS
Part 2: Doing the same thing in a realtime shader in UDK
Part 3: More crazy ideas.


So, a bit rushed but I wanted to get this quick tut out there, I hope it atleast gets some of you guys' creative juices going. A quick runthrough of some of the stuff I've been fiddling with and thinking about lately - be it screenspace, texture space, by lightvecor, etc etc, mapping things in interesting ways is just one of those awesome things we can do these days. I'll try to amend it to show a hipoly source as well as other things, just didn't have more time this morning. By all means keep your ideas coming and feel free to clutter up the thread with crazy attempts
Thanks guys!
Part 1: Generating color textures from heightmaps in PS
Part 2: Doing the same thing in a realtime shader in UDK
Part 3: More crazy ideas.
So, a bit rushed but I wanted to get this quick tut out there, I hope it atleast gets some of you guys' creative juices going. A quick runthrough of some of the stuff I've been fiddling with and thinking about lately - be it screenspace, texture space, by lightvecor, etc etc, mapping things in interesting ways is just one of those awesome things we can do these days. I'll try to amend it to show a hipoly source as well as other things, just didn't have more time this morning. By all means keep your ideas coming and feel free to clutter up the thread with crazy attempts
Thanks guys!
Replies
You can also add a gradient to alter the colour/saturation/etc as your scene transitions from lit to shaded.
Cheers for sharing.
Part 1 is about how you use this as a sort of procedural basis for your diffuse textures, having them generated based upon a heightmap ? Purely a photoshop thing ? Mind showing how you do this exactly, it isn't really mentioned and I haven't used this before.
I can see how it looks pretty good for the tree bark, but I can't really imagine how you come up with that specific gradient to attain such a look. You have a library of these things or something ? Mind showing some more examples ?
So, it pulls values from the gradient where the mask transitions between black and white.
Hey Xoliul, yeah, that's the part where it's a bit rushed, but yeah, basically part one is just Photoshop stuff - you do a gradient map on top of other grayscale layers, found under Adjustment Layers, then just go nuts with the color sliders and add whatever gradients you like to your library. It's really just a matter of playing around to get what you like and iterate on it to get a base texture that is in line with the heightmap/bumpmap/normalmap without having to paint colors by hand. I'm big on that *P I'll try to come up with more examples when I have the time
I'm also big on trying to find ways of getting at "sub-pixel" stuff in textures - ie, stuff that happens as an interpolation result between two or more other factors to get away from a set texture resolution, or purely as a style experiment. So that's part 2 :P
But I think the question is: How do you visualise which value of your mask will pull which specific value from your gradient?
I'm unfamiliar of any method in PS that'll let you "colourise" a greyscale mask with a gradient, like that.
Re-read your reply, and realised Gradient was different to Gradient Map, which I'd never looked at in all my years of using PS.
What a handy thing to know! Thanks man
So rasmus, do you finish the greyscale "depthmap" completely before you start creating the gradient? Or do you go back and forth a bit?
Sounds like there needs to be a dedicated photoshop tips n tools section of the wiki or some other central repository.
Also my guess as to the need for adjusting the RGB curve to match PS is PS's working gamma/colorspace being SRGB or AdobeRGB while UDK's is linear. SRGB and ARGB have a gamma value of 2.2, so to reverse that shift (ie correct it if viewing in linear space) you'd need 1/2.2 or, like you found, about 0.5 (technically 0.45... but hey.)
That's actually really good to know.. thanks.
Like I said, it would be fun if people posted any other crazy shader/texture things they might come up with, gradients or not. No such thing as mixing too many crazy ideas
This could be really useful on the tileable/organic stuff. Too bad it doesn't eliminate a diffuse texture lookup, even though it's small. You could make a gradient procedurally jumping through some hoops in UDK, but if epic made a gradient node this would be priceless. Btw is it possible with a custom HLSL node?
Once again, amazing technique. Can't wait to try it out in production.
d1ver: Thanks - you're right, and as I said, it lends itself best to tiling organic stuff for the PS texture creation, shader-wise the possibilities are endless. I don't have a problem with the texture lookup so far, it basically eliminates any visual traces of texture compression etc, but yeah, I have yet to try out the UDK stuff on a larger scale and for sure it is more of a style experiment than a replacement for normal texturing. The thing with offsetting UVs per-pixel is that sooner or later everything starts looking like melting icecream :P I'm sure you can do this with any shader language, offsetting UVs per-pixel is a common feature of SM3 as far as I can tell, it doesn't really matter what you do it with. Definitely one of the more exciting aspects of this generation graphics tech though
if you want a 2 color "gradient node" just make 2 color constants and lerp between them with the alpha being whatever your were gradienting over.
You could do it in a custom node programatically, but its would not be easily changeable at runtime, or you'd need n number of float4 inputs to the custom node.
Use the RGB channels for color, and the A for position along the overall gradation, then you can iterate over the gradient, and selectively lerp between each color pair based on value of the input pixel.
edit:
if you want to replicate the texture to texture example that's less code to deal with than my above example.. and I didn't feel like writing it all out.
here's the HLSL for the equivalent node setup in udk
EDIT: As a start to a proper gradient node it's cool - you'd need an interface though!
:P Thanks for the push. It took far longer than I'd thought all because it took me a while to remember/figure out the general form for making these sub gradations, but the mental math felt good. I finally had to break out the paper and work out what I needed in steps to find the formula. Its simple to the point that I'm going to blame lack of sleep for it taking so long.
Yes you would need an interface for it to be artist friendly. And a proper gradient node with unlimited color stops would need to be coded in C++ with access to the full unreal source.. or well at least the source that pertained to shader nodes.
One benefit to having it be procedural is you get much finer color resolution and control than by using a texture map. This is basically moot if you use a texture map for a control source, but if you apply it to a floating point value like the depth buffer, you get infinitely smooth transitions. Bilinear filtering for textures only does so much.
eg
The other, and to me more tangible, benefit of doing gradient mapping procedurally, is the colors could be set to be parameters, accessible by script, so you could change any given color and even its placement on the gradient on the fly in game.
Think of things like changing ranges of IR vision, or even faking entire different spectrum effects. Yes AVP did this, I don't recall how, though it very well may have been a selective screenbuffer effect much like this programatic approach could be applied to.
Another thing to note with either of these approaches, texture or code based, is the interpolation can be from ANY floating point value, be that depth buffer, single channel of a texture, or something like time, or a trigonometric output. You may notice some unused nodes in the below screenshot. One of those is hookedup to a modifiable sine node attached to a time input. So what it does is smoothly ramp through each of the colors in the gradient and back down, forever. Basically creating a multi step blink/fade effect.
Another benefit is not having to use an additional texture sample in your shader at the expense of some code. If you already have expensive use of texture memory, this may work better. If you have free memory but you are fill rate bound, and or have heavy weight shaders already going on, then another texture might be simpler.
I also have to state that epic mentions using the custom node may make less optimal shaders than their node based system, as the custom node, and I believe the entire shader it is in, cannot be evaluated by their shader optimizations.
Here's a general HLSL setup for a procedural gradient map.
float3 output; //output color const uint NUMCOLORS = 4; //number of colors for programatic gradient float4 gradient[NUMCOLORS]; //here's the actual gradient keypoints gradient[0] = color1; gradient[1] = color2; gradient[2] = color3; gradient[3] = color4; /* This method has a flaw, in that the colors listed here are essentially required to be listed in ascending order of alpha value, else the blending will not be smooth between adjacent colors.*/ float4 blend1 = gradient[0]; float4 blend2 = gradient[0]; float3 weight; float singleWeight = 0; for (int i = 0 ; i<NUMCOLORS-1; i++ ) { if (gradient[i].a <= ControlTexChannel) //if the position of our gradient key is equal to the control value { blend1 = gradient[i]; if (i == NUMCOLORS-1) { blend2 = gradient[i]; } else { blend2 = gradient[i+1]; } } } singleWeight = (ControlTexChannel- blend1.a)/(blend2.a - blend1.a); weight = float3(singleWeight,singleWeight,singleWeight); output = lerp( blend1.rgb, blend2.rgb, weight); //output = color3.rgb; return output;The color parametrization is also useful to just quickly create a bunch of instances.
I'll throw it into UDK to check it out.
float3 output; //output color

const uint NUMCOLORS = 4; //number of colors for programatic gradient

float4 gradient[NUMCOLORS]; //here's the actual gradient keypoints

gradient[0] = color1;
gradient[1] = color2;
gradient[2] = color3;
gradient[3] = color4;

//Sorting Function

float4 TempColor;
int StillSwapping=1;

while ( StillSwapping )
{

  StillSwapping = 0;

  for (int i = 0 ; i<NUMCOLORS-1; i++ )
  {

     if( gradient[i].a > gradient[i+1].a )
       {

       TempColor = gradient[i];
       gradient[i] = gradient[i+1];
       gradient[i+1] = TempColor;
       StillSwapping = 1;

        }
  }

}

//Sorting End

float4 blend1 = gradient[0];
float4 blend2 = gradient[0];
float3 weight;
float singleWeight = 0;

for (int i = 0 ; i<NUMCOLORS-1; i++ )
{
 if (gradient[i].a <= HeightMap) //if the position of our gradient key is equal to the control value
  {

    blend1 = gradient[i];

    if (i == NUMCOLORS-1)
   {
    blend2 = gradient[i];
    }
    else
    {
    blend2 = gradient[i+1];
    }
   }
}

singleWeight = (HeightMap - blend1.a)/(blend2.a - blend1.a);
weight = float3(singleWeight,singleWeight,singleWeight);

output = lerp( blend1.rgb, blend2.rgb, weight);

//output = color3.rgb;
return output;
My only worry is that there's no way of checking if two colors have the same alpha value. That could create a bit of misunderstanding(and subdivision by zero). I just don't know the code in HLSL that could give out a warning or smth.
As a really basic example, you have a character that you're about to fit with a grey-scale mask and a gradient map to colourise it.
On your texture mask, you set your skin to values between 0-25 brightness, the trousers would be between 26-50 brightness, the shirt would range from 51-75 brightness, and the shoes would go range between 76-100 brightness values.
So you split your gradient into four quarters. On the gradient ramp, you set a range of 0-25 for the colour of the skin, 26-50 for the trousers, 51-75 for his shirt, 76-100 for his shoes.
This allows you to set multiple colour sets to different parts of your model/mask, and should allow you to get more out of such an efficient way of texturing your assets.
@Vailias - That's pretty sweet, man. Could imagine being able to translate gradient settings to that, with little problem. Very cool
The simplest solution is to have a variable version and a static version and only use the variable version for assets that absolutely need it in the game.
I'd also thought of and notice the divide by zero potential in my code. It would be a matter of throwing another "if" statement or ternary operator in there somewhere to check if the alpha values were identical before setting up the subtraction.
Where I have it it winds up being .. farily safe mostly thanks to the compiler I belive. The only case in my initial shader where you can divide by zero is where you get a 0/0 situation. This still should cause some undefined behaviour, but I'm gathering that UDK's compiler has some safeguards to evaluate that to 0 rather than throw an exception.
Another method to fixing it would be multiplying 1/((Heightmap - blend1.a)+0.00001) * (blend2.a-blend1.a). So then you wind up multiplying by zero if the weights are the same, which is fine because a zero weight will always return the starting color.
I have to say though Vailias, I can't seem to get those ugly blocky compression artifacts to show up as a result of using a texture lookup - even with it compressed to Default as opposed to Grayscale. True it's not free from a little banding:
I'll try to post some more examples over the weekend, hope I have the time because this thread is rockin
All these come from the same code I had before, the 4 step color thing, with the colors changed into parameters so I could easily tweek them in a Material Instance while the scene was running.
I of course went directly to the nightvision effect, then played with some non realistic techniques to see how they'd look on a level not built for them.
Good times.
While monkeying around with it I lamented that iterating on the rainbow texture ate a fair bit of my time. Meanwhile a friend had showed me this thread and I put two and two together and went from this:
This this (I append the RGB output of the VectorParams with its Alpha output to get the right float4 input the HLSL is looking for. If anyone has a better way, I'd love to hear it!)
So I could do this:
Documentation Here
All I really needed to do was add more entries to the Gradients array.
//code authored by d1ver and Vailias on polycount float3 output; //output color const uint NUMCOLORS = 8; //number of colors for programatic gradient float4 gradient[NUMCOLORS]; //here's the actual gradient keypoints gradient[0] = color1; gradient[1] = color2; gradient[2] = color3; gradient[3] = color4; gradient[4] = color5; gradient[5] = color6; gradient[6] = color7; gradient[7] = color8; /* This method has a flaw, in that the colors listed here are essentially required to be listed in ascending order of alpha value, else the blending will not be smooth between adjacent colors.*/ float4 blend1 = gradient[0]; float4 blend2 = gradient[0]; float3 weight; float singleWeight = 0; for (int i = 0 ; i<NUMCOLORS-1; i++ ) { if (gradient[i].a <= ControlTexChannel) //if the position of our gradient key is equal to the control value { blend1 = gradient[i]; if (i == NUMCOLORS-1) { blend2 = gradient[i]; } else { blend2 = gradient[i+1]; } } } singleWeight = (ControlTexChannel- blend1.a)/(blend2.a - blend1.a); weight = float3(singleWeight,singleWeight,singleWeight); output = lerp( blend1.rgb, blend2.rgb, weight); //output = color3.rgb; return output;This is an extremely simple solution I came up with to the issue people were talking about with having several gradient maps on a single asset without having to rely on complex lerping. The shader setup shown here is literally just the grayscale into the gradient map UV's.
I simply used Photoshop's Gradient Map tool and assigned different grayscale ranges across the texture, and then stacked four different gradients in a row. Mipmapping will have to be disabled on the gradient to avoid color bleeding, and the smaller grayscale range per gradient will likely impact quality in some way, but for simple assets it should be passable.
My only issue with that is the relative lack of flexibility in the gradient maps themselves (you'll need a different set of gradient textures per color set, unless you start playing with stacked sets of gradient maps).
I wrote this post some time ago, and it's not UDK-specific (though the shader code is more than doable with material nodes), but it covers some general ideas:
http://teckartist.com/?p=26
Not 100% on the if statements, because I suspect the bottom grayscale values will cause problems. I suppose it could be fixed with another if statement to cull out the bottom range. In either case this shader network suddenly got rather lumpy again. How expensive is a Lerp anyway? I have the impression they are somewhat costly, but I'm not sure if they're bad enough to warrant a workaround like this.
I tried to give this a whirl in UDK because it's really cool but I stumble upon this if I use the exact setup: "error X3014: incorrect number of arguments to numeric-type constructor"
I saw this:
and this opens up some opportunities with regards to fast workflow / optimisation in UDK.
Image is by bungie, you can get the full talk on Bungie VFX for Halo3 at
http://halo.bungie.net/Inside/publications.aspx
Any idea what I did wrong? Am I missing something ?
-- FIXED! I used regular texture instead of CustomTexture...
Im Making a shader that can blend between rubber, plastic, metal, crystal, and emissive material properties, based on a gradient map. i just stack gradients that represent masks for each material property. i plan on using this to define spec, gloss, emissive, fresnel glow, cube map reflections, opacity, transparency, and metalicity. Using this method, i can have alot of interesting material variety without wasting entire maps on rare things like glow or transparency.
[ Images Deleted due to photobuckets greed. ]