Quarantine Map
polycounter lvl 16
Quarantine Map
Originally started as a L4D map ive decided rather to us the unreal engine.
Objective:
My objective in creating this map is to wrap my head around the UE3, this will help me utilize all my models to there full potentianl ingame and help me understand the normal work flow needed to not only make eye catching models but also polish up on my level design.
Basic Theme:
The map will take place in a busy street wich has been quarantined off by the goverment. there will be several paths in the sorrounding area (i.e: alley, staircases, shops, and underground train station.)
Layout:
Ill post this up when its finalized")
Prop list:
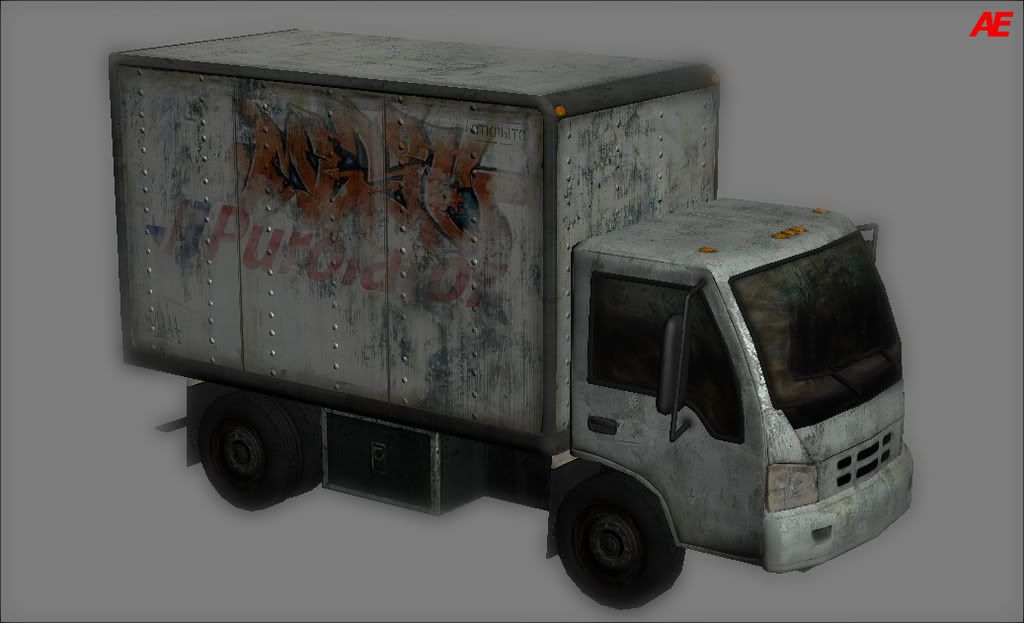
Truck Asset
Latest Update:
UE3ed shot 2: http://img.photobucket.com/albums/v92/armanguy/edgetruckLOWHIGH4-2.jpg
old updates:
Viewport grab: http://img.photobucket.com/albums/v92/armanguy/edgetruckLOWHIGH3.jpg
UE3ed shot 1 : http://img.photobucket.com/albums/v92/armanguy/edgetruckLOWHIGH4.jpg
First texture Pass: http://img.photobucket.com/albums/v92/armanguy/edgetruckLOWHIGH2-1.jpg
Flat shaded model with lowpoly+normal map: http://img.photobucket.com/albums/v92/armanguy/edgetruckLOWHIGH.jpg
Ill try to keep this thread tidy and updated with all the work i will be starting in the next couple of weeks. all feedback would be great.
Originally started as a L4D map ive decided rather to us the unreal engine.
Objective:
My objective in creating this map is to wrap my head around the UE3, this will help me utilize all my models to there full potentianl ingame and help me understand the normal work flow needed to not only make eye catching models but also polish up on my level design.
Basic Theme:
The map will take place in a busy street wich has been quarantined off by the goverment. there will be several paths in the sorrounding area (i.e: alley, staircases, shops, and underground train station.)
Layout:
Ill post this up when its finalized
Prop list:
Truck Asset
Latest Update:
UE3ed shot 2: http://img.photobucket.com/albums/v92/armanguy/edgetruckLOWHIGH4-2.jpg
old updates:
Viewport grab: http://img.photobucket.com/albums/v92/armanguy/edgetruckLOWHIGH3.jpg
UE3ed shot 1 : http://img.photobucket.com/albums/v92/armanguy/edgetruckLOWHIGH4.jpg
First texture Pass: http://img.photobucket.com/albums/v92/armanguy/edgetruckLOWHIGH2-1.jpg
Flat shaded model with lowpoly+normal map: http://img.photobucket.com/albums/v92/armanguy/edgetruckLOWHIGH.jpg
Ill try to keep this thread tidy and updated with all the work i will be starting in the next couple of weeks. all feedback would be great.
Replies
About the model, are you sure you want to spend filesize on a prop like this? Since there is already a prop that looks exactly like this in sourcemodels.cfg if I'm right.
The thing is that server hosts are very picky when it comes to filesize and maps that look good are bigger than stupid orange maps, certainly with custom content pakratted in the .bsp. I think you got my point
Good luck!
i get what your saying thanks for the tip :P but i want to showcase my skills as an artist and a level designer.
I was going to make a hummer model also but i know from the demo that they already have one. right now im just gonna try to plan everything out so ill be able to make a simple blockout of what i want in hammer then just play test that until i feel it runs good and it plays good. then add all that assets i will create hopefully it wont be too big for the servers.
Bigger shot: http://img.photobucket.com/albums/v92/armanguy/edgetruckLOWHIGH2-1.jpg
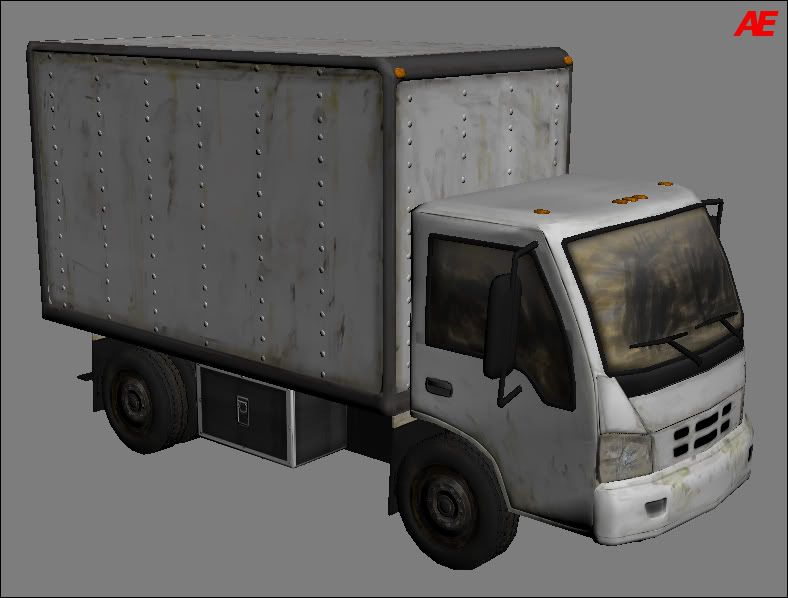
Lets see the specular do its magic!
Right now you dont have hard edges or flat surfaces simply because of the way you used the smoothing groups.
Texture looks good though
Hey thanks for the crit, let me just clarify this you want me to give the different sides of the vehicle different smoothing properties? so the edges look harder?
Um, arent you supposed to have a single smoothing gropu all over if youre using normals?
*goes back to the normal mapping thread"
exactly
what I meant is this (although overdone a bit)
I myself have a script that quickly lets me slide the smoothing angle of selected faces or objects (context sensitive) - that way I can quickly highlight or change parts of a object without the hassle of the polymodifier interface or the smooth modifier.
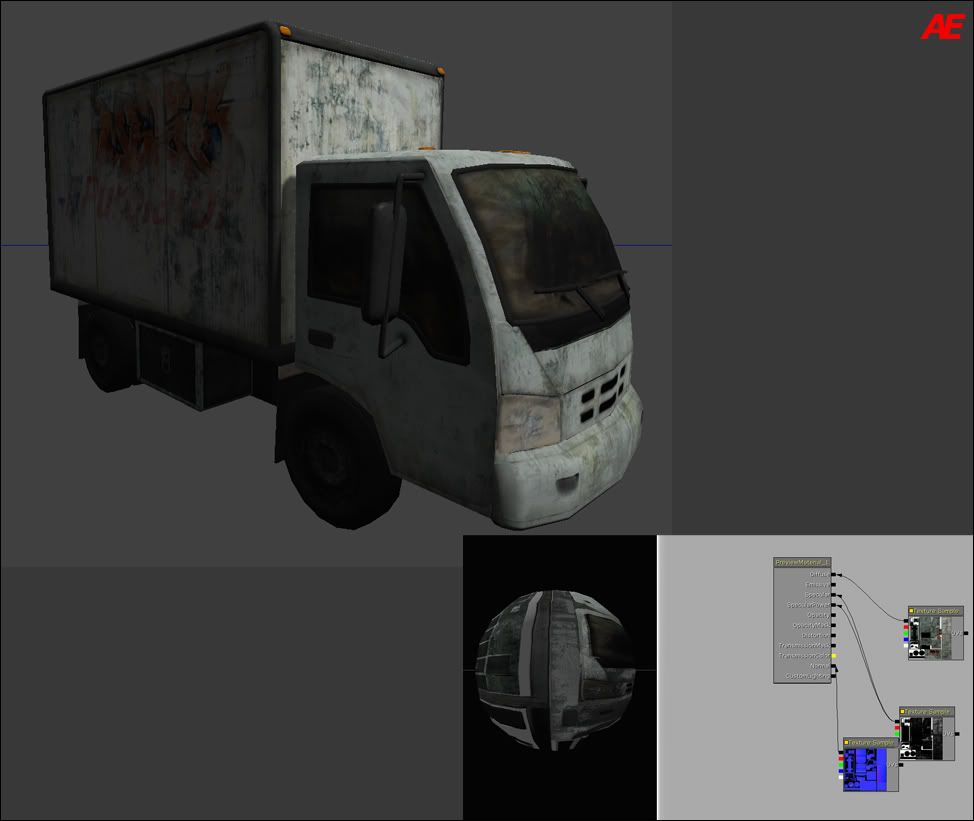
i updated the texture and threw it into ut3 but the normals are not popping like i would like check them:
http://img.photobucket.com/albums/v92/armanguy/edgetruckLOWHIGH4.jpg
and heres a 3ds max viewport grab:
I am guessing your normal map issues could be in how you created your material in UT3
I think it would be a good idea if you multiplied your spec power value to something like 35 - 75
It might help bring the spec out more in unreal.
thanks for the tip im guessing its because the contrast on my computer might be higher than some other user so ill add more definition and highlights to the wheels.
also ill be playing around with unreal ed alll weekend to see why its messing up
Quick Edit:
i was look on UDN and i came across the bumpoffset feature im not at home right now but could i use that to modify normal in the ue3 material editor?
yeah i dont think ill be using it its really distorts the model, ill probably just have to edit the normal in photoshop.
Idealy yes, but we do not live in an ideal world
What it comes down to is this, a tangent space normal map needs a good amount of geometry to be accurate, you cant use the same smoothing group on really hard angles and except them to come out correct, you'll get nasty smoothing errors. The more geometry you have around those hard angles, the more accurate the surface normals on your lowpoly mesh will be(normals are averaged, so if you have to extreme values, averaging produces less than ideal results) the more accurate your lowpoly mesh's normals are, the better it can support a normals map. Its best to do some tests with whichever software/renderer you're going to be using to find out exactly what does and doesn't work.
Often times it can be better to just *simplify* your lowpoly mesh, remove some of the details that could be represented with just the normals map, because IMO atleast, having a lower-poly less-detailed mesh that has a flawless normals bake on it is WAY more convincing that a super-detailed lowpoly mesh with everything modeled in, but tons and tons of smoothing errors. You basically have two options other than keeping a very simple mesh, and those are; Use smoothing groups to seperate hard edges, which can result in nasty seems depending on software/method/uv layout/etc or add in extra geometry to accomodate for errors.
Stumbled upon this bit of information some time ago (backing up with what you said,with pixxx) and proved extremely usedful
hahah thanks man means alot coming from you
also you know the way to told me to do the smoothing groups i just realised i actually did it your way instead of smoothing everything. the windows are a different smooting grop and so are the window trim i think the only thing that has the same smoothing group all around is the main cab :P
I would put the graffiti down the bottom of the truck and not at the top. People aren't that tall. ;^)
Here's a reference pic to show what I mean.
http://www.untitledname.com/archives/upload/2005/7/df-graffiti-face-truck.jpg
heres some modular work i did for the sidewalk:
I would create a hard surface model 1st, then maybe sculpt a little variation into the edges to make it a little more organic, then the rest of the detail i would probably add through detail overlays in the normal map. that way you should have a decent level of control over the forms. also the low poly is pretty chunky on the outside of the curve maybe add more edge support.
for the direction of the map i will being going for a western take on tokyo/ New york in the year 2020
anyways update wise i blocked out the map wich will end up being a duel map for ut3 might put it up for playtesting when i have more done. right now im gonna make a list of things to do before putting on the set dressing:
- 3 modular building meshes + textures
- 3 modular doors + 3 modular windows + textures
those are my goals for the next week as i have an 8 hour workdays i only really have 4 hours a day to work on my stuff wich should be enough to complete all those assets.
as soon as i finish those ill make new goals. ill be putting the truck on the side for now until i complete the more important aspects of the map.
again im glad for everyones input and look forward to get more.
thos wall is just going to be used for 1 main building and a secondary building wich you wont be able to access i still need to make 4 more varations on the building materials.
and i finished this sidewalk my friend told me it looks metallic is this true?
just a quick note the normals on the walls are really stong so they show better when i import it into ut3
the normal for the bricks on the wall is really bad. you can see where you cloned the bricks in the wave its created. the bricks themselves don't really have punch from surface to grout, it looks like it was just run through shape recognition in crazy bump rather than from a properly painted height map. as for UE3 normals, make sure you level all the channels to get the most out of the color range and nuetrallize the blue channel on any overlays to the normal maps so it doesn't destroy the depth below it.
i like the design of the shop front, the windows and door look like they make sense, looks like you have some type of reflection going on in there which is good to see. the geo is could use some beefing up, like a slight chamfer to all the razor sharp corners especially where the bricks form the pillars.
looks like this is progressing nicely man.
Excellent progress
Agree with PM about the bricks tho.
Even though i understand that you KINDA want to get over with the wall with just the nvidia normal filter, it is ACTUALLY more effective,rewarding if you actually either paint in a height map OR model the bricks in. its just a matter of making a block and move them in place
Should give you some experience with modular work aswelll
note: i made a wall texture before like this on the weekend did the high-poly by hand came out like crap in ut3 but awesome in 3ds max :S , workflow wise for the effect i want i think a crazybump pass is good enough, but the most important thing is how it looks ingame if it looks like shit ill redo them quality over quantity thats my modo ill try to be "less lazy " in my future attempts
http://spring.clan-sy.com/wiki/Height_Map_Tutorial
You could even do it inside of unreal
http://www.wonderhowto.com/how-to/video/how-to-paint-the-height-map-of-a-terrain-in-unreal-editor-197025/
i wish i had some better lighting in my scene but imma worry about the lighting after i finish most of the art.
update:
still need to make a modular roof for all the buildings
Here let me give you an example.i made this a ling time ago when i just took a phtot>nvidia filter boom. But look at how mushy things are.
if you REALLY dont want to make a high poly for it, i read a tutorial somehwere, i think it was on zburshcentral, where for alphas for the skin, the artist did two things.a) obviously desaturated it and b) (my favourite) he did a height filter where the height from the photo was lessened and the acual pores/scars became more distinct with better values. dont exctly remember the name of the filer but was along the lines of height map or something.
At least do something about it...really bringing the piece down man. plus the EXTREMELY obvious repetition isnt doing any good either.
again thanks for the crits bro really helping me out maintain some quality in my work :P
http://www.hull-breach.com/Talon/temp/normalMapMiniTut.jpg
thanks for the link saiden thats what i did with the new normals :P
this is gonna be the trim with a red/brown brick backsplash. and ill be making thos by hand to get better normals
remember most of the time with in game lighting you are only adding shadow and color to your textures in the end, so if you have something super dark its gonna be unreadable when shadows are multiplied over top of it, plus you would have to really crank your lights to get it brigher, thus effecting other objects nearby in the scene.
its best to have an overall level of brights and darks in your texture, you could you could probably fix this by simply adjusting the levels. keep the progress coming!
Also i wasent bring lazy with the logo i went for some starbucks before work near my house and really like how it was layed out, i was gonna make my own coffee shop in the level but really liked the colorscheme in the starbucks.
If its a HUGE! issue ill change the logo personally i like it and dont really think it takes away from the piece at all. but thats my opinion
timmy ho's is pretty good :P