[3DS Max] - Straighten UV's Problem
Hello!
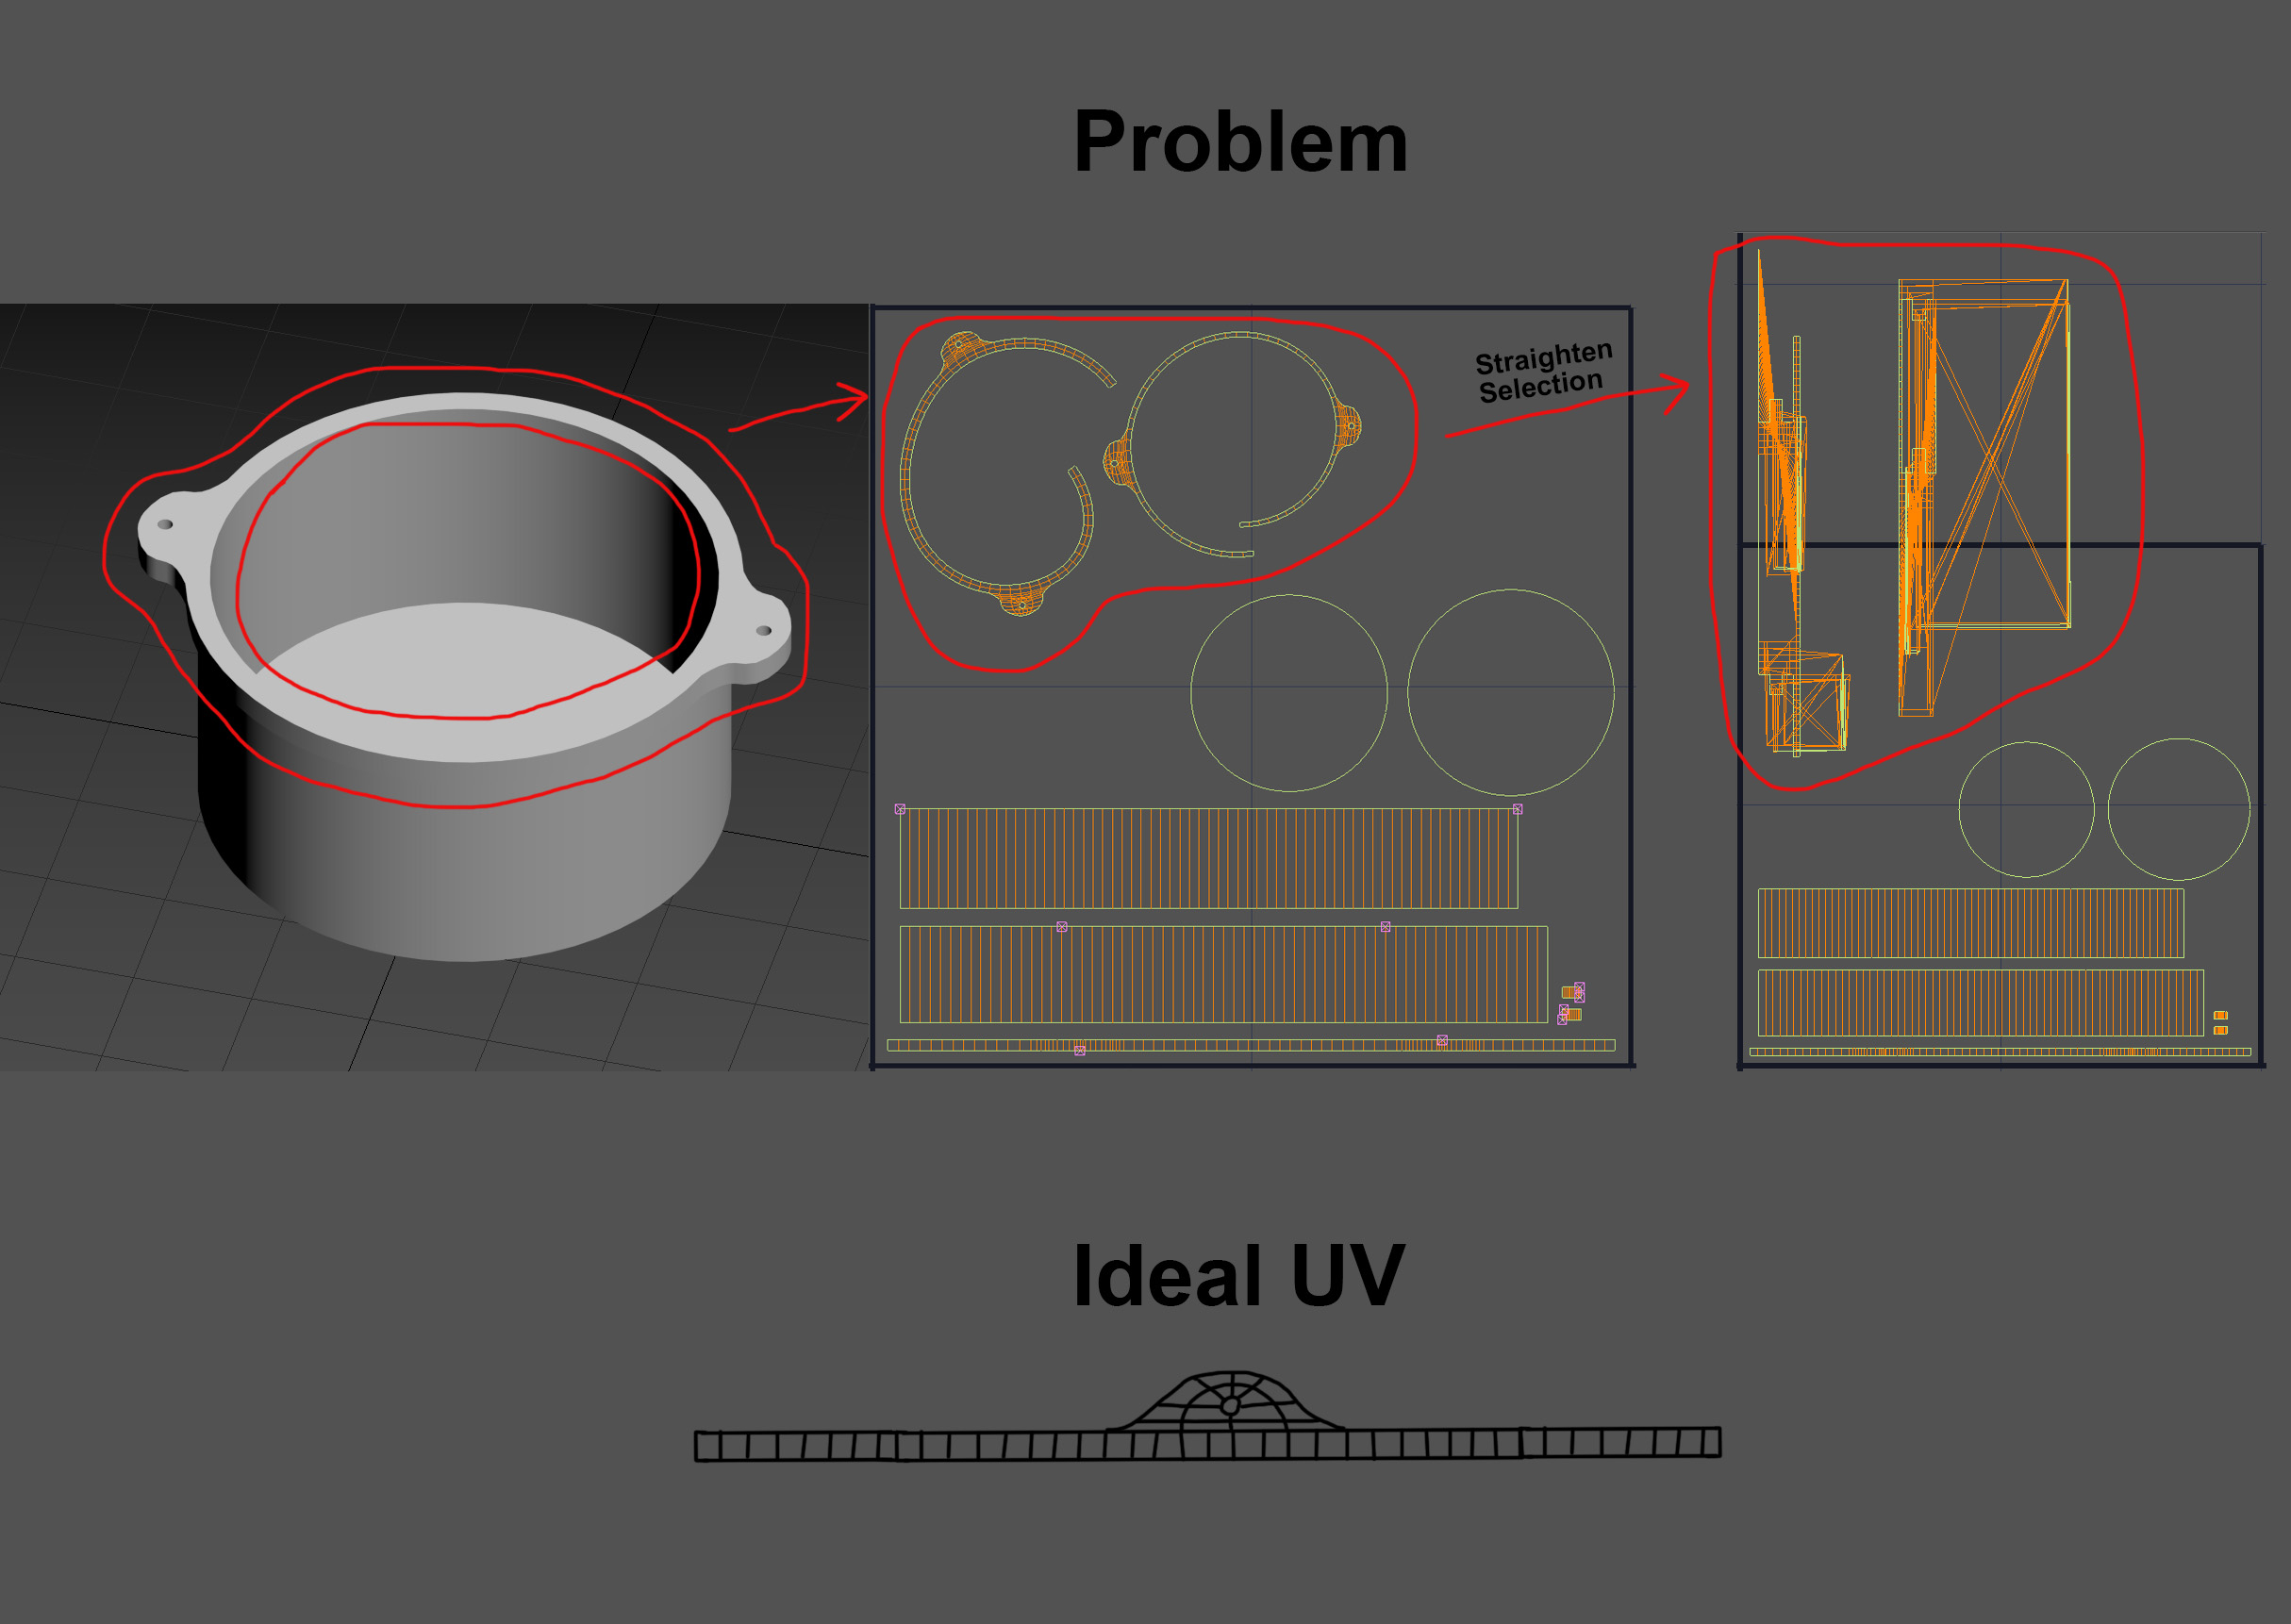
I'm trying to unwrap the UV's of this pan, and I'm having the following issue with the "Straighten Selection" feature in 3DS Max's UV Editor:

In brief, I'm trying to straighten these UV islands circled in red, but the Straighten Selection tool messes everything up, as can be seen in the far right. I could place some seams in order to isolate the pan holders, but I'm trying to keep everything on the same island. It seems that the Straighten Selection tool only works if the UV island is all quad and uniform, which is not the case. I also tried the "rectify" option in the textools plugin, but it didn't help me at all.
my goal is to make everything as straight as possible but maintaining that rounded shape of the pan holder, looking similar to that "Ideal UV" drawing on the image above. So is there any way of making this in 3DS Max? Any scripts or plugins?
I'm trying to unwrap the UV's of this pan, and I'm having the following issue with the "Straighten Selection" feature in 3DS Max's UV Editor:

In brief, I'm trying to straighten these UV islands circled in red, but the Straighten Selection tool messes everything up, as can be seen in the far right. I could place some seams in order to isolate the pan holders, but I'm trying to keep everything on the same island. It seems that the Straighten Selection tool only works if the UV island is all quad and uniform, which is not the case. I also tried the "rectify" option in the textools plugin, but it didn't help me at all.
my goal is to make everything as straight as possible but maintaining that rounded shape of the pan holder, looking similar to that "Ideal UV" drawing on the image above. So is there any way of making this in 3DS Max? Any scripts or plugins?

Replies
select the outer edge as so... (in editable poly) and use Create Shape from Selection.... the in the uv editor select the faces you want to map and select the wrap::spline option.
in the new dialog you have a pick spline option pick the created spline and set mapping to planar....
and voila
This is what got following the method you mentioned:
So, unfortunately, doing that is very time-consuming, even though this is indeed a possible solution. I had already been in a situation where I had to unwrap several meshes with similar issues, and what a headache that was! As you said, Straighten will only work with full quad strips. And I'm aiming for a solution that allows me to straighten even non-quad loops. Maybe there's a script than can do that, but I couldn't find it on my own
Having perfect UV's is something that will always take manual effort anyway, scripts/plugins only have so much "logic" when it comes to unordinary situations.
Worst case/fastest case, is to just leave out the stitching step. Faster, but you'll just have some extra seams here which may or may not be ideal in your situation, depends on the asset.
Following other folk's suggestion, I could solve this problem in RizomUV, which worked quite nicely. The only manual part was selecting the edges I wanted to be straight, apply a Horizontal Constraint to them and then, press unfold and optimize. This could be a little more straight on the sides of the island. I can always manually straighten them up, but I think this is the best I can go with little effort:
Ideally, I should be able to do this in 3DS Max, without having to rely on external tools. But if someone knows a solution for that in 3DS Max, I'm open to hear!
By the way, I have a high-end hotkey pad specially designed for UV editing (haters gonna say this is just a regular keyboard with a bunch of tape on top):
The RizomUV result is quite poor for two reasons :
- center edges are messed up (=will need later select>relax>straighten)
- external app means more clicks. Always a thing you want to reduce and a problem if you need to do that on several models or refine the model's topology for some reasons
On 3dsmax you can also rely on the Peel mode, this one allows you to view unfold in realtime depending on pinned vertices, it starts with two, but you can add more simply by selct+drag them around and see how it behaves best.
Another way to do that would be using the projection method, I did that to project UVs from a flat model onto a more detailed one :
the question i can't stop myself asking is why you'd do this to a pan other than as an exercise.
Straightening circular things out makes sense when you simply can't fit the object into your UV space, if you're getting artefacts from texture compression (probably not an issue outside of handhelds/ancient hardware) or if you're using trimsheets/tiling maps but it does limit your ability to generate efficient lods and takes an awful lot longer than simply planar mapping the faces.
- having cleaner bakes (by reducing aliasing)
- having less space lost in UVs
- easier packing if you need to do manual adjustments
- reusability of your maps
- stacking, trimsheet mapping...etc
- ease VFX through material as it can offer cool flows
- refine a base model that carries the base UVs but lacks some modeling details
- doing that projection after you did the texture can help texture the base model a bit faster/more easily, since you won't mess with mesh bumps & caveats and instead just paint a flat surface
- lightmaps seems less and less used but it can help avoid light/shadow bleed on such bakes if you intend to "generate" auto-lightmaps, which often just use existing UVSet and repack islands into another UVSet
(I also heard it can help getting easier to compress textures, but not sure on that ^^")
it's a useful exercise for sure though and there's been some really good methods demonstrated
conforming the mapping of the tube object (channel 1) to that of the lofted line while adjusting the u & v tiling of the loft. There's a wrapping issue where the mapping goes a bit off !