Ryse Moss Tutorial
Ryse Moss Tutorial
Hi, I'm Patrick Gladys - Environment Artist at Crytek in Frankfurt/Germany.
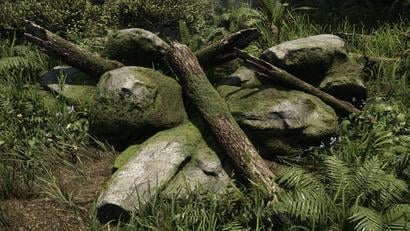

Basically the moss is made up of 4 polygon layers hovering one above the other. The UVs of those poly layers are covering a different section of our moss texture, which we will prepare now.
Preparing the texture
The moss texture is divided up in 4 sections.
From the top-left being the brightest but most transparent part
to the bottom-right being the darkest but most opaque.
This kind of setup allows us to look through the sparse top layer onto all the other layers below it, with the densest layer being at the bottom, this makes the whole thing look like it has some depth to it, whilst retaining the fuzzy effect. We will use the dark opaque part of the diffuse for the base polygon layer of the moss, and the bright transparent part for the top polygon layer.
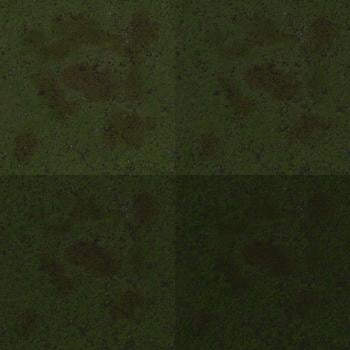
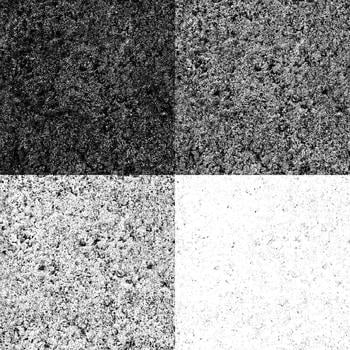
Texture created by Tom Deerberg
Example image of the structure:
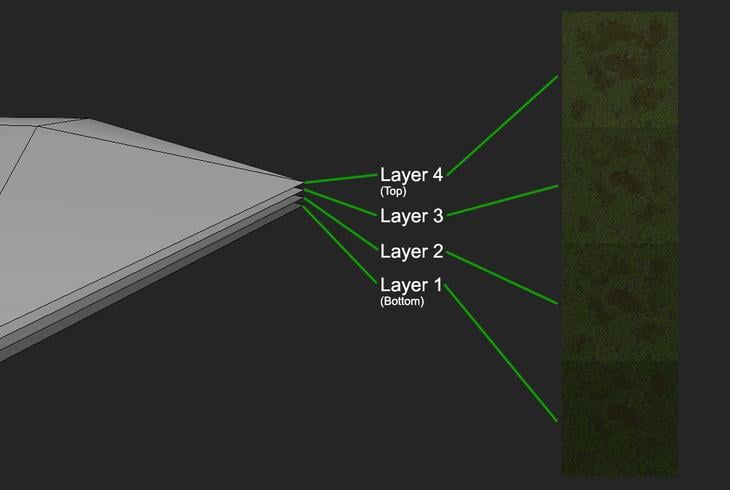
So you can get yourself a nice 2k moss texture, edit it as you like and divide it up so every individual section has a final resolution of 1024x1024. Get the brightness variation in there and create alphas of it accordingly.
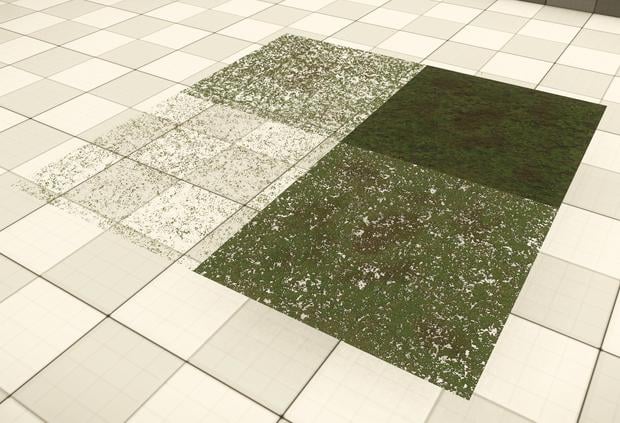
When you apply your final texture to a simple plane, it should look something like this:
Preparing the geometry
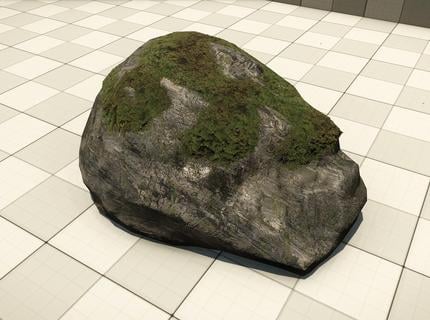
For the geometry I’ve prepared a simple demo rock mesh I want to use to explain how we set up things here. Mostly you want your moss to go onto other objects like stones, rocks, trunks, walls etc.
If not, you can also create moss chunks as standalone assets as well, rather than being a fix part of another asset.
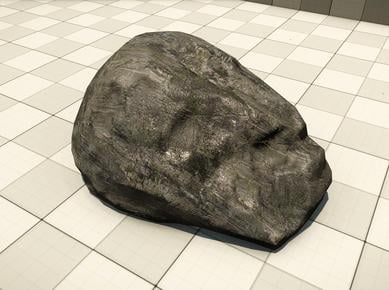
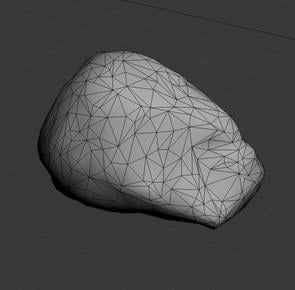
We start off by determining where our moss should be. You can simply jump into the re-topology tools of Max via Freeform > Polydraw and quickly cover the area on your rock with a basic poly shape; this is also our bottom moss layer. Don’t worry about the rock sticking out of the moss shape, this will be tweaked later on.
2. Create bottom moss layer through Max Freeform Tools
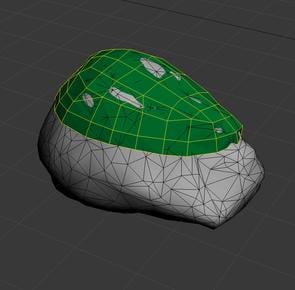
Selecting already existing triangles on our rock mesh and detaching them also works to create that poly shape, but you will probably end up with more triangles then necessary. Also, cleaning up such a mesh is more work than quickly making a re-topologised version, allowing greater control of the edge flow.
Now it’s time to apply a couple of specific modifiers in a certain order to make life easy!
3. The modifier stack
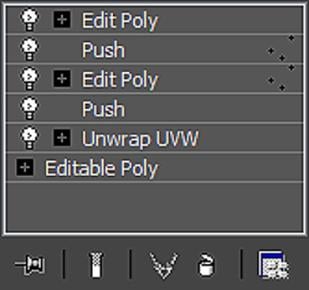
Apply all those modifiers in the stack to your newly created poly shape, exactly as you see them in the image. The ‘Unwrap UVW’ will be used on every single layer to move the UV shells up, down, right or left by exactly 0.5 in U & V space to be able to cover all four sections of our texture. The first push modifier affects the entire shape, this creates the final distances between all the polygon layers.
The next one, ‘Edit Poly’, has a vertex selection of the base mesh border only. We can now push the vertices back into the rock, we do this by using the next (& second) push modifier.
If you don’t push the border back into the rock, you will end up with a harsh transition only, since it is going to be a clear visible border.
Once the four layers are created, with all of them sequentially having their border vertex pushed back, they will create a nice fuzzy transition to the rock.
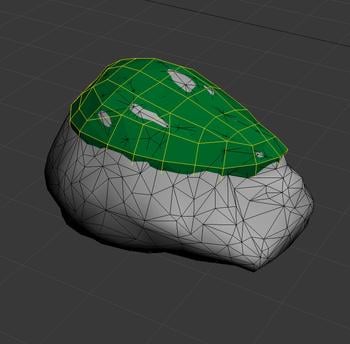
The very last modifier is a simple edit poly again, which allows us to adjust the shape of all moss layers at the same time, this gives us control over the final shape.
Don’t collapse the modifier stack! Just let it hang in there
4. Creating all four moss layers

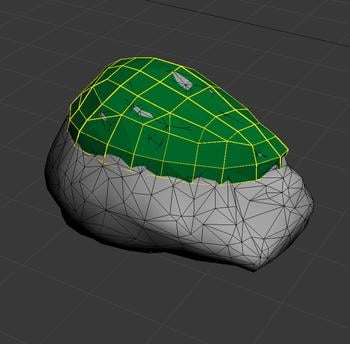
With the first moss layer and its modifiers prepared, clone it as a copy. On the cloned object you will have to adjust the UVs by moving them to the next section on your texture. Move them exactly -0.5 (absolute) in U space, so it occupies the bottom left area of your moss texture.
After that, switch over to the first push modifier and push the second shell out a little, so it hovers above the first one you've created. The other push modifier is adjusting the border selection of your moss shell that you want to push back into the stone if necessary, keeping in mind that it should still hover above the first moss layer.
Remember: We do this because the 4 layers will create a nice transition from your moss shells over to the rock as a result.
Repeat this step until you have all four sections of your textures covered and all four moss poly shapes are set up properly.
Summary:
0. Clone to create new shell
1. Edit UV’s for the shell and determine the position
2. Push out moss shell
3. Edit poly modifier to select border
4. Push modifier on border vertex selection to push them back in
5. Edit poly modifier again to tweak all moss layers later
5. Adjusting all moss layers (optional)
Our demo rock has all the moss geometry layers ready. We can export it into Cryengine and check what it looks like in this state:
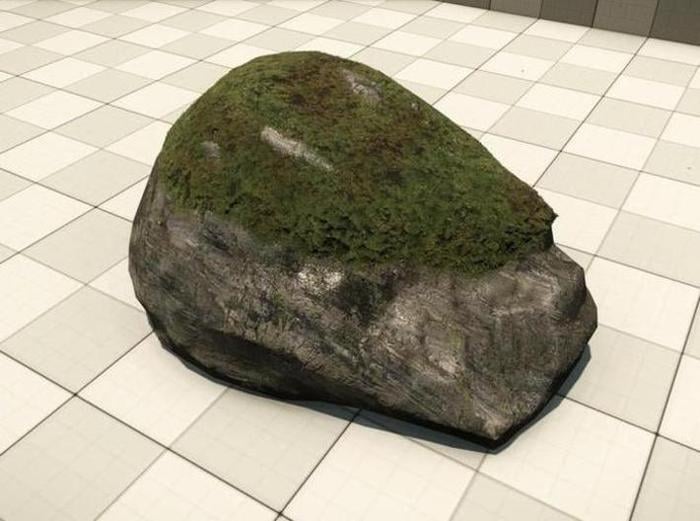
Do not collapse and attach everything together. Do not destroy your modifier stacks – try to stay dynamic and non-destructive. Link everything to a dummy and export the dummy, this keeps everything else intact.
The final steps are simple. Select all your moss layers and you notice that through the last Edit Poly modifier you can alter all vertices at the same time – make use of it and change up the shape by pulling out some areas, or knock them back if you like.

Hi, I'm Patrick Gladys - Environment Artist at Crytek in Frankfurt/Germany.
In this tutorial I will show you how to create moss the way we did it in Ryse.
Some people might think we used a shader for that, but in fact it was an old school trick we used on this to create the effect of a nice fluffy surface.
You might know it from Shadow of the Colossus.
Some people might think we used a shader for that, but in fact it was an old school trick we used on this to create the effect of a nice fluffy surface.
You might know it from Shadow of the Colossus.


Basically the moss is made up of 4 polygon layers hovering one above the other. The UVs of those poly layers are covering a different section of our moss texture, which we will prepare now.
Preparing the texture
The moss texture is divided up in 4 sections.
From the top-left being the brightest but most transparent part
to the bottom-right being the darkest but most opaque.
This kind of setup allows us to look through the sparse top layer onto all the other layers below it, with the densest layer being at the bottom, this makes the whole thing look like it has some depth to it, whilst retaining the fuzzy effect. We will use the dark opaque part of the diffuse for the base polygon layer of the moss, and the bright transparent part for the top polygon layer.


Texture created by Tom Deerberg
Example image of the structure:

So you can get yourself a nice 2k moss texture, edit it as you like and divide it up so every individual section has a final resolution of 1024x1024. Get the brightness variation in there and create alphas of it accordingly.
When you apply your final texture to a simple plane, it should look something like this:

Preparing the geometry
For the geometry I’ve prepared a simple demo rock mesh I want to use to explain how we set up things here. Mostly you want your moss to go onto other objects like stones, rocks, trunks, walls etc.
If not, you can also create moss chunks as standalone assets as well, rather than being a fix part of another asset.


We start off by determining where our moss should be. You can simply jump into the re-topology tools of Max via Freeform > Polydraw and quickly cover the area on your rock with a basic poly shape; this is also our bottom moss layer. Don’t worry about the rock sticking out of the moss shape, this will be tweaked later on.
2. Create bottom moss layer through Max Freeform Tools

Selecting already existing triangles on our rock mesh and detaching them also works to create that poly shape, but you will probably end up with more triangles then necessary. Also, cleaning up such a mesh is more work than quickly making a re-topologised version, allowing greater control of the edge flow.
Now it’s time to apply a couple of specific modifiers in a certain order to make life easy!
3. The modifier stack

Apply all those modifiers in the stack to your newly created poly shape, exactly as you see them in the image. The ‘Unwrap UVW’ will be used on every single layer to move the UV shells up, down, right or left by exactly 0.5 in U & V space to be able to cover all four sections of our texture. The first push modifier affects the entire shape, this creates the final distances between all the polygon layers.
The next one, ‘Edit Poly’, has a vertex selection of the base mesh border only. We can now push the vertices back into the rock, we do this by using the next (& second) push modifier.
If you don’t push the border back into the rock, you will end up with a harsh transition only, since it is going to be a clear visible border.
Once the four layers are created, with all of them sequentially having their border vertex pushed back, they will create a nice fuzzy transition to the rock.

The very last modifier is a simple edit poly again, which allows us to adjust the shape of all moss layers at the same time, this gives us control over the final shape.
Don’t collapse the modifier stack! Just let it hang in there
4. Creating all four moss layers


With the first moss layer and its modifiers prepared, clone it as a copy. On the cloned object you will have to adjust the UVs by moving them to the next section on your texture. Move them exactly -0.5 (absolute) in U space, so it occupies the bottom left area of your moss texture.
After that, switch over to the first push modifier and push the second shell out a little, so it hovers above the first one you've created. The other push modifier is adjusting the border selection of your moss shell that you want to push back into the stone if necessary, keeping in mind that it should still hover above the first moss layer.
Remember: We do this because the 4 layers will create a nice transition from your moss shells over to the rock as a result.
Repeat this step until you have all four sections of your textures covered and all four moss poly shapes are set up properly.
Summary:
0. Clone to create new shell
1. Edit UV’s for the shell and determine the position
2. Push out moss shell
3. Edit poly modifier to select border
4. Push modifier on border vertex selection to push them back in
5. Edit poly modifier again to tweak all moss layers later
5. Adjusting all moss layers (optional)
Our demo rock has all the moss geometry layers ready. We can export it into Cryengine and check what it looks like in this state:

Do not collapse and attach everything together. Do not destroy your modifier stacks – try to stay dynamic and non-destructive. Link everything to a dummy and export the dummy, this keeps everything else intact.
The final steps are simple. Select all your moss layers and you notice that through the last Edit Poly modifier you can alter all vertices at the same time – make use of it and change up the shape by pulling out some areas, or knock them back if you like.


Replies
To blend in the rock with the moss, use a Blendlayer shader (via Shader Generation Parameters in the material editor of Cryengine). Apply the shader to the rock and blend in additional moss somewhere around the border of your layered moss geometry by using vertex alpha in Max. This layered moss technique can be super expensive in terms of polygons, so I recommend you to use it for LOD0 only. To avoid weird swapping effects, use the Blendlayer shader on LOD1 where the moss geometry was, so the swap from LOD0 to LOD1 is less obvious.
Re-export and check the final result in the engine:
This method is very expensive when it comes to alpha overdraw and triangle counts. The game, tech budget and structure of the environments you work on have to allow such a technique, speaking of performance. In Ryse it swappes to a cheaper LOD quite quick.
I hope you found this tutorial helpful and interesting.
- Patrick
https://drive.google.com/file/d/0B1mqehHMyMQvVklUdWdEOVhuT1k/edit?usp=sharing
"Once the four layers are created, with all of them sequentially having their border vertex pushed back, they will create a nice fuzzy transition to the rock."
Genius! This looks useful for a bunch of other stuff too, like grass. Thanks a lot!
Thanks for sharing.
Is that alpha blend? How did you guys did when performance was low on any scene? Deleting layers and that's all? Or you got any more tricks
Great, really great info... thanks a lot!
Thanks a lot to all of you - I'm super glad to see you like this little trick and find it useful. Hope to come up with more stuff like this in the future and share it with you.
Vertex alpha is what you use to control your blendlayer shader in Cryengine. I used the simple moss texture blend on the rock to make the transition from moss to stone even smoother, and on top of that sits the moss geometry
The moss was used on assets in the level "Oswald" only - Lodding the moss geometry off in LOD1 already didn't make us run into great performance issues.
Looking forward to any other tips & tricks you wanna share
Do you recommend any particular way to decide on the amount of opacity between each layer? Things to avoid that destroy the effect?
Added to the wiki
http://wiki.polycount.net/GrassTechnique
Beat me to it!
Awesome tut, zen. Thanks for sharing!
That's great, thanks!
It kind of depends on the moss texture you use, but basically the more you get to the top layer, the lower(increasingly) the opacity should become. The top layer depicting the tips of your moss, and all the other layers letting you see through to the bottom layer. Maybe something like 100% 80% 40% 5% (from bottom to top opacity), but as I said, it depends
Can you explain why you chose to go for this method, instead of a blend texture in the shader? That would be much faster to paint in on individual rocks etc, and also seems cheaper. Isnt this taking a lot of ressources in overdraw compared to the gain in quality compared to having used a blend texture?
The method shows a mixture of both, the layered moss and the use of a blendshader. What you can do with the layered geometry approach is effecting the silhouette of your asset as well as largely control how and what is going to be covered by the moss. For example - having a greater moss carpet that is not only lying on top of one rock, but multiple assets at the same time, creating super interesting transitions from one to the other.
Using blendtexutres is a fix part of your shader and it does not effect the silhouette of your object.
Performance-wise, yes, you really have to observe the situation and take care - but we managed to go with it and it only exists in LOD0.
Ah, makes sense to only have it in LOD0, ofc.
And didnt think about it covering multiple objects!
Maybe it could be done in older engines like Source or maybe even GoldSrc.
Have you tried this effect with less layers and more layers ? Or four is really the right amount.
I suppose this technique could also be somewhat recycled with sand or snow textures.. creative juices are flowing!
It is depending on your texture, so you have to judge this case by case. But as the other guys said keep in mind that this method is expensive -> the less, the better.