Best Of
Re: The cost of a texture "draw call"? (Quantity vs Resolution)
In general the most important advice is to make use of the engine's profiling tools. For a few years GPUs are quite powerful, you can generate drawcalls on the GPU without the need of CPU, you can pull a lot of data as you need it (aka bindless). As was mentioned, we have APIs that were modernized for higher throughput, submission from multiple threads etc.
Therefore engines can make use of a lot of features depending on their target platforms. They may bake/batch data in different ways.
"it depends" is more true than ever.
Re: The cost of a texture "draw call"? (Quantity vs Resolution)
Shrike said:
- Realtime lighting and shadows multiply your vertice count effectively in engine but is unavoidable
- As one vertice can only have one material, UV, RGB etc, coordinate for each, adding a second UV doubles the vertice count again
- Layering materials on the same mesh should be avoided, split the mesh into the material parts as this again cases tons of unneccessary vertices as a vertice can only have one material, so they are doubled again for the new one
- Vertices up to a certain degree are easily handled by decent GPUs, materials and drawcalls usually are more important to watch out for
As example; If you have one car and the car has one mesh+mat for interior, one mesh+mat for lamps, one mesh+mat for windows, and one mesh frame that uses multiple materials for the details on it, like a chrome trim and whatnot, this is easily 5-10x the vertice and drawcall / shadow caster count and effectively performance drain - than having it all in one mesh and material, even if the actual model is not any different.
Now where I scratch my head the most:
(?) Material transparency is very expensive (in Forward only?)
(?) Drawcall performance is not linear, after a threshold that it becomes the main performance bottleneck as there is a physical limit the CPU can handle well
(?) Textures operations effectively cost performance in a material depending on texture size, but texture amount is not really important until you reach the GPU cap of (16 at UDK times?) - it just is part of your shader performance budget and an operation like others
(?) You can save texture operations in shaders by saving different maps in different RGBA channels, which then is 4x more performant for the operations as 4 invidivual maps?
(??) The texture overhead is depending on the passthrough/bandwidth of your GPU, if that is too slow you will see bigger FPS losses, and as long as your video memory is not full, overall texture size in your game does not really matter, but when its full, its going to be a huge fps sink unless it automatically turns down to the lower mipmap - (Im really confused about the entire texture thing still, size dosnt matter but also it does?)
Re: Dream Fusion 3D models. Is the end close for 3D artists?
While it is true that it is indeed "just another tool", I feel like there are massive blind spots in people's appreciation of the consequences of all of this.
Sure, the output of this or that AI algorithm isn't perfect or production ready, and artists are not going to lose jobs overnight because of it. And of course it's neat to have access to such a literal "make art" button - especially for AI-bros who just love the fuzzy feeling of "creating" something by typing in a prompt.
But one of the very real consequences of all this is that we are already at a time where the output of such prompts is directly usable in moodboards and thumbnailing/brainstorming. This is of course a lot of fun to play with (and I would encourage everyone to do so, as this stuff really is fascinating), but that also means that panels like this (100% AI generated) are now a thing :

Now *of course* one could prepare a similar collage with a few hours of googling, so in and of itself that's nothing new and both processes are similarly derivative.
But that also means that inevitably, there will be cases where some artists (the human ones) are going to be tasked to work from something that comes directly from an AI image generation tool, as opposed to coming from a human designer/curator. AI evangelists will of course say that it doesn't matter, that it's just a tool, and that speeding up a process is never a bad thing ; but there will absolutely be some people who will straight up refuse to be part of a process in which the thing that is handed down to them didn't come from the experience, knowledge and craftmanship of a designer (even if they never met that person IRL) but just a text prompt with the always useful "trending on Artstation" bit thrown in for good measure.
This rejection will not be because of the results being bad, but because it simply is less interesting since it means being unable to have any conversions about where an idea came from, what the influences of the art director are, and so on.
So to go back to the example of mocap and animation : sure, mocap didn't kill traditional animation. But will an animator specialized in manual animation (or even just mocap cleanup work) which up until now was always based on human capture, be just as willing to do the same work if based fully on a AI-generated sources ?
I am 100% sure that it won't take long for some studios to experience this first-hand and that we'll see some studios and companies positioning themselves as not using AI in their creation process, regardless of it being a useful tool or not. Because even though no one is owed a job, there is still a very real incentive in making sure that a team is working well together and solving problems and design challenges as a tight unit. Of course the deciding factor will be whether or not it will be sustainable to do so.
I am also very interested to see the reaction of the general public a year or so down the line, when we'll start hearing AI-generated music at the mall, or when we'll start seeing tons of products being advertised as "designed by AI". Some will love it because it's new and interesting, some will consume without giving it any second thought, and some will undoubtedly hate it.
 pior
pior
I made a dragonborn fus roh dah! wait I meant the other kind of dragonborn
dunno if I'll win, but it was fun :D dunno why I didn't pick up substance earlier lol
https://www.artstation.com/artwork/Le60zr
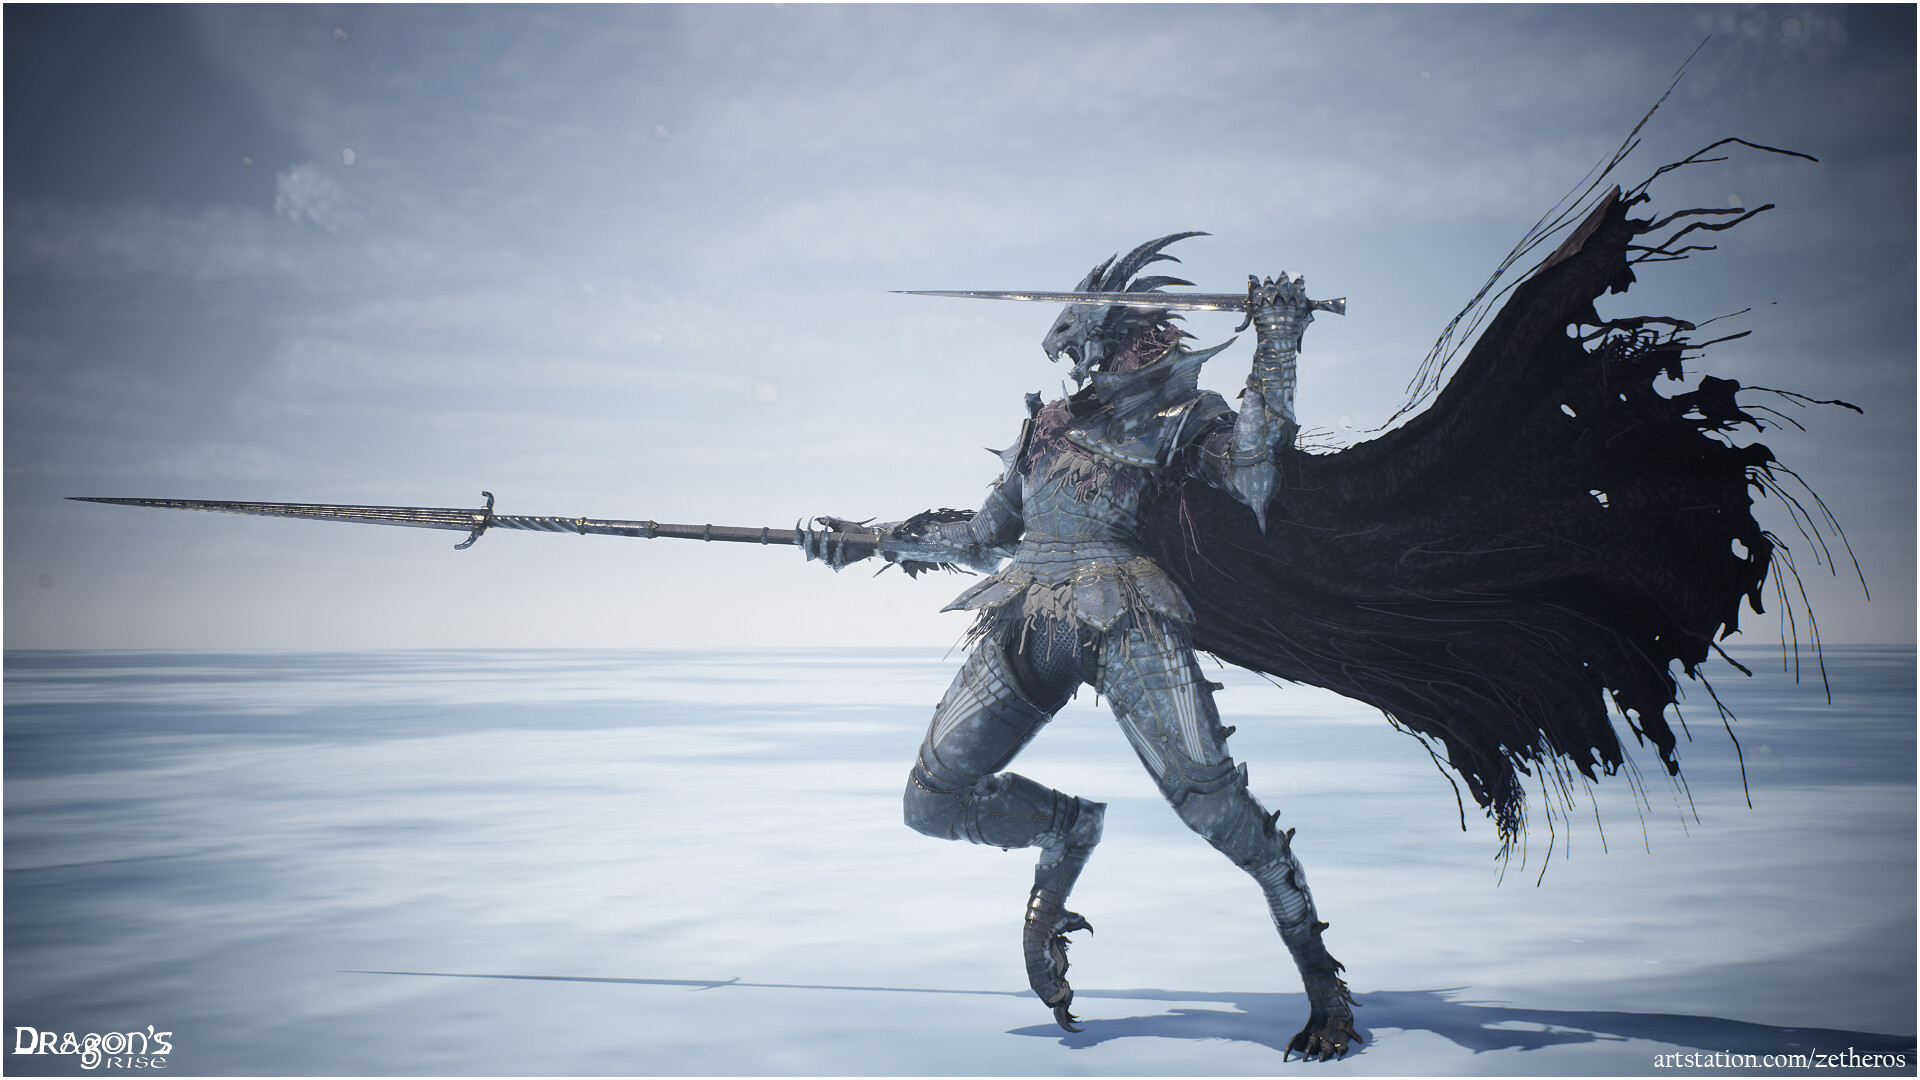
 zetheros
Re: Crowd funding project: Marking menus for Photoshop and other software
I'm sorry I missed this discussion when it was started a decade ago, and I'm sorry that the links above are broken, but I'll add my comments now for the record.
I published a paper about pie menus in the proceedings of 1988 ACM SIGCHI conference called “An Empirical Comparison of Pie vs. Linear Menus”, in which we measured the performance of pie menus versus linear menus and found them to be 15% faster and have significantly lower error rates, and I presented pie menus at that conference and many other conferences and trade shows, and implemented them in many products, including The Sims from Maxis/Electronic Arts.
https://donhopkins.medium.com/an-empirical-comparison-of-pie-vs-linear-menus-466c6fdbba4b
I love the idea of integrating pie menus into all of the Adobe Creative Cloud products, and recently I've been evangelizing them to Adobe as a member of one of their user interface focus groups.
I'm trying to get to the bottom of why after so many decades Adobe still does not support pie menus in any of their products. I would like to hear from user interface designers and product managers at Adobe why after all these decades Adobe products still don’t support pie menus. Certainly it’s not because nobody’s heard of them or seen them before, so there must be another reason, which I would like to know.
My question for Adobe is if the code really that complex and brittle and deeply mired in technical debt and legacy decisions from decades ago, that they're technically unable to implement something as simple as pie menus, or if it is a cultural problem that makes it politically impossible to implement anything Adobe didn’t invent themselves.
Blender has them. Maya has them. The Sims has them. Here they are running on a PDP-7 at the University of Cambridge in 1967 in a CAD system called PIXIE. So why doesn’t Photoshop have them yet, in 2022? Does Adobe not employ any user interface designers who have ever heard of them, or do Adobe’s user interface designers have any convincing arguments or immovable barriers against using them? Or do Adobe’s cowardly lawyers prohibit their user interface designers from improving their products, because they’re terrified of getting sued by Autodesk because they believe their FUD?
Here are lots of other pie menu examples and citations, and there are many other high-end applications that use them like Houdini and Maya. User customizable pie menus would significantly improve all aspects of Photoshop’s user interface and workflow across the board. Menu selection is an extremely frequent operation in Photoshop, and speeding that common repetitive task up by 15% while lowering the menu selection error rate would have dramatically and measurably more impact than any number of nickle-and-dime tweaks to the Gaussian blur dialog. Especially if users could design and share their own custom task and workflow-specific pie menus, just like the happy users of Maya and Blender and many other products have been able to for decades. In comparison to so many other successful commercial products and games and open source tools with pie menus, not only Photoshop but ALL of the Creative Cloud products look and feel like they were designed in the stone age, and needlessly waste huge amounts of their user’s time.
Links:
- X11 SimCity Demo
- The Sims, Pie Menus, Edith Editing, and SimAntics Visual Programming Demo
- NeWS Tab Window Demo: Pie menus work very well with tabbed windows
- Just the Pie Menus from All the Widgets
- HCIL Demo - HyperTIES Browsing
- https://en.wikipedia.org/wiki/Pie_menu
- Blender Pie Menus and Pie Menu Editor for creating custom fluent workflows: https://www.youtube.com/watch?v=AIa-Yu4Z35U
- Pie Menus in Blender: https://www.youtube.com/watch?v=meVfv-ewhlk
Here is a 30 year retrospective of work I and other people have done with pie menus. Why hasn’t any of this ended up in any Adobe products? Not Invented Here Syndrome? But Adobe keeps buying companies and presumably incorporating the best ideas of those products into their own, so why has Adobe been so resistant to implementing ideas you didn’t invent themselves? Does Adobe only buy other companies like Figma to eliminate competition and innovation, then never bothers improving their own products because they’ve wiped out the competition through monopolistic anti-competitive practices, in spite of and to the detriment of their own users?
- https://donhopkins.medium.com/pie-menus-936fed383ff1
- https://donhopkins.medium.com/pie-menu-timeline-21bec9b21620
- https://donhopkins.medium.com/designing-to-facilitate-browsing-a-look-back-at-the-hyperties-workstation-browser-535eab3a3b3c
- https://donhopkins.medium.com/the-design-and-implementation-of-pie-menus-80db1e1b5293
- https://donhopkins.medium.com/don-hopkins-october-31-2012-e0166ec3a26c
- https://donhopkins.medium.com/baychi-october-meeting-report-93b8e40aa600
Michael Knubben's post about "Pie menus are infinitely less powerful than Marking Menus, and absolutely not the same thing" is incorrect, and he is the victim of misinformation and FUD spread by Alias employees Gordon Kurtenbach and Bill Buxton. I wish Michael had read the comment I posted on that video 10 years ago, which would have corrected his misunderstanding. I wrote:
Don Hopkins, 10 years ago: "These "typical pie menus" are not at all typical -- they're just "straw man pie menus". Typical pie menus (like the pie menus in The Sims) don't behave the way this straw man implementation demonstrates, and don't suffer from the disadvantages demonstrated here. Typical pie menus support "mouse ahead" gestures and scale independence, and it's disappointing that the authors of this video weren't aware of that, and attempt to define marking menus in terms of a straw man definition of pie menus."
It's unfortunate that Gordon Kurtenbach and Bill Buxton purposefully made such a deceptive video that lied about the definition of pie menus in order to make marking menus seem better, because he knew very well that pie menus supported both submenus and mouse ahead display pre-emption, since I told him personally in an email discussion in 1990.
Here is the email thread in which we discussed pie menus and marking menus in 1990, and I told him all about pie menus. His first email to me explicitly stated that "We are very interested in the fact that you can mouse ahead with them" which totally contradicts what he subsequently claimed in his own videos, research papers, and patent applications.
From: Gordon Kurtenbach <gordo@dgp.toronto.edu>
To: Don Hopkins <hopkins@sun.com>
Date: Fri, Nov 30, 1990, 11:41 PM
Subject: pie menus!!!!
Hi Don. I'm a Ph.D. student at University of Toronto. Bill Buxton is my supervisor. We are interested in doing some experiments with pie menus and developing some novel ways of using them. We are very interested in the fact that you can mouse ahead with them and would like to explore this feature further. SInce you are the grand implementor of some hot pie menu stuff I have a couple of questions:
1) is their any public domain code for them?
2) have you published any more papers other than the CHI Washington paper?
Thanks in advance.
Cheers
Gord
From: Don Hopkins <hopkins@sun.com>
To: Gordon Kurtenbach <gordo@dgp.toronto.edu>
Date: Dec 1, 1990, 3:44 AM
I'm glad to hear from you! The code I've written is freely redistributable without restrictions, and the idea is not patented or proprietary, and I encourage you to experiment with them and find out how to use them best! I'll send you some more stuff I've written about pie menus, and the code that implements them for NeWS, using the "Lite" toolkit. I have a very very old implementation for X10 on top of uwm, but all of the interesting features are in the NeWS code. I also have a bunch of strange mutant pie menu subclasses I implemented whenever I got weird ideas. NeWS is good that way, the crazier the idea, the more fun it is to implement!
If you want to implement them from scratch, I'd be glad to discuss some mouse tracking strategies I've developed! There are some fine points relating to correct *predictable* handling of mouse ahead, menu display supression, popping menus up at the edge of the screen and pointer warping, and other kinds of interactions. With pie menus, the important thing is how you move your hand, not how you move the cursor. Working with Bill Buxton, I'm sure you know what I mean!
If you like, give me a call at work at (415) 336-3171, any time. I'm usually here until all hours. There's too much to say to type it all in!
At Sun, I am working on TNT 2.0, an Open Look toolkit written in object oriented PostScript for NeWS. In my spare time, I have implemented pie menus for TNT, and I would like to develop them further. Would you be interested in getting a version of TNT for Open Windows when it becomes available, to evaluate and play with? The feedback we've gotten from the people testing the toolkit has been fantastic, and it will be well supported by Sun! If you are into exploratory user interface implementation, rapid prototyping, look & feel customization, interactive object oriented programming, and that kind of stuff, you'll be in paradise! For example, it would be easy to dynamically modify an abstract class in the system, so that certain interactions with certain componants would be timed and logged to a file, to gather data for an experiment.
-Don
From: Gordon Kurtenbach <gordo@dgp.toronto.edu>
To: Don Hopkins <hopkins@sun.com>
Date: Dec 10, 1990, 8:36 PM
Don: TNT sounds great and yes I would be interested. Can you comment on the accuracy of the timing we could get from it? Here's what we are investigating. I'm interested in using markings as an input technique. What I mean by markings are gestures with the mouse or stylus that leave an ink trail. Now the problem with markings is that unless you use mnemonic marking symbols its hard to remember what strange marking corresponds to what command. You may say well then use mnemonic markings. But the problem is that mnemonic markings may not always exist, may be hard to recognise and may be slow to articulate with mouse or stylus. So my approach has been to use very simple marks such as up, down, left right etc. These marks are easily to articulate and very easy to recognize. Now how do pie menus fit into this? The great things about pie menus is that for non-heirarchical ones selection is a simple gesture and this gesture matches the movement needed to make a simple mark!!! So here's the way things could work: novice's mouse down and get the pie menu because they need that amount of support. Its slow but when your a novice you just want to survive not operate at top speed. The the cool thing is that expert can mouse ahead like you've talked about but they get an ink trail so they have a better idea what they've selected without even bothering to wait for the menu to come up. Essentially the markings are a language of glyphs which are really accelerators. Furthurmore if you make a mark and keep the mouse down at the end of it a pie menu comes up so you can verify that you did the right mark. The idea here is that this will give novices a "smoother" transition to an expert user who has the menu layout memorized and can make selections without needing to look at the menu.
So in support of this stuff we are conducting an experiment to see how number of items in a menu and the layout strategy will affect the ability to articulate the gesture to select and how quickly people learn the layouts of menus and are able to "mouse ahead" which in our world is "use the mark instead of the menu".
In the future, I hope to try this stuff on hierarchical menus to create richer marking languages. Plus I'm experimenting with other novel menu gadgets where a marking can correspond to the selction movement.
Ok, hope this wets your appetite. Thanks for the info.
Gord
From: Don Hopkins <hopkins@sun.com>
To: Gordon Kurtenbach <gordo@dgp.toronto.edu>
Date: Dec 1, 1990, 3:44 AM
I think TNT can provide you with excellent timing accuracy. Events are location and time stamped, and you can respond to them in the NeWS server where they are happening. There is a global event manager, a light weight PostScript process running in the NeWS server, that provides synchronization, using a centralized "services" architecture. The global event manager catches certain events and passes them off to local event managers, who are responsible for managing objects who asked for certain classes of events. Any event that would change the input distribution, by expressing or revoking interests, or changing the canvas hierarchy, will cause the input queue to be blocked until the changes have been made and it's safe to continue event distribution. This means that the events get to where they were supposed to, and mouse ahead works very very well, even when the system is loaded and lagging behind. This architecture also saves us a whole lot of time and space (sharing interests and event managers), and makes it much easier to program an object to respond to events (because all the hard stuff is done behind the scenes by the system).
-Don
Re: Dream Fusion 3D models. Is the end close for 3D artists?
MOCAP WILL KILL ANIMATION!!!
 Eric Chadwick
Re: The Bi-Monthly Environment Art Challenge | September - October (80)
Added the treasure chest! Been tuning the lighting some more as well as the textures on the egg statues. Went with an unlit shader for the treasure chest in the first render and a lit shader in the second. Not sure if I like all the details blown out although it does have a cool glow effect thats nice for treasure. Thoughts?
I still need to adjust the line thickness for the trim sheet as now it seems even more faint. Planning on getting to that when I add some sand next.


 squarebender
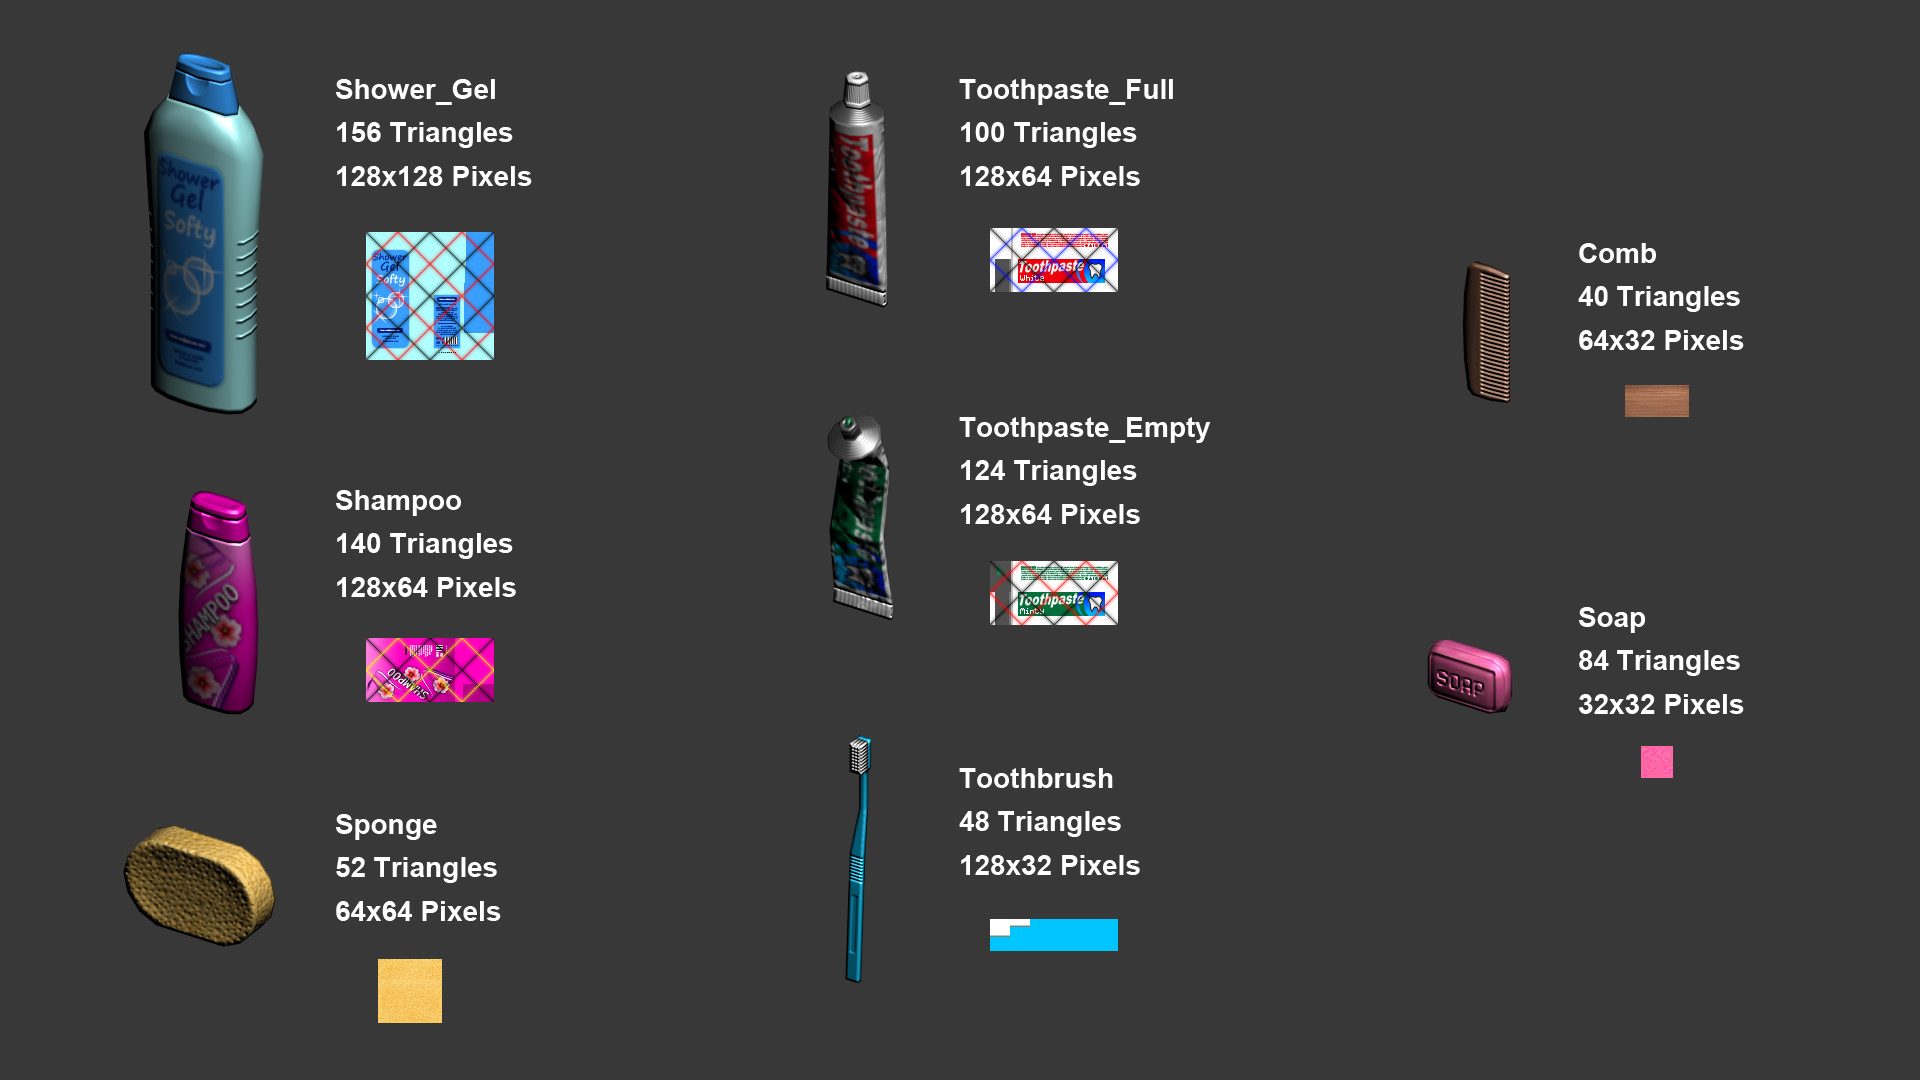
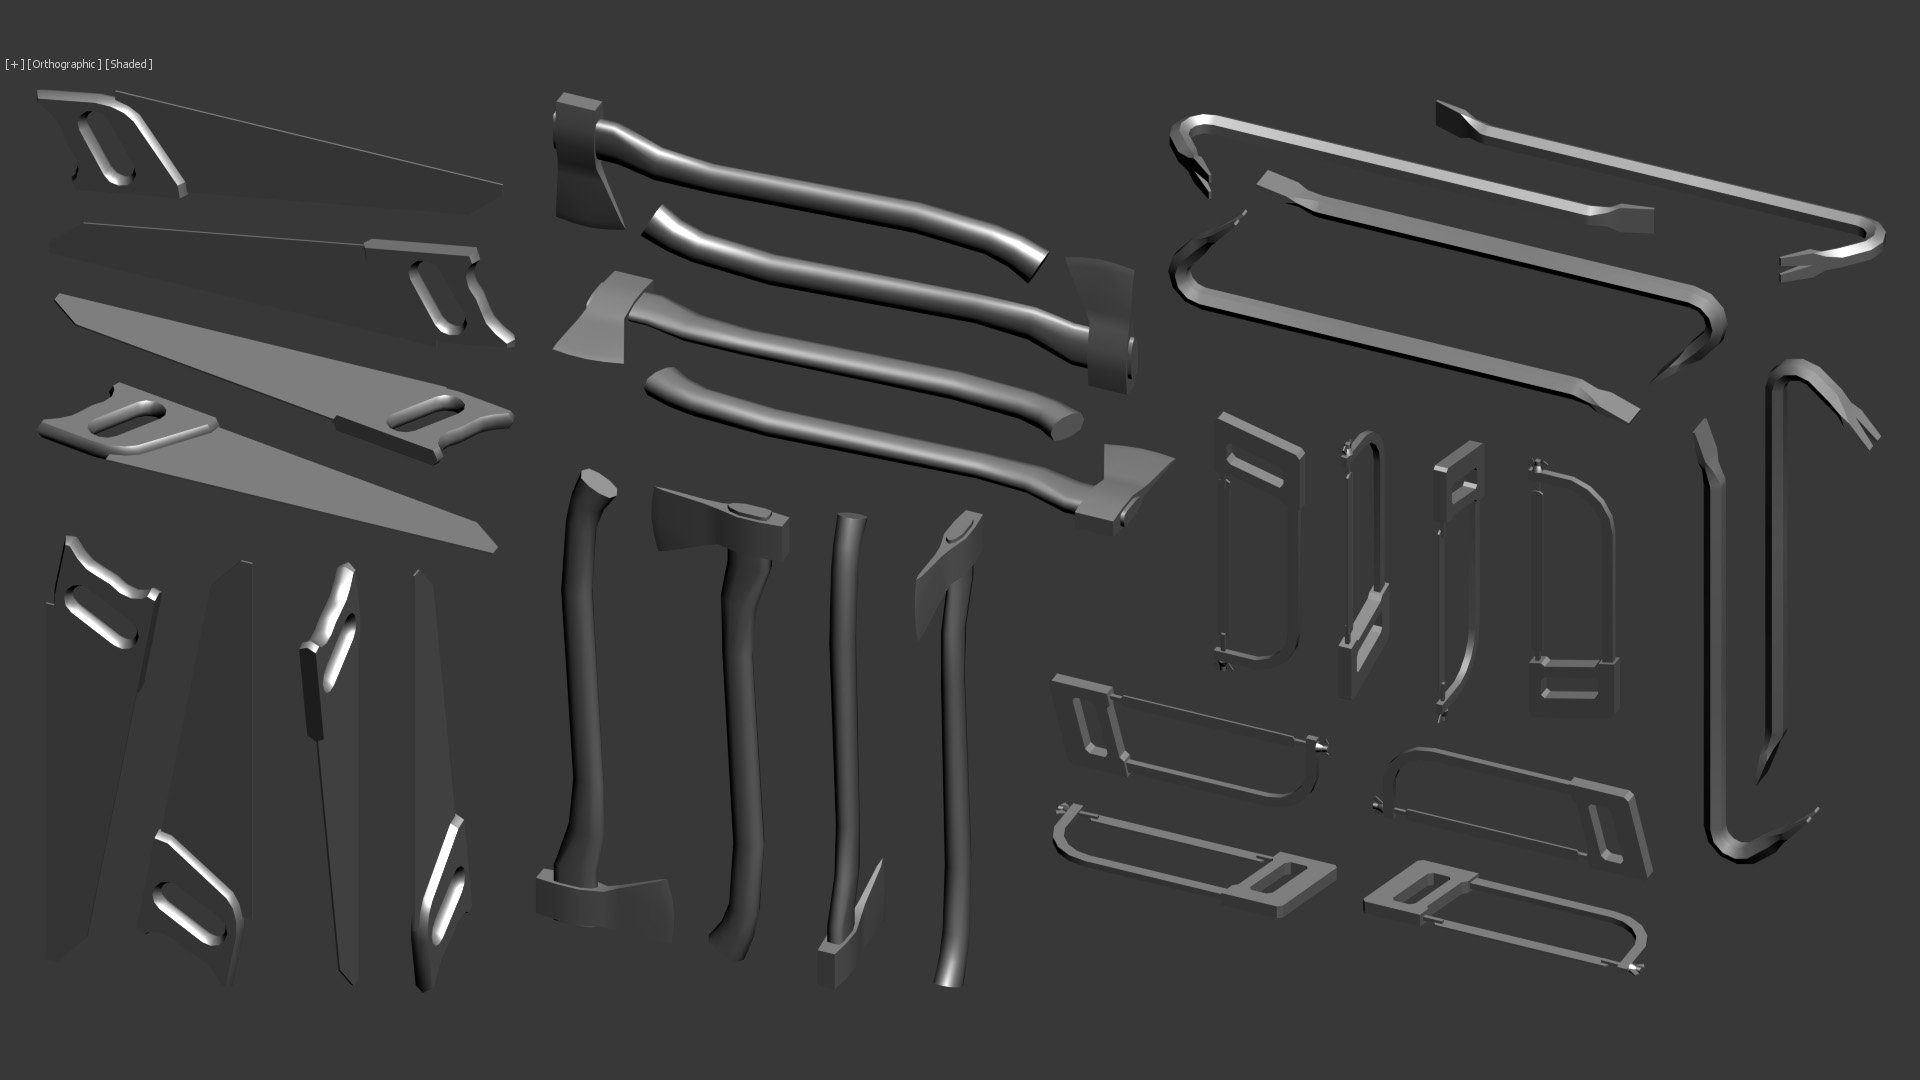
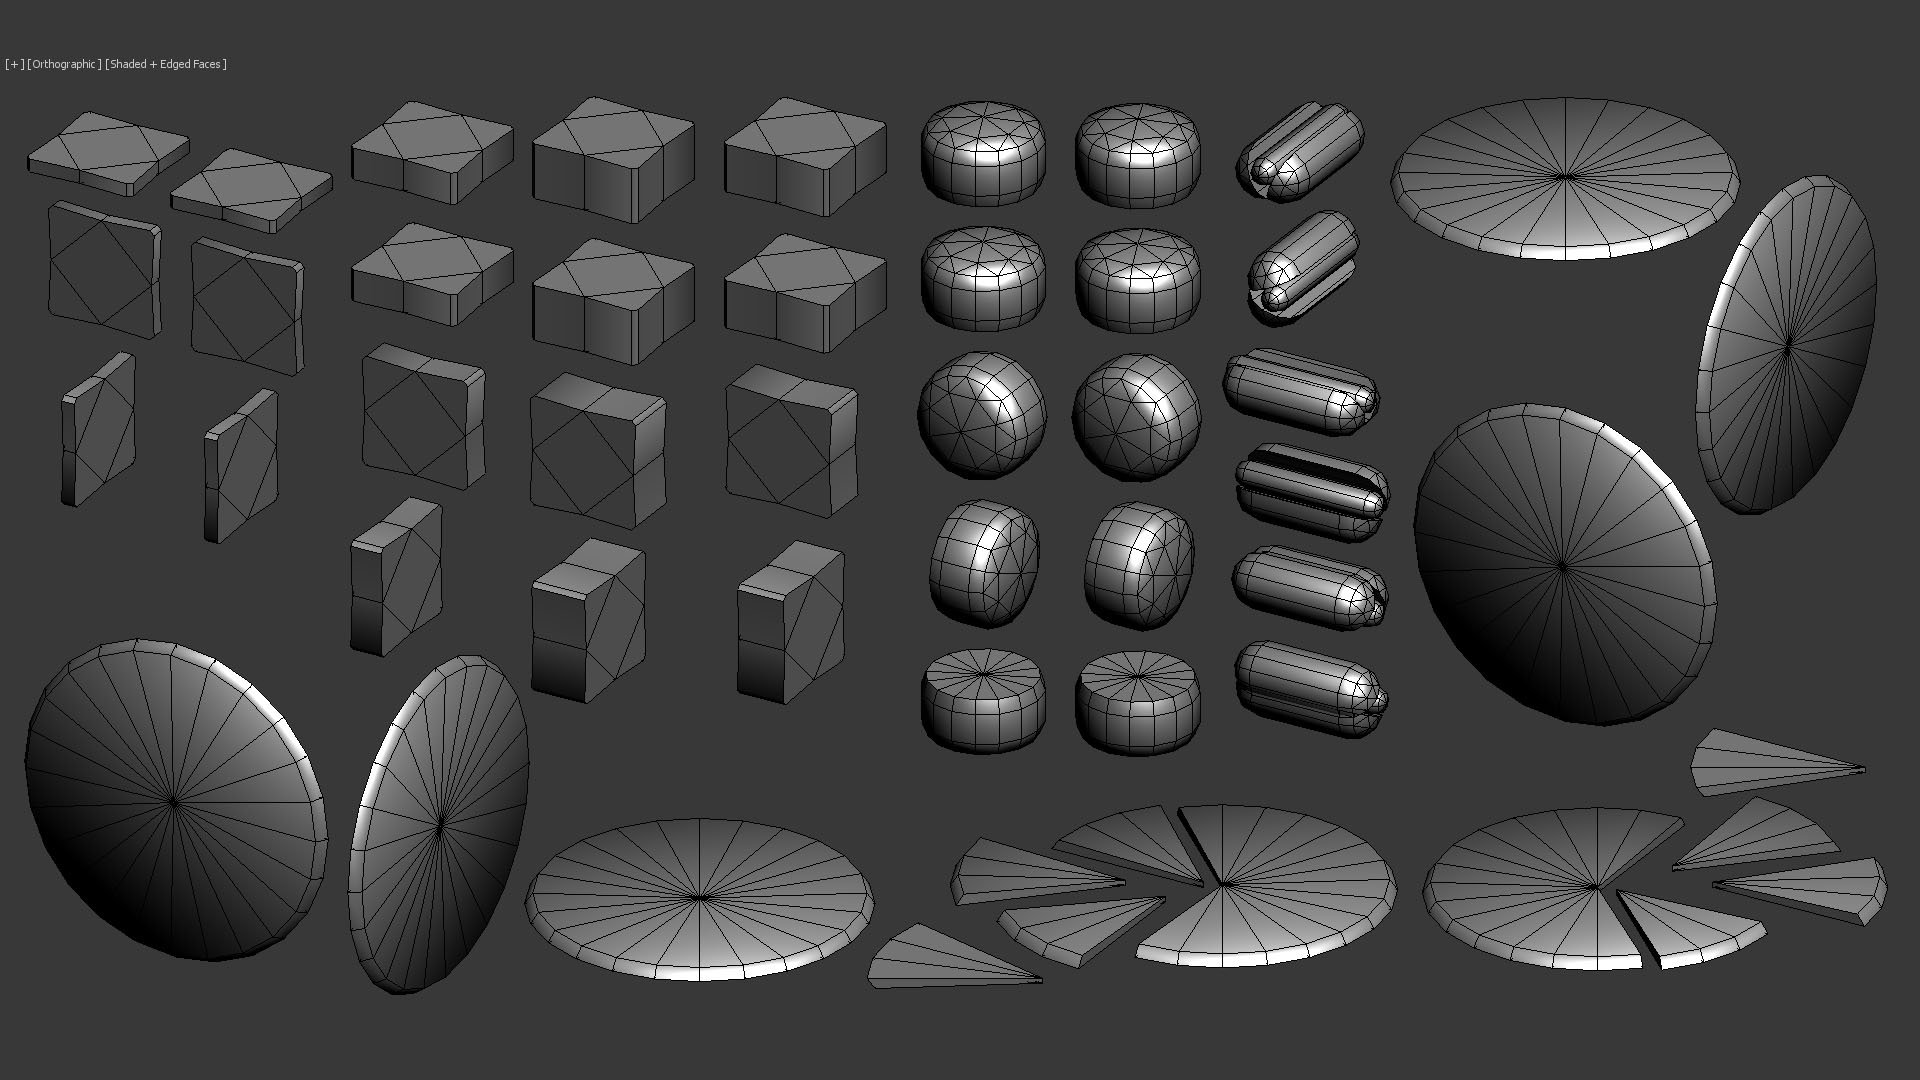
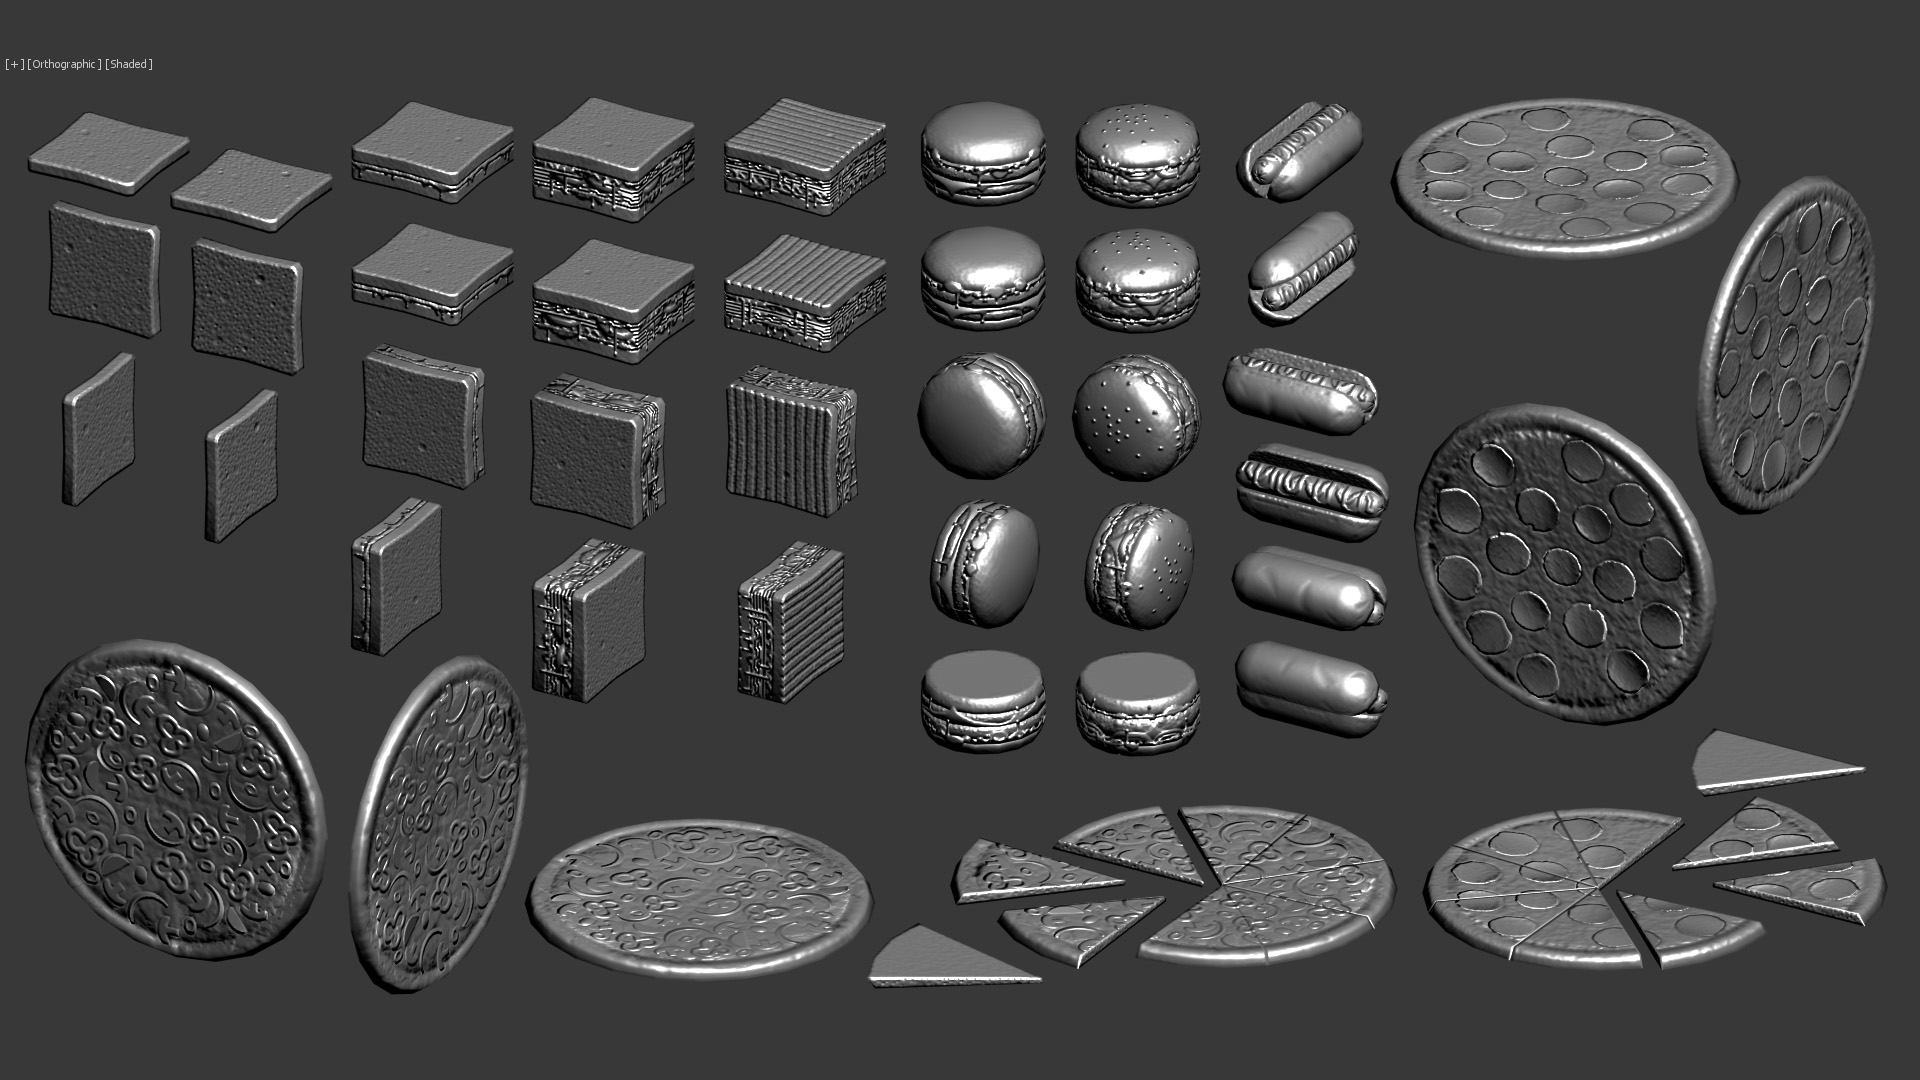
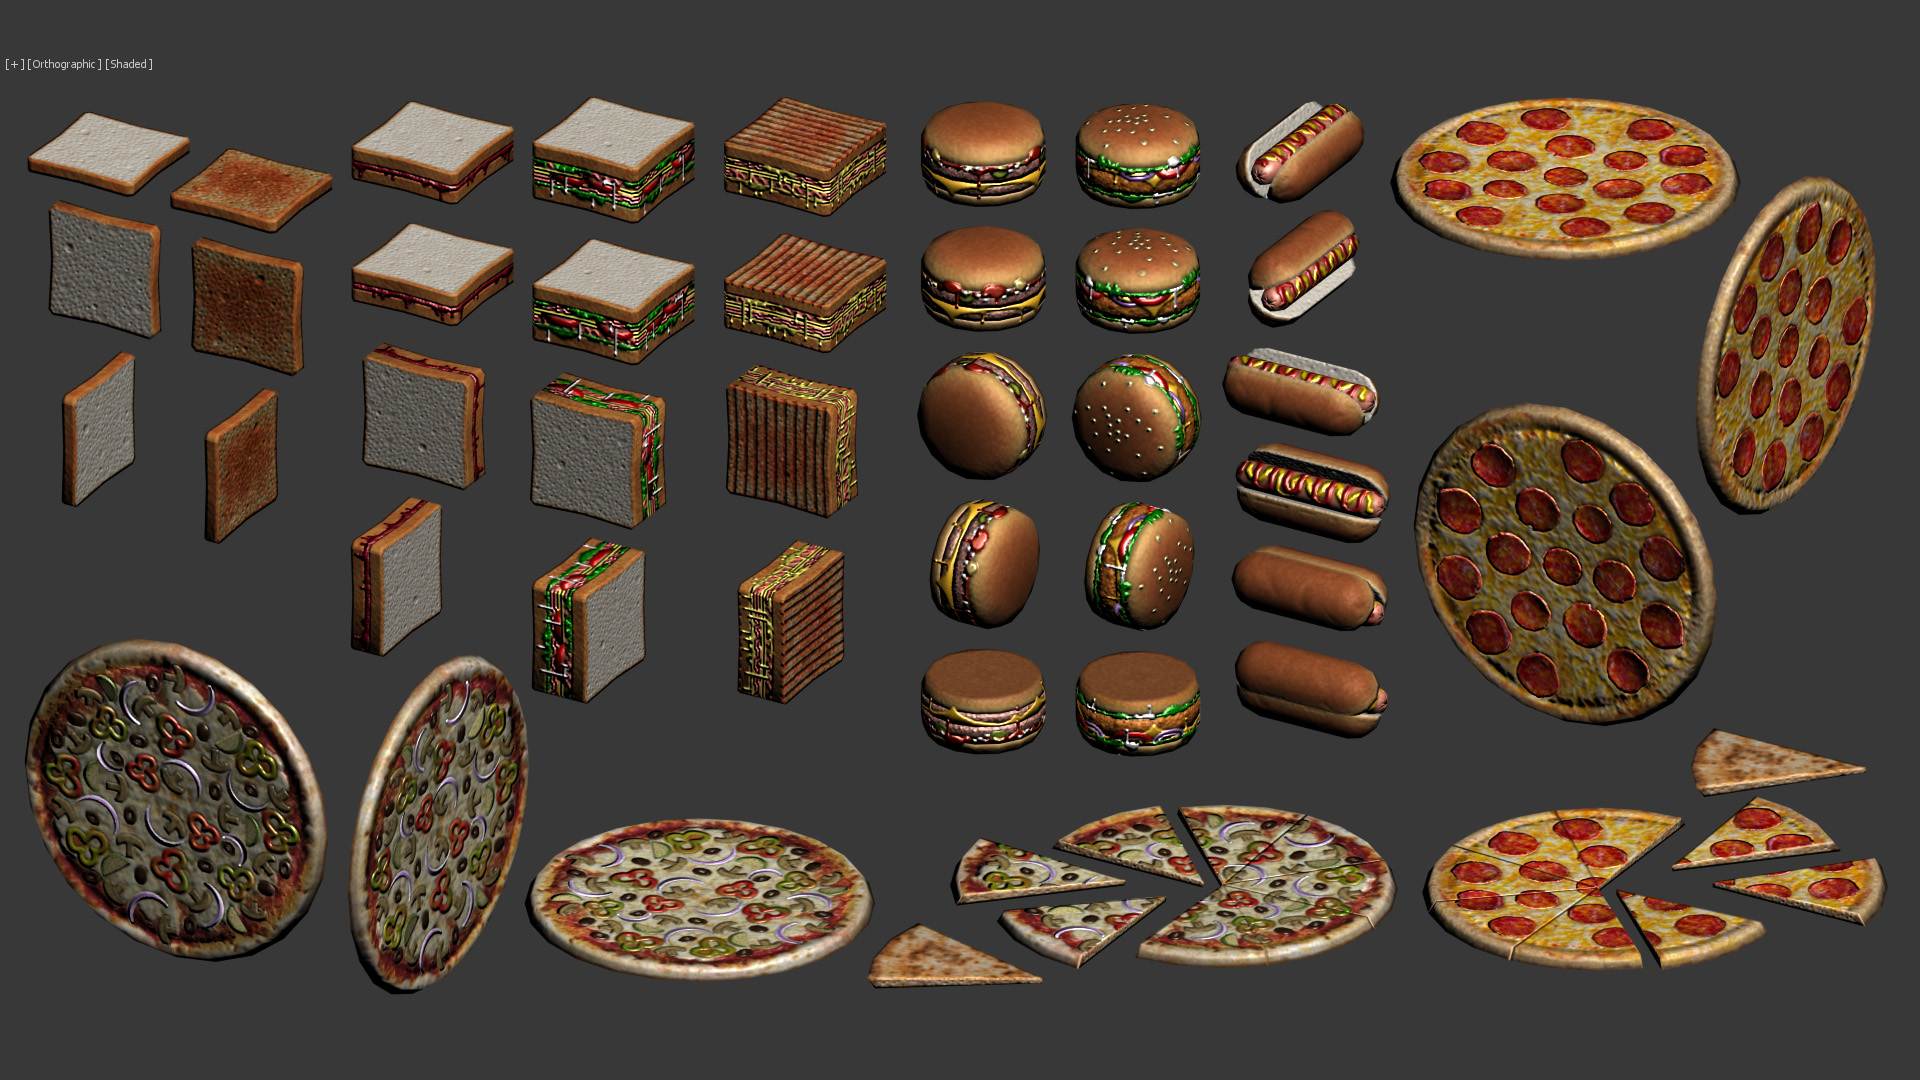
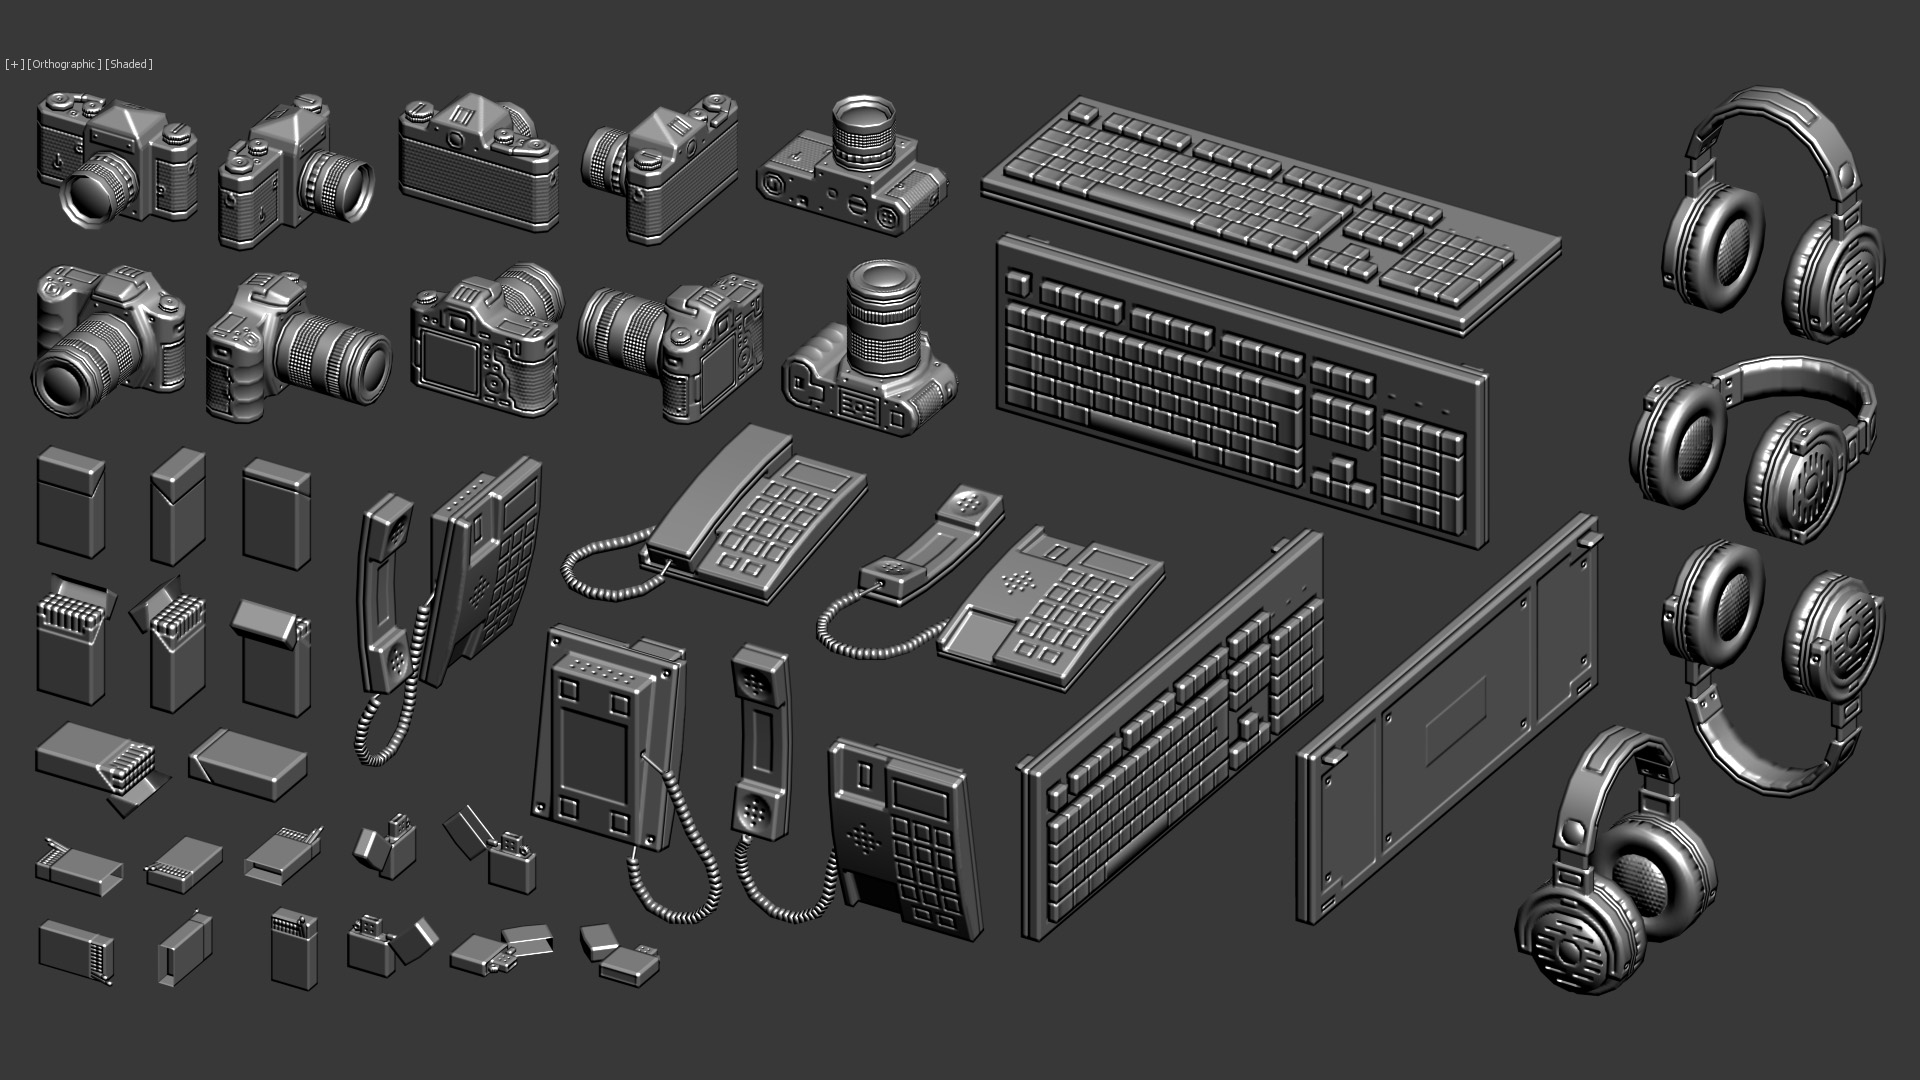
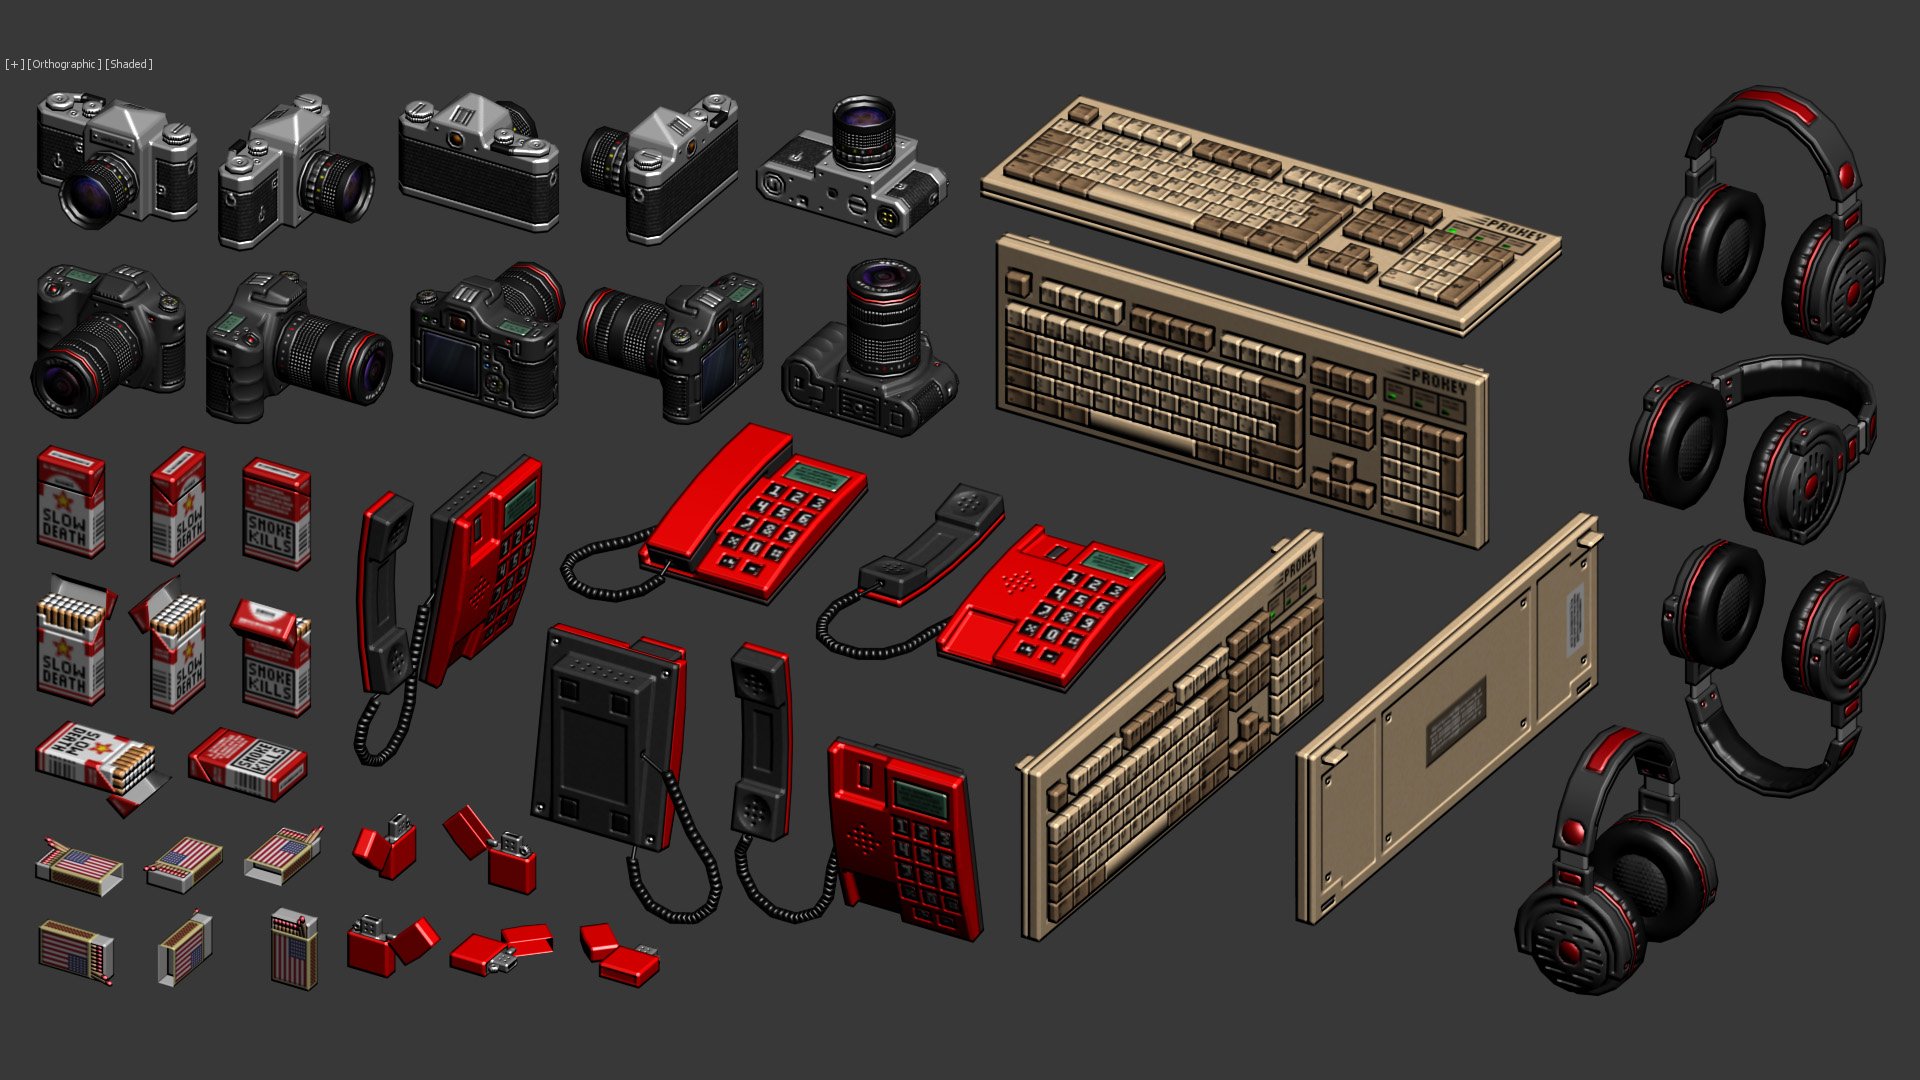
Handpainting Normal Maps pixel by pixel (100% Photoshop - 0% HighPoly)
Hi everyone,
I love to handpaint normal maps using just photoshop without doing any highpoly at all. I only do this when the polycount is kept quite low and the texture size is as small as possible.
When I work like this 90% of the work is done with the pencil tool in one pixel size (not the brush tool). The rest 10% of the work is done using any tool that photoshop can provide. I also have the "NVidia normal map" filter, but I barely use it. I only use it when I handpaint an organic "height map" and I whant its normal map, or when the UVs contains alot of diagonals. But when I use this filter I never use the resulting image, because with the texture sizes I'm working on are very small, the resulting image that the filter produces usually is quite blurry and messy. So, whenever I use the filter, I only use the resulting image as a reference to then paint my own normal map.
The images I'm going to show you are my own projects, they are not done for any actual game or anything. I just do them because I enjoy it so much. The first images I'm going to show are basicaly simple objects, and then I will show more complex objects at the end. The shaders I use for this are very simple, they only use difuse map, normal map and specular map. The screenshots are taken directly from 3dsMax, not using any game engine.
I hope you like it!
Bathroom:
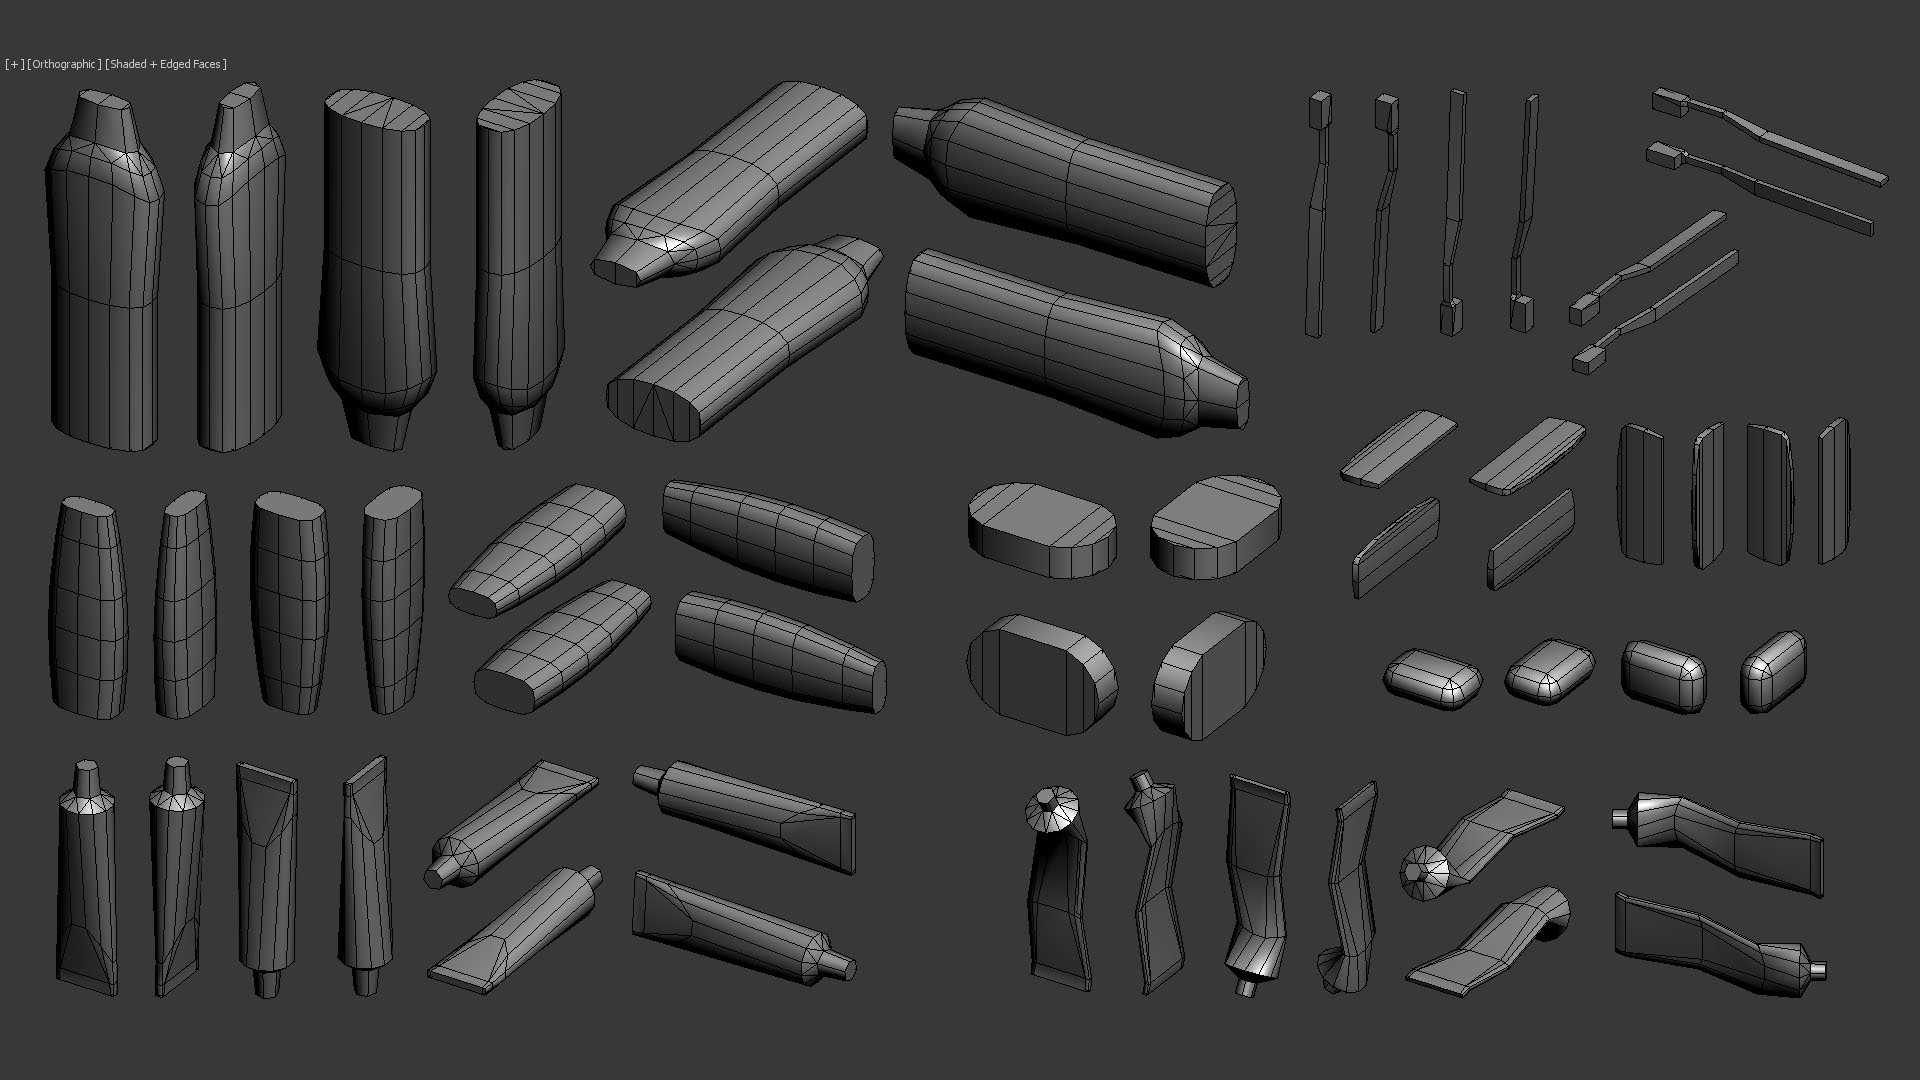


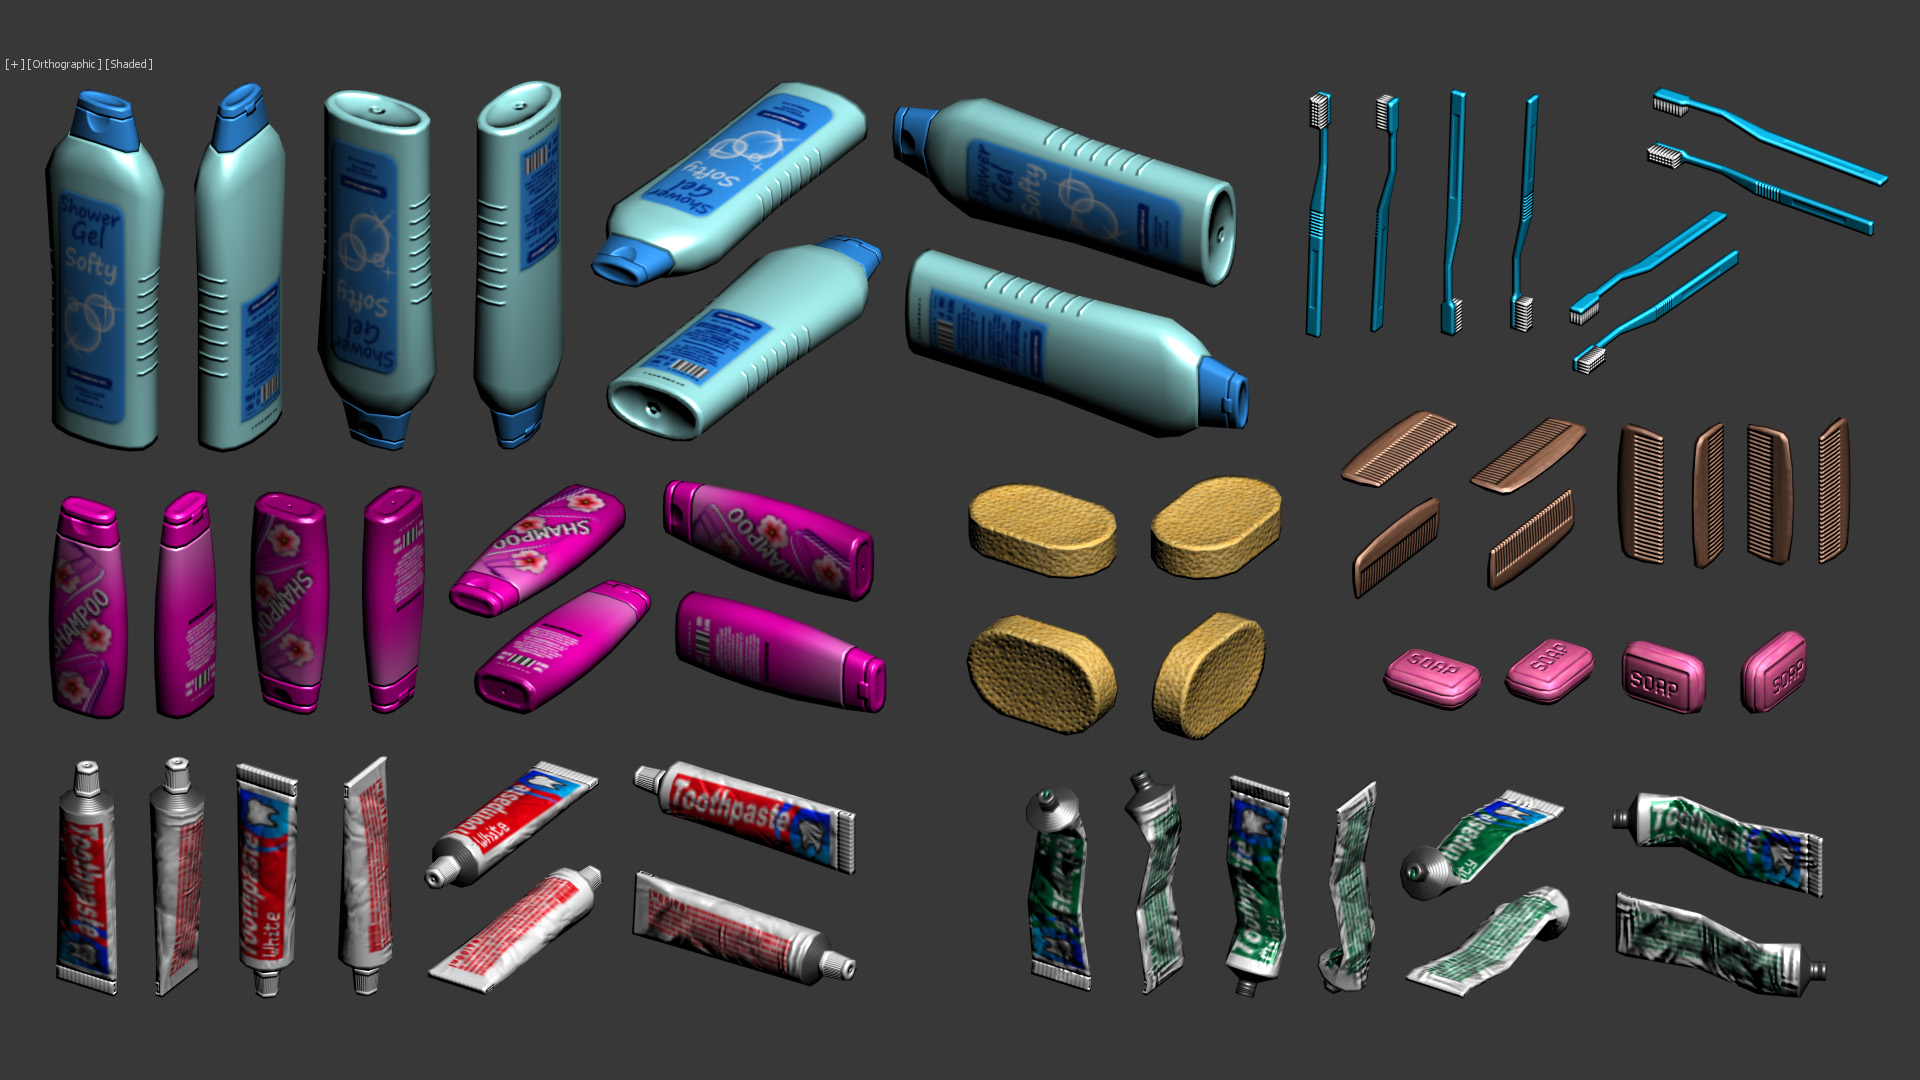
Tools 1:


Tools 2:


Food 1:


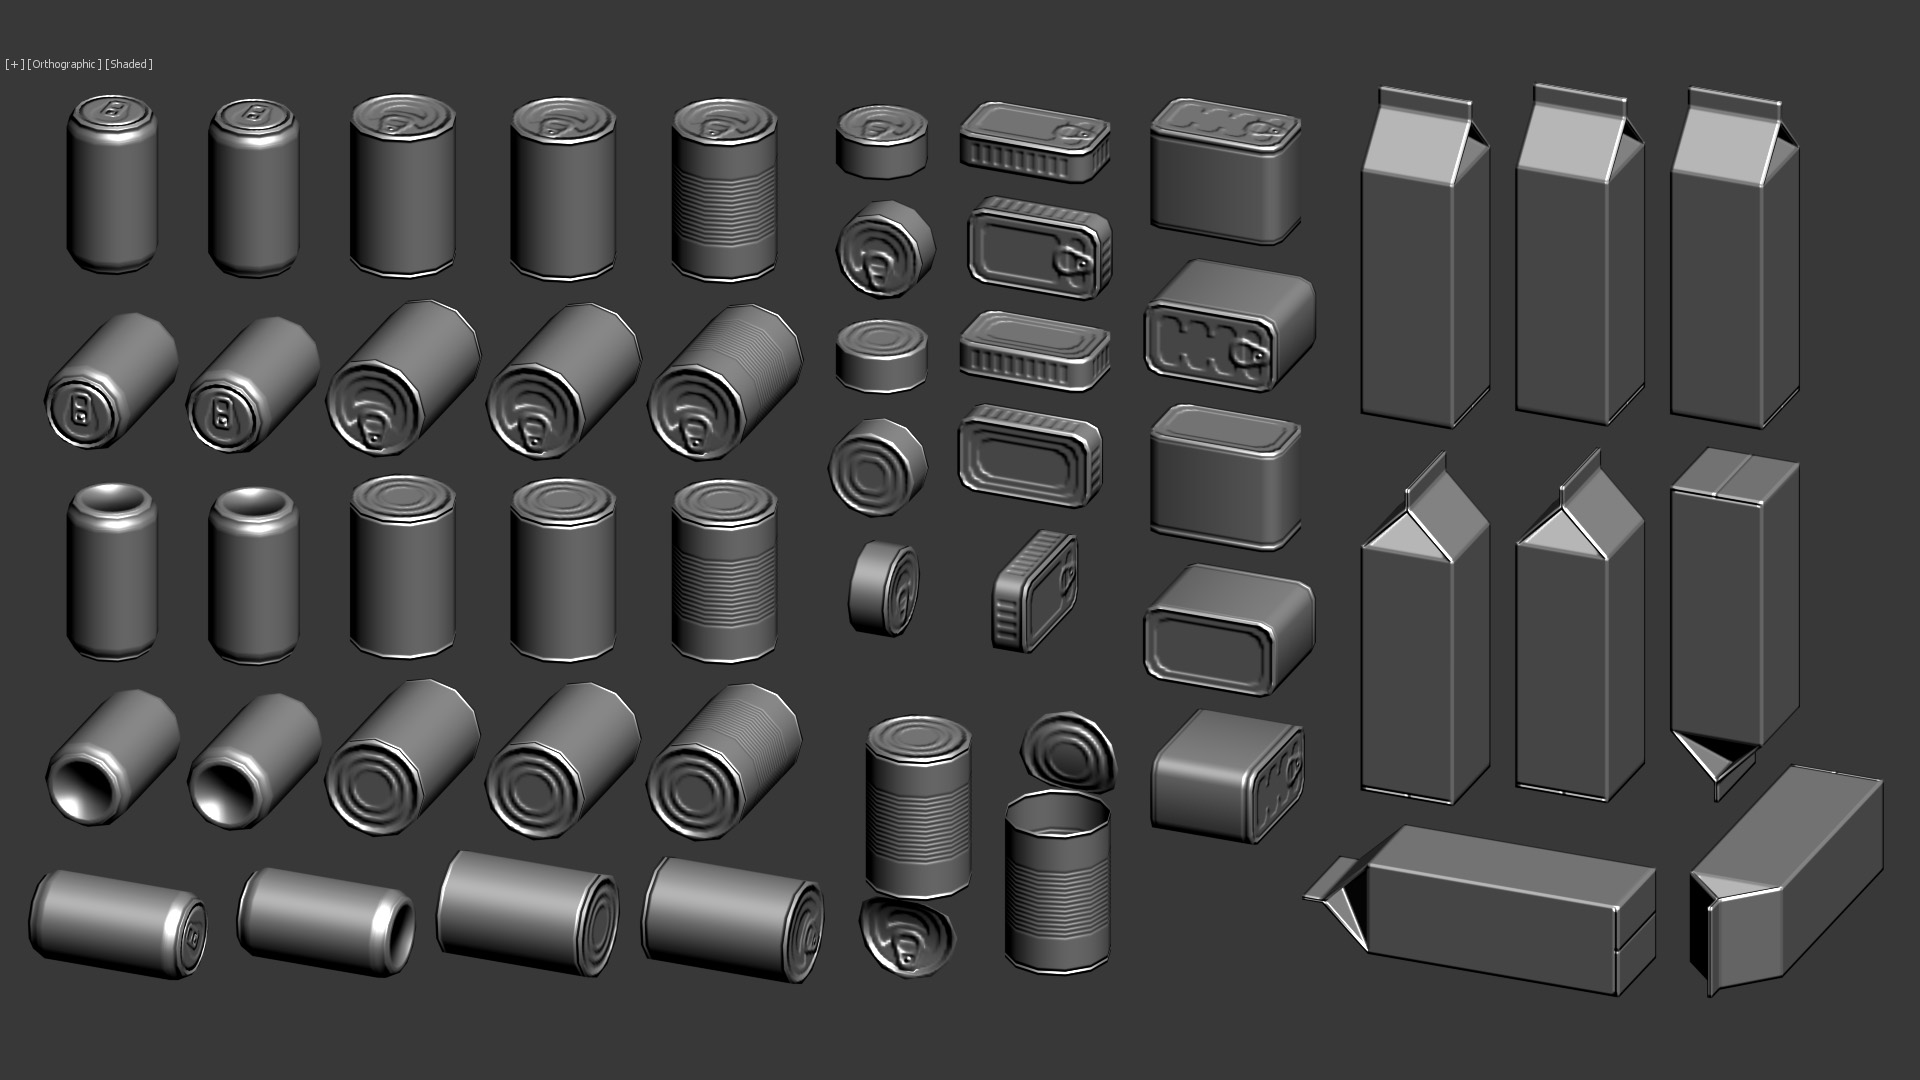
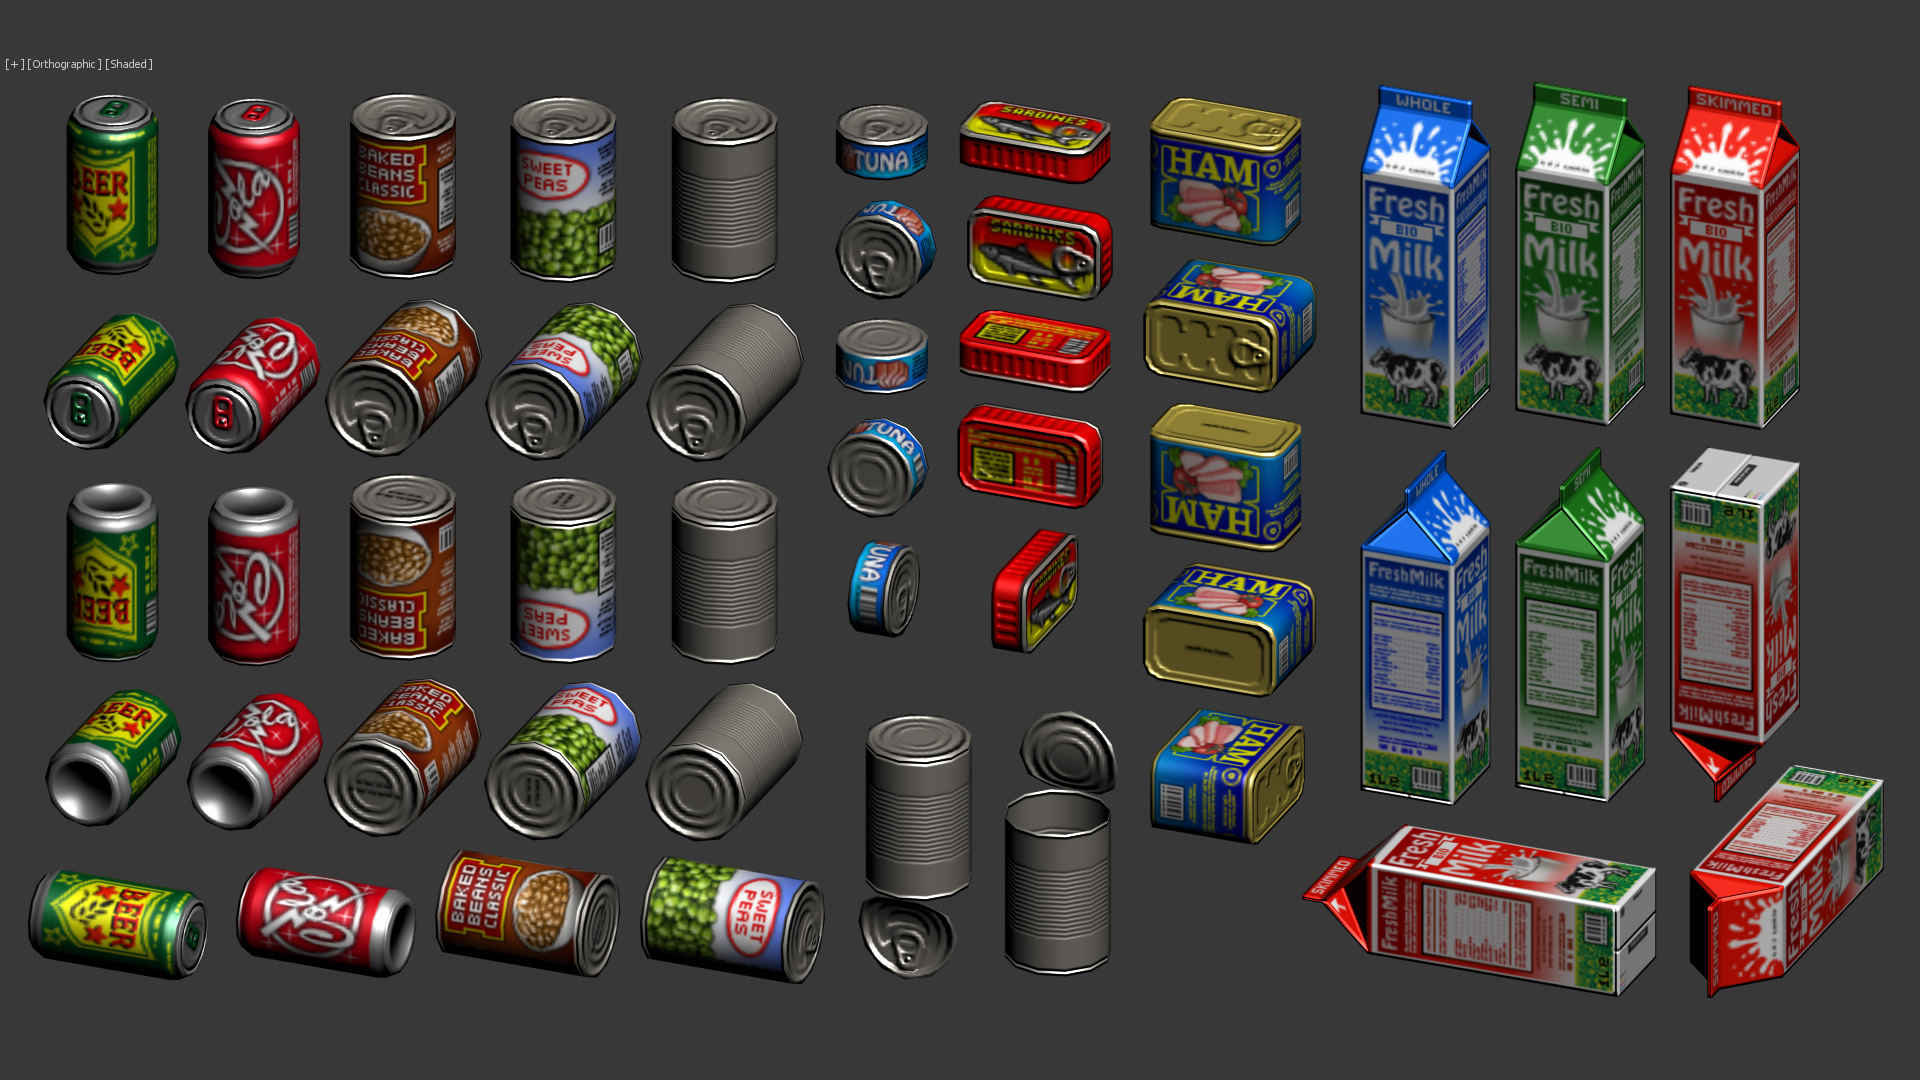

Food 2:


Livingroom:


Scorpion Evo3 :


H&K MP5:
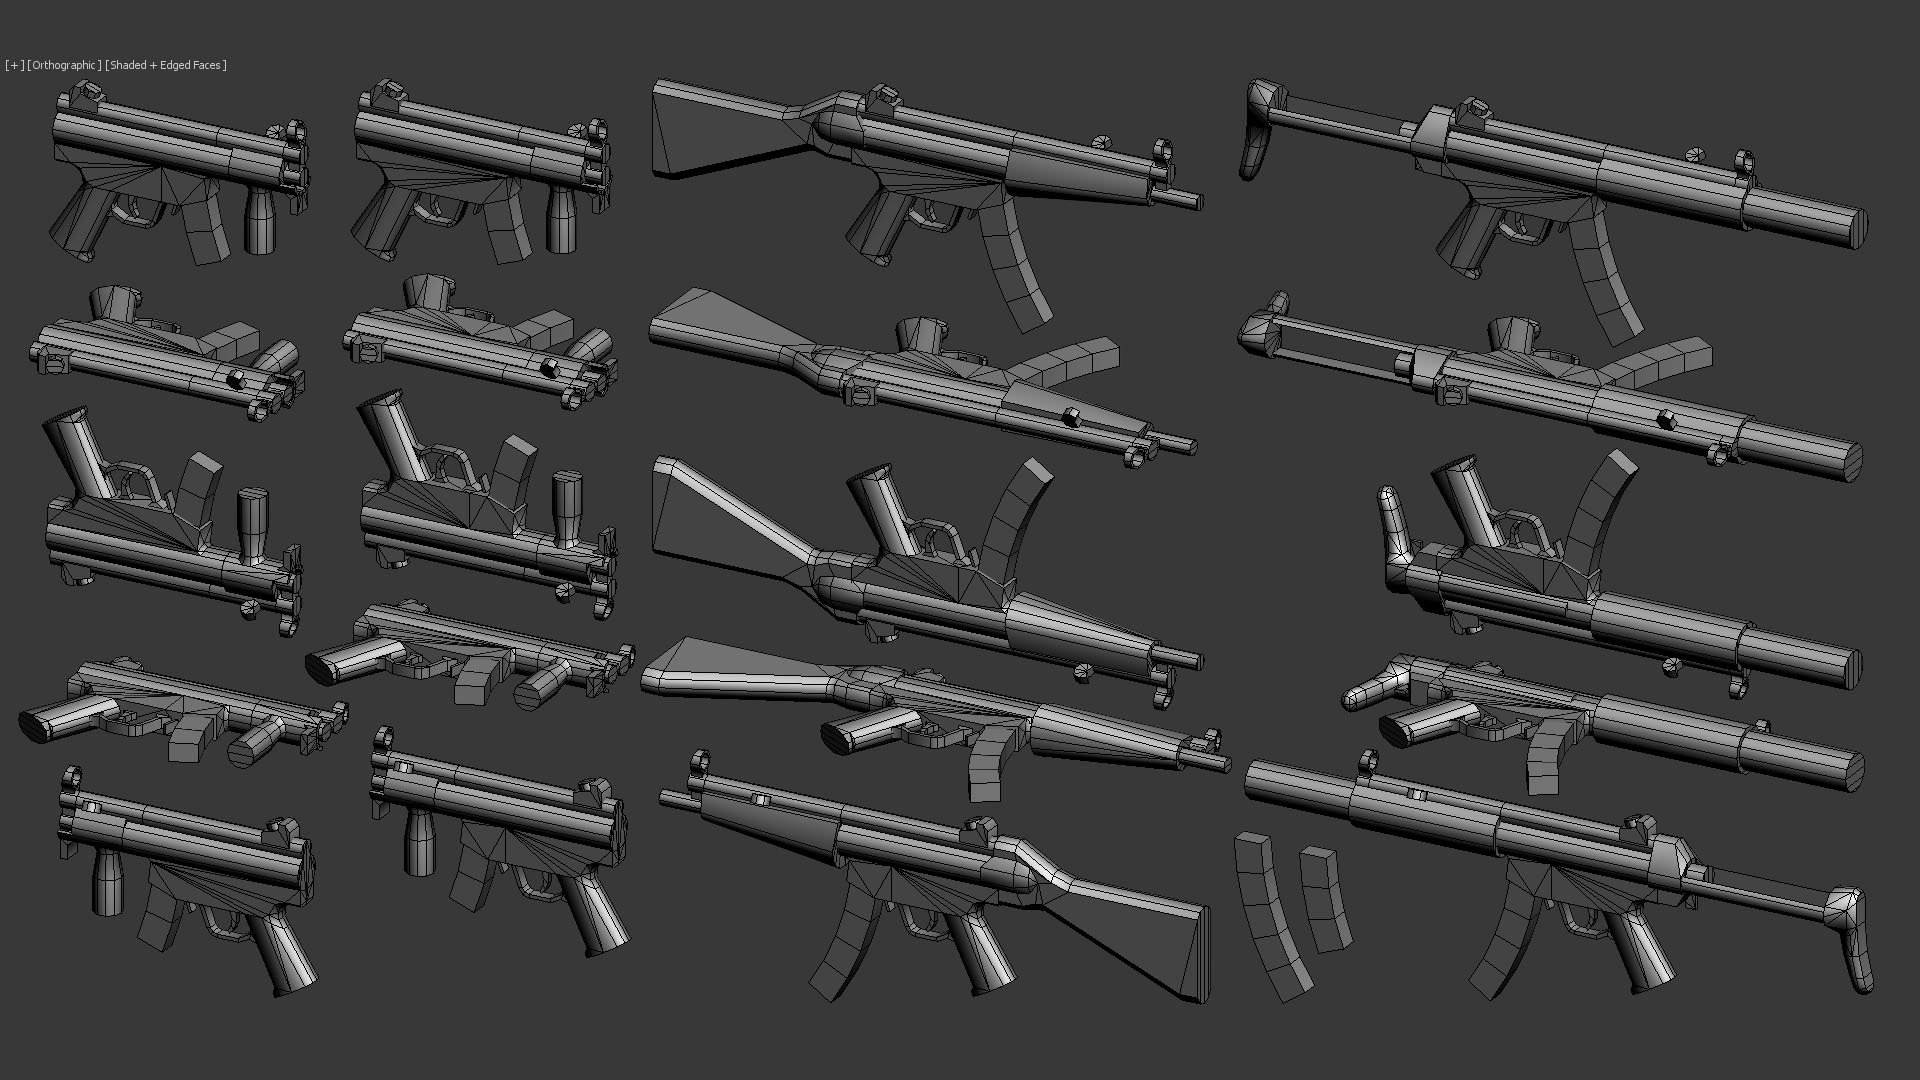


More guns:
I like guns, so I made a few. Polycounts and texture sizes are consistent with the rest of the objects.

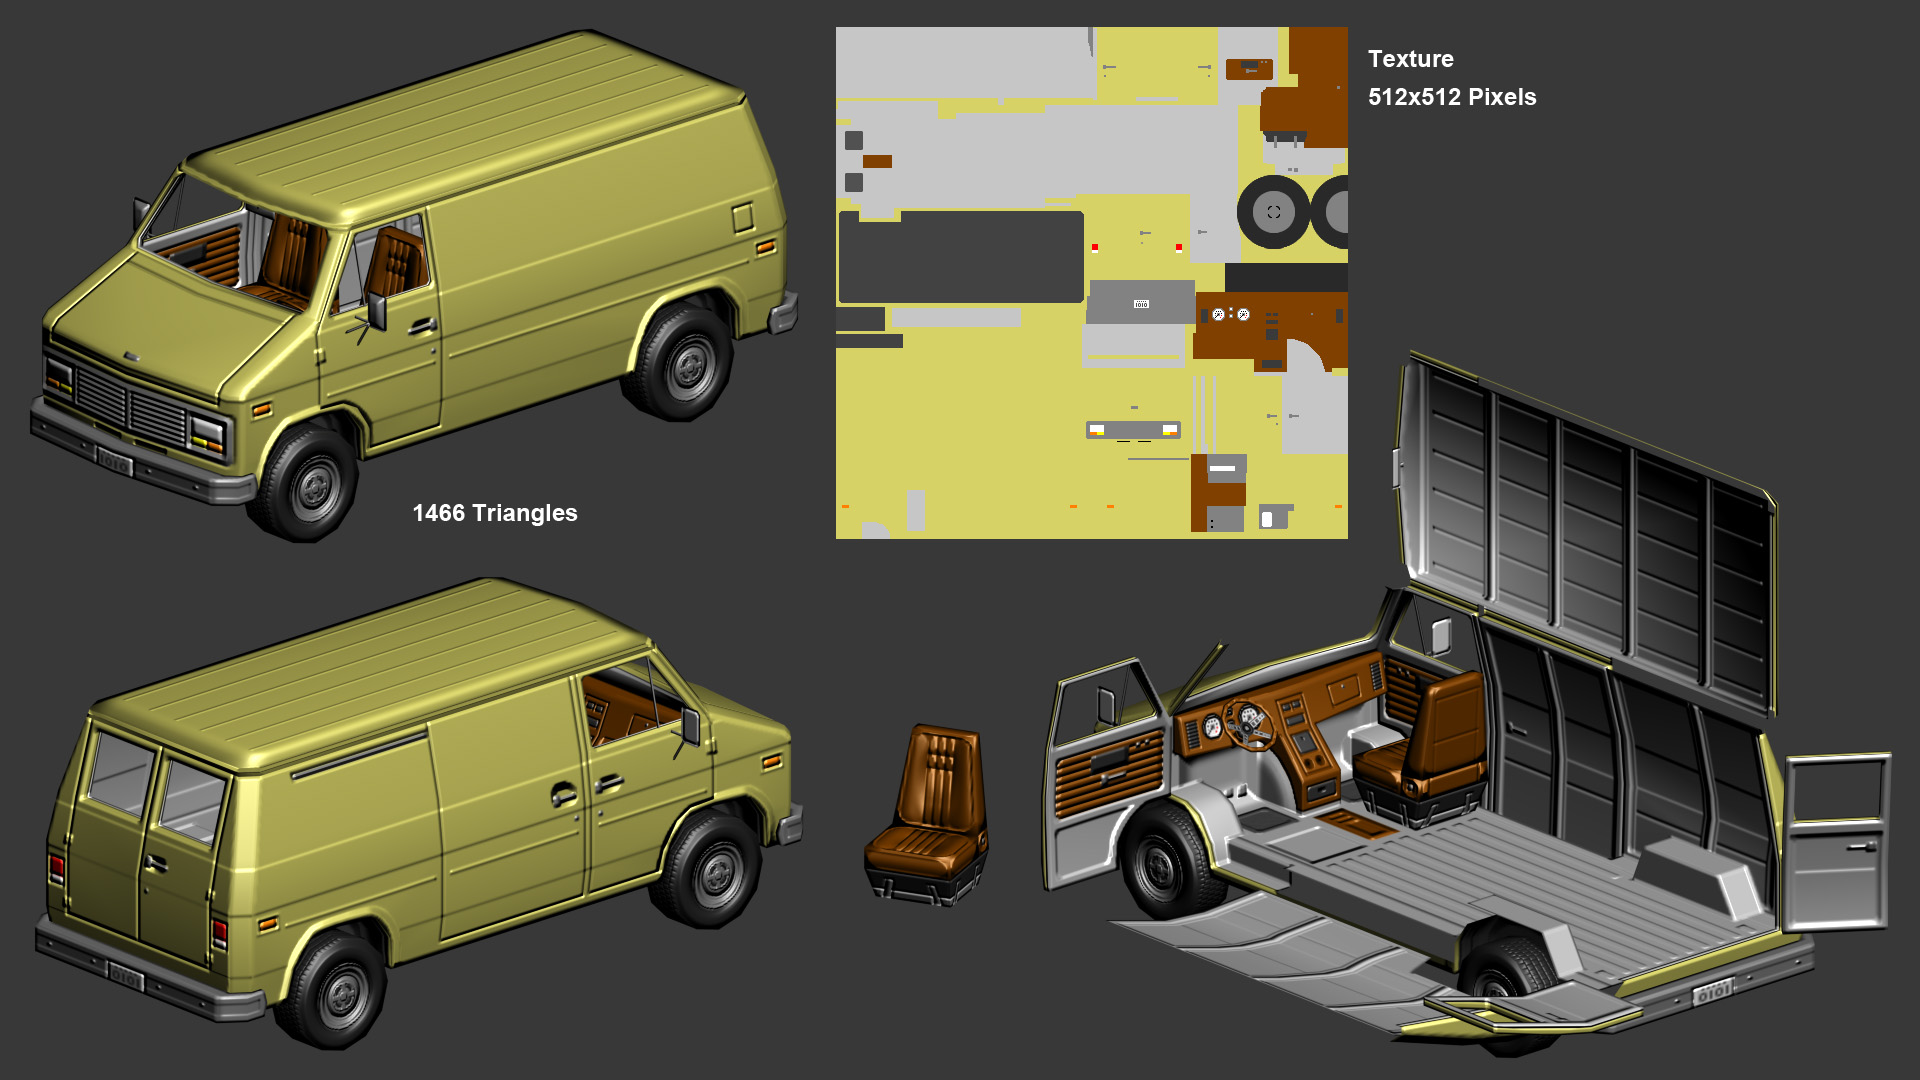
Vehicles:
There is something I whant to say for the last object. I did this object and the normal map back in 2011. Since then I have improved alot, so today I would have done things quite diferent. I'm not particularly pround of the underneath part of it, but at that moment I was already too bored with the object, so I kept it as it is. Also, I never did the difuse texture, so I've created a very simple one just to show you how it could look (No specular map here). Still I think is good looking enough to show you.


Re: Show your hand painted stuff, pls!
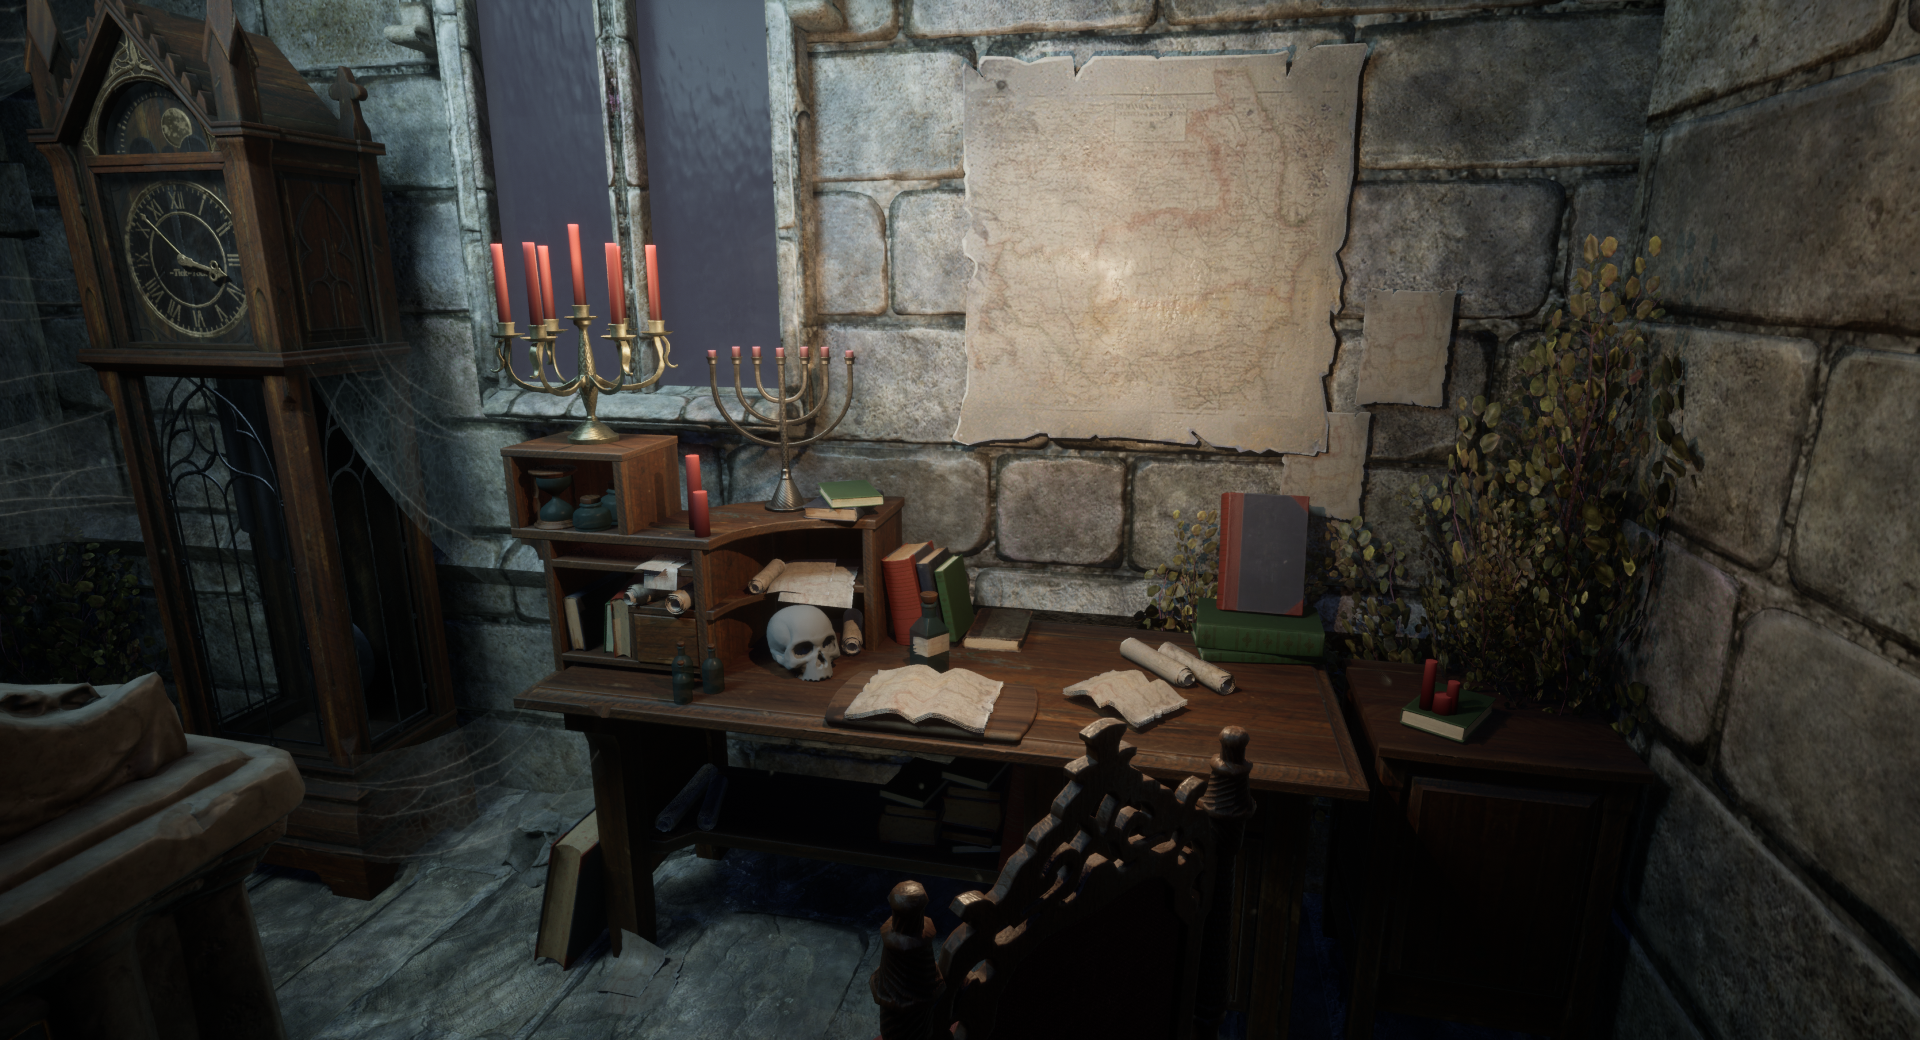
I want to share my work, which I made for Pathfinder: Kingmaker

Other stuff: https://www.artstation.com/artwork/Jy410
 Yunir
Yunir
Re: The Bi-Monthly Environment Art Challenge | September - October (80)
Thanks for the feedback 🙏 Lighting is definitely something I still have to improve - And all of the assets too ofc 🤓
@SORENU If you don't already, you could use the different planes as masks to push color/value range and readability:

@PaulJChris hi! I think it looks good overall, although I find it a bit hard to read with the different colors.
Some nitpicks: I would interpret the concept so that the ground plate on the right extends to the wall of the forge, some larger chips could already be tackled in blockout, curvature of the the lavapools appear to be more pointy, lava-channels appear are bit narrow. Might be changes you made deliberately, just saying 🙂. If you are going the highpoly - lowpoly route, I wouldn't care to much about polycount at this stage, as one would likely do a retopo anyways. More polys, less facetted look - unless you apply subdiv modifier. Or do you plan to keep the blockout as the lowpoly? Keep it up!
@Esselle I think it would be cool to see the model set up in a game engine or 3d viewer. I like to use sketchfab, as it's pretty simple (not so many settings to get lost in).
edit: added most recent screenshots

 Fabi_G