The BRAWL² Tournament Challenge has been announced!
It starts May 12, and ends Oct 17. Let's see what you got!
https://polycount.com/discussion/237047/the-brawl²-tournament
It starts May 12, and ends Oct 17. Let's see what you got!
https://polycount.com/discussion/237047/the-brawl²-tournament
Best Of
Re: Adobe raises price of Photoshop 50%
Hopefully the painting program I'm making will be the best in a few months time 
*if you want a rock solid paint program, and don't need a ton of features anyway
*if you want a rock solid paint program, and don't need a ton of features anyway
 Muzzoid
1 ·
Re: WIP Mortuary: What I wish someone told me 8 years ago (but to be honest, I couldn't listen)
had some busy weeks, so not much time and energy to work on this. luckily that doesn't matter once you have a job. Not that it really matters how much you spend on your portfolio while you don't have a job either. More time spent doesn't increase chances to get a job. They'll ask you to spend 16-40hrs on a shitty art-test, even though you have 100s of hours of work in projects posted on your portfolio already. Somehow 3-6 years of studying isn't enough for them to make a decision, but if you spend a few more hours they might be convinced? In reality, portfolio work doesn't matter that much after a few solid pieces. You don't suck for not getting a job with a serviceable portfolio, the industry does. It's not even because of high standards or that it's highly competitive. It's mainly lack of work positions but also wide-spread incompetence on their part.
but I did have some time to implement some changes to the scene
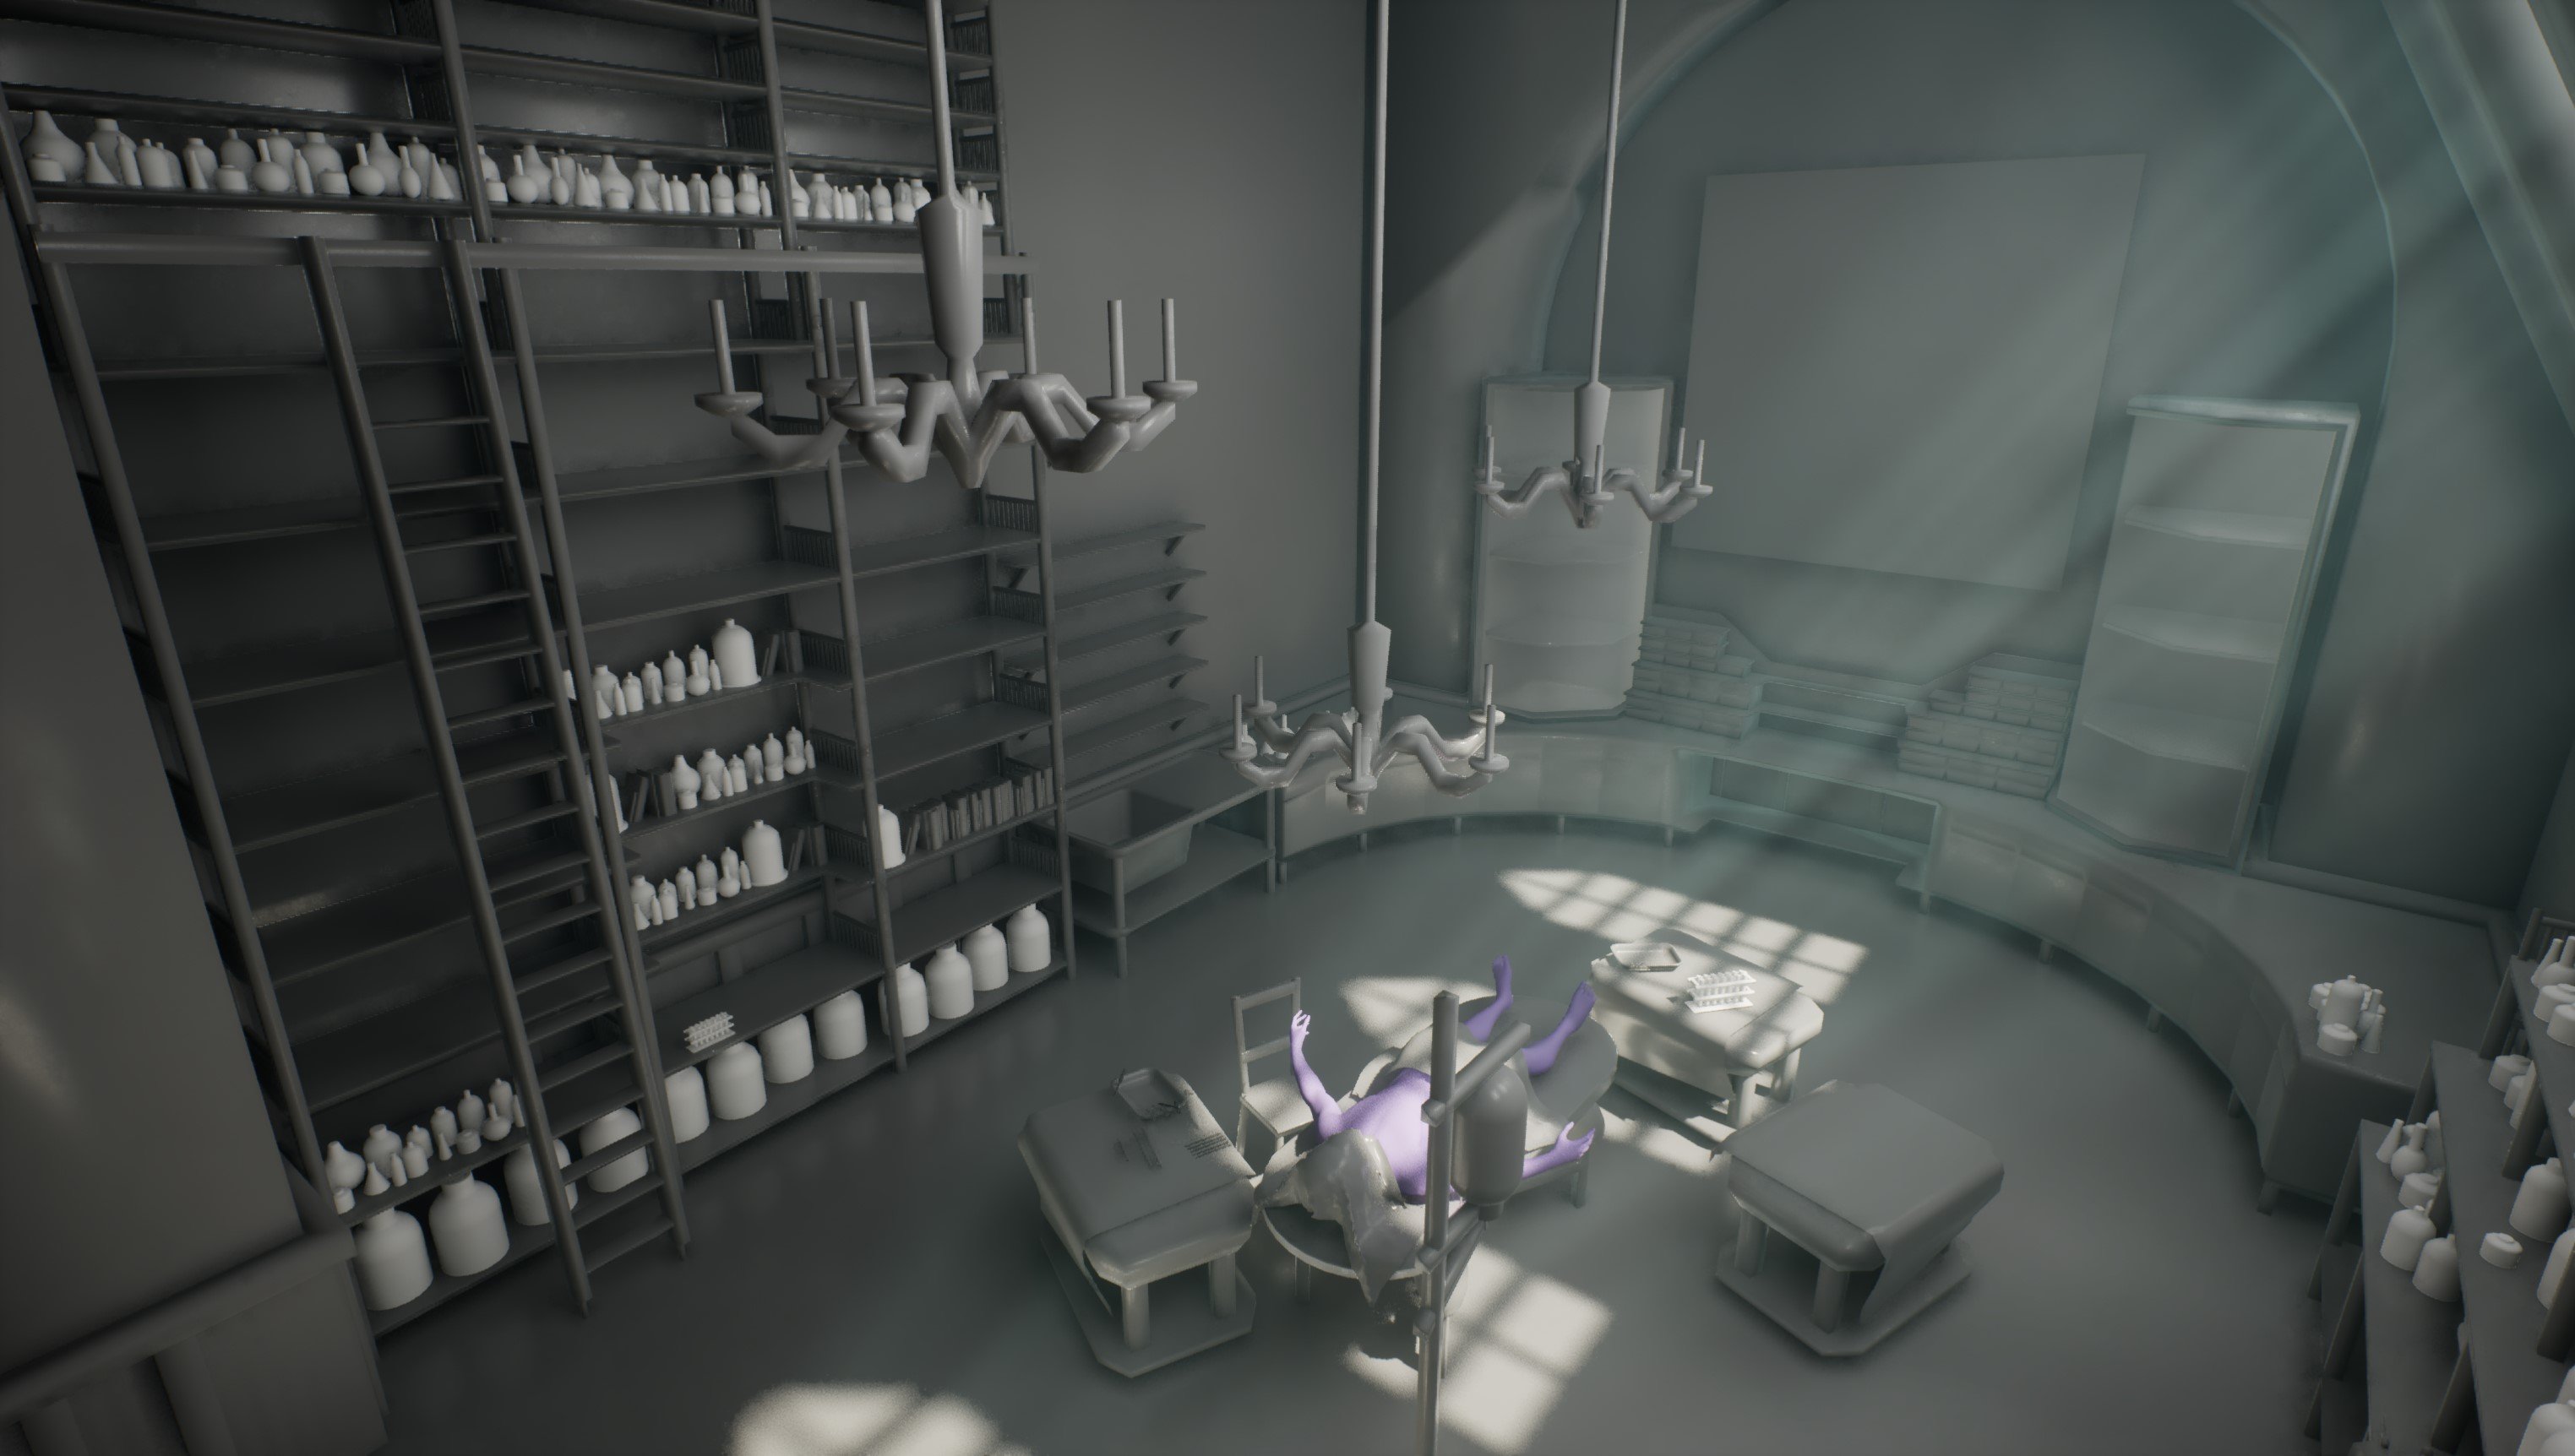
Next step will be to populate the scene more to fill out all the areas, get a more final feel for the entire composition.
In doing so I'll also be gathering references and refine the list of assets needed - I want to make sure that I commit to making as few assets as possible.
but I did have some time to implement some changes to the scene

Next step will be to populate the scene more to fill out all the areas, get a more final feel for the entire composition.
In doing so I'll also be gathering references and refine the list of assets needed - I want to make sure that I commit to making as few assets as possible.
 Daniel_Swing
2 ·
Re: Gina (critique welcome)
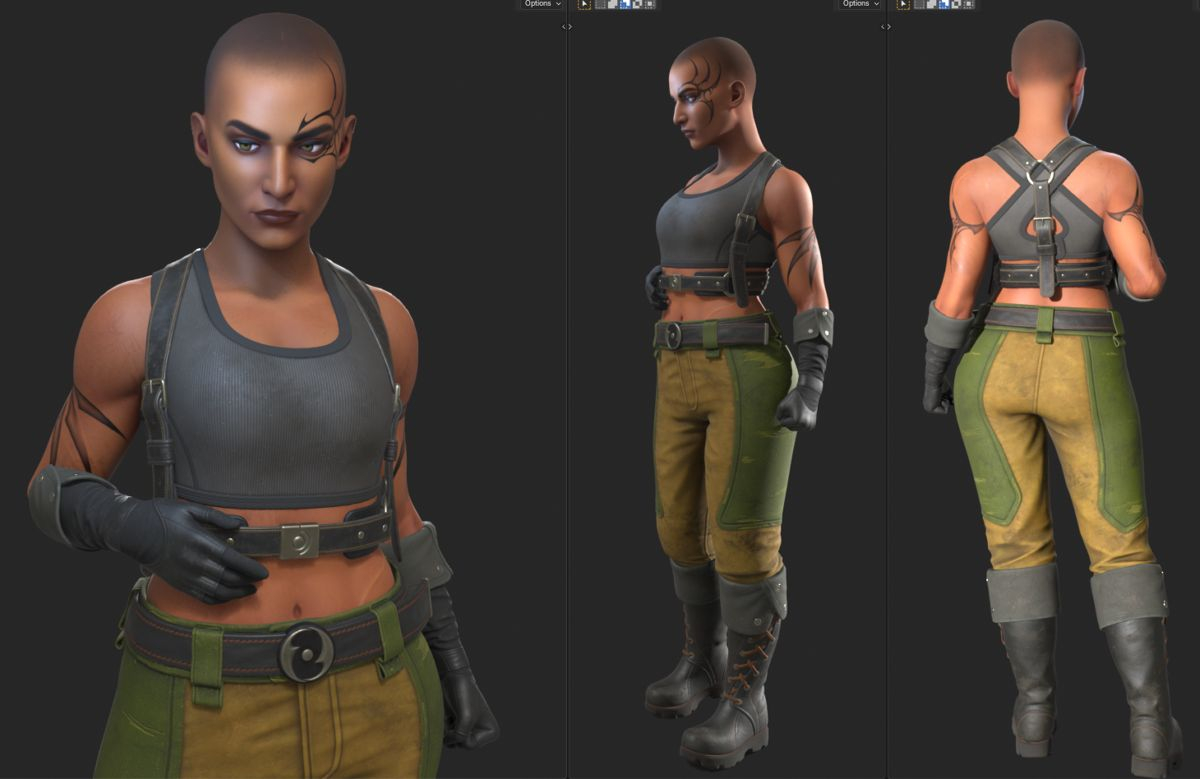
It got a little easier in the end.
I'm assuming there were some changes in Blender, because the (simple) face rig was much easier to make this time. Weight painting was the most time-consuming though. But it's as finished as it's going to be, I think. At least until I add hair. By this point I got used to seeing her without it. Wonder how that part will go.
Will have to go back to SP to readjust some values before export.
Otherwise just need to place hair and figure out how to properly render things.


 stray
stray
1 ·
Re: Advice with secondary forms
This is an exercise that i want to see you doing! I would recommend making the matcap's identical between both.
For this exercise, i want you to get out of the mind of 3d analysis, as in don't try to intepret and remember the 3d forms, and instead get into matching the shading exactly. Think like a painter, you are just darkening and lightening pixels, you are just doing it through the abstraction of a 3d model.
The study isn't on anatomy, it's on training your brain to understand form from shading.
For this exercise, i want you to get out of the mind of 3d analysis, as in don't try to intepret and remember the 3d forms, and instead get into matching the shading exactly. Think like a painter, you are just darkening and lightening pixels, you are just doing it through the abstraction of a 3d model.
To put it another way, the lessons you need to learn, are specifically those differences that are hardest to capture. If you push a study to 70%, you only covered the path you already know well, it's by pushing it to be exactly what's there, that where the gold is to be found.
 Muzzoid
1 ·
Re: Learning Diary - Zbrush Sculpting for Characters and Creatures.
if i can say, well done, otherwise if you wanted to push things a little more i always liked the more exaggerated look and such that play on more depth and sharpness to say the clothing wrinkles. otherwise this is getting there for me, yes about front page stuff, some of us do not get extra help and only have ourselves to go on so i get you 100% there.
 iam717
1 ·
Re: SOLVED: ZenTools problem
You can install ZenTools for Maya 2025 by following the installation instructions found here. The package is a complete rewrite, and does not require any additional plugins. Cheers!
1 ·
Re: Learning Diary - Zbrush Sculpting for Characters and Creatures.
Hey guys, I want to share with you the personal project I'm currently working on.
My idea for this project is to create a stylized game ready character, kinda similar to the dwarf I did previously, but this time I want to expand in the complexity of the character, but not only that I plan on creating a small action scene with this guy.
I chose a concept by Zong Dexian, Soldier:

I really liked pretty much everything about this concept, the style, proportions etc. So I decided to give it a go, starting from scratch, I also wanted to practice a bit of some stylized anatomy before, to make is easier when blocking the armor/clothes but also to train it a bit.
I tried starting with ZSpheres, but Idk why I can't get that right, ended up giving and restarted the blocking by doing it the good old way, using primitives in zbrush, I reached this stage:


After getting the main shape done I dived into sculpting anatomy, nothing too complex, just to the point I would feel like it was a good study overall:

While reaching the end of the anatomy stage I was dreading what was after, blocking and creating all the clothes for him, my experience with the dwarf and some other projects was that this part is always so bad. But, surprisingly, It wasn't at all that bad this time, I even enjoyed trying to problem solve some of the parts, also It was fun integrating a poly modeling software(Maya in this case) and zbrush at the same time, using GN import/export, instead of bashing my head trying to create everything zbrush.
Anyways, this is the final blocking with all his acessories/cloth pieces:
The highpoly stage is pretty much the same as everything I've created using zbrush so far in this thread, nothing too mind-blowing and different from the dwarf for example, and it's the stage I'm at:


I'm almost finishing him, next I will start creating a secondary creature that I will need for my scene I said I was planning on creating with this guy. I believe this is my most ambitious project yet, but nothing too complex to avoid frustration and spending way too much time.
I'm taking my time with him, and I'm enjoying it, accepting the fact that it's not as astonishing as what we can see on the front page over here, or artstation, or a lot of places, and that's ok, it will take time to get there.
That's it, I will post him again when hes finished or at least close to it, thank you so much if you've read until this part, stay safe on motivated on your journey!
My idea for this project is to create a stylized game ready character, kinda similar to the dwarf I did previously, but this time I want to expand in the complexity of the character, but not only that I plan on creating a small action scene with this guy.
I chose a concept by Zong Dexian, Soldier:

I really liked pretty much everything about this concept, the style, proportions etc. So I decided to give it a go, starting from scratch, I also wanted to practice a bit of some stylized anatomy before, to make is easier when blocking the armor/clothes but also to train it a bit.
I tried starting with ZSpheres, but Idk why I can't get that right, ended up giving and restarted the blocking by doing it the good old way, using primitives in zbrush, I reached this stage:


After getting the main shape done I dived into sculpting anatomy, nothing too complex, just to the point I would feel like it was a good study overall:

While reaching the end of the anatomy stage I was dreading what was after, blocking and creating all the clothes for him, my experience with the dwarf and some other projects was that this part is always so bad. But, surprisingly, It wasn't at all that bad this time, I even enjoyed trying to problem solve some of the parts, also It was fun integrating a poly modeling software(Maya in this case) and zbrush at the same time, using GN import/export, instead of bashing my head trying to create everything zbrush.
Anyways, this is the final blocking with all his acessories/cloth pieces:

The highpoly stage is pretty much the same as everything I've created using zbrush so far in this thread, nothing too mind-blowing and different from the dwarf for example, and it's the stage I'm at:


I'm almost finishing him, next I will start creating a secondary creature that I will need for my scene I said I was planning on creating with this guy. I believe this is my most ambitious project yet, but nothing too complex to avoid frustration and spending way too much time.
I'm taking my time with him, and I'm enjoying it, accepting the fact that it's not as astonishing as what we can see on the front page over here, or artstation, or a lot of places, and that's ok, it will take time to get there.
That's it, I will post him again when hes finished or at least close to it, thank you so much if you've read until this part, stay safe on motivated on your journey!
 RaphaelFabris
2 ·


