Search
-
Re: Halo 4 Battle Rifle (WIP)
 Thats great for first gun project,looking real good.Did you enable qualified normals for this and is there only single sg? Yeah don't bake in modo.Even in the 601 version there's no averaged cage.Ray distance method yields worst results.Use modo only for model and uv stuff.Try xnormal or simply bake in 3dsmax/maya.
 -
Re: Fan Art : Final Fantasy 7 : Fusion Sword
 Thanks for the feedback! Right now I'm working on the spec/gloss for that area to help give it some definition. It has a pretty strong normal there, but without the spec, it's lost. As for displacement, I've only ever done that process for pre-rendered meshes, never real-time. Would that be the equivalent to a height map…
 -
Re: Marmoset Toolbag 3.02 is Available now!
 @BradMyers82: A thickness map is on our list of things to add for a future version. The AO is indeed baking from the highpoly source, and is not generated from the normal map. Toolbag 3's baker uses the GPU rather than the CPU, which is why it is so much faster than CPU bakers like xNormal.
 -
Re: Soviet KV-1 Heavy Tank WIP
 I don't think it's the fault of Maya / xNormal. You should assign the good smoothing group to the mesh in order to have a proper baking. The result of the bake in Max will be the same, as long as you don't assign the right smoothing groups. This should help.…
 -
Re: Is baking only within the envelopes faster?
 theres a chance that your ao won't match your normal maps. i would say maya gives a cleaner bake than max although it takes longer. I like Xnormal for its speed. but i never get the results i want out of it, I only use it if i have to.
 -
What the hell is going on with my roughness texture???

 I am super confused. All of a sudden, Marmoset does something weird with roughness channel. I am working on modular pipes. So far I created two texture sets. Steel texture set: And iron texture set: I made steel textures first in Quixel Mixer. Then I just copied the project and made some changes to color of the base metal…
 -
Re: workflow problems
 well there generally no 'formal' sign off stage for each part, like low poly/sculpt/texture sign off or if there was it became a bit muddy as the process developed. ie quick blockout, then detail pass on some cloth, they maybe some work on the hair to get signed off. then they might decide the proportions were not what…
 -
Baking Directional Light Maps in Blender? Is that possible?

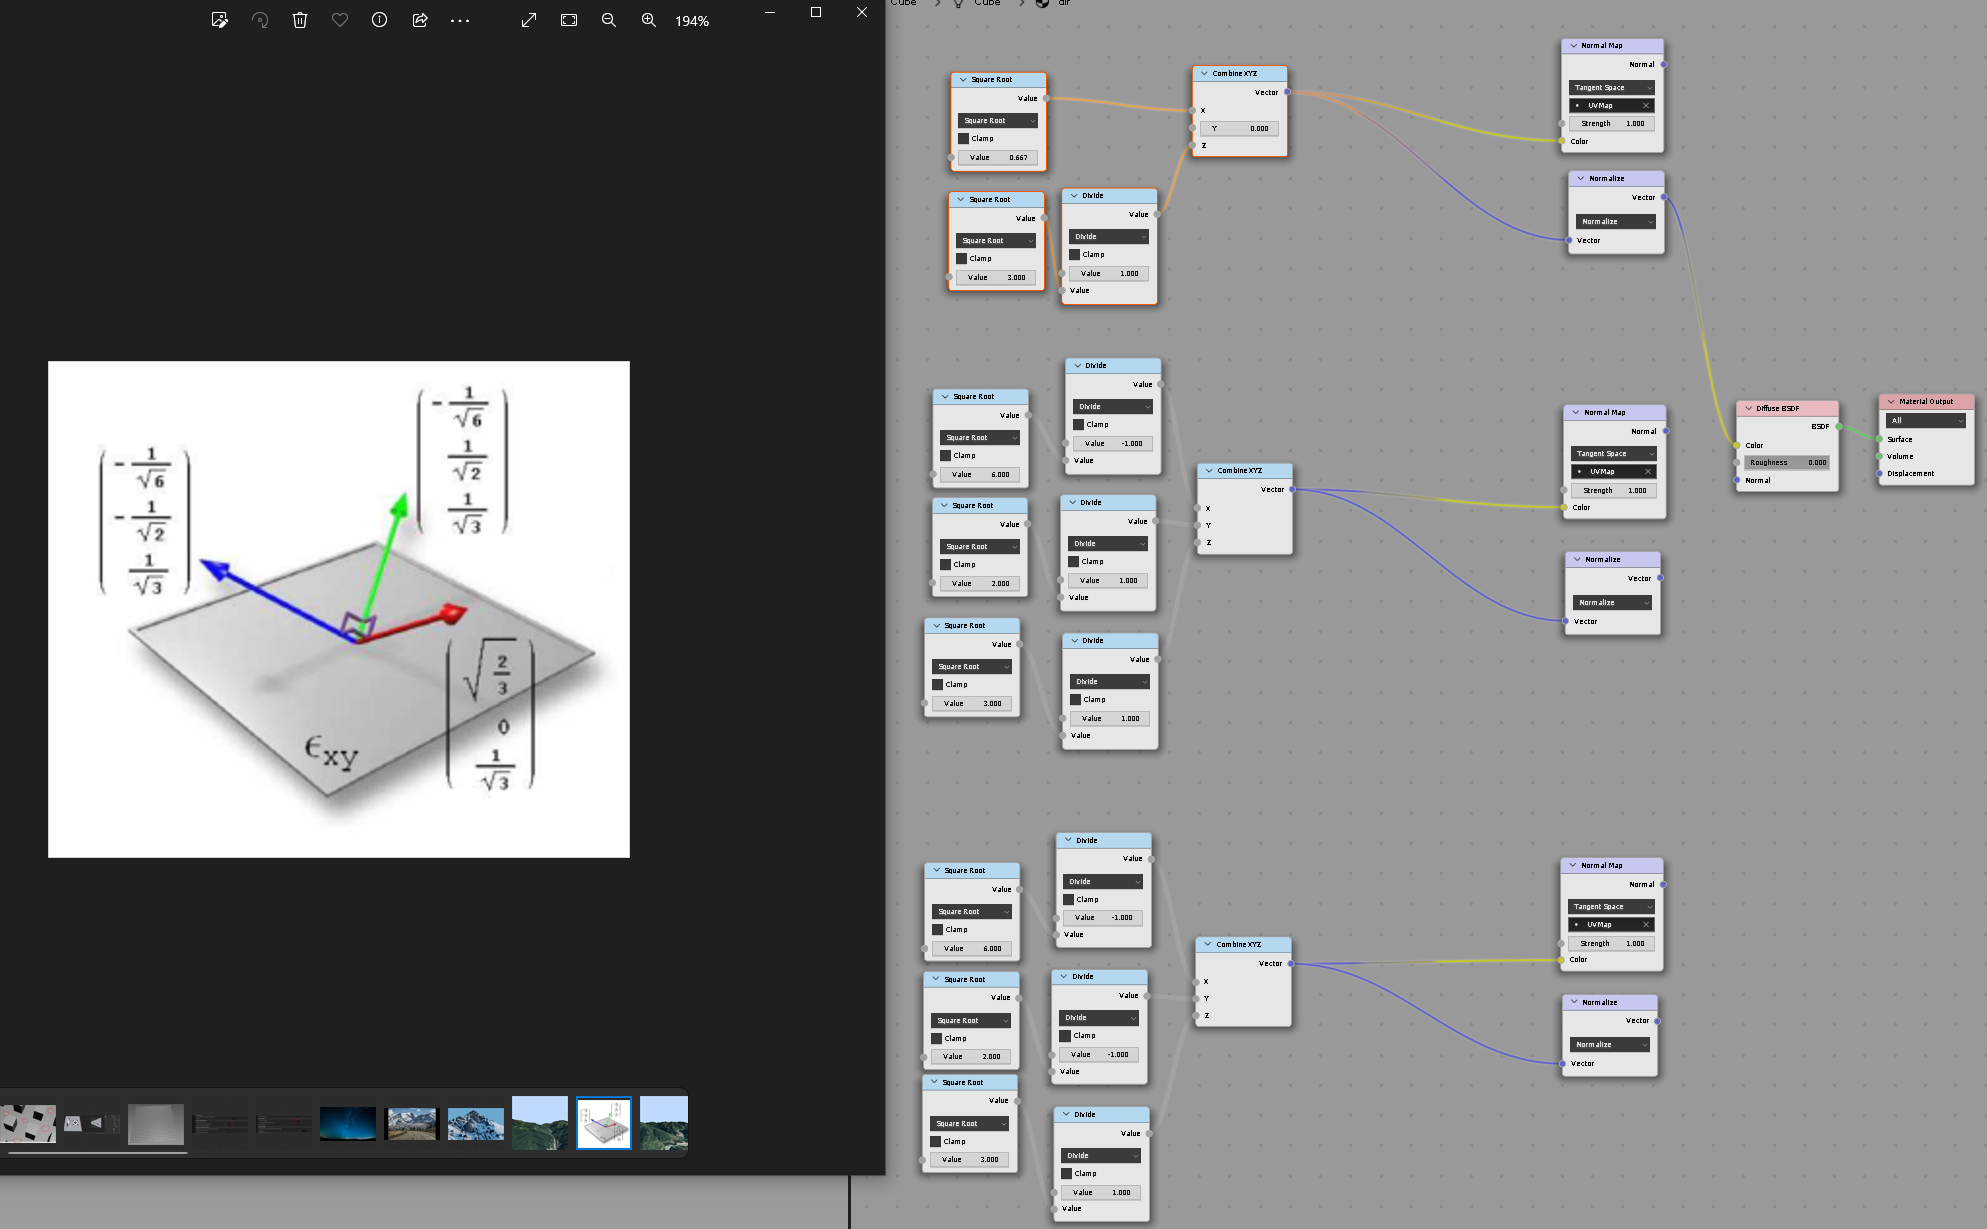 Hi folks I was trying to make a Directionality Lightmaps (Radiosity Normal Mapping) Find whis topic, but unfortunately its outdated and all the images are gone :/ : https://polycount.com/discussion/71538/how-to-directional-lightmaps-with-3dsmax-vray Currently this is what im doing: Here's my 3 basis which i use to bake GI…
 -
Re: School Girl
 Yeah it's not your gfx card. Your normals are broken. I'm guessing because you are perhaps using non manifold geometry for the hair which Maya doesn't like. edit polygons>normals>set vertex normal> ( open dialog box ) >unlock normals. If that doesn't work reset all the normals. edit polygons>normals>set to face.
 -
Re: Texturing workflow technical help!

 The difference in green channel value you are seing is probably coming from a confusion of terms. "Bent" normals refers to a technique that fakes some extra shading by bending the normals in a way that is not just related to the surface of the high, but also to cavity information. That way when light shines down an object…
>37664 results