Search
-
Re: Double hinge, for mechanical claw???
 I had a quick try at this in maya, from what I understand, the green and red pieces rotate together at the same angle, so a aim constraint is not needed. The blue claw piece is only meant to face in a locked direction/axis and as the red and green pieces rotate the blue claw piece slides forward/up diagonally towards the…
 -
Re: RGCA - Best One-Minute Movie/Best Use of iClone - Adolf
 Reply by Adolf · · Home› Contests & Challenges Archives› Reallusion Game Character Animation ContestScene 03 - The Catapult's field In this scene I used the new iClone6 physics engine to create a catapult that actually worked and it was able to throw "virtual" stones to some kind of enemy. So, first I needed to take the model from the Unity pack and break it in the pieces that should be articulate in iClone. I exported…
 -
Re: LPC vol2 #2 - action film - heros & baddies
In your animation menu, there is a 'Constraints' drop down menu, use the 'Parent' constraint to have the control handle control the joint (select the handle, then the joint, then select 'Parent' constraint). You'll see your joint(s) turn purple when properly constrained...move your handle and the joint will move too. You… -
Maya LT - IK Handle Going Crazy Issue
 https://gyazo.com/8bad465f84c2387a0cbc2a78eb9f839d Im following along with this amazing tutorial (https://www.youtube.com/watch?v=h_A5XJmqSSE&list=PLt_Y4A81J7Bd7mxwP_Gi-ttVuL30QRY7d&index=58) and hit a road block. Basically I try and create a IK handle from the wrist to the top of the arm and my entire join chain goes…
 -
Re: Problem with Rigging : How to make a character mantain a sword grip?
I think monster meant constrain the locator (which the Left Arm IK is contrained to) to the sword as you're using the right hand to control everything. Then I'd orient constrain the Left Hand to the Sword maintaining offsets, then add a pole vector to give a bit more control over the left arm. Space switching may be a… -
Re: Technique for modelling tracks
 Constrain > Curve(Path). I'd try making a few modular pieces (textured), then constrain them and adjust the age where needed. If the track is large enough that it would take too long to manually duplicate these along the constraint, you could keyframe the path%age from 0-100 (make this linear) and then duplicate it along…
 -
Re: [maya/UDK] Converting ncloth to bones
 You could duplicate your bone chain, add constraints between the original and the duplicate and key the duplicate for export. Add _ignore as suffix to the original chain to exclude it from export. Otherwise, if you key the original chain, look in the attributes if you get a "blend something" attribute. When you key a…
 -
Re: Does having five edges meet here work for this product? What’s a better alternative?

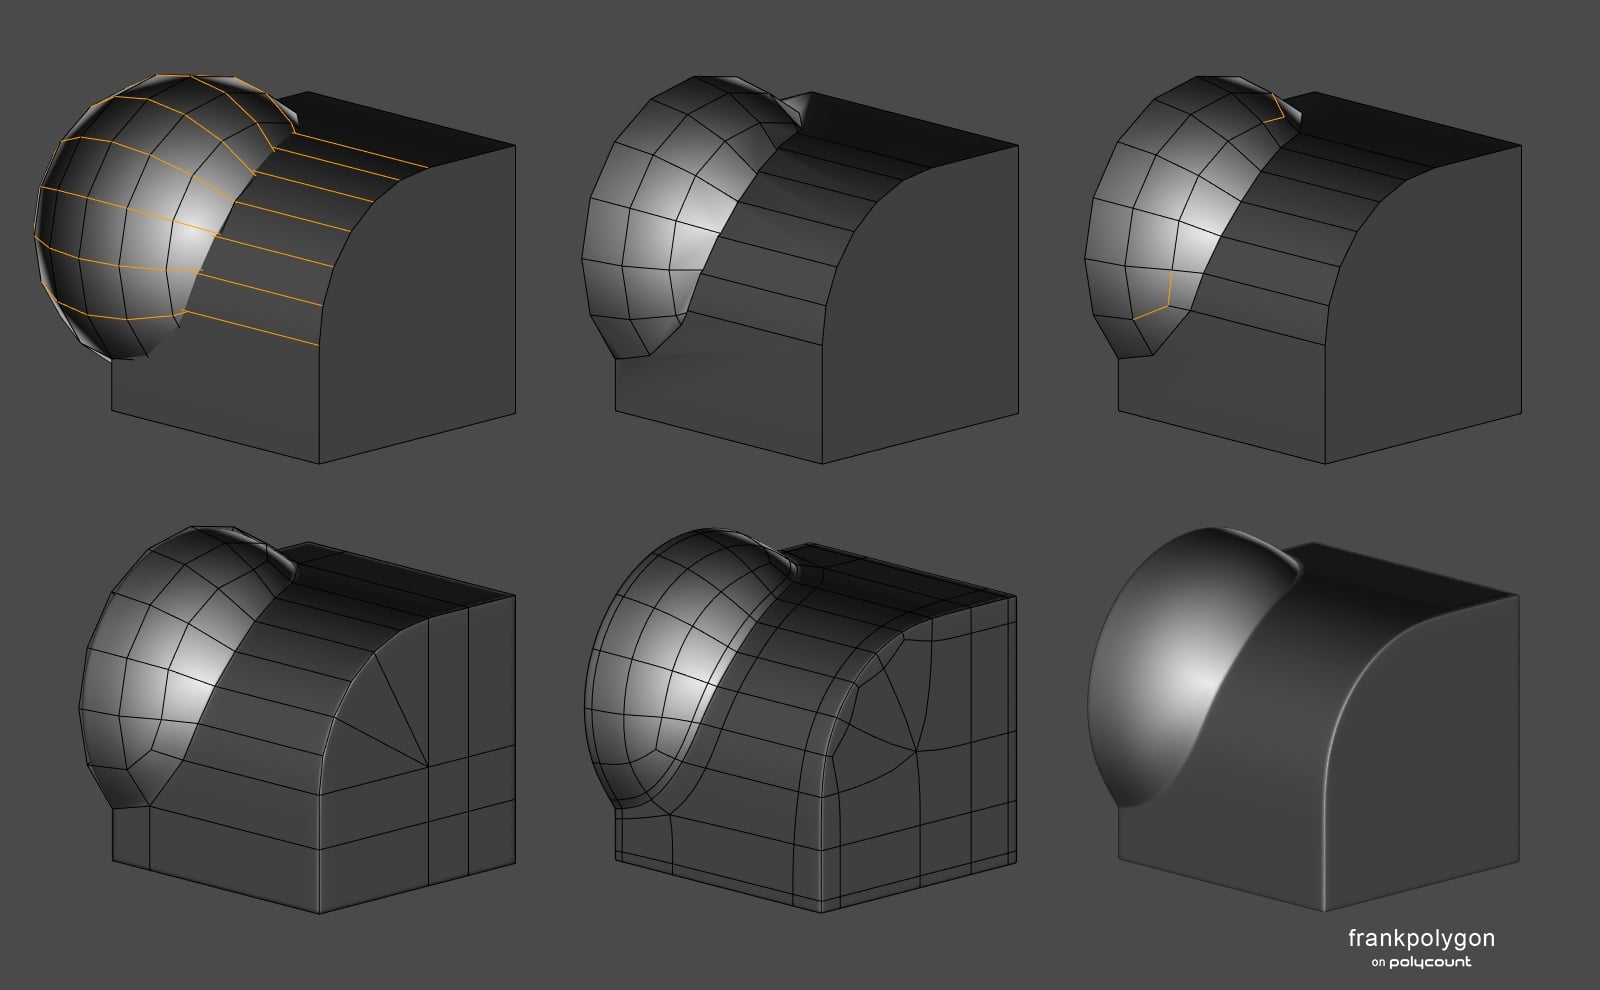 Frankpolygon's perspective is what I'd think about plus the principles discussed relate too other shapes/subd processes as well e.g. Hemispherical intersections "Segment matching is a fundamental element of most subdivision modeling workflows." It's not the topology "A significant problem with trying to formulate a fixed…
 -
Re: Mechanical Rigging question
Use a couple of locators as targets for the hydraulics constraints. Create a locator, parent it under the base in the position of the hydraulic pivot and create another locator parented under the boom arm in the position of the end of the hydraulics. Point constrain both piston parts to their respective locators, then aim… -
Physics setup for driving games
 For some of the veterans of the industry here, what would be the physics setup for the cars of some of the old school racing games like RR1 and Sega Rally? On RR, obviously the handling is very stylised, and the collisions are ULTRA basic (obviously not really supposed to be advanced/realistic collision wise) - but I'm…
>8070 results