shoulders from japan.

grand marshal polycounter
Hey all
I was checking some Japanese 3d console games recently (mgs and ff series) and I think I noticed something.
I'm not 100% sure but I feel that the characters in these titles somehow share the same shoulder topology that I like to refer to as the 'Bender' look. Like the bottom variant labelled '2' here:
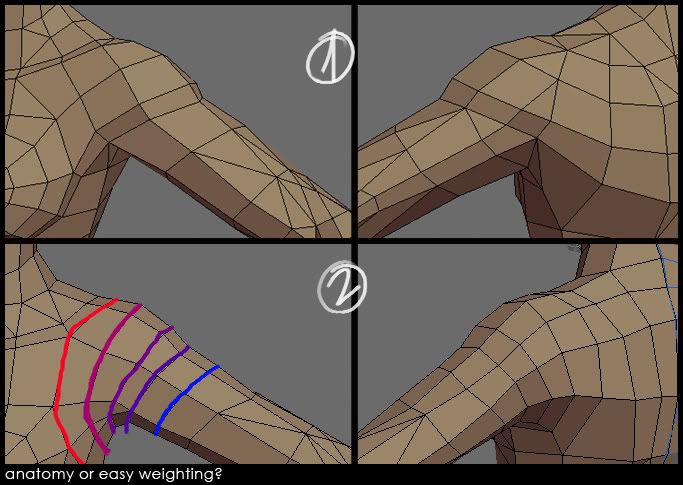
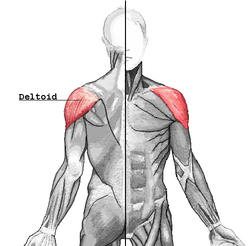
I usually wrap a loop from the bottom of the pectoral muscle (or boobs) all the way up to the final attachement point of the deltoid (as seen in '1' and here http://upload.wikimedia.org/wikipedia/commons/thumb/9/93/Deltoideus.png/250px-Deltoideus.png), but if the problem is seen from a vert weighting point of view I'm sure that solution '2' allows for a very easy setup that blends the shoulder-to-upperarm weights in a nice linear manner. It might also allow for better looking extreme movements such as crawling and large sword actions.
I still have tests to run, but what is your view of the problem?
References :
http://www.ffxii.net/images/screens/game/11.jpg
http://www.userrankings.com/spiel/1321/images/screens/1321/31.jpg
I was checking some Japanese 3d console games recently (mgs and ff series) and I think I noticed something.
I'm not 100% sure but I feel that the characters in these titles somehow share the same shoulder topology that I like to refer to as the 'Bender' look. Like the bottom variant labelled '2' here:
I usually wrap a loop from the bottom of the pectoral muscle (or boobs) all the way up to the final attachement point of the deltoid (as seen in '1' and here http://upload.wikimedia.org/wikipedia/commons/thumb/9/93/Deltoideus.png/250px-Deltoideus.png), but if the problem is seen from a vert weighting point of view I'm sure that solution '2' allows for a very easy setup that blends the shoulder-to-upperarm weights in a nice linear manner. It might also allow for better looking extreme movements such as crawling and large sword actions.
)
I still have tests to run, but what is your view of the problem?
References :
http://www.ffxii.net/images/screens/game/11.jpg
http://www.userrankings.com/spiel/1321/images/screens/1321/31.jpg
Replies
i don't think it's a japanese thing, more of a "traditional" way of modelling them, used by a majority of artists, including many leads who usually create the initial assets everyone uses later for production. and yes, it makes skinning less confusing at the expense of polys.
it is also better suited to half-automated shoulder rigs with twist bones and the likes.
on my current project, i tried to promote the first variant and apparently confused the technical artists quite some. i literally had to show them where to assign which vertices. that's what you get when everyone likes to paint nice weight-gradients, i guess. weak!
deformation problems are inevitable when the skinning is done in the smooth fashion on a mesh like this - the "bent tube" look strikes again.
however, you still can tweak your triangulation, so that the hidden edges flow similar to the layout on your upper wireframe. then at least it's possible to fix the skinning without resurfacing the model.
I can confirm that the company Square do use the topology shown in figure 2 for their lower spec poly models, but do vary it ( very slightly )as the polycount increases, bodies tend to remain fairly low and they spend their polycounts wisely on areas of interest, I only know this from the ff viewer that was knocking around the net some time ago, and I was able to grab a lot of the models from the game and study them in Maya.
As poop stated, it was something that worked for monster when we worked on BR2, so I just went with it and have loved it ever since.
Anatomy is great and all, but when you're working with a limited rig and you need to get your character to reach up, nothing beats the bendy straw shoulders.
I tried making shoulders closer to what real muscle flow worked like for Spy, and I got good results too, but the shoulder rig was a bit more complex than on BR2 and Aeon.
It's all in working with your animator and seeing what your rig can do.
Alex
If you have that, I don't think it really matters if you model the bendy straw way or follow the edge loops of the shoulder.
Obviously it isn't all down to the model. Bone placement and weighting are also key. Our rigger has been doing an amazing job handling all the shoulder deformation of our characters. But I'd also like to think that our character team has it down pat when making good deforming geometry.
I've always been curious as to which would work best. I've always modelled my characters in the bendy straw way and only ever once tried doing it the anatomically correct way. But I've only ever had to rig and animate 2 characters so I've never really had any experimentation to see which would work best.
-caseyjones
The anatomical forms and masses of the deltoid and pectorial muscles can be described in the normal map or texture (both of which spread with greater even ness with the bendy straw design.)
This is one of those good threads!
I have never posted and I'm not advertising it or anything, but I've spent months thinking of nothing but shoulders in my spare time and CAT really was my ultimate solution. Of course, if you are using a pre-existing game engine and skeleton it's obviously not going to do anything for you.
There's some nice things it can do, but it just wasn't for us. We switched over to Maya for animation.
Thanks for the info guys.
bendy straw, edge flow hybrid solution:
Arm raised above the reference pose using a clavicle rather than shoulder rotation:
lil' necromancy anyone?
Was that sarcasm ?
number 1 would have the edge flow from the deltoid (shoulder) muscles to the chest, which is more anatomically correct. (especially when the arm points upwards and pull the shoulder up)
I find that as I break from the 3k low budget range towards the 6k range and higher, I can afford more anatomically correct forms.
You have a very strong portfolio, and I find it very curious that you embrace number 2, have you ever tried going with number 1 successfully ? what was your opinion of it ?
I know this thread was dead, but the discussion on shoulder geo will never die! And we are constantly learning and trying new things to share, no?
http://wiki.polycount.net/Topology
If you want me to take them down, that's fine, just let me know.
This might be a decent place to discuss it?
I know, endless pimpage, but some of that info can be found in pics here...
http://wiki.polycount.net/Limb_Topology
I'm also curious about what skinning/weighting methodology people are using these days. On the cowgirl, I used good ol' tried-and-true vert weighting techniques I've learned over time, but not really discussed online except I guess in scattered DVD CG tuts out there. I'll try to elaborate later.
It's great for topology, but not for skinning per se.
Using Max in a production pipeline I'll often use skinwrap to get a quick weighting with all the bones in the skin modifier, and then use the paint weights brush. I wrote a little skinning tool with 4 or 5 buttons for brush sizes (and a spinner to adjust), and the same for weighting strength. This speeds things up considerably.
I'll normally blur the weights all around the joints, then go in with a hard brush on the inside of the elbows, backs of the knees, underside of the fingers etc. and pretty much go for 100% weighting to a single bone at the crease.
We've built a few detailed rig deforming animations, (one for fingers, one for arms etc.), plus one long animation that puts the rig through a bunch of limb bends and then runs through several dozen common ingame animations, getting more extreme towards the end. At the start it's walking, running that sort of thing and a thousand frames later it's firing backwards whilst riding a motorbike.
Generally I find that the paint weights brush is good enough for most weighting, but I still resort to setting single weights. For eyeballs I'll grab a single vert, grow it to select the entire eyeball, then spin the weight up to 100%
Also, a lot of "form" in some next-gen titles are almost completely dependent on normal maps to help the character "read". Ever see the UT3 characters without the normals maps? Ugly...:)
Deformation is not usually a high priority with game studios, however, it's changing a bit these days as I've noticed more sub-d style "quad mesh" topologies in next-gen titles.
Erik and I spent the last couple of years making it a fairly high priority on several hundred models.
I really think there is a constant re evaluation of weather you should build your mesh for ease of mapping, lighting or skinning and deformation as not allways do they all meet together well. I recently started building a model at home to test out how well max copes with its Skin-Morph tool. I strongly belive a mesh that folows muscle formation is the best for this. In games we try to keep to this as much as possible, it makes our jobs quicker and the end result look better.
http://tech-artists.org/forum/showthread.php?t=50
That's awesome! I wish more places would. Kudos.
Here's a personal character I am working on right now. You may recognize him from the Wind Waker game. It's a much higher rez quad sub-d mesh, but it illustrates how much more you can get out of the deforms if you "cut in" as much form as possible and you vert by vert point weight those areas. You'd be surprised at what you could achieve with just one or two extra bones as well.
I also usually go with the Andrew Loomis "Cape" for the chest area. It's easy to weight paint. Even though the topology is not as organized as a "bender" mesh, you can get really nice creases if you plan the splits in the arms specifically for deform.
A good test to see just how well your shoulder deforms hold up it to get your character into the "strong man" position:
I see it all the time with my students. They get frustrated when they start skinning their characters and can't figure out why an arm no longer looks like an arm when it's away from it's bind pose.
As for the last pic, it illustrates "helper" bones in action. Just two simple extra bones really makes a difference.
Some of my other "helper" bones in action. These are to simulate muscle slide, low-tech style:
Cheers,
-Rod
I go with #1 for the most part but I never rig anything so.....
We played with the default settings and managed to get deformation that was good enough to go into the game for rapid prototyping.
And would it be possible to add such bones to a Character Studio biped?
Related topics are "Wire Parameters" in Max, I think it's called "Set Driven Key" in Maya if you want to look up further information.
You can set up float expression controllers for objects to control their position (x, y, or z), rotation (x, y, or z) and scale (x, y, or z). For most roll bones you'd simply set up an expression in their X rotation.
I've not tried to build a bicep bone, and I don't have max at home, so this is theoretical from here on in...
Build a helper bone, aligned and parented to the upper arm.
If it was only going to bulge outwards then that would probably be it's local Z if aligned to the upperarm bone, so in the motion panel (I think, I don't have max here), assign a float expression controller to the Position Z. This'll pop up a dialogue box.
In the float expression you set up a variable to monitor the local Y rotation of the forearm - this is easy, you hit the create variable button, give it a name (Left_forarm_y_rot woud do) and point to the object you want to monitor (the forearm bone) and select from the list what you want the variable to store. It's something like local.rotation.Y.
Local will be relation to its parent, in this case the upperarm. The angle between the forearm and the upperarm would likely be say, 0 to about 170 degrees? That'll be in radians as I recall, so you get a number between about 0 and 3. As the arm animates the variable will update constantly.
Then you use that offset the bicep bone. This is where I'd need to sitting in front of max to figure out the actual maths, but basically you have a input box in the top right of the float expression control and whatever you type in there is what gets applied to the bone. You could leave it blank and nothing would happen, you probably type in a constant and the bone would always stay at a certain value.
For twist bones, like the upper arm roll you'd probably have created a variable called left_arm_twist_X, so in the expression box you type:
When the arm rotates on the X axis, the rollbone will only rotate 50% of that.
Anyway, back to the bicep...
You've set up an expression to control the Z position of the bicep bone, and you've got a variable called Left_forarm_y_rot giving you a number betwen 0 and 3. Your actual expression could be as simple as typing:
This should take your initial Z pos and apply an offset between 0 and 3 units. This might make you arm shoot off into infinity, so you might need reduce that movement by a factor of 10:
Or make it move 5 times as much:
I think that I've probably been more confusing than helpful...
Seen bits of the following resources here n there but never could find the mother load.
Sorry if as much is old news to some but...
I have been combing the internet every so often looking fer a flouroscopy
collection that was comprehensive enough to use as a general reference for joint placement research.
Nice thing about flouroscopy is that the xray image is usually videotaped/filmed!( cineradiography. )
Particularly shoulder video showing the joint/skin positioning with a full range of motion has been
particularly elusive and desirable ( to me at least ).
Seems as if, since I last attempted to farm some reference on the internets,
alot of juicy examples are now online.
Particularly:
X-ray studies of the joint movements Dr Russell J. Reynolds
although the footage is pretty raw ( pub 1948 )
The direct commons link is HD enuff that when run through hilights/shadows
( to dial hilites down with greater tonal range dialed up )
and the reduce noise filter in after effects,
the result shows the joint positioning in relation to the outer deformation perfectly through an entire range of motions.
corrected: ( looks alot better/revealing when playing )
( no shadows 0%, ( Hilights 50% 90% tonal width )) ( reduce noise default values )
low rez preview:
( besides the shoulders, nice full range of motion on all the major joint rotations very extensive for 12 minutes )
[ame="
High defininition version: link right click "save as"
available thru: http://creativecommons.org/licenses/by-nc-sa/3.0/
Available on the same website is a nice resolution version of the following motion study: ( Best version I have found other than the gifs floating around: )
[ame="
High defininition version: link right click "save as"
available thru: Creative Commons Attribution-Non-Commercial 2.0 UK: England & Wales
Also of interest on the internets ( new to me at least )
Cool phoneme studies from the 60's n 50's. Like the previous footage the body parts can be dialed in nicely with a little image adjustment
( it is easy to make out the throat back, lips, joints/teeth and tongue motions made to create the words in the video ) ( no links need to be youTube extracted if wants )
[ame="
[ame="
Not sure if you saw this, but Chris Evans is sharing a bunch of flouroscopy videos of his own shoulder in motion.
http://chrisevans3d.com/research.htm
Plus he has tons of great rigging/skinning reference links...
http://chrisevans3d.com/reference.htm
Holy Moly!:
It's like xmas
Nice of him to expose himself to radiation fer the sake of art/science research!
( example pics of radiation death from the early days of retail shoe sale flouroscopy machines are pretty gruesome ! )
If u were going in for surgery anyway however...
someone should create a:
"www.share_yer_flouroscopedTUBE_book.com"
Thanks for the great links Eric
Wish I could find more "modern examples" like these that cover other joint rotations. Even though the resolution isn't as high,
it is clearer to visualize what is going on. Even so...
I find the same shadows/highlights filter ( shadow off ) tonal width can help dial in either the skin or joint details.
like:
before adjustment:
after: silhouette is an easier read...
The weightlifting reference is perfect example of an important consideration many seem to miss:
Ask everyone in a room to lift their arm above their heads and usually they will bring their arm staight up in a frontal arc instead of the classic t-pose "side arc".
ugly:
( seeing ragdolls break with no clavicle constraint really irks me )