Home 3D Art Showcase & Critiques

Warmachines , Character Scene

1
polycounter lvl 17
Offline / Send Message
seforin polycounter lvl 17
ok I did say I was sculpting with a friend on my odd days, at my night job im working on my next gen scene, so im multi tasking right now, anyway so I started work on my next gen scene (thanks vig for the ref stuff)

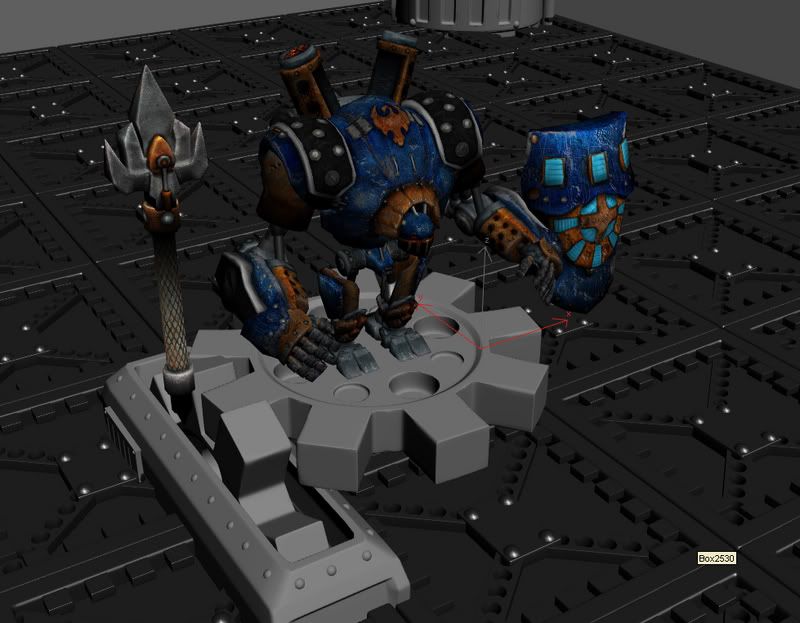
Im going for a small scene because I still want the focal point to be my character in the end, I just wanna add some scenes for added details when making these blush.gif

Anyway I took alot of stuff from the books and expanded on that (If you have the books look at page 1 and look at my floor pannel :P)

Anyway the downside is Im not sure if im adding to much or to little to this scene. I was planing on adding a crane lever thing from above the ceiling haning....any other recommendations of what I should add/ not add/ tweak?

neatthing1.jpg
neatthing2.jpg
neatthing3.jpg

Replies

  • CheeseOnToast
    Options
    Offline / Send Message
    CheeseOnToast greentooth
    The foreground parts are looking great, but that floor is incredibly busy, and is taking away from the character. Textures and lighting might go a ways to sorting that out though. Maybe try a quick light setup to get a feel for the final. The character will definitely need some backlighting/rim lights to pop him out.

    Is this a high poly scene to be used as a source for normal maps? If so, you're going to need to change all those vertical planes on the floor tiles to be angled so that the raycaster will pick them up, something like
    this.
  • Joseph Silverman
    Options
    Offline / Send Message
    Joseph Silverman polycounter lvl 17
    Needs less floor + empty space, and a more personal setup. This is a stand for your character, not a character for your stand, right? I know it's tempting to make a big interesting scene, but the goal is just to have a solid composition that focuses on the character. Bring everything in closer, and set it up carefully, and it'll look a lot better than a giant detailed room.
  • Wells
    Options
    Offline / Send Message
    Wells polycounter lvl 18
    those floor tiles look specifically designed to fuck up the robot's pathing. each one is a foot trap.
  • Maddness
    Options
    Offline / Send Message
    Maddness polycounter lvl 11
    actually, i have a question about the character before i comment about the scene.

    how tall is he?
    is it a mech that someone rides in,
    or is it like a walking robot that's as tall if not a little taller than a man?
  • Mark Dygert
    Options
    Offline / Send Message
    Maddness,
    cygnar.jpg
    The character second in from the left is of standard human height. I'm pretty sure Sef modeled the one in the middle, but I'm not as farmiar with Cygnar as I am with Khador.

    Seforin,
    You build pretty fast, you're on a roll. I really like what you have so far, the boiler thing looks cool and pretty steam punk-ish. The lightning coil things are cool also and looked ripped right from Warmachine.

    Crits:
    - The scene is too big to make the focus the character. Having that large of a scene will also cause you to fill up a lot of dead space. It also makes the character feel smaller.
    - As Brome says all the time, nail down your cameras and pick your viewing angles. This will help considerably when filling in details. I would stick close to the floor so the character towers over the camera(viewer) but doesn't dominate the view since you want to show off the enviro as well.
    - The floor could be better used for the walls if it was scaled 200%. Walls have massive loads to support so struts and rivets like that make sense for walls. Floors aren't as structurally important. Concrete is cheap, self leveling in many cases and doesn't rot or rust. Stick to concrete with minimal details, if you want to jazz up large sections of the floor, lay some hoses (yeah more simple splines) toss some opacity mapped oil stains, whatever. A really detailed floor might have a grate, or some black/white caution marks. Normally you want your floor and ceiling to be pretty uninteresting. The floor and ceiling should purposefully lack detail to drive you to what you should be looking at.
    - The lightning coil things might be better put to use on top of something other than the floor. Blend them into a generator or some other piece of machinery.
    - Drop the ceiling down to 2 mech heights, move the walls in two floor tiles and scale up the boiler to take up a good chunk of the background.
    - Catwalks?
    - Don't forget that boilers do something other than just burn coal and exhaust. Shouldn't it exhaust outside the scene? You need cold water coming in and hot steam pipes going out, along with shut off valves and maybe a few large back up pumps. Also think about how the coal gets in there, who puts it there and what his/her work station looks like. You're not just putting random junk in a scene you're creating a functioning world =)
  • Maddness
    Options
    Offline / Send Message
    Maddness polycounter lvl 11
    awesome. that's what i thought. Thanks Vig.

    So my crit on the environment would have to be that it's too big if you're trying to just have it accent your character. I would suggest making a smaller chamber type thing.


    think of the marine in the opening cinematic of starcraft 2,
    or the chamber that Darth Vader was getting built in, in episode 3.

    it's a more personal space, and you can add a lot of detail in there that compliments the character, and it also gives the character focus, because there isn't as much space for the viewer to wander around in

    Sooz_464f3b300f097.jpg
    250px-Vader_complete.jpg
  • seforin
    Options
    Offline / Send Message
    seforin polycounter lvl 17
    nooooooooooooooooooooooooooooooooooooooooooooooooooooo(to the above vader pic)

    anyway yea I figured the floor pattern will be to busy but it was a test, I plan on just making 1 pattern and normal maping/specing it and then tiling it all over, perhaps on the ceiling that will be a better pattern.

    ok im gonna bring the sizing of the room a bit smaller,

    I wanna add 1 CRAZY huge detailed boiler style thing in the center but not enough to take away from the character...I dunno so much about cat walks wouldnt that take away from the point of looking at the center of the room as oppose to look at the ceiling at that point?

    I really Wanted to make one of those things that melts, metal but I couldnt find any good ref..anyone know what im talking about with that?

    And I was thinking a assembly line that rolls thing but I wasnt sure, again I dont want to add to much to make to busy..

    Im thinking that I wanna make this scene feel more factory..am I going about this the wrong way?

    Someone suggested I do this instead for my guy...ugh I hate scenes....I can never figure out the fung-shui' of the damn thing!

    https://www.youth2work.gov/_sec/media/reports/annual2003/images/goal3_1_img_14.jpg

    anyway new sizing for now, I plan on doing more of a zoom on my character with the roation and then a quick camera around the room when done.


    fullroom.jpg
    charclose.jpg
  • Mark Dygert
    Options
    Offline / Send Message
    Much better, the focus is back on the character. The angle of the camera is still looking down on it. Drop a biped in the scene, put the camera in its head to get roughly the right perspective. You don't want to be looking down on the model unless you are on a 5ft high platform... oohh that could be cool... Maybe have a row of controls framing the bottom of the shot like you're standing on an elevated control platform.

    [ QUOTE ]
    I really Wanted to make one of those things that melts, metal but I couldnt find any good ref..anyone know what im talking about with that?

    [/ QUOTE ]You just need to know what to look for =)
    Smelter, Iron Working, Blast Furnace:
    http://www.asarco.com/AMDC/images/converter_furnace.gif
    http://www.old-picture.com/united-states-1930s-1940s/pictures/Smelting-Furnace.jpg
    http://www.supplierlist.com/photo_images/26389/iron-smelting_medium_frequency_furnace.jpg
    http://www.faw.com/Events/images/022-2.jpg
    http://www.hardwaresource.com/about_hinges/hinge_history_images/modern-steel-making.jpg
    http://www.hardwaresource.com/about_hinges/hinge_history_images/modern_copper_smelting.jpg
    http://www.opiniojuris.org/files/roger-copper_smelting.jpg
    http://www.moltenmetalsystems.com/100_0297.JPG.JPG

    Suggestion, delete one of the walls and have it lead off somewhere else. A tunnel, a doorway, a large opening for a crane, something other than a box. It helps create the illusion there is more to the scene then what you are seeing. If you can make the viewer want to explore down that hallway then its a win for you.

    It might help to work in tiles, like what you started with on the floor. Have the walls be two or three tiles high, build a set of modular pieces you can arrange inside the tiles to get different looks.

    Looking good, keep at it.
  • Austin
    Options
    Offline / Send Message
    The only weird part to me is the floor, otherwise it's looking great.
  • seforin
    Options
    Offline / Send Message
    seforin polycounter lvl 17
    ok did some updates, played with sizing, changed those tiles to be just 2 big plates on the wall, decided to create a assembly line with magma poring into a tumbler which pores into a iron press that will be using electricity that will be powering the machine/ conveyer belt with metal bits coming out (probably warmachine parts) so this is the updates so far, as usual crits and such are welcomed

    full1-1.jpg

    part2.jpg

    part3.jpg
  • seforin
    Options
    Offline / Send Message
    seforin polycounter lvl 17
    ok did more work to the scene, feel its about time to normal map and start lighting and rendering stuff out. Heres the high poly and some of the low poly stuff

    sce1.jpg
    sce2.jpg
    sce3.jpg

    lowwire1.jpg
    lowwire2.jpg
    nmap2.jpg
    nmap.jpg
  • rooster
    Options
    Offline / Send Message
    rooster mod
    coming on nice man, the big no-no I see is the background wall being a scaled up ceiling tile. nothing wrong with reusing stuff but oval rivvets look really weird (and big) smile.gif. I would scale it up uniformly and fill in the gap with smaller versions of itself or some other details
  • seforin
    Options
    Offline / Send Message
    seforin polycounter lvl 17
    I think im gonna change the back center to something else like keeping it but fixing the rivits and the square center piece. making it a bit more detailed then now

    Other than that you like?

    I plan on making all things for the envrionment 1024s and 512s only

    (small things 512, big 1024)
  • seforin
    Options
    Offline / Send Message
    seforin polycounter lvl 17
    more updates, all 512 maps so far, only other thing that will be 1024 will be the tumbler machine, but not that far yet

    still need to clean up the N maps a bit more


    EDIT:

    ALL THESE IMAGES ARE WRONG! laugh.gif
  • JordanW
    Options
    Offline / Send Message
    JordanW polycounter lvl 19
    Your low poly objects look like they could use more geometry. Some chamfers and divisions will help get rid of the waviness in your normal maps.
  • Mark Dygert
    Options
    Offline / Send Message
    One thing that jumps out at me is the void poking in on the normal maps. I think its because the high poly is smaller than the low poly?
  • PeterK
    Options
    Offline / Send Message
    PeterK greentooth
    Do you have max 2.5 star turned on? Those normals are pretty jagged.
  • seforin
    Options
    Offline / Send Message
    seforin polycounter lvl 17
    well the void ones like the wall and floor pannel are going through the floor box a bit so really dont care if the edges are a bit messy as of right now

    as far as max 2.5 star?

    Uh no but I do have mental ray high set on when rendering.

    For some reason looking at these maps on my pc they dont look as sharp as they did on my laptop last night. Really weird.
  • seforin
    Options
    Offline / Send Message
    seforin polycounter lvl 17
    edit: I found out why its looking jagged on my pc and not my laptop, I have it on my pc to be set up for linear when I was doing my DS texturing a while ago....reason it looks that jaggedness and didnt even realise theres are all viewport grabs was why...my bad tongue.gif
  • seforin
    Options
    Offline / Send Message
    seforin polycounter lvl 17
    1-6.jpg
    2-7.jpg
    3-4.jpg
    4-2.jpg
    5-1.jpg
    6-1.jpg

    ok the more FIXED version now

    sorry about earlier
  • eld
    Options
    Offline / Send Message
    eld polycounter lvl 18
    There's still some crazy shading errors there,

    and one great sollution is to just hard-edge the lowpoly so that the shading of the lowpoly looks proper before you bake, and then split the uv's over where you split the shading on the lowpoly.

    That'll make your shading looks insanely perfect.


    and it seems like you've cage-baked the holes there, you should just do a straight light-trace bake there, so the holes does not warp.


    if you do these things, you'll keep it lowpoly, without any beveling, and you'll keep the shading perfect.
  • seforin
    Options
    Offline / Send Message
    seforin polycounter lvl 17
    im a bit confused when you say hard edge the low poly, you mean like chamfer the edges like when I was making the high poly?

    Like can you show some examples of what you mean/ paint over or something?
  • Joao Sapiro
    Options
    Offline / Send Message
    Joao Sapiro sublime tool
    ii think the highpoly shapes arent interesting, they are basically some prettied up primitives, i would try to make something more challenging , take a look at gears of war enviros etc , theres tons of inspiration smile.gif
  • PolyHertz
    Options
    Offline / Send Message
    PolyHertz polycount lvl 666
    seforin, he's refering to smoothing groups when saying hard-edge.
  • eld
    Options
    Offline / Send Message
    eld polycounter lvl 18
    yeah, smoothing groups.


    You'll inherit bad shading from a badly shaded lowpoly onto the baking.

    So having smoothinggroups for those extreme 90 degree turn, or even anything that makes the shading go crazy on the lowpoly, just use smoothingroups.

    Usually you'll get a shading-seam on the final model, but that can be worked around by having a UV-seam where the shading was split, that way the normalmap will bleed over the uv-seam on the texture and fix the seam.
  • rooster
    Options
    Offline / Send Message
    rooster mod
    never used that before eld sounds useful- dont want to hijack the thread but can you or anyone describe how splitting the uvs makes any difference? don't quite understand the trick
  • seforin
    Options
    Offline / Send Message
    seforin polycounter lvl 17
    bah ive been the guniee pig for another thing again!

    ok so basically if I have a square box for example, and on the edges I have those edges very hard, if I were to keep the low poly and keep those edges in smooth group 2, and the top part on 1, when it registers the normal maps, it still gives it a nice hard edge look even more so than before?

    Do I have to do this process pre baking or post baking though?


    EDIT: Johnny , I kinda agree its a simple environment, but im trying to make my character be a focal point, so I dont want the envrionment to be to overbearing or tossing off the eye to much
  • Joao Sapiro
    Options
    Offline / Send Message
    Joao Sapiro sublime tool
    i would try to add chamfers to it so that it become smooth without smoothing groups
    like you pick a simple cube , you unwrap it , then you copy it ( not instance ) and add edes to make it when you apply 1 smoothing group only , smooth. tangent space is shitty in that way, so the shading of the lowpoly will influence the normal map, but it still will benefit hehe...

    btw i dont understand when you say you want the character to be the main point yet you fill in the background full of distracting objects ? thats a bit weird, thats like sayng : "i want this wall to be green , but only 1 cm square"

    if you want the character to be the focal point just give him a base wink.gif

    Not beeing a prick, just stating what i think honestly, but i would keep going with this since you have a pretty solid idea what you want of it !

    good luck man
  • seforin
    Options
    Offline / Send Message
    seforin polycounter lvl 17
    I have a way of doing camera work to show the focal point being him, going into after effects to blur out the background slightly, show off the char, after which show the envrionment a bit, go off to the next thing on the olds demos after

    I had a few people telling me it was going to be a overpowering scene, but I also have particle work on the character in the center, so If I do that I believe the eye will go back to him and not the envrionment, not sure about the blur effects for the back just yet, I might do some other particle work in the scene but still up in the air at this point.

    And yea dont worry back walls arent going to be green, there going to be pink laugh.gif
  • eld
    Options
    Offline / Send Message
    eld polycounter lvl 18
    normalmapsms6.jpg


    This is how you should do it

    the first one uses one smoothinggroup, and as you see, the shading inherits on the baking. badly.

    the other one has smoothingroups to fix the shading, but the normalmaps cannot work properly like this, so it creates a seam.

    the last one has the UV split, so the normalmaps can do their thing, result: shading is perfect.
  • seforin
    Options
    Offline / Send Message
    seforin polycounter lvl 17
    ohhhhh Im seeing what you mean now, so instead of trying to uv unwrap it as 1 unit like you do with most normal map objects, the parts that have that nice hard edge, you keep detached so it creates your nice hard seem where it is suppose to be.

    Damn that sucks gotta re uvunwrap alot of these then =\
  • eld
    Options
    Offline / Send Message
    eld polycounter lvl 18
    Yeah, I've seen so many cases in games where normalmapped assets has been baked on a mesh that was just one smoothinggroup, and even with some more edges, it's hard to keep the shading perfect.

    but with this method you always end up with the perfect bake, and perfect bakes are a must, since shading flaws are very very noticable.

    the normalmapped asset should look identical to the highpoly in the shading.
  • seforin
    Options
    Offline / Send Message
    seforin polycounter lvl 17
    ok doing a bit more work thanks for some of that help with the new way to uv unwarp hard edge things, some things still had to unwrap the normal way, also the more zoomed in shot is what I plan on doing to show off the character when rendering, with him in a basic idle particles coming from his back and having him spin on the gear. all maps are 512/256 and 1024 (only machine thing to the far left with conveyer belt is a 1024, last thing to normal map will be magma tumbler which will be 1024 as well.Ok enough talk, take a look


    thing3.jpg
    thing2.jpg
    thing1.jpg

    Thanks again for the advice eld smile.gif
    Also johnny, this still to crazy to show off based off that angle?
  • eld
    Options
    Offline / Send Message
    eld polycounter lvl 18
  • seforin
    Options
    Offline / Send Message
    seforin polycounter lvl 17
    asg.jpg


    A new update, going into photoshop to fix alot of these old problems now

    redid ALOT of the maps now, hope this is looking a bit more nicer
  • Joao Sapiro
    Options
    Offline / Send Message
    Joao Sapiro sublime tool
    i still think that the shapes are very uninteresting and can be seen as something to distract the eye, i would try to do more complex shapes or something more interestic, right now everything is too much chamfered boxes and stuff.
  • seforin
    Options
    Offline / Send Message
    seforin polycounter lvl 17
    ok decided to toss a update

    The side walls and floors arent the official before anyone says anything, so far all thats left is the floor, side walls ceiling magma tumbler and machine press, and then all lighting from there.

    any ideas what I should do for those side walls? Texture wise?


    meh1.jpg

    meh2.jpg

    meh3.jpg

    meh4copy.jpg

    meh5.jpg
  • Rhinokey
    Options
    Offline / Send Message
    Rhinokey polycounter lvl 18
    your diamond plate has 3 foot long extrusions on it. that should be tiled about 10x more than it is to be accurate, almost all of your metal textures are being used way too large of a scale, should be tiled more. rember when you get a photosource of meta, most likely its just a 4 to 10 foot piece of metal, sometimes even smaller. you can't take and place that across a large model, it needs to be used to the scale that was intended,
  • seforin
    Options
    Offline / Send Message
    seforin polycounter lvl 17
    thanks rhino, i'll scale down some of the metals, I used a combination of photo sourcing and hand painting to get the desired effects I originall had the diamond plate a bit smaller, but the effect didnt look well once I had applied a 2nd normal map pass to it (but I didnt have the new version of crazy bump on my laptop last night, so maybe crazy bump might give better results)
  • seforin
    Options
    Offline / Send Message
    seforin polycounter lvl 17
    still trying to tighten the graphics, think im gonna redo the texturing a 3rd time on that floor base thing. Just not feeling it

    1-7.jpg

    2-8.jpg

    3-5.jpg
  • seforin
    Options
    Offline / Send Message
    seforin polycounter lvl 17
    ok insperation kinda hit me , so heres a bit of a fix update, see how that turns out..

    asf.jpg
  • seforin
    Options
    Offline / Send Message
    seforin polycounter lvl 17
    ok more midnight crack rolling, things I still hate but cant think of what to do to fix it

    Floor (base)
    Floor platform (Thing with holes in it)

    Suggestions would be awesome

    all thats left to be texture is the tumbler and then its all lighting and particle work from there! laugh.gif

    midnightcrack1.jpg


    midnightcrack2.jpg
  • Joao Sapiro
    Options
    Offline / Send Message
    Joao Sapiro sublime tool
    i still think that no matter what camera angle you choose the character will "blend" in the environment and wont pop, right now this is an environment with a character on it, not the other way around frown.gif
  • rooster
    Options
    Offline / Send Message
    rooster mod
    you've got a lot of conflicting values, everything is the same high contrast and there arent any areas for the eye to rest. basically everything in the scene is wanting to be looked at which makes it confusing to read. What I do in this situation is take the image into photoshop, convert to greyscale (not desaturate), and on a new overlay layer paint dark and light appropriately to make the character pop and other details sink back a bit. Then take that overlay layer and put it over the original image (might need some saturation tweaks) and thats what you're shooting for in the scene. You can maybe make a few tweaks with regular paintbrush too at that point
  • seforin
    Options
    Offline / Send Message
    seforin polycounter lvl 17
    banging_head.gif

    what about lighting wouldnt that add to it though?
  • Joao Sapiro
    Options
    Offline / Send Message
    Joao Sapiro sublime tool
    i still say what i told you before, if it is to dysplay the character i think that you should ditch the enviro and maybe make a base or something ( take a look at nuclear dawn work ) if you want to pimp enviro ( wich is what you seem to be doing here ) keep going, right now in order to make what you want id recomend make the style of the textures be diferent from the character dunno , they all kinda distract the eye like rooster said frown.gif
  • seforin
    Options
    Offline / Send Message
    seforin polycounter lvl 17
    well maybe I should display the char and the environment seporately,

    I Was planning on rendering out the character as seporate unit to get the AO layers as I render it out so I could take that back into after effects and really pump up the quality of the character,

    Im guessing I Should just finish that tumbler and then do a 2nd pass of all the texturing after I place some lighting if the lighting dosent make my guy go pop

    Its odd though I figured all they gray metals would make your eye lead away from the envrionment and more towards the char since hes a bright blue and all

    also johny your avatar looks like the same face you made for halloween smile.gif
  • seforin
    Options
    Offline / Send Message
    seforin polycounter lvl 17
    ok I spent some time this weekend with my good friend, we both took into account many things people were saying about the room being to cluttered//boring // etc, so We reworked the room a bit and did a bit of mach up lighting etc

    ss-52.jpg

    is this feeling a bit better to most peoples eyes now?

    The lighting working for everyone or no?

    also adding in particles for magma // fire etc
  • Mark Dygert
    Options
    Offline / Send Message
    Looking ace! The lighting is great, good use of colors too.

    Crits:
    You might need more foreground lighting it feels like the focus is not on the character but behind it. which is kind of a dead spot? The conveyor belt makes a cool looking S through the scene but there isn't much to bend around. Since that forge piece that looks like a jet engine is pretty cool looking it might be a good idea to scale it up and give a reason why the belt bends the way it does? Unless you have something else planned for that space?
  • Xena
    Options
    Offline / Send Message
    dude,

    modeling looks awesome! Background color is too saturated. Bleach it out a little bit to pop the robot
1
Sign In or Register to comment.