The Bi-Monthly Environment Art Challenge | November - December (81)

Hey everyone! Welcome one and all to the 81st Bi-Monthly Environment Art Challenge for the months of November and December!
This challenge is a way for real-time 3D artists to test their skills and create a piece of work based on concepts provided. It's open to those of all skill levels and we do our best to provide meaningful feedback along the way so everyone can come away from the challenge with actionable points on which they can improve their craft!
Anyone is welcome in this challenge no matter your skill level! It's a test of your own ability not a competition between members. We're all here to improve as artists and learn from each other.
- ENVIRONMENTS -
HARD SURFACE ENVIRONMENT:
Gears 5 by Yaroslav Odnorogov
https://www.artstation.com/artwork/aGR42z

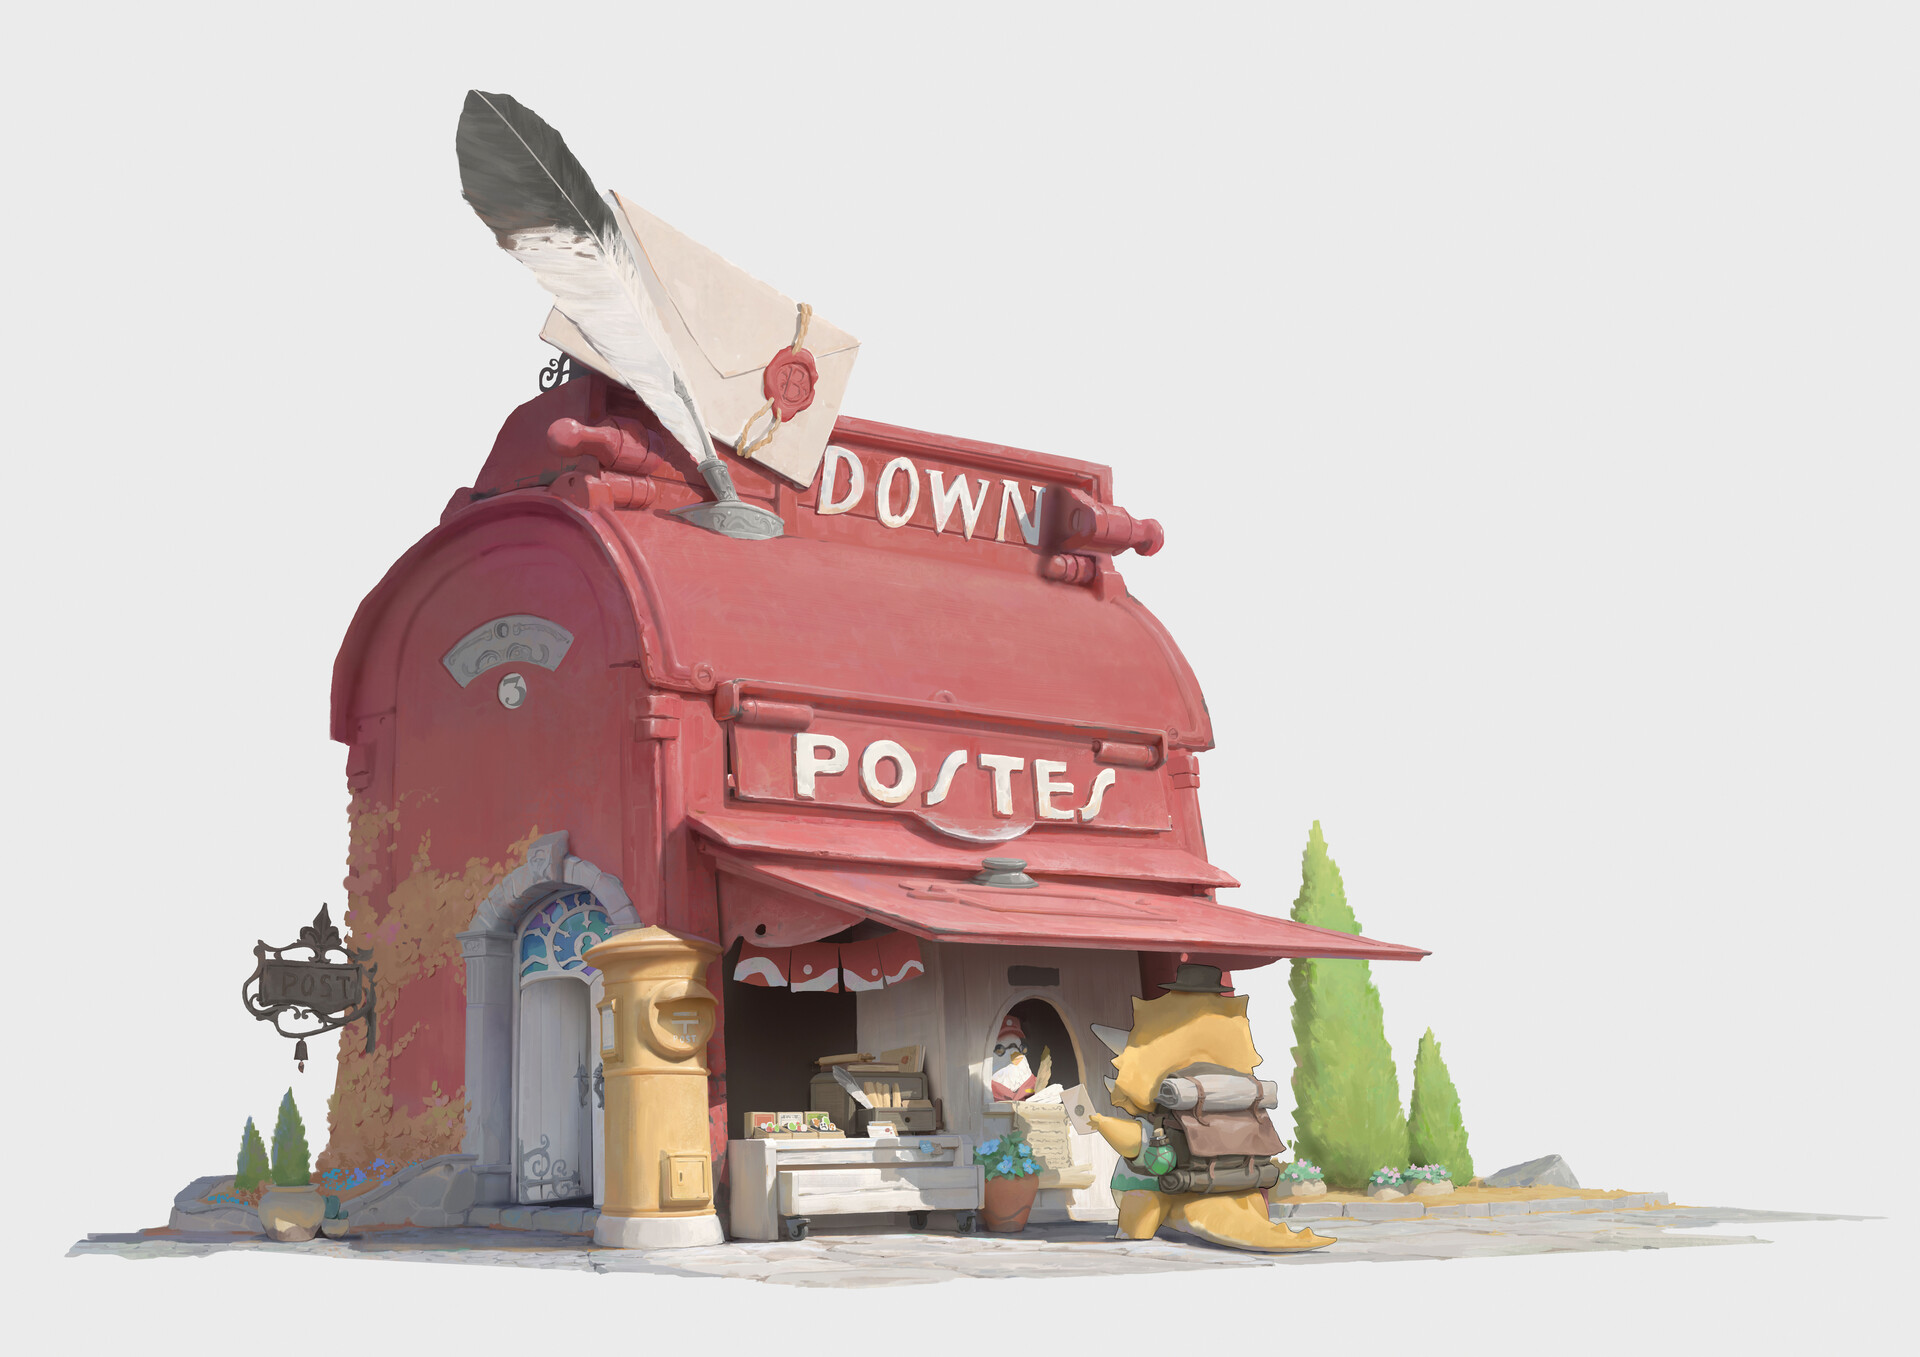
STYLIZED ENVIRONMENT:
红邮局 by joker chen
https://www.artstation.com/artwork/r9VBXe
- PROPS -
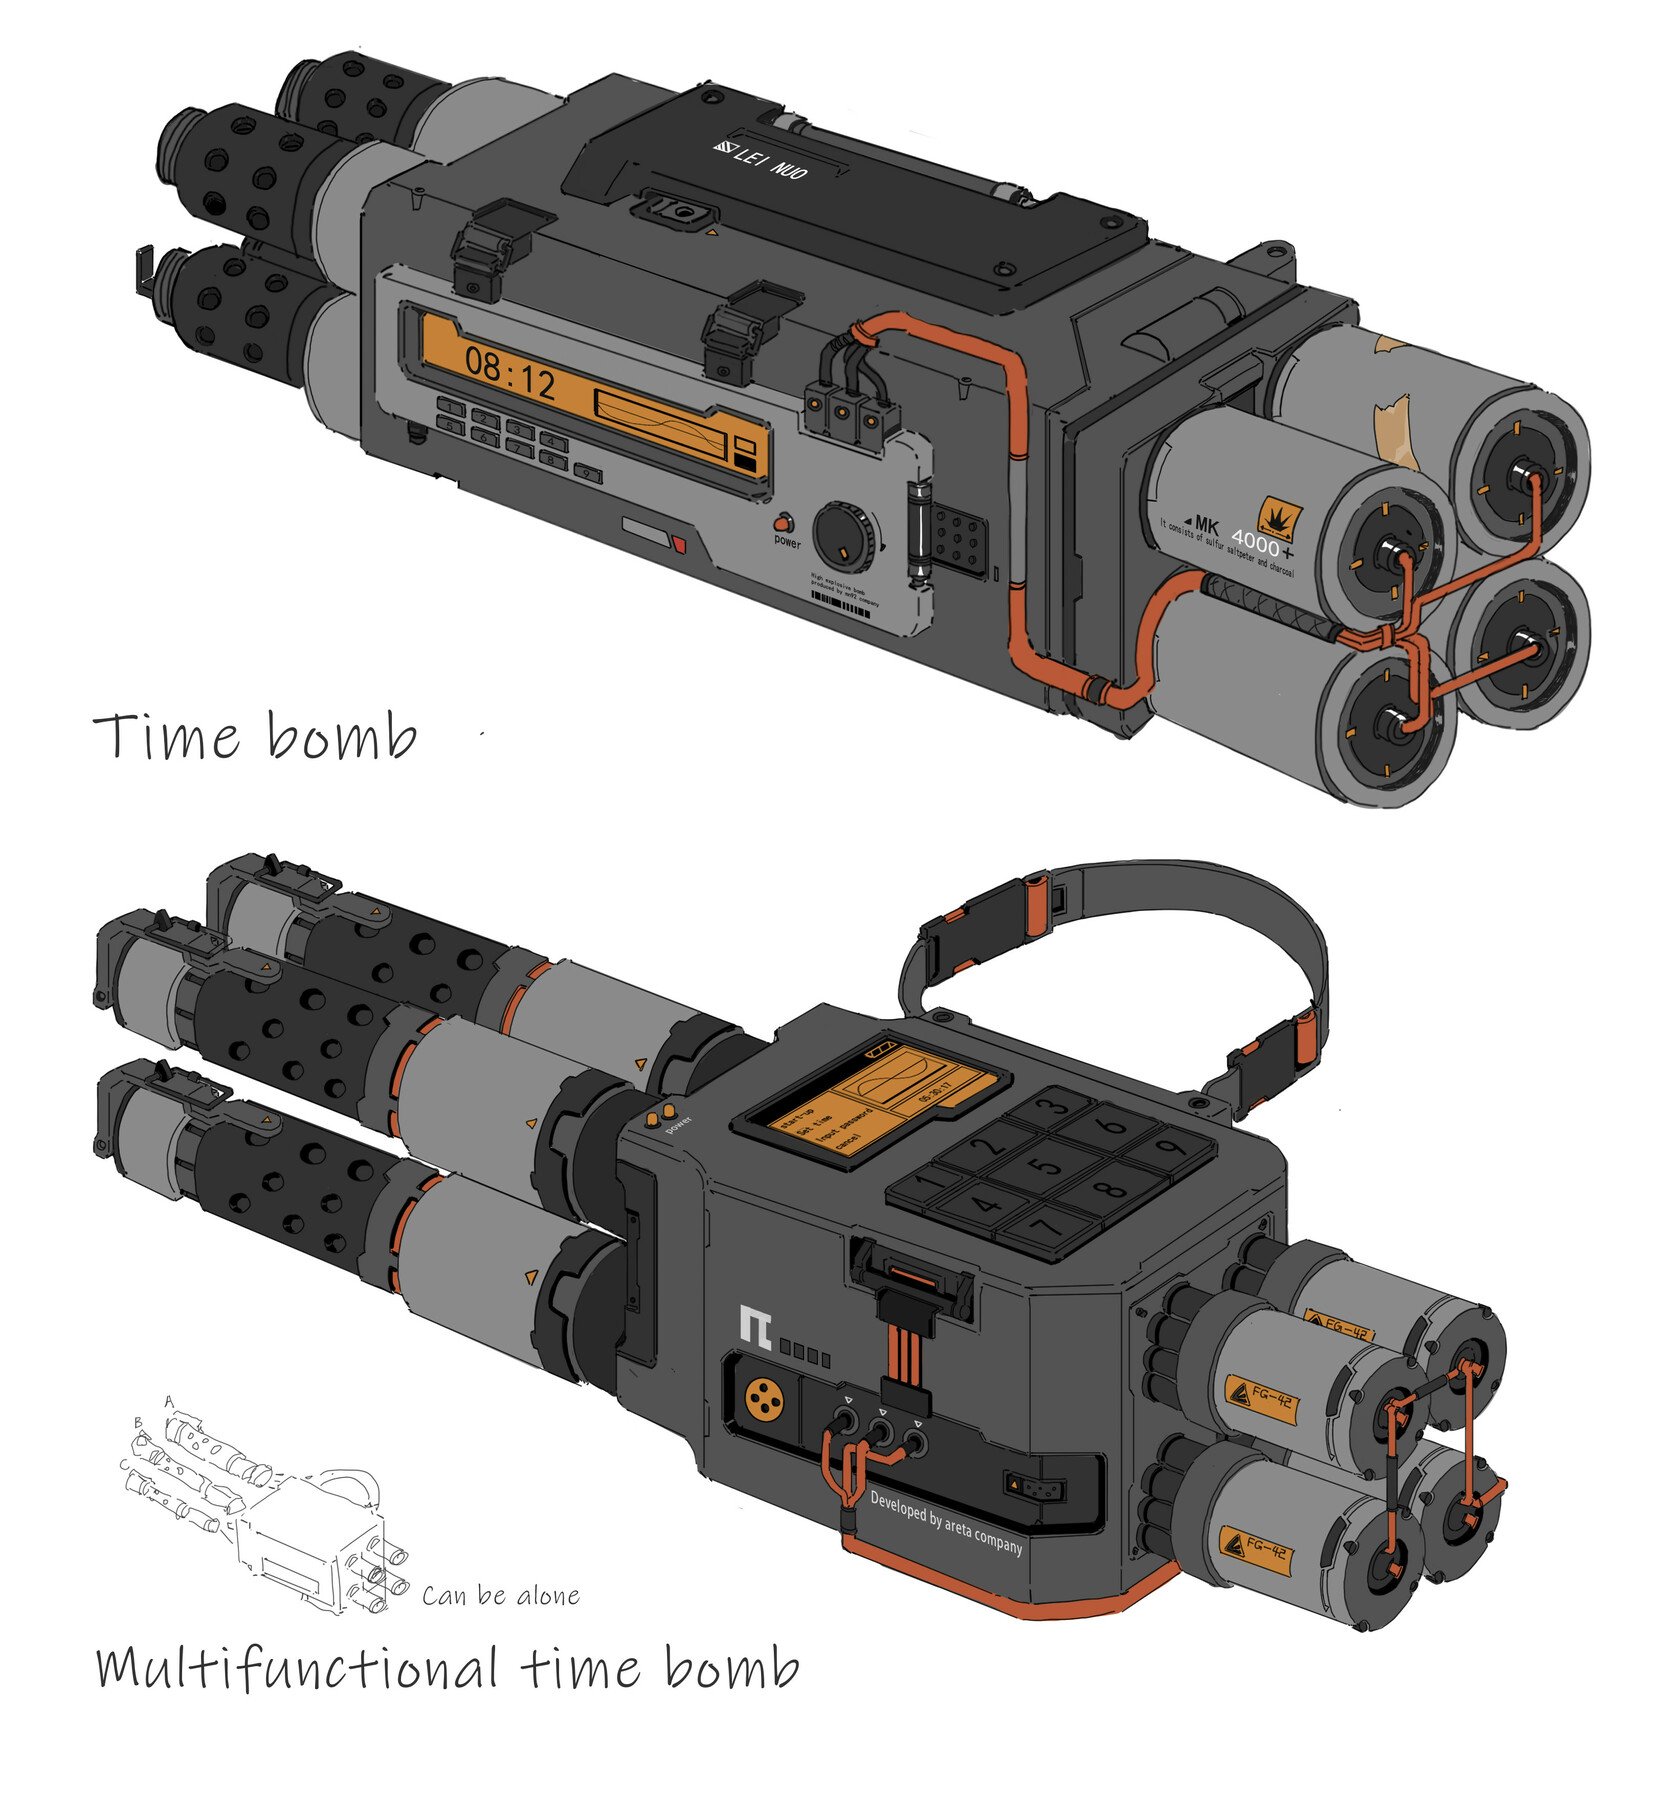
HARD SURFACE PROP:
bomb by kunbei
https://www.artstation.com/artwork/zD6xxw
STYLIZED PROP:
Props design / interior - Islandia by Victor Maillet
https://www.artstation.com/artwork/2qaA6Y

- RULES -
Please read all the rules before starting:
- Try to post at least one critique for every post that you make. This will make for a better learning environment and help us all grow as artists.
- Try your best to finish as much as you can in the time frame provided, but remember even if you don't finish by the end of the challenge we encourage you to keep pushing and finish your piece!
- Post what you are working on in this thread so that way it's a more centralized place for advice and critique. Please avoid creating a new thread as we don't want to spam out the forums.
- It is recommended to use a game engine to present your work. Unreal Engine, Unity, and CryEngine are very common engines that can be used but feel free to use any alternatives that you want. (Marmoset Toolbag for example.)
- Feel free to change up your chosen concept a bit if you want! Interpret these concepts to your liking, especially if your aim is to add storytelling elements.
- If you finish your project and decide to post it to Artstation, make sure you give credit to the concept artist in the form of a link to their profile. Additionally, it is recommended to ask a concept artist for their permission to post a 3D piece based on their work before doing so.
- RECOMMENDATIONS -
- When you are just starting out making a scene, it can seem complicated or imposing. Take your time planning and blocking out, it will set you up for success later on.
- Think about how you can re-use assets, re-use textures, break it down as simple as possible and plan it out. A lot of people will break it down in their own way when they start out their challenge. Gather some reference images as well for different parts of the scene, don't be afraid to make it your own.
- We strongly encourage you to go and look at other games and see how they make their assets as well as get concept art to give it your own feel.
The goal is to learn and grow both artistically and in your ability to both give and receive critique, but don't stress about it and remember to have fun!
Good luck!
Replies
Love the choices! My absolute favourite is the stylized post office so I will go with that for this challenge. It is plenty of lovely little props and details which should keep me quite busy for the next two months :)
Oh, wow. The first challenge is figuring out which of these to choose. There are things about every one of these that I want practice on.
I agree with Esselle! Going to have a go at modelling the Post office and its props for this challenge :)
Hello everyone! I thought I'd start with the chair. Here's my current WIP. I spent the better half of a day on this as I tried to get a final model ready.
Upon closer inspection I think the back's shape could be tweaked a little bit more to match the reference.
Also, which grain style do you think works best here? The thin pattern, like on the legs, or the thick pattern like on the back area?
Almost forgot - I used Maya for modelling, Zbrush for sculpting and Painter for texturing. The rendered were made in Painter with iRay.
I would love to read your comments!
@YairMorr You're off to a great start! I think the thick pattern of the grain style looks better and goes well with the concept.
In case you're going for an exact match with the concept then the front two legs should be less curvy. The cushion and the curved part between the front and back legs is also thicker in the concept. Also, the legs are shorter.
@YairMorr hey! Looking nice so far, I interpret the spirals between the legs as elements giving structure to the chair, so I agree that they could be thicker, also from a construction material point of view. Other than that, you could place a mesh of a potential user next to it to check that the proportions are working. Keep it up!
I made a small sprint, also with the chair, using a trim sheet approach and built a table based on the same awesome concept batch, using the same technique. Maybe I find time to do more furniture assets, or refine the existing ones. I think currently some wood directions don't make sense, as the wood would have to bend extremely :D As always, I used modifiers where possible to make life easier. Modeled the rest straight and deformed by curve. Used lot's of mirror modifiers ofc. During blockout, relied on solidify and bevel modifiers.
Tiling pattern created in PS used inside Painter for the surface (micro and macro):
@Fabi_G this looks great! It's really interesting seeing different interpretations to this design. I really liked your approach texturing this chair. I just got one comment regarding the textures, and that's how they're mirrored along the back element, especially noticeable on the top part.
The fabric texture looks nice, but I think it doesn't match the style of the other elements so much, as it is very "procedural", as opposed to the stylized wood.
Also, thanks for your comments on my work :)
@YairMorr Hey, thanks for pointing it out 👍️ I applied the mirror modifier and adjusted the UVs. Made some more adjustments to geometry and added some simple props for less emptiness. Also added some vertex colors for color variation. Maybe I will add some fuzz cards and make a custom pattern to improve the appearance of the fabric, for now I adjusted mesh, tiling and and vertex colors.
Looking forward to see your progresses 🚀
Hi everyone! First time for me posting something here.
Never actually had a lot of time for personal projects. :'(
I tried out the chair.
Modeled in Blender, Textured in Substance Painter and rendered in Marmoset.
Albedo - Normal - Roughness - AO
And some details.
@Eich this looks really nice! Only comment I've got is that your model has lots of redundant vertices. I marked some of them but it seems to me there are a lot of double edges along the legs? Was there a reason I'm not aware of that you left these on? The rule of thumb is any vertex that doesn't contribute to the silhouette should be removed. There are reasons sometime to leave "redundant" vertices on, e.g. when you wish to support a specific UV layout.
Overall it looks really nice! Keep working :)
@YairMorr those vertices are there on purpose. I didn't use Low poly and high poly meshes, so all the vertex are there to support ther curvature. I use only a mid poly mesh and bake maps on itself.
Removing them will create artifacts with the normals.
@Eich Hi 👋 Nice chair and presentation!
Two small nitpicks (sorry for nerding off 😝): The direction of the wood grain on the seat board seems a bit unpractical imo (makes sense if the whole chair was carved out of one block of wood though). And the beams of the back-rest appear a bit thin above the seat, which makes it look easy to break of.
Regarding the shading/geometry, if you wanted to simplify further, could also use hard edges + UV splits and bake down blenders bevel shader. Or create an instance of the chair and give it a bevel modifier to act as highpoly.
Keep it up! 🚀
@Fabi_G Hi and thanks!
I love nerding off by the way! 🙃
I didn't notice the weird direction of the grain on the seat! Thanks for pointing it out 💪🏻
The structural weakness is also a good feedback!
I wasn't trying to achieve a super optimized model, more like a smooth one. I work with ninite on ue5 so the vertex count is not such a big issue for me, and workig with mid poly meshes its a huge time saver in terms of baking maps and fixing their problems. Maybe I will do another pass in zbrush later on. But at the moment I don't have so much time 😭
There's been some solid feedback so far so I don't have much to add at the moment. I'll continue to lurk and look forward to seeing more updates.
I appreciate that the concepts this time around are smaller scale as I don't have much free time.
I've decided to go with the Gears 5 artwork. I like that there are a lot of interesting shapes and materials in a small piece. I've been working on pre-production and getting a block-out finished to iron out all the small shapes and the scale of everything. I've been looking at it for too long so it's time to get some other eyes on it, I appreciate any feedback.
@AD_3D Very detailed blockout, good job.
I think shapes and proportions are all there so keep like this.
The only think I noticed it's the top of the roof, it seem like the cube below the sphere is a bit bigger than the concept, and there is a very sharp border below.
I don't really know if is really like that or if it is the angle of the render. Just check it.
Otherwise I think it's really well done and I look forward to see it finished! 💪
Hi guys, I had dropped 3d more than 5 years ago, maybe almost a decade, so I wanted something easy to test if I still remembered how to model or to re-learn it in the process, so I've attempted the chair here :) (using 3ds max)
it's only the "mid poly" model with a bunch of OpenSubdiv applied so not game ready, but that wasn't meantioned in the rules so hope it's ok
I think I've made the seat too long x°D
Hello everyone,
Here's a quick WIP. I've decided to challenge myself with the hard surface environment. Today I finished working on the geo, which is currently a combination of final lowpoly and some mid-poly for sculpting. I'm planning on sculpting mostly everything. Most of the objects will have bespoke textures. I'll use trim sheets with some parts, like the wood or metal beams. I'll see if I can get away with 3 materials for the walls and the tower.
I'd love to hear your feedback!
Thanks!
Nice updates!
@YairMorr blockout is looking good! Looking forward to seeing more.
Thought I'd give the hard surface prop a go.. still a bunch of work to do regarding polycount/topology - as well as the strap, wiring, and textures. I deviated from the concept here and there, but judging from any of the renders I've done now and earlier, I need to adjust proportions as it currently looks like some kind of AA gun. Although annoying, the shading issues are not due to poor topology - only exception is pin handles where topology needs refinement.
@CyberNomad Cool to see someone tackle the hardsurface concept.
What's your overall approach?
Curious what's happening with the shading. Do the screenshots show the model with baked maps?
I think it helps doing some kind of blockout first to establish large proportions and overall scale. But with separate elements, scaling them should be easy enough.
Keep it up!
Here's my progress so far. I noticed some shape differences that aren't exactly the same. Major differences is the cushion not feeling soft enough and the curvature of the back legs arching up the backseat is not as deep as the reference. Any tips on how I should approach revising the shapes?
I worked high Poly from Zbrush to Blender for Low Poly retopo. So I think I have to edit the HighPoly in Zbrush, then adjust the Low Poly (hopefully not destroying my UVs) to iterate the model. It's a long way to change small details like this but I'm assuming that's the only way.
What I should have done in hindsight is to model the low poly first then high poly. Then I could've made faster shape iterations before noticing the differences at the point of texturing. The reverse works as well had I revised the high poly before making the retopo.
Everyone has posted some lovely models, happy to see other peoples work! 😄
Hey @Kruskebunken, looks cool! Props for doing overpaints on your work, good technique to make observations. I wouldn't stress too much about the asset not matching the concept 1:1 - but you have a point that the shape of the concept is a little more dynamic.
(Nitpick alert: I would make sure the backrest is one piece with the back legs to ensure stability. Imo concepts often don't have a solution for everything (concept artists are only human) and additional references can help to add believability and ensure the final asset stands on it's own.)
If you want to adjust the shapes, I'd focus on the highpoly first, not thinking about the lowpoly. Once the notes are addressed, lowpoly adjustment. With a fairly simple object like here, it shouldn't take to long. I agree, starting with a blockout and refining until it reflects the concept is a good way to go. It can then be used as a base for highpoly and potentially the lowpoly. But of course every object is different, sometimes other approaches are faster.
In a production environment, I also experienced making changes to just the lowpoly, due to lack of time. Obviously doing this can lead to headaches down the line, e.g. if a rebake is necessary.
Overall, I'd say more refined textures would be nice, like the different browns breaking up the wood in the concept. But maybe that's were you stopped because you were unhappy with the shape.
Keep it up!
Edit: Took a jab at the post concept. Used bevel + fwn for most of the shading and vertex color for coloring.
Heres my WIP for the Timebomb. My aim is to practice the UE5 workflow and hopefuly get a portfolio worthy piece out of it.
It was a bit challenging at first to interpret some of the shapes. It took a lot of reference and gut checks and I hope I made decisions that feels realistic/functional for wiring, cap and the buckles.
UE5 workflow is new for me and techniques wise, I've made the mistake of beveling before unwrapping. I've tried to make the edges appropriately soft/hard with bevels, and suspect some of the edges are a bit sharper than they need to be.
I'll update next after I'm done texturing, with final Model and post texturing.
I'd appreciate any critique. Happy Christmas and stay warm folks.
@FissionMailed looking forward to see it in engine! Could you elaborate what you mean by UE5 workflow? Keep it up!
I am finally done with this project. It took a few turns and troubleshooting after I committed to doing the shape revision but I’m happy I did. Thanks for the feedback @Fabi_G it helped a ton! Looking at wood crafting and references clearly showing how a chair actually is put together.
Focusing on the high poly was the best solution for revision. I redid the low poly and UV (manual seam placement, but with blender auto-packing for island placement). Additionally when UV mapping, making sure that I aligned my UVs to the pixel grid and not at an angle or curve.
For texturing I tried to add more details but had issues at first since it all wasn’t very cohesive. To solve this I looked at Animal Crossing: New Horizons which is filled with props that are rendered using PBR materials. Keeping it simple with a flat base color and then add key secondary shapes such as the wood veins, then the roughness scratches last. This cemented the polished wood I was looking for.
My biggest issue was baking normals, because I was not using smoothing groups properly. This caused triangle artifacts in the normal map and beveled edge artifacts. The solution is to make seams at the 80-90 degree angles for and marking sharps at sharp angles.
Such a good feeling to be done with a project, Im looking forward to seeing everyone else's progress.
I also wrote a post about my progress (with additional WIP pictures), thoughts, baking issues and how I fixed them. Please have a look: https://polycount.com/discussion/231890/sketchbook-lucas-chang#latest
@Kruskebunken this looks fantastic! I enjoyed reading your journey making this model, and it really shows the progress and the time put into it. The wood looks interesting. From the spec you can really feel the polish layer on top of the wood itself, like from this angle:
Great job!
@Kruskebunken hey nice result and cool that you documented your process, going to check it out 🤓
@YairMorr Thanks a lot! I'm happy you noticed it since it was one of the harder things to get "right". I actually looked hard and carefully at a chair I had, which had the similar wooden treatment I was looking for. It made it clear what kind of scratches and flaking the worn polish had.
Hey guys! This is my progress so far on the "Time Bomb" using Blender with Boxcutter
@Pep_mepla This looks so good! It is really nice to see such clean cuts. Its hard to tell if the proportions are the same, but maybe that isn't an issue.
The size difference between the concept art and your model are not matching up 100% imo, so there's some small adjustment I'd make but aren't anything major.
Blue lines indicate something that I think is a different size compared to the concept. For example the cylinder at the left end, looks to be longer than in the concept. The attachment above also appears to be much larger in your model, making the holes seem too small.
The concept art seems to be drawn in orthographic perspective so check proportions in that view as well in Blender.
Good luck! :)
@Kruskebunken Very nice work, I especially dig the texturing on the wood finish. If you ever revisit the project, I think a subtle gradient at the edge of the seat where it meets the wood could help it pop a bit as well as a slight desaturation on the green colour overall. Great job and I appreciate the write-up as I've struggled with modeling and baking out complex shapes like that.
@Pep_mepla Good progress so far. One suggestion I have is do some quick idea sketches/blockout for the front where the 4 cylinders connect to the box shape. Right now they're just sitting on a flat surface as if they don't connect to anything. It might be one of those things where the player never sees it, but I believe it helps to figure out how everything connects together for these situations where the concept might not cover these areas.
WIP Update
I've been working on high-res modeling/sculpting. Still have a long way to go but I wanted to push through to the baking process for the roof as I was concerned about how well things would bake out. I'm happy to say it wasn't as bad as I thought it would be, some tweaks and I'm happy with the result. My main concern now with this specific piece is the polycount, sitting at around 7600 tris, and there's still the rest of the tower and other pieces to do. It's using about half the space of 2k texture right now (my plan is have the whole tower on one texture map if possible).
@AD_3D Nice work! I don't have anything to add on the Time Bomb piece as I hadn't delved into that model but generally it looks really awesome! Superb hard surface modelling skills :)
Very nice work on the roof of the tower! That cornice with the spiral looks great. It took me 4 tries and almost two days to figure out how to arrange the topo for the low poly and the high poly too. When switching to ZBrush, my initial tries failed on the subdivision stage.
You have concerns about the polycount - judging only from the wireframe you supplied, I believe the edges marked red can be removed. It'll save you some tris. The challenge does not specify a budget, so I guess there are no wrong answers in that regard. It all depends on how close the camera can get to your object, when is your object going to be used (gameplay, cinematic), end platform, etc.
Keep it up, and I'd love to see what you come up with!
Hey everyone, I just finished working on the tower and the wall. It was extensive work and I had so much fun! To showcase the models, I created an environment using UE5 and Quixel. I tried to make the environment fit the concept, make it as simple as possible and also let it blend with the models.
The tower is 1 model, the tall wall is actually a bit modular and comprised of 2 pieces that can be placed on the ends and between wall pieces. This enables me to extend the wall for as long as I want. If I flip the sides I can add some variation, but it's not a very robust solution.
The tower is 10,718 tris, the tall wall is 18,440 and the sandbag wall is 24,616. I tried optimizing as much as I could, and I bet these models can be optimized even further.
The tower uses 1 material (mostly), the walls use another material as well. I added a shared material for some of the beams, the barb wire and the sand bags.
I hope this post was useful to anyone :) Thanks for reading!
Hello guys!
This is my WIP on the "Time Bomb". I am a 3ds max/Cinema 4D user but started playing with blender now which is fun. I will update you with the textured final one.
@YairMorr, I think it looks great!
If you wanted to give it another pass, I think the surfaces could be pushed a bit more. E.g. some breakup and variation on edges. Looking forward to the next one!
@AD_3D bake turned out nicely! I'd say you decide the polycount limit. If the camera gets close, I think it's reasonable, especially if it's a nanite project. Else I would assume lods kicking in at a distance (could try unreals lod generation for fun, to check if it's noticeable). Looking forward to the next update, Keep it up!
@AD_3D thanks for the feedback I adjusted colors accordingly. A slight edge fade, a gradient from front to back and a darkening gradient from the wood up. Very small and subtle changes that made it more cohesive now, so thanks again!
Furthermore I think you have made very nice progress on your project. Your bakes are looking really nice. Polycount can be optimised later, I'd focus on spending time with other assets to bet them up to par with the roof and then evaluate the progress. Good luck!
@YairMorr Beautiful work! The muted colors and your modeling is very impressive.
Its really cool that you built a scene with Quixel assets. I also like the fog, but I would've toned it down in the foreground. I feel it washed out the heavy darks from the concept art. Adding some smoke texture alpha card behind the building (like the concept art) can also pop the silhouette more.
I lowered the brightness and masked it from the building forward (maybe a bit much), keeping the background the same brightness. Then I airbrushed the smoke around. Could be cool to see with smoke cards, as I think it give more contrast to the scene.
Original image left and my paint-over on the right, original concept art below
Thanks a lot for your feedback guys!!! It is really encouraging. So I tried to correct some of the things you pointed out, but leaving the overall proportions which I like.
I'm slowly but surely getting there :D
@AD_3D I love how clean your bakes are turning out! It really shows the effort on the high poly model!
@YairMorr I think I saw your final renderings on Artstation yesterday and it looks AAA for sure, loved the final result!!!
Happy holidays everyone!!!
I wanted to thank you for the feedback, it was really helpful. However, I must call it a day with this one. My goal was to practice more my hard surface skills and learn to use blender's boxcutter addon.
Given the time left, I won't be able to retopo and texture the model, but so far the experenice was great. I'll try to make this challenges more often and with more time.
Stay safe guys!
@Pep_mepla this looks really awesome. The details are great! This looks like a good hard surface practice.
@Fabi_G and @Kruskebunken thank you very much for your feedback. I took another go at the textures and the environment based on your comments. This is my final go at this, as I want to start the next project. It was a good practice and I hope to make more challenges in the future.
Hey everyone! Happy New Year to you all!
It has been great to see the work done on this challenge! I loved seeing the guard shacks come together, the seemingly simple chair hiding some tricks for people to learn, and the intricate modeling for the bomb. I'll have to make note that no one seems to like cute little post offices besides @Fabi_G. 😅
Genuinely, superb work all around and I hope that everyone brings that enthusiasm into 2023 with whatever you do! On that note, the new year also brings a new challenge and I hope to see you all there! 😊
https://polycount.com/discussion/232099/the-bi-monthly-environment-art-challenge-january-february-82
@Kruskebunken Looks good, I think that adjustment really helped make it pop and feel more connected with the chair frame. I even notice a subtle edge highlight on the seat I didn't see before,
@YairMorr I really dig the set and atmosphere you setup for the scene. I think the change of removing the fog from the foreground now gives a clearer view of that interesting surface detail you have going on, especially on the fences. One suggestion I have for the future is push the weight of the sandbags more. I can see you already have that going on, so maybe it's just needs a bit more squash especially to the stacked ones. Nice work!
@pep_mepla Good job on the modeling. That's going to be a fun texturing project if you plan to revisit it.
@Pinkfox @Fabi_G The post office is my favourite one out of all of them, and I was glad to see someone take that on, Fabi_G you did a nice job on it, although I don't see the post anymore, maybe my webpage is bugged out.
--
I wanted to push through with the texturing for the guard tower to get something to post here for feedback. I have about 90% of the sculpts done for the other parts, and hopefully the texturing will go faster now that I've figured out a lot of the process. Over the next week (depending on work) I plan to get everything textured and in engine for a simple scene, with some damage added through decals. When it's complete I'd like to post a final update here if it's allowed, otherwise I'll have it up on my portfolio page if anyone's interested.
I appreciate any feedback as I want to improve the tower and also nail the other parts of the scene. One issue I'm having is getting caught up in over-detailing so I would like to refine the process and increase my speed.
Thanks to everyone for the feedback so far, and thanks to Pinkfox for setting these challenges up.
Happy New Year everyone!
@AD_3D that tower is beautiful work! I love the extra details you added like the segmenting on the bottom frame and the wood detail on the windowpane (I thought that was metal lol). The cracks look great as well! I've got just one suggestion regarding the main damage on the front wall - the inner border (marked green) is a bit too round. Considering the broken shape in other areas it stands out a bit. Other than that the details are amazing.
@AD_3D looks really nice! Like the surfacing! If you wanted to, I think there could be more large scale "brushstrokes" (eg some gradients to indicate dirt build up and weathering, materials affecting each other) also to further increase readability from a distance/with squinted eyes. If you worked with trims you could add those in vertex color.
These challenges have been a source of great entertainment and motivation to me - thank you to everyone who made it so! Wish you a great 2023!