The Bi-Monthly Environment Art Challenge | May - June (78)

Hey everyone and welcome to the 78th Bi-Monthly Environment Art Challenge for the months of May and June!
This challenge is a way for real-time 3D artists to test their skills and create a piece of work based on concepts provided. It's open to those of all skill levels and we do our best to provide meaningful feedback along the way so everyone can come away from the challenge with actionable points on which they can improve their craft!
Anyone is welcome in this challenge no matter your skill level! It's a test of your own ability not a competition between members. We're all here to improve as artists and learn from each other.
- ENVIRONMENTS -
HARD SURFACE ENVIRONMENT:
Flooded library by Tarmo Juhola
https://www.artstation.com/artwork/D5KgZ0

STYLIZED ENVIRONMENT:
The Lost Grove by Neil Richards
https://www.artstation.com/artwork/oem14

- PROPS -
HARD SURFACE PROP:
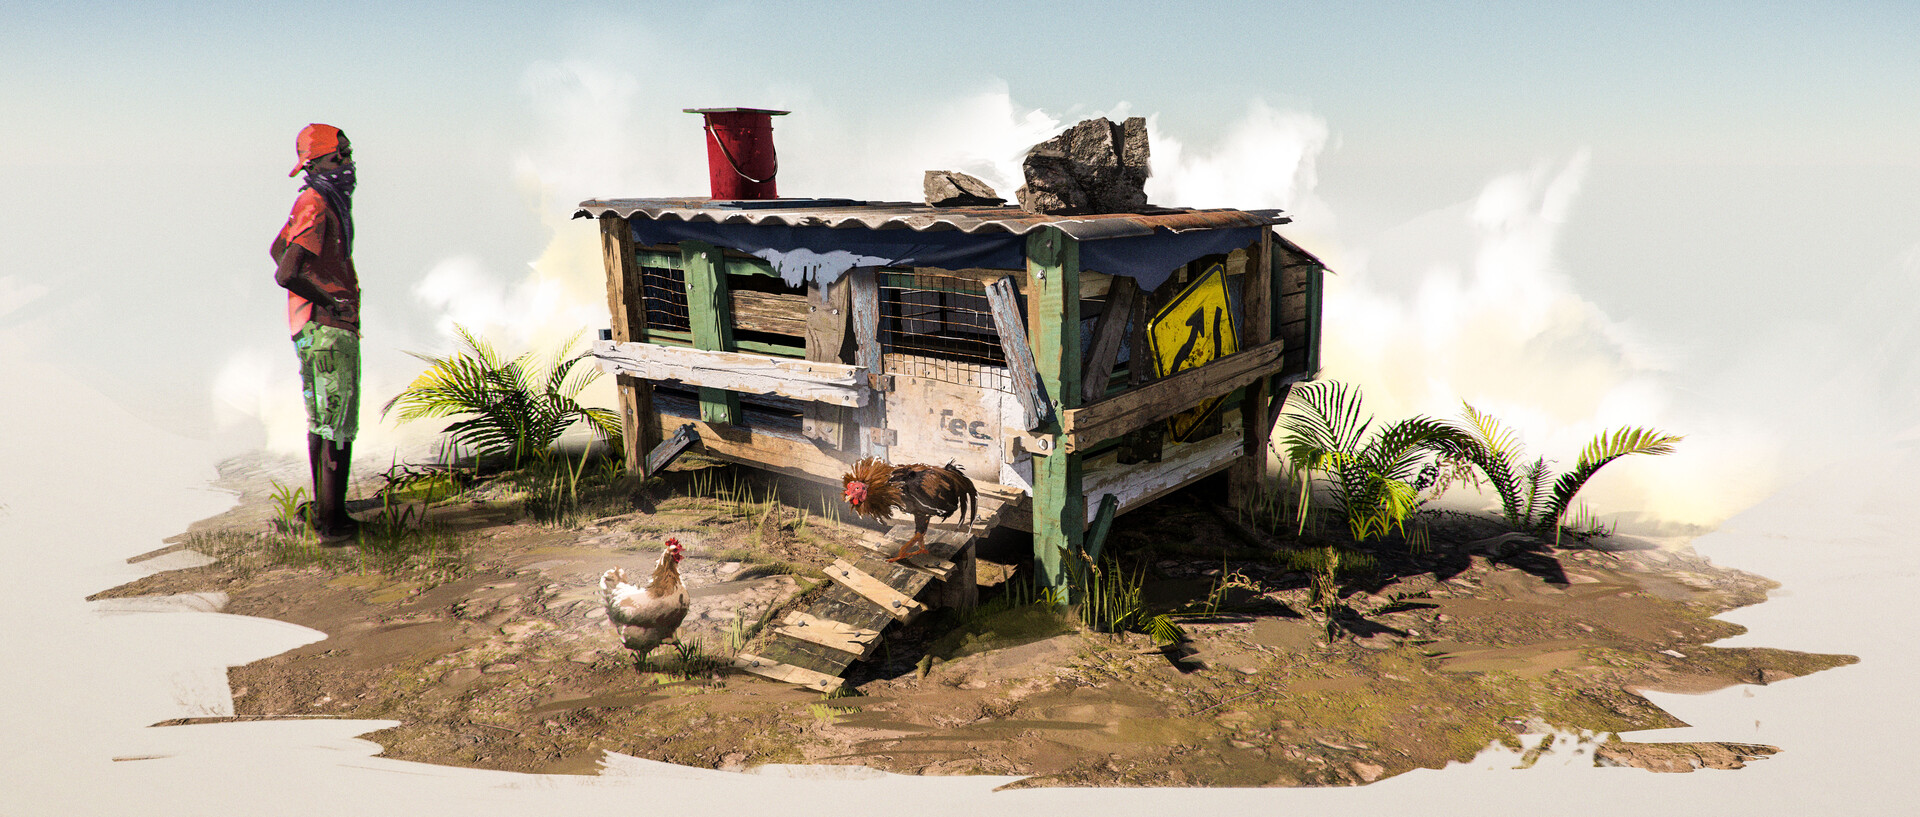
Chicken Coop by Philipp Rademacher
https://www.artstation.com/artwork/YKzJyV
STYLIZED PROP:
"Swale eaters": Fish chasers pathway by Mariia Tverdohleb
https://www.artstation.com/artwork/4blYRk

- RULES -
Please read all the rules before starting:
- Try to post at least one critique for every post that you make. This will make for a better learning environment and help us all grow as artists.
- Try your best to finish as much as you can in the time frame provided, but remember even if you don't finish by the end of the challenge we encourage you to keep pushing and finish your piece!
- Post what you are working on in this thread so that way it's a more centralized place for advice and critique. Please avoid creating a new thread as we don't want to spam out the forums.
- It is recommended to use a game engine to present your work. Unreal Engine, Unity, and CryEngine are very common engines that can be used but feel free to use any alternatives that you want. (Marmoset Toolbag for example.)
- Feel free to change up your chosen concept a bit if you want! Interpret these concepts to your liking, especially if your aim is to add storytelling elements.
- If you finish your project and decide to post it to Artstation, make sure you give credit to the concept artist in the form of a link to their profile. Additionally, it is recommended to ask a concept artist for their permission to post a 3D piece based on their work before doing so.
- RECOMMENDATIONS -
- When you are just starting out making a scene, it can seem complicated or imposing. Take your time planning and blocking out, it will set you up for success later on.
- Think about how you can re-use assets, re-use textures, break it down as simple as possible and plan it out. A lot of people will break it down in their own way when they start out their challenge. Gather some reference images as well for different parts of the scene, don't be afraid to make it your own.
- We strongly encourage you to go and look at other games and see how they make their assets as well as get concept art to give it your own feel.
The goal is to learn and grow both artistically and in your ability to both give and receive critique, but don't stress about it and remember to have fun!
Good luck!
Replies
Getting my blockout started! Excited to be participating in my first art challenge here. Good luck everyone!
@Its0urFate Really nice progress so far! Also appreciate how you showed the various steps throughout the blockout, it's great reference for others to get an idea of how to build things up from a simple form to something more complex. 🙂
Exciting concepts! I started with the flooded library too and will try to keep the project short and simple. My main goal is to get more familiar with UE5, especially lighting/reflections. Any idea how to create the water in a way that the windows will shine through? 🤔
@Its0urFate Nice progress! I agree, the animated presentation is very cool 👍️ Are you going to use baked or fully dynamic lighting? Keep it up!
@Fabi_G I think I’m going to go for dynamic, but I’ll try both to see what looks good. Yours is looking awesome!
Thanks! Looking forward to updates!
It's very cool to see the GI update dynamically with Lumen, but it's demanding for my GTX 1060. I continued with the scene and of course the amount of tasks exploded! For the water I chose to try out the UE5 water plugin and faked light from underwater windows with some emissive planes.
A few more hours, then I will have to close the project.
Hi all,
First time participating! I'm loving the environments posted so far. Both are looking great. Looking forward to seeing the final results.
Found a bit of time today, thought I would have a go at the hard surface prop. Just a blockout for the time being.
I'm curious how people would approach texturing something like this. A few options come to mind:
Maybe I'm overthinking it :D
Cheers!
Hello! First blockout looks good. I'd note that the person in the concept looks like a child to me (for scale reference).
Sound like reasonable options! I'd say which one depends much on the rules you set yourself.
If it's a generic asset, option 1 seems a good way to go about it. This way one could build more assets from the same modules. One could also store masks in vertex colors if enough geo.
I'd say 3 seems like a good optimization measure. Can make sense to group modules by material. One could also start texturing with atlas/trimsheets and add additional meshes later for details.
Keep it up!
Have to stop on this project for now. In the end lost focus a bit and spent too much time with sequencer and animations :O certainly something I want to explore in the future projects to make environments more lively. Maybe I will find some time later this month to improve a few things. Greatly appreciate any suggestions.
Some aspects to improve: Better books, rework level mesh, polish boat and debris asset, expand debris library, improve trim sheet and create additional textures, improve foliage.
@Fabi_G Everything looks great! The grunge on the architecture really sticks out nicely and the dingy is really well done! Hope to see this project updated down the road!
@chummyship I wonder have you considered trim sheets? You might be able to use just one material for the prop. Looking good so far!
I managed to fix a few things scale-wise and threw it into UE5. I'm working on texturing right now (the wood on everything is temporary) through Substance Painter/Designer. I wanted to get texturing done earlier in the week but I kept tweaking scale and proportion to where I liked it. Trying to figure out water in UE5 as well, which is stumping me a bit.
@Its0urFate thanks! Certainly will improve it and potentially break off smaller tasks (book system?).
Like the proportions!
I'm curious how you will approach the water. It's something I didn't find a satisfying solution for yet. Using a water surface from the water plugin, I couldn't get the reflections work nicely with indoors and outdoors, like occlude the reflections with skylight. I hope the documentation and sample availably for this system will improve.
Small update: got the textures put in for everything and adjusted some lighting in the scene. Still working on getting that water looking right.
Hi everyone! So here's my final result. I got some of the dead trees from Quixel, along with the hanging vines and debris floating on the water. I'm really happy with how everything turned out and it was a lot of fun to work on. I hope you all like it too! I posted it on Artstation in case you want to view it there as well: https://www.artstation.com/artwork/G8VPvz
Heya! This is my first time participating in one of thsese as I've always just missed out on the previous ones, but I'm excited!
I decided to go for the stylized environment, as I've been wanting to practice my skills with similar artstyles for a long time, and it gives me a good reason to get better at UE.
This is the result of a few hours of basic blockout (and bashing my head against a wall trying to get Unreal Spline Meshes to work how I wanted). Really happy with how it's looking so far! While I'm terrified of having to work on vegetation materials (most notably the leaves and grass), I'm still just as impatient to reach that point since I'm really motivated to push myself to get them to look as good as I can!
I'm seriously impressed with how quickly the rest of you sped through your own projects, and they all look amazing!
Hey! Wow, people got really fast on this one !
@PeculiarSana, nice blockout! One thing I see on your work for now is that it doesn't feel like the tree roots are sitting on the ground as much as they do on the concept. I'd say you could make their point of contact with the ground much closer to the tree, a bit like that (I overdid it a bit though):
Getting those root shapes right at the blockout phase will really help with the final tree shape, as it'll really make it feel like the tree is invading/sitting on the shrine.
For me, I went for the hard surface prop:
I'm planning to combine a trim sheet (for the wood planks, sign, the grill) with some tileable textures (fabric, steel, mud, basic wood maybe). For the trim, I think I'll make a shader that'll allow tint variations and add baked AO to make a rust/moss mask. My goal is to try to make this asset with a good texel density but the least materials/large textures as possible (so I might even put the fabric on the trim, maybe also the steel, though the roof is big so I might not have enough space to put it there).
My initial blockout in Max. Next step's gonna be the lighting blockout in Unreal.
@simonBreumier That's overall fitting the reference well. Looks like that tarp may be 3D - may be easier to manage, if it was based off a plane.
Only worked on this for about 3 more hours before a headache hit me, but I think I'm mostly done with my blockout (which in my case tends to involve basic solid colours so I can get a feel for how everything works together). Interested in hearing any feedback before I go further with this.
Only thing I might change before moving on is switching the central bright blue light to some torch lights from a cave that descends below the tree, as I really like having the specular reflections right under the entrance.
@simonBreumier Really appreciate the pointer you gave regarding the roots! It lead me to notice that the terrain climbs higher than what I had in my version. Really like how your prop is looking, though I can't tell if the two-way sign on the side is a bit too thick in your model, or if that's just the normals messing with my perception.
Edit: Would anyone have any suggestions on how I could achieve surface water caustics in UE5? Not too sure how I could go about doing it other than maybe some lights with alpha masks to simulate caustics.
@Its0urFate The scene turned out nicely, congrats on finishing it 🍻
Very nice blockouts, I look forward to updates 👍️
@PeculiarSana Could also fake caustics by projecting them in the material or have some decal skirts.
I went back to the scene and swapped the ue5 water system with regular plane with simple shader, as I wasn't satisfied (especially reflections). Also created some simple additional assets and simulated falling books and newspaper/cloth (much fun!). Placed some decals and adjusted light (maybe too bright 🤪)
Nice work everyone!
I decided to try this challenge for the first time. Maybe I should have posted more updates throughout my progression. That may help me to finish this project.
I definetly need to change/improve my lighting, create that water and all that clutter. And the boat.
Little progress update that I've been doing today.
I think I have finished mine.
Here's a little gif of my process. Had really fun making this. 😊
@hile Awesome work on it! Really love the colors you were able to achieve and it's very crisp overall. Really awesome to see so many people doing progress gifs, too! 😀
Some tiny nitpicks to consider for your next project:
Those are definitely nitpicks though and you killed it overall!
@hile looks cool 👍️
Hello I'm just starting. It's my first time doing one of these!
Much success, looking forward to updates.
Hey everyone :)
Here is a progress picture of my initial blockout in Maya prior to moving into Zbrush. I will keep you updated. :)
Hi guys! There's a lot of great stuff here.
Here's my model right now. I haven't done any of the foliage or ground yet, since I have to learn those skills before trying it out 😂.
I used this challenge to try and make a model that's as efficient as I could (tri-wise). I was able to get it down to 10,360 tris, with the most being from the cloth at 3,612.
The Particle Board texture was downloaded at: https://3dtextures.me/2019/01/23/wood-particle-board-002/ . I am curious as to how often you guys download textures vs creating them in Designer.
Hey @Khulim, I think it looks cool! Still, here are a few points I think could be improved:
What program/engine did you render the prop with? How did you aproach the texturing?
When texturing, I like to combine baked maps (large to medium shapes) with scanned data (Megascans mostly - especially when using Unreal) - and sometimes handpainted maps.
Keep it up 🚀
Thanks for the reply! These are some great points! I'll have to experiment with Opacity masks and cards to have them more readily available in my toolkit.
I used Blender for the render.
My approach to the texturing was starting from the most primitive elements, like the grain and color of the wood, then the worn paint over the wood, then lastly the dirt and grime. I kept altering the colors of the wood until I found a nice blend variety ( like that random redwood piece on the plank) to more uniform found in the rear bedding area.
Now that you mention it, the dirt is even from top to bottom. In the real world, the bottom would definitely be where most of the dirt would be.
Thanks again!
Since I likely won't have the time to finish this as I'm going on a trip and working on university stuff, here's the furthest I got with my project.
This was the first time I sculpted and properly baked normal maps, so I'm quite happy that I at least managed to make it this far! I might try to push myself to finish this in the last week of June, but I'm not too confident in managing that.
Finally i had time to work on this project :) I got alot of the modular models done. Still alot to do. Very challenging but im learning. There are problems with lighting in particular. Because I use the new Unreal engine 5. I still don't fully understand how the lighting works in it. The environment is far too dark. The last picture as an example. I was hoping i could create the ligthing only with directional light + ambient skylight but now im not sure if thats possible. Maybe i need to fake the lighting somehow. Edit. If someone has advice how to work with UE5 lighting in this enviroment it would be very helpfull 🙂
Hey @PuuroMan ! Looking good so far! A few ways to make the outside light comes in a bit more:
I think there's good explanation on bounced indirect light in this https://www.youtube.com/watch?v=ZWADlXyfYCk&t=1483s (although it's UE4)
This one also (UE5 this time): https://www.youtube.com/watch?v=h5_4vAMqye4&t=253s
Alright! Finally took the time to get back on the hard surface prop.
First, here's where I'm at (UE5 render, vegetation and rocks are from Quixel, dirt material is from substance source):
Now for the technical part:
I really wanted to make this prop with the least possible textures, a single material instance but a decent texel density, so I've put everything on a trim sheet:
The trim is made of three textures:
Then I made a shader in Unreal which:
For each paint you can choose two colors to make its texture come out, the noise mask packed in the noise paint mask (in the blue channel) is also used to get a more natural transition between painted and not painted wood.
A quick view of the shader:
EDIT: thinking of it I'm stupid, instead of making a shader with three differnet painting colors I could have used the vertex color to decide the color of the paint right away 😅
And the paint mask part:
Though I gotta say I think this is not the best way to add noise on a mask and am not too happy with the way it looks right now so I might change it, I'm opened to suggestions!
Everything is textured with this single material (even the bucket at the top and the nails^^), final details were added using decals.
Hope you like it and I'm open for feedbacks :)
@PuuroMan as Simon suggested I would start with changing the exposure. I like to set the exposure to manual and then change camera settings to get a lighting level I'm happy with.
I saw the challenge late and had to give it a go after seeing the Hile and Fabis artwork. Just found tesselation got removed from UE5, not sure how to adjust my workflow when working with Substance designer height maps. Lots to do and learn!
@atunnard nice start!
Me I've recently decided to use UE4 when I need to use heightmap, because it feels like teh current UE5 solutions don't have the quality of a "released" state.
If it can help, you can still use heitmap in UE5 but right now the existing systems are... not bug-free. From what I've tried you can use:
Thanks for the help with lighting now my enviroment looks way better and realistic :) I feel like im done with this challenge. I learned what i wanted to learn. Now i feel a bit exhausted after working so hard with this enviroment hah :D I need to take few days time off from 3d.
Bit of a rush to finish and was not happy with the water but ran into a dead end on the method I was using.
@simonBreumier very cool and nice to see the breakdown 🤓
@PuuroMan Cool scene 👍️ Imo the texture tiling is a bit apparent in some areas.
@atunnard I would note that the shading on some elements (vertical part of pillars, ceiling arches) looks too round/smooth. Maybe use hard edges or face weight vertex normals to achieve tighter shading. Good luck for the next one 🚀
Made a run at the chicken coop targeting sketchfab viewer, using a trim sheet (1024x2048) + some vertex color.
Edit: Trim Sheet
Vertex Color
@Fabi_G nice take on this one! Hope to see you on the next one :)
Hey all! Very sorry about getting this out late. Hopefully those in Canada and the US have been able to enjoy the holiday weekend. 🙂
It's been very warming to see the various takes on the environment and props throughout the last challenge! This includes a participant who shared their work on the stylized prop over on the Polycount Discord. Love seeing the different approaches and the transfer of knowledge as there isn't one way to tackle these things that are perfect.
With that said, challenge 78 is officially over and I'm happy to announce challenge 79 is under way!
https://polycount.com/discussion/230707/the-bi-monthly-environment-art-challenge-july-august-79
Hope to see you all over there! 😀