[Finished!] ComEng V-Set Train.

interpolator
Hello! This is a journal thread for my latest project, the V-set electric trains manufactured by ComEng in the 2 decades to 1990. These are lovely old intercity trains that run in New South Wales, connecting Sydney to the Blue Mountains and Newcastle, among other places. I always found them very charming whenever i've had the opportunity to take them. They are unfortunately being phased out very soon.
I am currently still quite early in the modelling stage:
I will be attempting to use a trim-sheet for this project along the main body of the car, in tandem with modular/bespoke assets. This is my early experiment with laying one out - any tips or comments would be greatly appreciated. Some insight into the best approach to texturing something like this would also be useful.


I expect I will also end up with a decal sheet for details like these:

Some of the modules so far:

I have hit a snag with the pantograph: I have been having a lot of trouble deciphering the mechanics of the thing. This is the model so far:

The lower section of the structure has a lot more going on in my references that I cannot figure out - some kind of spring system that actually drives the pantograph up and down as needed.
Here are 2 of my references. This first image has some kind of double-set of pistons connected to a bellows/accordion of some description - however I haven't the faintest idea how or where either end connects.

This image is of an S/C/K set, which has a very similar design - except the pantograph is not enclosed, affording you a much better look at it. This has a different set of pistons, however even then I do not understand what they do or how they interact. One of them even seems to disappear!
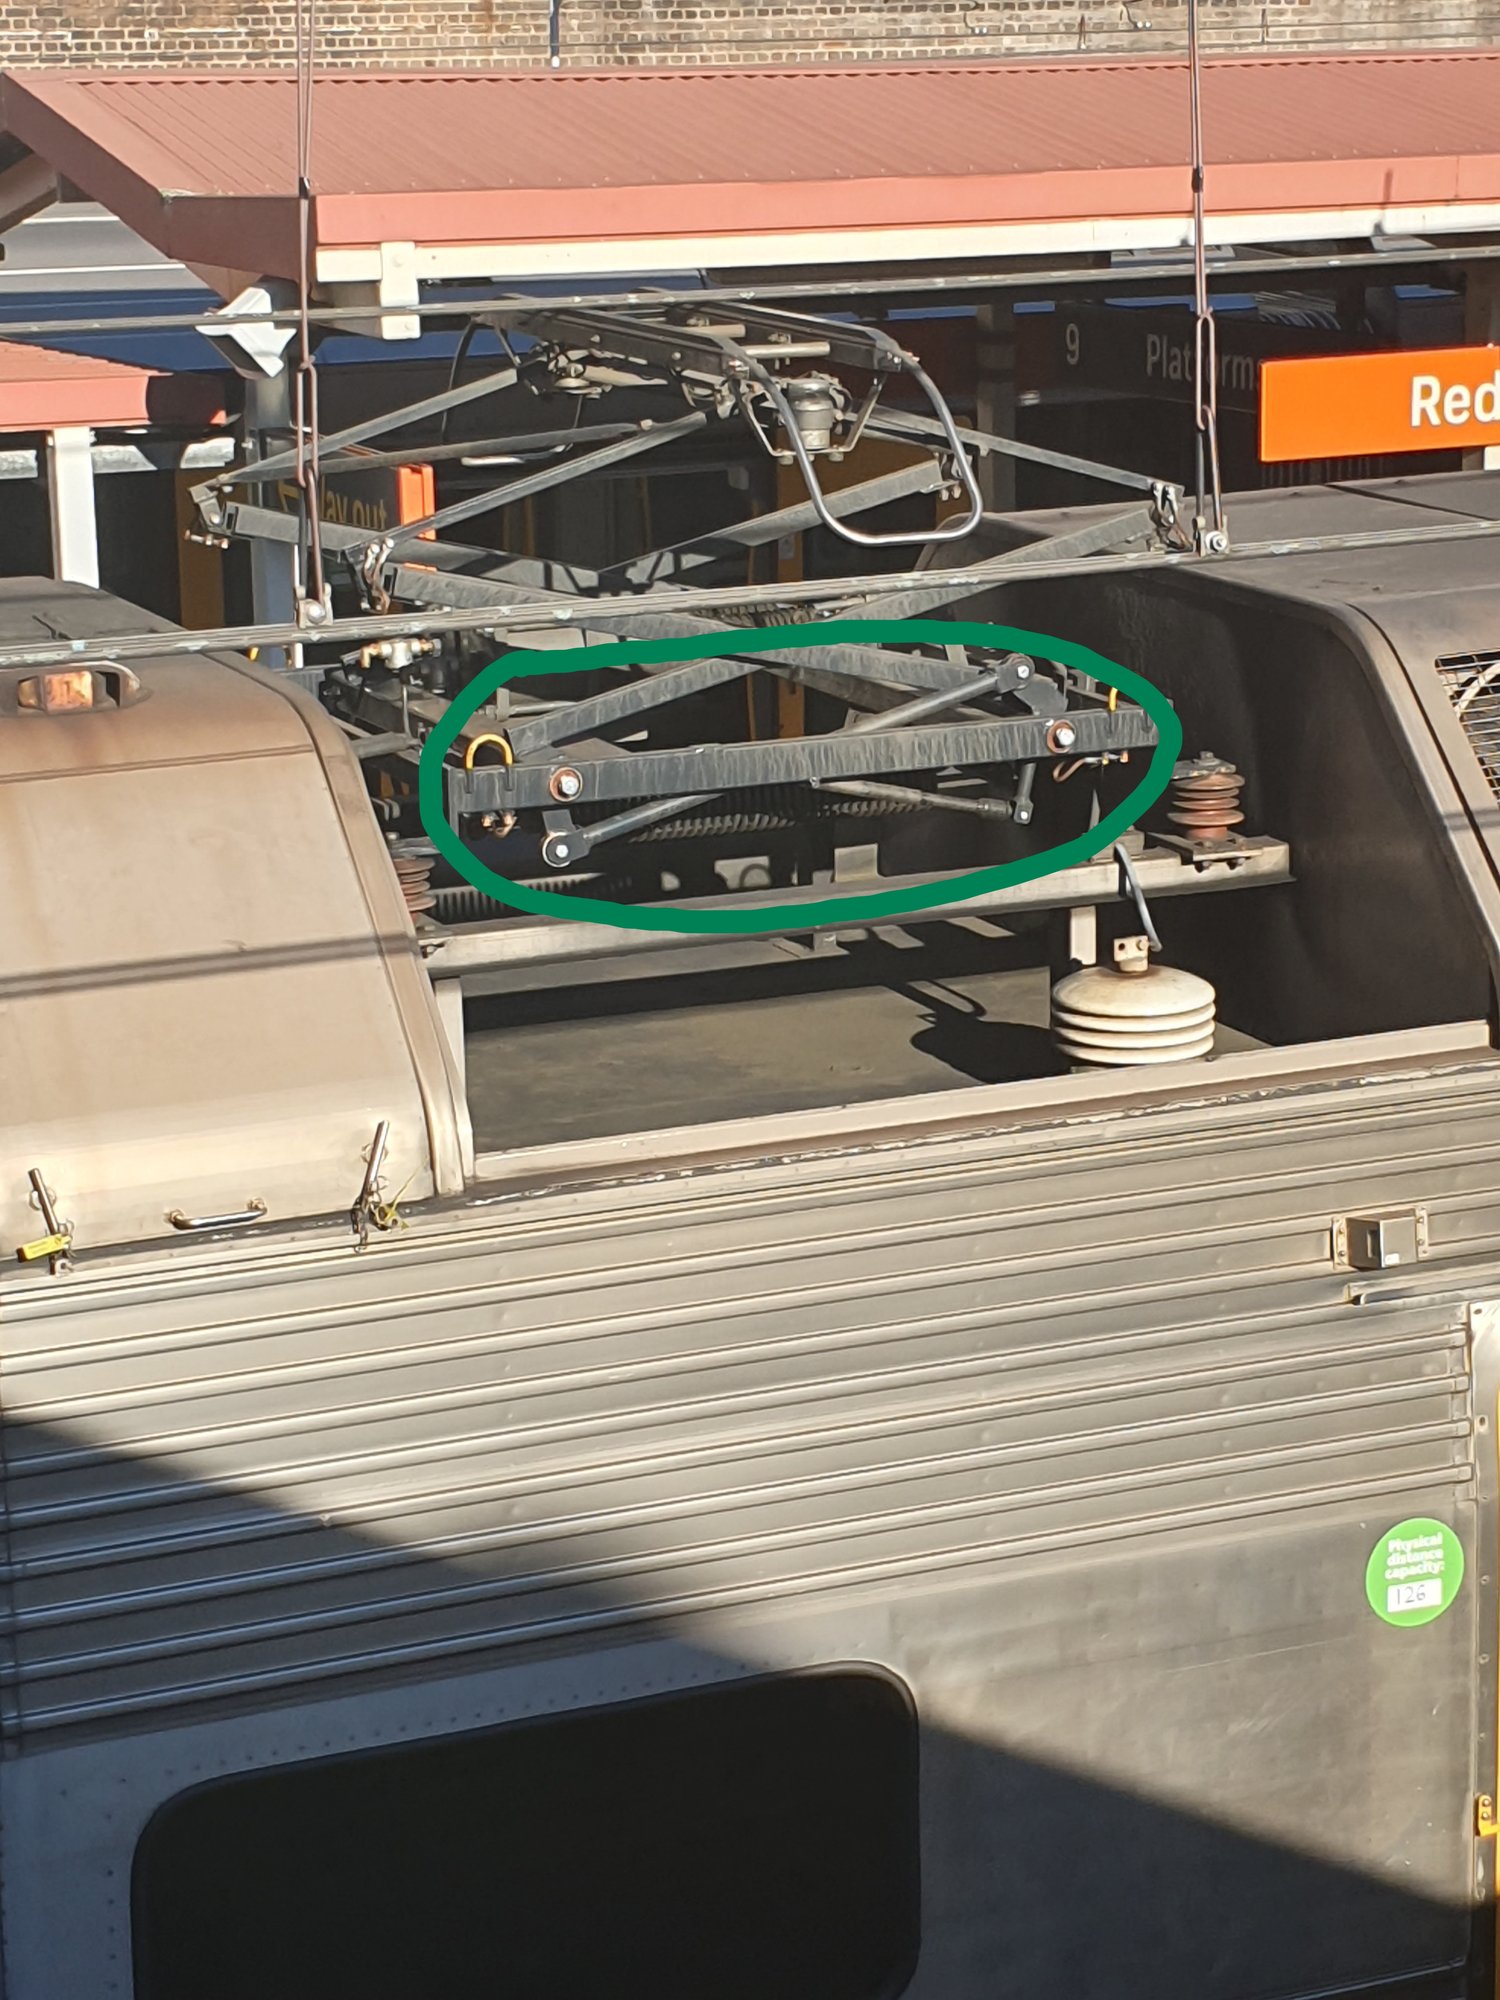
I expect I will just have to camp on a railway bridge somewhere to get the reference angles I need. In the meantime, if anyone has some engineering know-how and could take a crack at explaining how these pistons fit together, that would be much appreciated.
Thank you
Replies
Thanks
This is an RGBA set of packed masks, each channel corresponding to a colour parameter in-shader. This lets me re-use and re-colour elements such as the logo, which appears multiple times across the train body. I am considering adding the ability to selectively mask off areas in-shader, for smaller decals where scaling and transforming won't cut it. The logo was sourced from the TfNSW open database.
I have also tweaked the materials on the side-doors a bit.
It's funny you say that, as as a child I was under the impression that all trains were double-decked. It's only very recently that Sydney has (re)introduced single-deck trains for it's new Metro system.
Thanks for the encouraging words!
I've been spending time fleshing out the front facade/undercarriage section. Still very much WIP.
Changes in-action. I also made some changes to the dust-mask generator. I figured that since objects are separated anyway, I wasn't saving any draw calls by not instancing my trim material, so I introduced some parameters to tweak per-object and better fit the mask to each item. I'm still trying to figure out how to introduce some sharper crevice dirt. I experimented with a 2nd UV map, which had poor results. I also fixed a bug where an unclamped subtraction in the mask was influencing areas it shouldn't have been.
Have put a tiny bit of thought into the broader environment, with some very rough blockouts.
That is all - This was much longer than I thought it would be! Thank you for reading, feel free to drop any thoughts about the blockout/wider env concept. (Or anything at all!)
Thanks.
I think i'm satisfied with the front undercarriage bit, I've been working on breaking it down into components for baking and painting. I think all the structural/support stuff and cables will be unbaked, with a trimsheet (costs around 14k), while everything else will be made from a kitbash of painted components.
I have got the low poly ready for the front undercarriage section, and baked/mapped it out. Looks no different to the previous screenshots as yet, so I don't see much point in posting.
That said, here you can see a bit of a breakdown of the texturesets as they stand on the model, where each unique colour maps to a unique matID (default blender grey notwithstanding). At the moment, there are about 22 texturesets across the entire model, including my trims & tileables, which account for 5 of them.
In terms of polycount it's a bit less clear. UE5 reports between 60-70k at any one time at fullscreen 1440p. I don't believe it considering there's no Nanite elements here and my estimate based on individual props says it should be about 120-200k.
Should i be re-adjusting my expectations? Does this seem reasonable for the scale, complexity and target of the model?
Some insight would be helpful, thank you
This is a huge asset - and you're already being quite optimal with it by not using unique textures/bakes, decals, trim sheets, and some shader work.
I started learning realtime art back around the beginning of the 7th gen, so a lot of the benchmarks and metrics I use to measure optimisation is still sort of stuck in that era. As such, I get nervous once I start breaking 50k and 3-4 texturesets (couple this with the fact that i've never tackled anything of this size). So by 'readjusting my expectations' I was looking to see if I should be less conservative, or whether what I had right now was working.
I understand this is always a bit of a roundabout conversation as there are a lot of factors that go into these decisions that ultimately makes it up to the discretion of the artist, but it's good to know that someone else can affirm my choices.
Thank you.
With semester done I am returning to this, hopefully I can finish the actual train by February next year - The surrounding environment I'm not too sure about. Not a lot to update on since i've just come back to it, but thought i'd revive the thread anyway.
Low poly for the pantograph is about done (and I guess High poly too - apparently didn't mention it before). Will likely introduce another 'layer'(?) into one of the trim sheets for the cables, everything else will be baked & painted.
On the cables, I'm trying to get that raw coiled metal rope look for them, which you can see in the reference. Given the deep height variation that defines the material I've found it difficult to do at low poly. Has anyone tried something like this before and is able to share some insight into how they approached it?
Also finished painting the bogeys.
I have also made a brief start on painting the facade undercarriage. Does anyone have a good source of reference they use for defining metal materials? I've been managing alright for now but it doesn't quite look how I want it to - this is a surprisingly complex material. I've only got a macro view of most of the materials from my references.
Thank you!
Hello again,
Wrapped up the low-poly for the catenary and a couple of other bits and pieces and bobs. My Substance license expired and I dithered about on whether or not it was worth coughing up for Adobe. I guess this year is when I poke around with Quixel perhaps. So i've got a fair few bakes and paints lined up.
Started work on the rear of the carriage finally, will aim to re-use as much of the kitbash I prepared for the front as possible. I don't intend to make separate locomotive and carriage units, although it's not something I've actually investigated properly. In theory I guess I could just swap the front facade for my rear-piece, although the dimensions of the resulting unit will be weird.
As you can probably see, also started on a rail track and ballast while I was out of license. Made some procedural shale/ballast in Houdini and scattered them across a track I modelled with a simple RBD DOPnet. Pretty happy with the results, although it does tile quite noticeably.
Am thinking about leveraging Nanite for this, especially as UE5 has seemingly deprecated tesselation. As a point of reference, the scattered ballast alone for a single module comes in at 2.4 million polys for ~1500 stones. Interestingly there is very little performance impact when instancing them out in UE5. I could certainly be more aggressive by individually instancing each ballast stone in-engine, which needs some investigation - my initial look seems to suggest it isn't possible yet..
I think for presentation I will put the larger environment idea on the backburner, or at least release this project in phases - the environment alone could end up being an extra years work! Instead - for "phase 1" anyway - I was thinking of doing a number of different livery variants, just to give the portfolio post some flash, as a sort of 'look through time', reflecting the history of the network. Could even have some fun designing my own or doing a collab.
Thank you! (PS, having trouble with this new post editor :P )
Oops, it's January already.
Progress has been a bit slow, have had a lot of other things on my plate. Mainly just painting and baking at the moment, I still need to collect some more references to figure out the modelling on the rear section, and there's a lot of little annoying greeble pieces that I need to get to - they're basically just cubes but also aren't which makes it difficult to model to a convincing degree of detail.
Pantograph materials are a bit meh at the moment - Lumen also doesn't like casting shadows from it at all so there's basically no tone in the lighting around it (presumably something to do with all the little thin pieces it has). I also need to add more global variation to the ballast, probably with some planar projected noise to darken certain rocks.
I am however fairly happy with how the front facade has turned out, I did struggle against it for quite a while.
Let me know what you think, thanks!
Truly Massive!
I'm learning alot thus far even though I don't work with your tools - cheers for sharing.
And looking forward to seeing those final render/s 🤙
Nice work!
Waiting for final renders 💪
Hello,
Thank you both for your comments, it is very encouraging and I appreciate the support.
Rear of the carriage is ready for painting. Bullshitted the mechanicals on top a little bit - even with some photos I snapped I can't make much sense of it, hoping it holds up. Only 2 extra MatID's for this module, everything else is trim & tile.
The greeble bits I was complaining about, finished up. UE5 has really gimped translucency I feel. They do help break up the large empty sections on the model.
Also working on an overhead cable module. Will connect this up to some kind of pylon just to tie the scene together. Extending beyond the scope of the train a little bit, but I feel that it's valuable for presentation purposes.
I should begin thinking about properly lighting and composing this soon, at the moment i've just been using this as a stage, so there are lights sort of everywhere. Any other final polish things I should think about let me know, it's coming up to that point. I do have some livery stuff in the works, not enough to really show... yet ;)
Thank you!
Hello!
Blocked out a pylon, but now that I'm looking at it I don't think I like it.
Seems a bit too dominating and screws with the composition. In particular I don't want to have anything extend over to the other side of the train as that will block cameras, which leaves me with this unbalanced L-shape. It's also very large (despite being more or less in-scale), and so takes over the focus. I think I will leave it out, and just have the overhead cables floating.
Rear of the carriage is painted.
My boyfriend is also helping me out and is working on some illustrations for a livery/wrap variant! I am again going to leave the idea for the historical paints, as university goes back in basically a week and I do want to get this out before then.
Still a work in progress, let me know what you think of the idea. There will be another large illustration to match the rear end of the carriage, as well as a start and end piece for the trim along the middle.
Thanks - happy for any feedback on the pylons & the illustrations.
The pylons kind of contextually 'frame' this scene quite nicely but tbh not sure about that wrapped illustration though?
however all good, just a personal preference. I'd worked on a rail project just prior too covid hitting here in VIC so used to seeing clean skinned trains, is all 👍️
@sacboi I am planning to do two sets of renders, the 'skinned' one will be a bit more stylised and is a bit of an opportunity to play around a little bit.
This is what i'm looking at for the main renders.
I have cooled it a little bit in post-process, and I've had to tweak the saturation a bit to compensate for the colour-space curse. I am wondering if this is too dark of a tone, and that maybe I should brighten things up - although the deep contrast is nice at the moment.
And for the skinned version. Background is very WIP at the moment, although I want to set a bombastic kind of tone.
Thanks!
Calling this done!
Have a look at the full set of renders on my Artstation: https://www.artstation.com/artwork/xYZYkY
Finalised livery & backdrop renders as well:
Thank you very much to everyone who followed along and gave their thoughts and encouragement throughout this project, it's been lovely to see. To everyone else, I'd still love to hear your thoughts!
Until next time!
Beautiful model! You could probably convert this for Trainz Railroad Simulator 2019 or DTG Train Simulator, upload it as a payware mod and make a killing. I'd buy this!
Amazing work on this, this is incredible.
very nice modeling and texturing, great work
Thank you! Much appreciated :)
@griffinrails Interesting idea, would you be able to point me towards the modding communities/resources for either? Does either game use Unreal Engine? I suspect the complexity of the model as it is now would be a bit beyond what's performant. Definitely open to doing it as there is a dearth of Australian content in these kinds of games.
Trainz and DTG Train SImulator as far as I know have their own different game engines. Trainz: A New Era onwards uses it's own scratch built 64bit engine, however I'd say Trainz 2019 onwards would be the safest option since it has the most powerful engine. You'd likely have to downgrade the model a bit though, or at least the shaders and textures. The bogies, pantograph and cabin all ahve to be seperate game assets, and have to have animations. You could easily just use a stock standard cabin or use the cabin from the old V set made for the game.
There are plenty of discussion forums for the game itself, although you do need to have a MyTrainz account to access the forums i believe. (MyTrainz accounts are made either from the forums or when you purchase one of the games). Trainz 2019 is VERY pricy, so Trainz: A New Era on Steam would be a better option for testing purposes and whatnot.
The community is friendly and can help you with any problems.
Forum URL:https://forums.auran.com/trainz/forum.php
DTG Train Simulator is another option, however their community seems to be far more elitist, and the company DTG (DoveTailGames) is rather disliked due to their scummy busniness practices. Nevertheless, they would help you with any problems on their forum.
Forum URL:https://forums.dovetailgames.com/forums/trainsimworld/
Also, some VERY useful tools are found on the PEVSoft Website when it comes to Trainz modding.
PEVSoft URL:http://trainz.shaneturner.co.uk/tutorials/index.php/home/utilities/pevsoft-trainz-tools
Don't want to come off as forcing you to make a mod here, sorry in advance.
Was into sims when starting out, though been out of the loop for a while but checking out their respective wiki (eg: Trainz) is where I'd start and by the way your project has inspired me to have a crack at making a Chs6 loco using a 2/3D workflow, on another forum 👍️
@griffinrails Not a bother at all! I would love the opportunity to have my model (and all its details) available in a more interactive way. I just need to scope it out a bit - maybe this is what finally gets me to buy a train simulator...
@sacboi Looks like a great project, lovely little loco and those pantographs will be interesting. Good luck :)
I would be able to assist in getting it to work in Train Simulator Classic, if your interested! You would be able to find me at the Dovetail Games forums as cityrail-rulez cityrail-rulez | Dovetail Games Forums
The only thing I can't figure out is braking, acceleration and other types of physics, however these can be setup using a few templates created by Dovetail Games for developers.
As for getting your model into Trainz (TRS 2019 or higher) You only need to export to FBX as long as the model is setup with empties and animations, the empties only require Trainz naming conventions which I'm learning myself. From what I do know is that once you have setup the part naming conventions for Trainz to know what they are and animated things like the wheels and pantograph. Load up Trainz Content Manager and create a New Asset, open up the folder and place your FBX inside and setup the configuration. Setting up your model for Trainz isn't as complex as setting up for Train Simulator Classic 'Less confusing' HAHA
Edit: I have changed a few things from my original post as I originally asked to obtain your model.
Would you consider importing your V Set into Train Simulator Classic? If not, that's alright