[WIP] Abandoned Hotel Bar - UE4 Modular Environment

WIP#1 - Research, reference and blockout
Hello everyone! Thanks for checking my post, I am currently attending CGMA's UE4 Modular Environment course taught by Clinton Crumpler and I decide to write a series of blog of my weekly update for this project.
It's a 10 week course and it is mainly focused on developing a game environment by using modular parts in Maya and UE4, and I decided to choose an abandoned bar environment to work on. Our first week of the course is mostly about gathering and analysing references, scheduling and planning the project, and creating blockout with an industry standard modular workflow.
Reference:
I don't have a particular concept to follow, it's mostly a collage of different reference images.

Blockout:
To start with, I quickly blockout the wall in Maya, without making it modular first, just to plan my interior space. Then I built very simple blockout of my main furniture modular pieces and throw them in it to adjust the space. Then in photoshop I did a quick sketch on it to divide my modular pieces. The goal is to use as few modular pieces as possible to build your space.
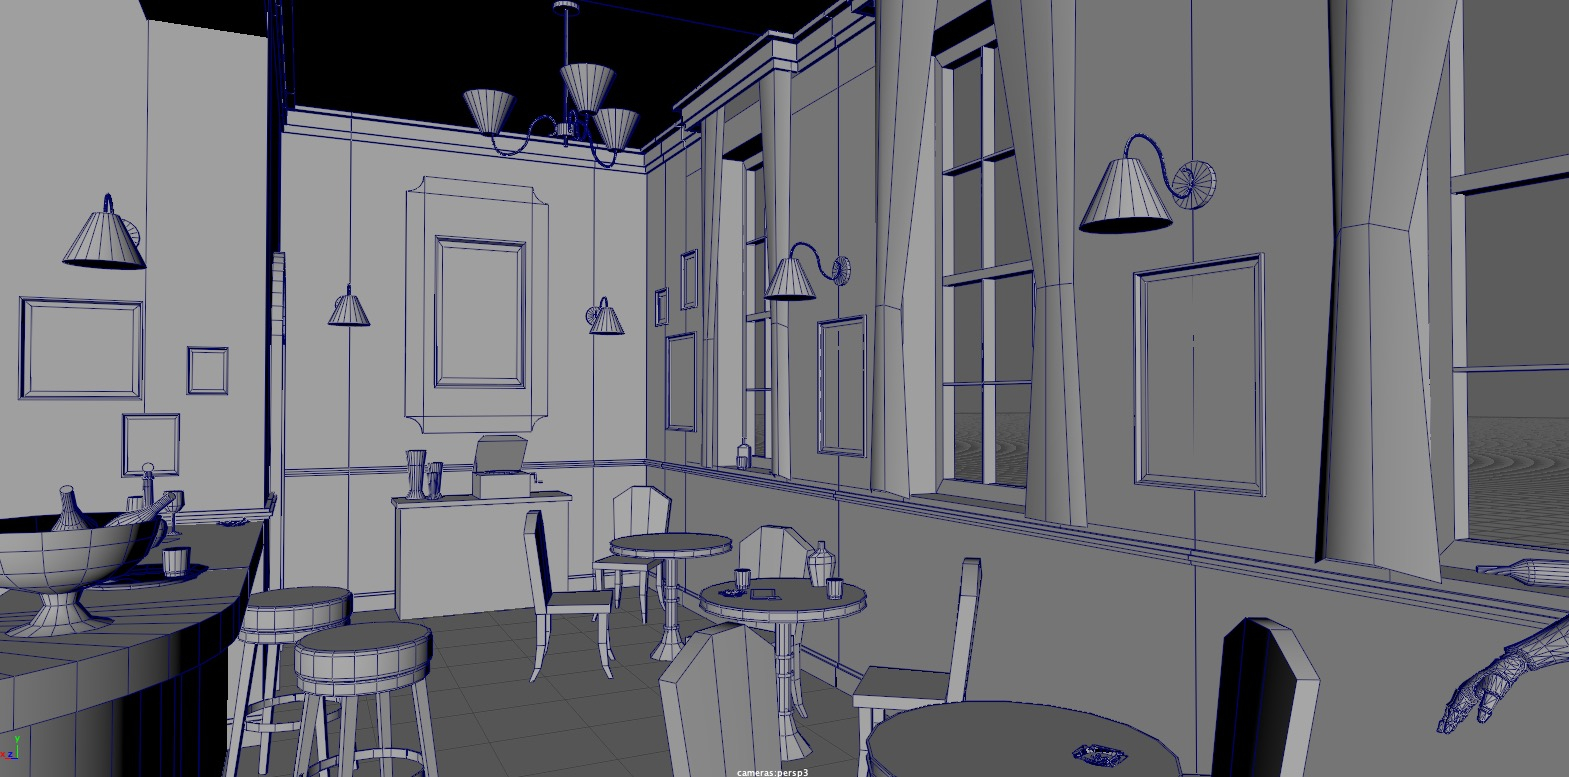
After I finalise the size of all my modular piece, I moved to Maya and start building my modular meshes with more details. It's still ok to amend the shapes at this stage if you found some errors when building them.
This is what I have in Maya at the time, the silhouette of your modular should be as close as your final pieces as possible. They should have a good pivot point on the grid, and every modular should nicely snapped to each other when you assemble them.


What's next?
For week02 of our course, the assignment will be properly setting up and assembling our modular piece in Unreal in an efficient manner. And I will start detail planning the texture I will be using for both tileable and unique ones, and same time keep developing my mesh.
Thanks for checking out my work and feel free to let me know your opinions about it so I can improve them in the future!
Or check out more detailed post on my ArtStation blog: https://www.artstation.com/hsclaratan/blog
See you next week!
Replies
WIP#2 - Basic setup in UE4, trim sheet and unique texture
Hello everyone! Welcome back to my second update of the project
Blockout Set Up in UE4:
During the past week, I've imported all my blockout pieces in UE4 using grid system, setup the basic lighting and working environment, have everything proper named and organised in folders, and here're some shots after that.There were some light leaking in my scene at first, then I made a light blocker to add to the outside to cover all my walls, floors & ceilings, it's a very simple block with only certain faces cut out if you have windows in your scene. This is the easiest way to solve the light leaks since using two-sided materials or have the mesh with double sides will cause more draw calls.
Trim sheet:
After finishing setting up the blockout in unreal, I started planning my trim sheet. I used my Asset list I've created in the first week and divided my textures into trims, tile-able, unique, and hybrid textures. And then mark them up in my scene.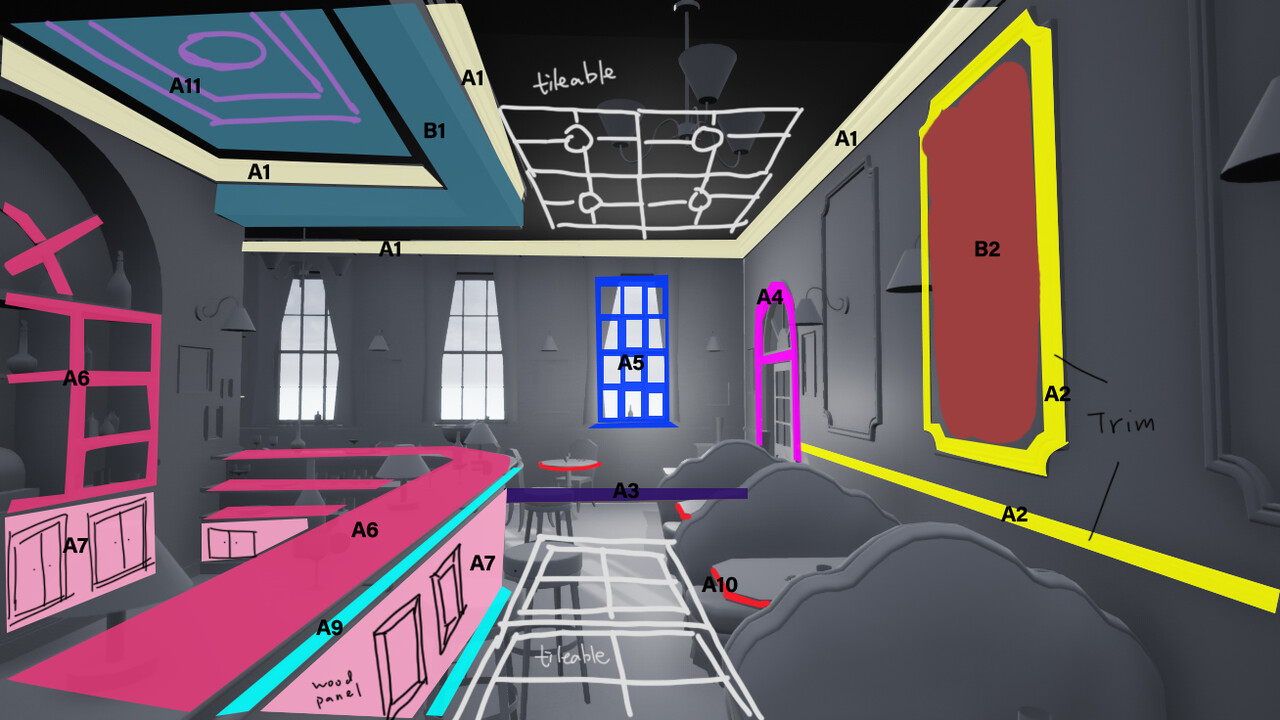
To build my trims, I first used photoshop 10x10 grid guide layout to divide them up, then export it into Maya, turn on the same 10x10 grid, and start building up each trim mesh on top of my reference image.
After I have the general blockout of my trim sheet mesh, I did some tests on my assets before polish them just to see how they will work on actually models. For example when I applied the wooden panel trim on my the outside part of my bar counter models, with the normal map it still looks quite flat so I know I need to extrude that part of the mesh to give it more shape later on.
Besides that, my task next week for the trim sheet will be bringing it to ZBrush and add more ornament details using alpha brush, and sculpt some wear and damages onto it.
A little preview of my work in progress trim sheet this week.
High-poly mesh for unique assets:
For the other assets that use unique textures, I went for the the normal high-poly to low-poly workflow, this week's task was to model as many as high-poly meshes as we can so I choose to firstly create the chairs and tables since they take up the most space in my scene.I modelled my high-poly meshes in Maya, again my next step is to bring them into ZBrush to sculpt some detailed worn and damages.
In the meantime I keep updating my timeline and to do list just to get organised.
What's next?
For the next week, I'll keep polishing my trim sheet, after I finalise it I'll bake it properly and do more test on my other modular assets. In the meantime I'll do the ZBrush pass on my unique meshes, and after that start to optimise them into low-poly meshes, setup uv and bake them in Marmoset.
Again, thanks for reading my blog and feel free to let me know your opinions about my work so I can improve them in the future! See you next week!
You can also view more detailed update on my art station blog:
My Artstation: artstation.com/hsclaratan
What tool are you using to organise all of this?
WIP#3 - Abandoned Hotel Bar - Texturing tile-able, trim sheet and unique assets
Hi, welcome back! Haven't update here in a while cause I was busy working on creating my unique assets and tile-able texture, and I want to post them all together when I have more results.Trim sheet texture:
I finished the texture for my trim sheet, I haven't test it in unreal yet so there might be slight twist later on, but overall I think I finalised all the materials for each trim and how I want the color arrangement to be, you might notice my wood material here is relatively 'cleaner' here, this is because I'm going to use it in a large area of my modular pieces and too much dirt/damage look will mess up with its 'tile-ability'. So for the damage I will use decal/blend material to achieve that later on.
I improved my wooden panel mesh since last time and modeled more edges to emphasis that wood feel, also put different color id on the horizontal and vertical panel, by doing so I can better manipulate the directions of the wood grain during the texturing process.
Unique mesh baking:
I've had my high poly unique meshes last time, so this week I just finalised my low poly version and bake them properly.
I bake the texture maps from my high poly mesh using Marmoset toolbag, it gives you better baking result than substance painter, I use this technique where you explode your meshes for better baking result, this helps me get rid of the normal map projection issue and give you a clean bake.
Basically by setting up two key frames in Maya and export the exploded version when baking, and you can always slide it back to original position when export the whole mesh into unreal later on.
I used this trick on mostly of my assets baking and it all baked successfully without any error.
Texturing:
For the texturing, I set up some smart materials for me to use on trim sheet and most of my assets, so I can make sure they will have a more harmonized look.
For the edge of my table, I decided to treat it as a hybrid texture and use the metal part of my trim sheet.
Some previews in Marmoset:
I have three types of lamps in my scene, they shared the same style so to create them more efficiently, I break them down into different unique parts where they don't look the same and only modelled, texture those parts. Then assemble them in the end like I did with my tables and chairs.
So basically those three lamps are using only one texture maps, this will save lots of draw calls in unreal, and also much easier to texture them.
For the metal part I used the same smart materials for the tables, and reduce the dirt level a bit to avoid repetition. I tried to create the lampshade with a classy buttermilk glass look without using transparency, I used the fiberglass material in substance painter, modified the color gradient and roughness level to get the look I want.
Tile-able textures:
I was trying to create as much as tile-able materials I can, and I wanted to use this opportunity to practice my material creation skills, so I didn't use any textures from megascan and I've made all my tiling material from scratch inside substance designer.
I've finished with my floor and ceiling tiles, and plaster ceiling material, still have a green plaster wall material to do. But overall I'm more comfortable now creating texture in substance designer.
I didn't have time to test them properly inside unreal, but I'm planning to do this next week soon and also will learn how to transfer the exposed parameter inside engine to control the result more efficiently.
Also I will need to make another set of them to have a damaged and broken look, and use that to blend with my first set. So you might notice that they look quite clean compare to my chairs and tables.
What's next
My next stage is to bring all the updated assets and textures into unreal and test them properly, and also apply my trim sheet texture to my modular pieces, will also be my first time so that should be fun!
Thanks for checking my blog and if you have any feedback please feel free to leave me any comments")
See you later!
You can also view more detailed update on my art station blog:
My Artstation: artstation.com/hsclaratan
WIP#4 - Abandoned Hotel Bar - Apply textures in unreal
This week I was mostly applying textures on my structural assets and test it out in unreal. Still got lots of other assets to do, also my lampshade is too thin so I'll need to get back to that. And I tried adding some dirt and wear when texturing in substance painter but they still look a bit stand out in my scene so I need to figure out how to fix that later on.
For the wall itself I made a very simple green plaster in substance designer, without too much damage feature on it, so it doesn't mess up with its tile-ability.
Here's an overlook of my modular assets that use the trim sheet and tile-able texture.
Basically each modular mesh use two or three material slots, one for trim sheet texture, one for the plaster wall, and occasionally another one for variation. First I set up all the uv inside Maya using my texture as a reference, and import them back in unreal to assign the instance materials.
Because I was using the same texture density(5.12pixels per unit) for trim sheet and modular mesh, I can just unwrap all the uvs in the same scale using the set density function in maya's uv tool, that way all my texture will be applied in the correct scale as I planned.
To avoid the seam between each joint meshes, I move and snap their uvs next to each other, and also because my meshes are created according to the grid system, it made it easier to unwrap and snap inside maya without stretching the texture.
And even there's still some seam can't be avoid, because how I made my wall textures, it still won't be too noticeable, and I can also cover them up with decals in unreal later on.
For the corner piece, I 'butterfly' the two uv faces, and have them overlap at each other, and add some edges in the center to soften the sharpness of the corner.
So this is my progress this week, let me know what you think!
Next week I'll learn how to set up a proper master material in unreal to have more controllable parameters, also need to speed up finishing more props like my sofas and stools.
Thanks for checking out, see you next time!
My artstation: https://www.artstation.com/hsclaratan/blogWIP#4 - Abandoned Hotel Bar - Set up Master Materials
Hi there, just a quick update of my progress this week. It's been a super fun week, learned so much about master materials, never realised they can be so powerful!My progress so far:
Things I've changed since last update:
- Finished off the trim for the rest bar counter modulars, and moved on to the shelving area at the back using the same texture, still need to improve the geo and uv arrangement.
- Texture the ceiling above the bar area, need to add decor trim to give it more varieties.
- change those mosaic glass trim around the door to a more matt material, cause I've got the comment that it didn't go with the rest.
- give it more thickness to my lampshades so they don't look thin
- Textured my sofa props, still work in progress and I don't want them look too repetitive.
- Did a small vertex paint test on my wall, but I want to have a more grungy look, like peeling plaster effect so I need to figure out how to achieve that.
Some previews in marmoset:
Think I need some feedback on my sofa asset, I want to make it look better than just a ' plain fabric material '.
Master Materials:
- Master material for tile-able assets, like my walls, floors, ceilings. With feature to control tiling amount, bump offset, vertex blend, and directional dust.
-Dust function:
I set up a material function to have a noise map overlay on my basic texture, using a component mask with only blue channel turned on, so the noise will only appear on top of the surface. I learned this technique from this article https://80.lv/articles/creating-an-abandoned-home-interior-in-ue4/
- Glass Master Materials:
For this particular project, I don't mind compromise a little bit performance to achieve a good visual result, so I choose to make a real glass shade with proper transparency and that. With controllable features like roughness variation, dust, and blurred effect for frosted glass.
An example of how those features can give the bottle assets more texture variations.
I'll keep working on the rest of the unique props, same time improve my shaders cause I'm thinking to add a dirt mask feature, and maybe using a second uv workflow.
Thanks for checking my updates! Feedback is always welcomed!
WIP#5 - Abandoned Hotel Bar - lighting
My lamps had overlapped uv on lightmaps that's why the inside looks really dark, I'll need to re-create the lightmap uv and try bake again.
Also the metal part looks dark on some area, I think I need to add more reflection capture near them.
This was without the edge shadow.
The edge information works better if the mesh has more subdivision, like below test mesh, where the shadow was distributed more evenly, but it would be too heavy for the engine since I have many modular pieces, so instead I used a noise map to add to my height lerp.
Besides that, I still need to work on my assets since the course is ending soon. My lighting is also just wip and still need lots of tweaking.
WIP#5 - Abandoned Hotel Bar - Story Props
Hi! Haven't post here in a while, been working on some story prop for my environment. I wanted to create some props that are good enough to showcase in my portfolio like the gramophone so I spent more time making it.Here's my latest render previews in marmoset:
The final model has 4.6k tris
Same high to low poly workflow using Maya and ZBrush, maps baked with marmoset:
Textured in Substance Painter:
Stickers and vinyl texture all made with Photoshop:
My initial reference: