Sketchbook: Camille Meehan

polycounter lvl 3
I accidentally hit the soft select mode key B, in my Maya studies. Hit B to toggle it on and off.
I Google searched, "why is Maya outlining in rainbow color," and "why are my outlines bright in Maya," and even "autodesk maya outlining in multicolor??' (yes, including the double question mark) which fortunately got me to an answer which I found on the Autodesk Support forums as an answer to this question "When I select a vertex, it turns bright yellow and surrounding ones turn bright yellow to a dark orange".
I was pretty frustrated that my clean outlines were suddenly broadcast live in technicolor. Fortunately, it is a super easy fix.

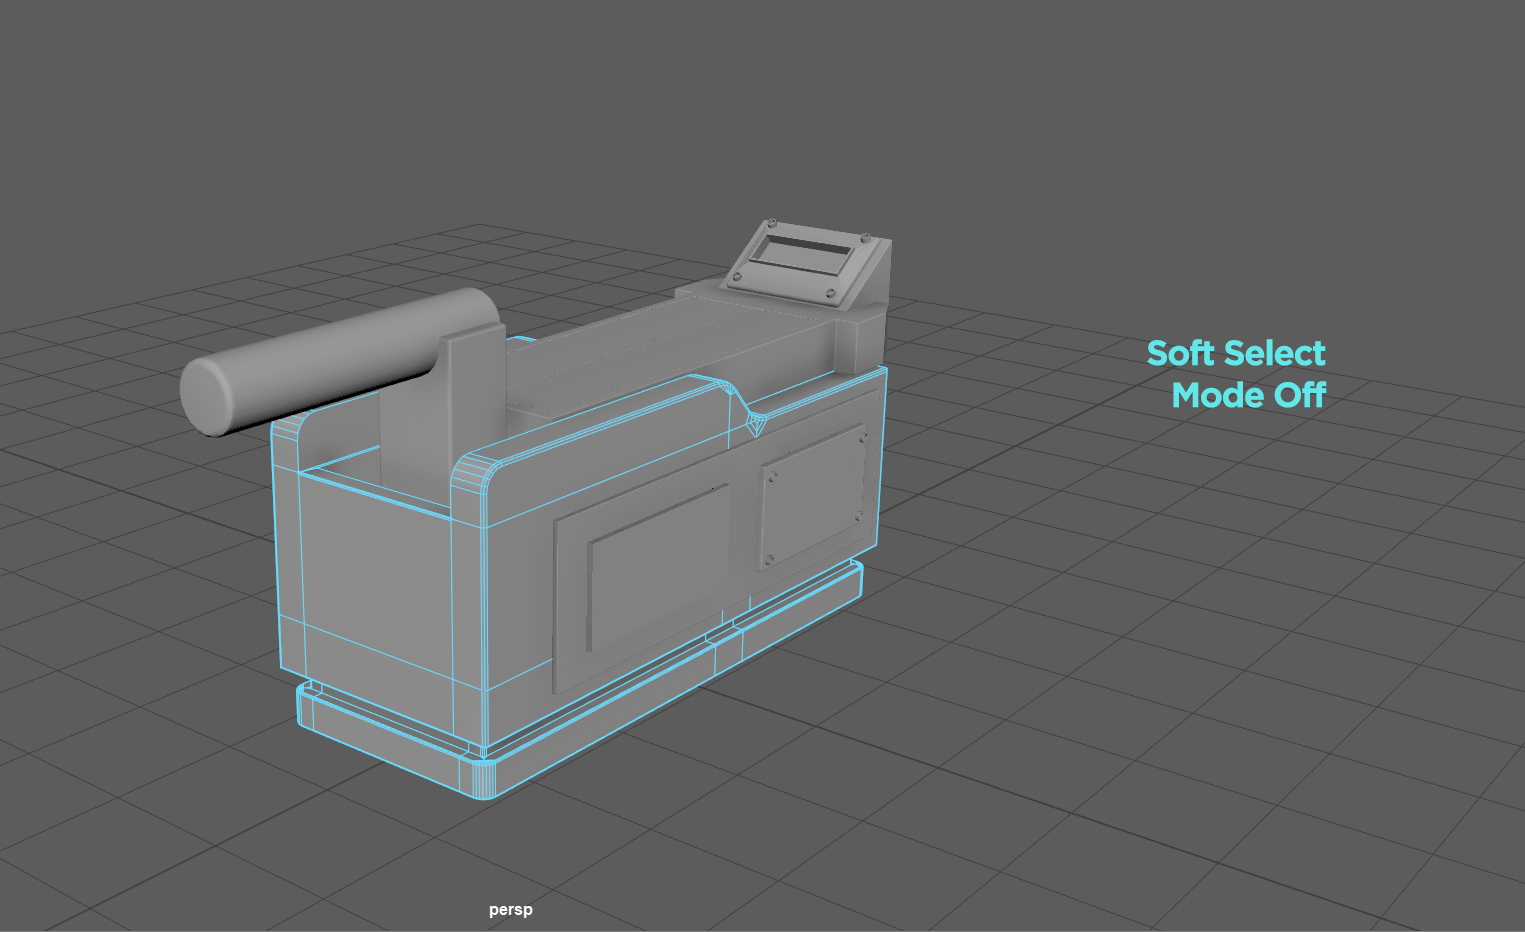
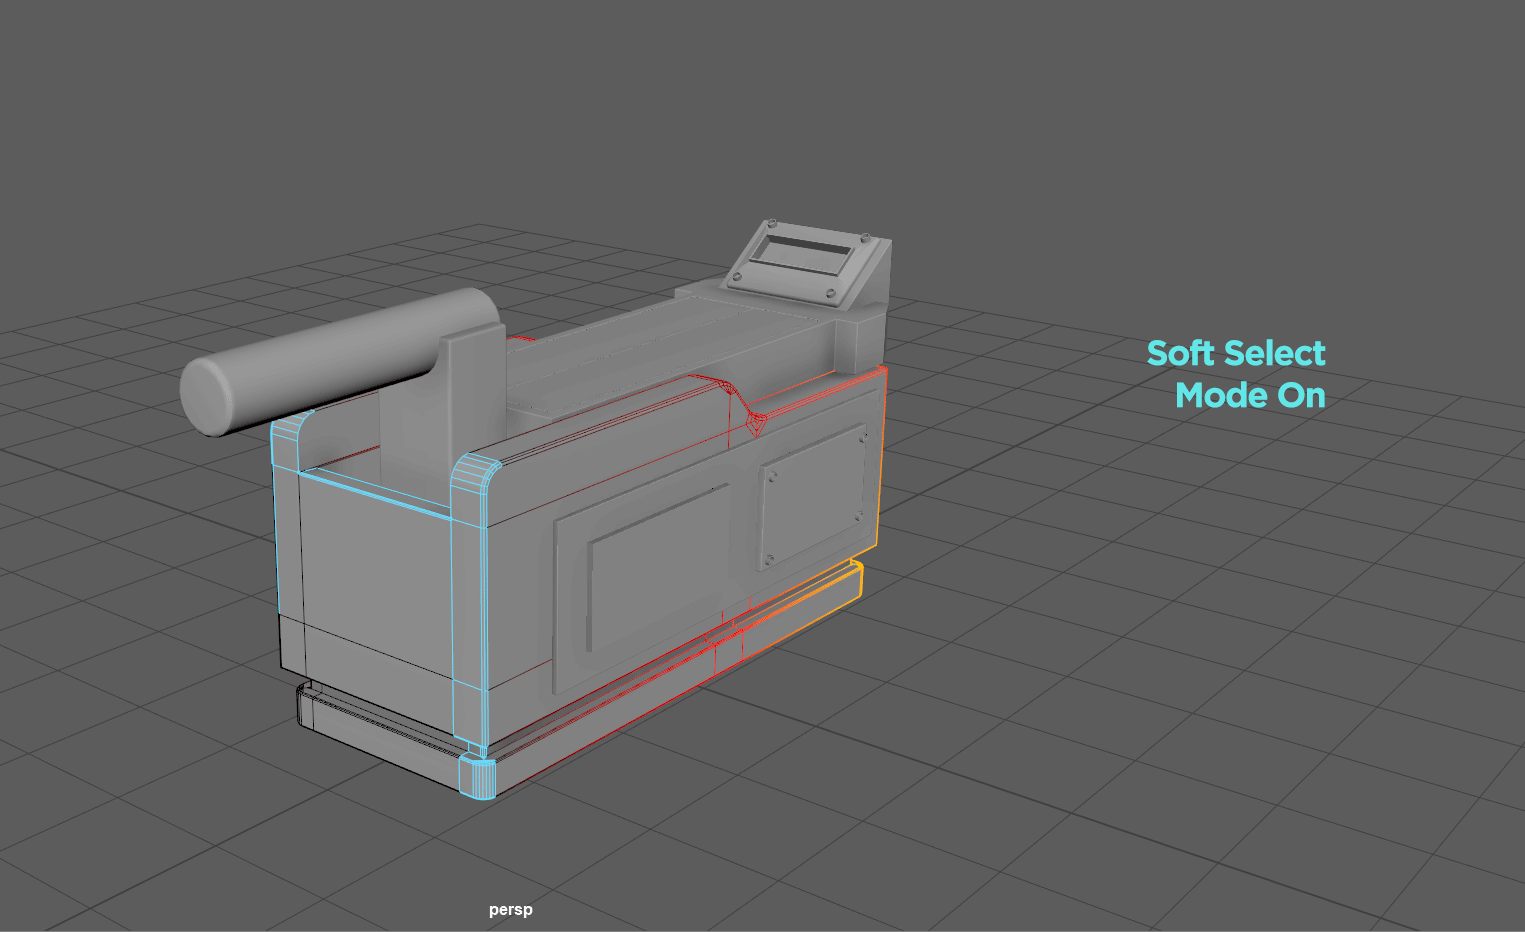
That's the ghostbuster trap that I'm working on for a Udemy course, Maya for Beginners, Complete Guide to 3D Animation in Maya. I've been developing the parts of the trap that aren't included in the course, which means adding edge loops and practicing skills I learned earlier on, this was driving me bonkers. Hope it helps someone else new to the Soft Select tool.
I bet it's useful, I should figure out how to actually I use this soft select tool.
I Google searched, "why is Maya outlining in rainbow color," and "why are my outlines bright in Maya," and even "autodesk maya outlining in multicolor??' (yes, including the double question mark) which fortunately got me to an answer which I found on the Autodesk Support forums as an answer to this question "When I select a vertex, it turns bright yellow and surrounding ones turn bright yellow to a dark orange".
I was pretty frustrated that my clean outlines were suddenly broadcast live in technicolor. Fortunately, it is a super easy fix.
That's the ghostbuster trap that I'm working on for a Udemy course, Maya for Beginners, Complete Guide to 3D Animation in Maya. I've been developing the parts of the trap that aren't included in the course, which means adding edge loops and practicing skills I learned earlier on, this was driving me bonkers.
I bet it's useful, I should figure out how to actually I use this soft select tool.
Replies
Later on I'll be texturing and animating it. First I have some organic modeling to learn, a skeleton a la Coco style
At the cabin, I continued working more on the Udemy Lucas Ridley course. I'm just about done with the 3D modeling section and moving on. First though, I seem to be struggling to get the wire deformer to work as demonstrated. I'll post what I have available via images but since they got all split up by my working in a different location they might come in a later post. Specifically, I made a spine by using a lattice motion deformer on a polygon and animating a snapshot of it up the spine curve. I am trying to wire deform the resulting polygons to the curve so I can adjust the spine placement if needed later and I must be doing something wrong. It doesn't seem to be linking up. I'll try again on that today and am optimistic I'll figure it out. It may have just been the laptop interface? Maybe being on my desktop will solve the problem, hah. *crosses her fingers*
Here is a bit of what I've been up to.
Reference photo.
This was based on an old Mike Hermes YouTube video https://www.youtube.com/watch?v=PntVhzpWDKY for how to make a mug. I didn't like the resulting stretched geometry on the inside and bottom of the cup so I adjusted it by adding some caps to the cylinder and adjusting edge loops on the inside.
I just learned to link a polygon to a path in the Udemy course so I used that technique to make the handle, which is much more detailed than the one in the Hermes tutorial.
From there I wasn't entirely sure what to do but I had just learned edge modeling and so I went from there. The trickiest part was wrapping my head around the geometry and getting everything to line up on the cup where it connects. There were a lot fewer edges on the tutorial so...yeah. Puzzle solving
This shot below is me learning to edge model the eye socket in a skull.
I haven't finished up the Austrian cup just yet, but I'm looking forward to seeing it finished so that I can do the hot chocolate tutorial and fill that cup up!
First, the spine, wire deformer in a neutral position and then pushed over down below. For some reason, the laptop wasn't having any of this however, it may also have been operator error.
Then I used the bend deformer to start some ribs. These proved more challenging then I expected. Also, somewhere in the sculpting process things went a little wonky and that top rib amusingly seems to have some little spurs. I've decided to let them be in favor of moving on to other bones and soon a new model. So, warty ribs
Followed by my triumph, the beginnings of a sternum.
I'm amused looking back at my former posts because I had no idea what the soft select tool is and now I use it all the time. I'm hoping that is how these deformers and lattices end up to me, second nature. I am going to sculpt the collarbone next and try to do the full skeleton, even if a bit rough.
The wildfire smoke is pretty bad where I'm at, so I'll be indoors on my computer modeling away. Silver lining.
The smoke cleared up last night! I'm so happy, every window is open and I can breathe.
Below is where I beveled the sternum edges more.
And I didn't get any process shots on the collarbone, it is a cylinder. I learned how to grow and shrink my selection while working on it. That is really helpful. The rectangle in the background is going to be my scapula bone and is the next thing I'll be setting up. I anticipate it will be more of a challenge, but the arm bones should go relatively fast if the collarbone is any indicator.
---
It is a rough week.
"At Columbia Law School, my professor of constitutional law and federal courts, Gerald Gunther, was determined to place me in a federal court clerkship, despite what was then viewed as a grave impediment: On graduation, I was the mother of a 4-year-old child."
"How fortunate I was to be alive and a lawyer when, for the first time in United States history, it became possible to urge, successfully, before legislatures and courts, the equal-citizenship stature of women and men as a fundamental constitutional principle."
"When I was growing up, there were no women in orchestras. Auditioners thought they could tell the difference between a woman playing and a man. Some intelligent person devised a simple solution: Drop a curtain between the auditioners and the people trying out. And, lo and behold, women began to get jobs in symphony orchestras."
~ Ruth Bader Ginsburg
Rest in power.
Next week we'll be modeling a robot and using this sphere as part of it. I am most interested in living creatures, natural structures, and plants, so I'm pondering how to put my own spin on the robot. I bet there is a way I could make it solarpunk, yeah, I'll try that.
Regarding the sphere below, it is actually a cube polygon. The lack of triangles should help it smooth out and make it easier to edit for the upcoming project.
What's been keeping me so busy in the 3D world? Yikes, well, making this little owlbot for one. I ended up redoing her arms and legs after the first attempt where I tried modeling them into one mesh. (then I beveled them to delightfully disastrous end hahahaha)
I spent yesterday creating a full set of UVs for the character and I think they make much more sense to me now, though obviously, I'm still waiting on my instructor David Mooy's feedback to see what needs to improve. I suspect the UVs should be straighter, but that is something I can iterate on.
This is way more complicated than the design in the school assignment, but the design of the school assignment didn't interest me as much as this does. Thanks for taking a look at my concepts and meshes!
Recap of the problem:
1. When I hit 3 to smooth polygons in Maya, they would often vanish entirely or stretch out.
2. When I loaded my .ma file saved in ASCII the files would do things similar to the image above, with geometry exploding or vanishing outward. For a time I would just reload over and over until the file blessedly fixed itself. I would sometimes need to open a file five times to get it to load up fully.
3. I didn't think I could render the subdivision because hitting 3 was so disastrous. Being new, I didn't realize this was essential functionality...and so here is the fix that worked for me.
Windows > Settings/Preferences > Preferences > Modeling > Global Subdivision Method
I changed the Global Subdivision Method from OpenSubDiv Catmull-Clark to Maya Catmull-Clark
I suspect this has something to do with my graphics cards or the age of my hardware but I don't really know. My instructor David Mooy took a long careful look at the polygons and determined that nothing there was likely to be causing the issues.
So far, the solution above has fixed all my problems with the disappearing polygons in Maya 2020. It also helped a classmate with the same problem, so hopefully, it helps you.
Skeleton updates! The main thing I did differently from the video here is to pull up an anatomical drawing of a skeleton to create a less stylized model. It is still very much stylized but I wanted to know how to do the sort of modeling that bones require, and so sculpting it took a bit of time but was a great learning experience. The feedback from CGMA has helped me level up quite a bit since these bones were put together, and it also helps to be able to hit 3 to smooth now haha.
This is shortly after the last update. You may notice the sternum is gone. It vanished in a smoothing glitch which fortunately I fixed later. I also learned how to save iterations and that has been a godsend. For this skeleton though, no more sternum >-<
Hand is coming together.
Then the foot is coming together.
And that is where she's at. Needs a hip and sternum and then flipped to be a complete situation.
Image from the CGMA course page.
While that's a super cute bot, it isn't my style so I decided to sketch out my own concept and model. David Mooy had stated in the class that provided my robot had the same basic parts, it would work fine. Hence, I started makin' my Owlbot!
Concept art was made by me with heavy influence by the concept art of Georgia Patton, which you can see animated by Alina Godfrey on her site.
I'd love to work on more natural environments, so naturally, I gravitated towards making a bot that would fit into a Solarpunk style future. I adore this line from my inspiration board, "We are golden, and our future is bright"
Thus my owlbot is a garden tender from such a world as the above. Crafted to look like animals from the days of yore, some of which have been restored in their natural habitat, and others which serve as a reminder to the people of what was lost but which may yet be reborn.
(Genetic cloning from long dead creatures passenger pigeons, Tasmanian wolves, great auks)
So here it the concept art for my owlbot. It evolved over time as I grew more confident.
Here is the color idea, which came along after I remodeled it away from a single mesh.
I should have tried modeling the interesting leg booties and arm gauntlets in the beginning, but alas I did not. So here is the modeling as it progressed.
I set up UVs for the first time as well. This was an eye opening experience. Ultimately I had to redo it, but you know what they say, practice makes progress
So that is what the first part of my CGMA coursework looks like. I've loved the feedback on my homework from the instructor and I feel like I'm leveling up quickly.
Here she is now in all her C3PO glory.
*** Just kidding. *** I'm having rendering issues!
If you know what to do when a texture that should be working is coming in black under a default Arnold skydome light, let me know. I'm trying to figure it out, and I bet my additional rendering studies this week will help me understand.
So I'll continue on in the next post with the mesh, UVs, and closeup shots of my final model. I do have some nicer renders where the texture is working as intended. I'll post those at the end.
I love the way the eyes came out and am looking forward to seeing how they animate and express themselves.
My instructor pointed out that the edges in the back of the skull, where the 'brain' connects to the skull, suggested I move the vertices out away from the corners to reduce the 'pinch'.
Again with the eyes, I'm really pleased that I sunk them back into sockets. I redid the jaw because it had some zero area faces that were wrecking the model's UVs. I'm relieved to be able to spot them now with more ease. I also reworked the entire torso to make it softer, rounder, more consistent in edge loop spacing/vertices alignment.
Closeups of the bits and pieces. The first time around I did a bevel that split into 4 instead of 2, it made UVs a challenge and made the edge look artificial (in a bad way). So here I redid the bevels and softened it up, more consistently treating all the edges.
Feet were tricky, the first time I did them the auto bevel did some unpleasant things. I learned to not use auto, to just go through and look to make sure whatever mode I pick is working well before settling on one. The one feedback David Mooy gave me on these post redesign was an introduction to the fit to curve edge loop functionality. Which, when used on the Ankle joint, could have made it a smoother transition in the curve. It essentially attempts to maintain the curve's shape when the edge loop is placed, reducing the distortion a loop might otherwise add.
Texture mapping. I hand-painted this onto the model in Maya, and I believe I set the resolution too low because when I looked at the file in Photoshop it was much less detailed than expected. It was interesting that the hand coloring resulted in a sort of bleeding from one piece to the next. This was my first time texturing a model and I'll soon be doing more of it with Substance Painter as my main focus.
Finally as promised, I'm down to showing off the first Arnold renders. I used an image that I sourced from Polycount user post by pixelpatron for my skydome light. I created a procedural texture on the edges to reveal a coppery metal underneath my paint layer. I dig it.
Thanks for reading and looking at my modeling. Stay safe out there.
Maya can't seem to locate Arnold, which seems to be a common enough problem. I'm trying the troubleshooting listed here in case you run into the same issues. Arnold errors when launching program after updating Maya | Maya | Autodesk Knowledge Network
I just tried doing a clean uninstall and am reinstalling, but...
It looks like I got some work to do.
*edit* I forgot to uninstall Bifrost and a few other smaller items in my clean uninstall. I removed them, then uninstalled again...reinstalled, and I think it is working now. We now need to make sure that Arnold is loading, and YES, we are back up and running. Victory is mine.
I'm working on more everyday stuff like furniture, stationary, and houseplants.
The table bottom is probably not going to show in the finished render I have in mind so I might not add the drawers that graced this 1900's industrial work desk. They're really pretty though, in that old library catalog sort of way, so I may just.
The sketch I'm working from is this concept I put together, roughly inspired by the botanist Elizabeth Gertrude Britton (Knight).
I've also been playing around with kids, this is what we came up with.
Chickens, all the chickens. It's fun because Maya is so different from any of the games that kids play. "Why can't we see the colors as it changes?" "Well, this software can sometimes have trouble showing all the colors which is why we make it optional..." (I think that is the answer, roughly.)
The last year of studying 3D has been magical, and while there are many more images and moments than I could fit into this short video, I think I did a fair job of covering the bulk of my studies. It isn't a demo reel, because frankly there is a lot of not so great work in there. That's how you learn though, make mistakes, get better. Bit by bit.