Best way to unwrap islands - The U+U unwrap?

interpolator
Hey, so we have been trying some things when asking ourselves which would be the best way to unwrap simple shapes.
I had stretching issues when making large islands and the criteria are those:
(Yes this is going to be very basic, so basic in fact that I never really thought about that stuff too hard)
Factors:
1. Minimize small islands that waste tons of UV space and are just a mess if you ever want to texture anything manually, especially as many packing algorithms do not pack small islands well, so have as much of the islands in one piece to have the UVs organized, clean and maximize space
2. Optimize Vertice count and minimize edge cuts
3. Minimize skewing / stretching
4. Ease of Unwrap
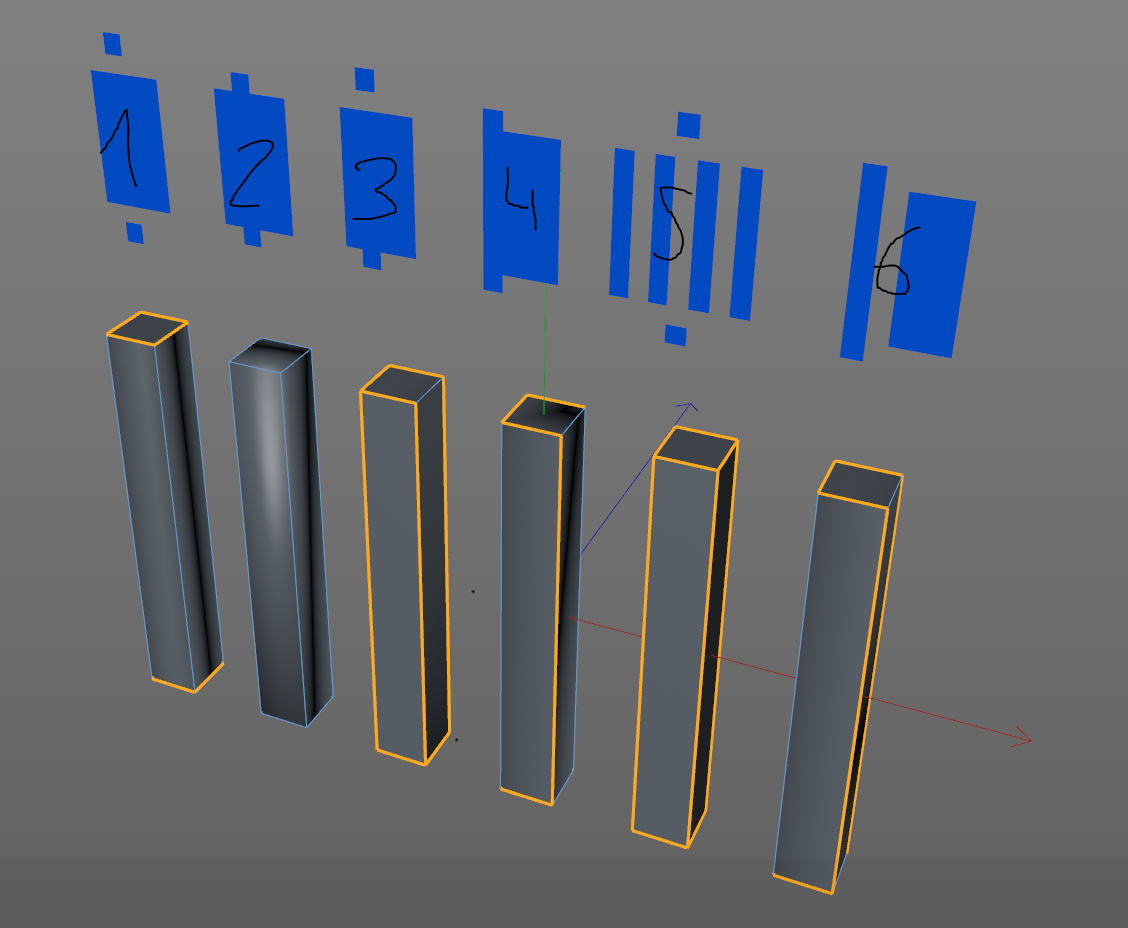
Here are the candidates:
And here is the bake:
Edit2: After some troubleshooting: If you have matching tangent spaces these can all be baked without stretching.
The below result holds true in non optimal environments, (if you want to bake normals that work in any environment, like selling assets on the asset store / 3D Marketplaces or for clients you dont know about)

The full island has heavy skewing and the "T" shape does not work as well as I thought
Now onto the real meat: Vertices

Here it becomes very clear why cubic auto unwraps are really bad. They waste a lot of space, are hard to find and a shitton of vertices.
Remember real in-engine vertice count matters over triangle count. These all have the same amount of triangles, but performance is far from the same.
Edit: My test seems to use the worst case, not ideal matching tangent spaces.
If you have ideal tangent space matches, number 2 and number 4 would be the most optimized if you put in the extra effort over number 1,
in non matching tangent spaces (or you make assets for 3D Marketplaces with all kinds of end user spaces), this here is my conclusion:
So we have 2 candidates:
Nr1 - Baking Roller unwrap
+ Very Simple to unwrap
+ Saves a little bit of UV space due to less border surface area (vs Nr6)
+ Majority of the UV space is at one place
- Makes the UV messy again with tons of small solo pieces, hard to work with when doing manual edits, bad oversight, ugly uvs
- 18 Vertices, worse on performance but acceptable
- Has seams on a lot of the edges
Nr6 - [ ] Hugging unwrap
+ Great performance with 16 out of a potential minimum 14 vertices
+ Nice clean and easy to work with UVs with splits in 2 larger pieces
+ Has long Pieces which are easy to paint on and have a little less seams
- Harder to unwrap
- More surface area = potentially more spacing area if the packer is unusually good with tiny single pieces like Rizom UV
So in this simple shapes example I think the U+U unwrap is the best choice despite being a little harder to pull off,

Let me know what you think or if I am missing something. I have not tried a world space normal to tangent space conversion or anything the sorts, and no support loops have been used on the lowpoly. Id like to hear some tricks and tips if there are some.
I had stretching issues when making large islands and the criteria are those:
(Yes this is going to be very basic, so basic in fact that I never really thought about that stuff too hard)
Factors:
1. Minimize small islands that waste tons of UV space and are just a mess if you ever want to texture anything manually, especially as many packing algorithms do not pack small islands well, so have as much of the islands in one piece to have the UVs organized, clean and maximize space
2. Optimize Vertice count and minimize edge cuts
3. Minimize skewing / stretching
4. Ease of Unwrap
Here are the candidates:
And here is the bake:
Edit2: After some troubleshooting: If you have matching tangent spaces these can all be baked without stretching.
The below result holds true in non optimal environments, (if you want to bake normals that work in any environment, like selling assets on the asset store / 3D Marketplaces or for clients you dont know about)
The full island has heavy skewing and the "T" shape does not work as well as I thought
Now onto the real meat: Vertices
Here it becomes very clear why cubic auto unwraps are really bad. They waste a lot of space, are hard to find and a shitton of vertices.
Remember real in-engine vertice count matters over triangle count. These all have the same amount of triangles, but performance is far from the same.
Edit: My test seems to use the worst case, not ideal matching tangent spaces.
If you have ideal tangent space matches, number 2 and number 4 would be the most optimized if you put in the extra effort over number 1,
in non matching tangent spaces (or you make assets for 3D Marketplaces with all kinds of end user spaces), this here is my conclusion:
So we have 2 candidates:
Nr1 - Baking Roller unwrap
+ Very Simple to unwrap
+ Saves a little bit of UV space due to less border surface area (vs Nr6)
+ Majority of the UV space is at one place
- Makes the UV messy again with tons of small solo pieces, hard to work with when doing manual edits, bad oversight, ugly uvs
- 18 Vertices, worse on performance but acceptable
- Has seams on a lot of the edges
Nr6 - [ ] Hugging unwrap
+ Great performance with 16 out of a potential minimum 14 vertices
+ Nice clean and easy to work with UVs with splits in 2 larger pieces
+ Has long Pieces which are easy to paint on and have a little less seams
- Harder to unwrap
- More surface area = potentially more spacing area if the packer is unusually good with tiny single pieces like Rizom UV
So in this simple shapes example I think the U+U unwrap is the best choice despite being a little harder to pull off,
Let me know what you think or if I am missing something. I have not tried a world space normal to tangent space conversion or anything the sorts, and no support loops have been used on the lowpoly. Id like to hear some tricks and tips if there are some.
Replies
- Even though it is always good to break down a test to its bare necessary and sufficient minimum tech requirements, here the test might be actually be *too* barebones in the sense that it is not necessarily representative of an actual asset. By that I mean, if the project did indeed rely on a lot of simple rectangular poles like that (or similar assets), and performance was a deep concern (mobile) ... then sure enough you wouldn't give such little parts their own unique bakes like here, and would rather resort to tiling/atlasing techniques. So imho while there is value in the questions you raise, your best bet is still to *also* perform similar tests in parallel on actual full assets.
- Your picture showing the shading of the baked results is not telling the whole story. It seems like you are using a baker in which ray direction is being influenced by hard edges and/or UV splits, and also displaying wonky results not in accordance to the way the maps were baked. Therefore you are being led to dismiss scenarios (red Xs) that are actually totally workable. And there's also the question of using a cage or not to remedy issues too. Anyways, at the end of the day I can guarantee you that cases 2,3,4 can absolutely look accurate using the appropriate workflow and tools. So at this time, you cannot really get to any conclusions until you get that part straightened out
At the end of the day If I were to just pick one layout based on the balance of tech + optimisation + ease of work, that would simply be the first one (tube and caps) with or without hard edges at the caps. With or without a hard edge on the long side would depend if done on a squarish asset (angular blocky side = ok to throw a hard edge there) or a smooth cylinder (in which case placing a hard edge is imho asking for trouble later, even though lots of people seem to do it). Also depends on the behavior of your baking tool and target engine.
All the other layouts are imho a pain to work with and visually confusing/needlessly convoluted, with no real benefits. And the U+U would constantly prevent you from quickly throwing a texture overlay in PS for instance, so that's a deal breaker. It can also trick you when packing things manually, as you might end up wanting to scale down the long part vertically to make it match the other island and then you'd get uneven density.
I baked with Marmoset without a cage, with marmoset I usually never need a cage anymore (or so I thought) but it sounds like there is still merit to it then - unless thats not the issue
But isnt the Marmoset auto cage just the same what I do as manual cage anyways, a push extrusion on normal direction?
Maybe im doing something else wrong but I wouldnt know what. I will try a bake with a manual cage when at home. Its been some time since ive done realtime but my smoothing splits are according to UV splits of course, maybe my 3D software has weird normal handling?
(Yes we have shittons of simple shapes due to top down perspective and a lot of smaller assets (top down games, RTS, building games, Architecture etc all use a lot of primitive shapes) so this really repeats a lot in our case)
We also tried a manual cage and still the same smoothing errors. What are we missing?
Are you face weighting your normals manually for the clean result?
Thanks! But These are your files, straight to marmoset, same distortion. Without cage and with cage, no difference.
I compared vertex normals of your files vs mine and they are identical also. So its a marmoset thing?
Also I really wouldnt know how a cube would be baking fine on a 1 piece UV.
Literally the first thing I learned about Baking (from very talented Sebastian Zimmermann who baked the Crysis 2 nanosuit) is that paradox of unwrapping a cube in one piece due to normal skewing. Since when is that not a thing? Why wouldnt we just put cubic things in one piece when its just more effort for better vertice count, spacing and far superior clarity?
Me and the colleague are confused now.
---
Side note;
(We are making like 50 assets per sheet in one go, and there is a ton of rectangles. This is now mostly a mix of the UU method and some classical caps-off, which is now very clean. Its a bit of extra effort but at that amount of props which are reused many times this really makes a difference.)
Edit: Ok I tried a xNormal Bake here with cage, again 100% unchanged files of frmdbl
Ok and here is the normal map frmdbl provided (I didnt bake) with the files you baked, there is clear skewing - very heavy skewing on Unity tangent space, and medium on MikkT space, shown here:
The normals you sent me also look exactly like my xNormal bake and equally skewed
Im very confused now
Your normal map is also skewed like my own bakes
Also it looks like marmoset does not display the tangent space it bakes for which is weird. So if I bake for unity tangent space, marmoset does not use the unity space in its viewport, which I did not know.
If I bake marmoset to marmoset it does look perfect. If I bake unity space to marmoset and/or import to unity it looks broken. I think Unity uses a different tangent space with their new render pipeline changes, that must be it, and we got tricked by that. Also I did not realize it making that big of a difference actually. So then you would also have to tell me which space you baked it for : P Thanks for the help!
So I will make some more tests then and see how far can I push before skewing.
----------------
I edited the main post to reflect the new findings. So in non ideal tangent space environments I think my comparison still holds up, its still the "safe" way of not doing anything wrong, like when selling on the asset stores or for people who have no clue, old engines etc.
Imho what you have to concern yourself with first and foremost is the ray direction of your bakes. Different tools behave differently when no cage is being used - some split rays at hard edges and some don't.
You will have to proactively deal with that sort of stuff on a case by case basis as no two shapes are the same.
Lat but not least, depending on the way your baking tool behaves you can also implicitly control ray direction by actually splitting off the caps at the ends of long objects temporarily, and weld (or not) later. This is very powerful, and once you start thinking that way you'll quickly realize that many objects do not even require a full bake anyways. For instance, if you are working on a shoulderpad you can very well just bake the main outside surface and leave the rest as simple geometry. This opens up a ton time saving opportunities - basically not thinking of everything as "high first then low then bake" but rather "what is the least amount of content actually needed to achieve this or that asset". Like here, one could argue that the caps of these little test poles hardly matter at all - yet they are influencing your tests and potentially your workflow choices as well.
The absolute safest (in the sense of less chances of the result looking off in various environments) imho remains : cylinder unwrap, split caps, baked with a cage (which can also be deformed to finely control ray direction BTW), and hard edges at the end of long shapes (long tube) and/or whenever a deep change of direction happens.
Overall I would still recommend you to test out more complete assets from start to finish (full chair, little props, and so on) rather than focusing only on these test poles. Also, I'd still recommend you to investigate tiling/atlas techniques for performance reasons.
The unwelded cap sounds like a cool trick, not sure where I would use it tho right now
Im using a SDF Signed Distance Field workflow for the Highpolies so things are a bit different either way, im not doing any subdiv work.
I have tested around 100 varied small assets before for this project, from chairs to tires to lamps to fridges (as said I make big sets in one batch and unwrap and bake 30 props at a time or so) to 5k tris cars and tanks.
Many of those are so close at minimal count that there is no LOD possible aside of billboarding (and straight deletion), so these vertices are important
You cant LOD a cubic wood plank or metal piece. You can make a 14 vertice or a 18 vertice cube however.
And I really hate the 1 quad UV islands, its just a mess each UV sheet having hundreds of them, and the space they eat with the
(pretty nice but not perfect) packing of 3D coat. With Rizom and great packing of small caps that would favor caps more.
I will also bake and unwrap 50 weapons at a time when they are done, we are not making one detailed asset for 2 weeks, I have to move product :P I also need to make names, tooltips, balance, mix sounds, ammo types, icons, vfx and more.
Most of these larger prop sets, even the weapon sets will be reused a lot, and each efficiency and performance gain there will be greatly
multiplied. If I just made a first person weapon, I would care a lot less about how my UV splits were or 2k vertices more or less.
If you suddenly have a set with 100 rectangular shapes which will then appear 5-10x at a time in game, it suddenly matters a lot more
how a cube should be unwrapped ideally
Yes the cylinder unwrap is the classical thing Ive been doing mostly before, if the unity tangent space works fine I will go with more 1 island ones again however I think, its just superior if the shading is correct. 14 vertices vs 18 of the capped off, cleaner and higher texel density.
If that does not work I will definitely go with the UU style for the rectangles in conjunction with some capped offs, its a bit more effort but it seems like a smart trick that is a bit hidden, but it also depends on the unwrap tool always how annoying certain actions are to pull off.
Yeah that's exactly my point - that's not "skewing", or at least not in the sense of "rays being cast at an angle that makes baked rivets appears slanted rather than straight on". As matter of fact that's precisely one more thing you might want to address in your tests : adding some floating geometry near the end of the lengthy shapes, to actually see if you are getting skewing/slanting problems (which you very likely will if you are not using a cage deformed accordingly, or fully split off caps causing the rays to go perfectly sideways). That's what I mean by making more relevant assets : not necessarily making more of the same, but rather, covering more grounds and potential issues.
TLDR : as usually referred to (and as I understand it), skewing has nothing to do with your UVs, you are being misled by the terms used in the tutorial your are referring to, and that's why you are surprised that these bakes *do* work even though you assumed that they wouldn't. Skewing has everything to do with ray direction, and that's completely independant from the layout you decide to use or the "gradientness" of the resulting map.
Also : the screenshot of the assets tells me that indeed you might be going down an overly complicated path already (highpoly for everything, auto packing into a massive sheet, baking, and so on). I know that this path is tempting because "everything is automated" therefore it gives an impression of efficiency and of a one-click process, but imho it might not be the case in practice. Of course I don't know all the details of said project but just by looking at the screenshot of assets I get the feeling that everything could be done with one single tiny 512 or 256 texture with a bunch of premade normalmap details, applied directly to the lowpolies as you model them. It would require some prep work but in the end it would potentially cut down asset creation time dramatically. And that's not even mentioning that if a source model (pseudo high) is absolutely necessary for some reason, you could still leverage round edge baking as opposed to a full highpoly.
So yeah what I am trying to get at is that there is currently a bit of a inconsistency between the specs and limitations of your project and the workflow developed for it. There's no perfect solution of course, but "let's bake everything to a big texture" sounds like a bit of bruteforce solution which might cause more issues that initially expected. It doesn't really make sense to worry about vertex count down to the consequence of this or that UV layout ... while in the meantime deciding to bake 50 assets to a massive texture. But then again who knows.
(loving these tiny weapons btw
Floating geo that is a good point, although I can paint the skew in marmoset. A highpoly with lines and such on it would compare much better also, I should definitely try that. I was to foccused on if it could even work at all due to the tangent space mismatch
How would you get the normalmap edges from your trim sheet onto all the models? The details yes of course (bolts and holes and plates etc) but the edges? Ive seen the Sunset overdrive approach but people struggled to replicate it well and it looks more complicated than making a highpoly
We are currently abusing the cinema 4d SDF workflow with the volume builder and I can make batch highpolies in one go, it is laggy but it has significant advantages
I can do something like this in a couple clicks, 30 seconds
I can make my lowpolies into the highpolies nearly 1:1 directly based on the final optimized lowpoly geo without caring about anything
I can add global surface detail and other stuff based on noises, and its all parametric and can just be turned off. You can voxelize anything, take a particle emitter and shoot bullets at the mesh and make them subtract and form holes or whatever, it has crazy potential.
Hard to see in the gif, but it also has a completely surface surpassing material texture based on layered noises (textures only partially supported) - this is not only on flat surfaces but really deforms the mesh even on the edges, not flat like a painted detail.
This is very good for "lazy" people like me who need to get a lot done to decent quality with lowest effort possible, but as said it gets very laggy if you make much at once.
----------
Maybe you are right with the big batching, but im basically paying upfront effort to save down the road effort. When you have little manpower and need to make an entire game you need to be smart and this is my new approach, maybe it will be ditched later but I think it will pay off.
And the plan is not to just make assets, but have a library that has a future. For a sequel I can just give someone my stone set, my concrete set, my wood set, etc and have it all upgraded in one go. The hardest on the big batching set approach is knowing what you need, so at the start it sucks and will never be finished and you have to say stop at one point, and the final bake will be tedious, but then you also dont bake 50 meshes seperately. So having all my concrete props in one UV first makes batching easy, and makes handling within engine much easier.
You dont have 50 textures x5 in your project with a mess of materials and everything but one material that can control it all, its way cleaner when you have it finished. I also Unwrap it all in one go, which is 5 exports imports rather than 50. The highpolies are also done in batches with the volume builder, as much as performance goes. I highpoly 10-15 at a time basically with this approach. Same for texturing, you can just do 50 in one batch, when you get to the finalizing steps it really pays off.
The downside is uncertainty and going back to them is more stress, but the approach here is to cover all types of props we can think of we would need in one set, so we model more than we might need. This is also a library people can later use for modding potentially as well.
So this is basically a planning approach to making assets that rewards planning.
The better you know what you need, the easier it is.
For our first game I did the classic "Oh I just make what I need right now when it comes up" and now that I learned all the things you kinda need from the first 4 years, I kinda go full batching on everything, and I feel I get a ton more assets out of it than otherwise. It also gives you incentive to do more, if its already there in low, you just include it and then its there. Im not building what I need but really a library of things we can use, keep and upgrade down the road and have easy track of.
The weapons right now are a bit high, 500-1000 but ill LOD those and optimize more (again I can just give someone the sheet and let them make an LOD in one go)
1. Unity HDRP also does not use the Marmoset Unity space.
2. Marmoset does not display the baking tangent space in the viewport but the marmoset tangent space
That leaves the question if methods that require matching tangent space to work fine should be avoided when doing per example assets for sale on 3D Marketplaces or client work of unknown tangent space. I had previously never asked or never heard a 3D freelancer ask about the tangent space, maybe this should be more on the radar.
It really requires and rewards planning and making multiple iterations before you go into the final bake. Its not something you make in one go but slowly progress and iterate over time. Maybe its +- no net gain for 3d assets but ill give it a try, it definitely works great for my 2D asset workflow and game design work so far. Also its of course for my own style of working, project and experiences.
The thread is clearly splitting into two topics so I'll comment on both separately.
- - - - -
On tech
As stated in the recent posts above, the other factor you absolutely have to take into consideration is triangulation. In my earlier replies I assumed that it was accounted for - but if it wasn't, then that's definitely the one missing factor you were wondering about. Especially if your goal is for assets to be as resilient as possible and compatible with as many engines/renders as possible, then on a scale of 1 to 10 the shape of your UV layouts would rate as 0 (ok, maybe a 1 if you start relying on hard edges way too much) and the triangulation would be ... pretty much a 11. Now of course you might get marketplace customers asking for a quad version because they don't know any better, but then you can just explain the situation to them or put in your FAQ. Been there done that
- - - - -
On workflow and planning
It goes without saying that planning is paramount, and the fact that you have all this mapped out is excellent and shows that you are aware that at some point things just need to get done
To your point about this kind of approach working in 2d and gamedesign therefore it should work here : there is a huge caveat here in the sense that fully uniquely baked assets tend to not leave any opportunity for editing after the fact (besides duplicating or deleting parts). For instance, something that is totally possible in a diffuse-only workflow (adding a little bit in the corner of the layout/texture, moving things around to make some extra room, and so on - as one would do all the time when working on oldschool WoW-like characters or props) becomes near if not completely impossible once you start relying on very accurate baking/shading (as you saw it yourself : merely omitting to triangulate the assets breaks them completely, even on something as simple as a little square pole).
Another way to look at the issue would be : what if you only were given a hard limit of a single 512*512 texture for your whole game ? Sure enough you would figure out clever ways to work with that limitation yet still produce bold and fresh looking results ... and it would also be quite consistent with the scrutiny being given to your triangle count.
Now I also need to play devils advocate here by stating that even though relying on a highly optimized shared texture *would* indeed speed up your production time greatly and lighten the overall workload, if the goal is to also sell these assets on a marketplace then this could confuse some customers expecting a so-called "traditional" unwrap (as relying on a shared trim sheet would basically require 3 or 4 UV channels : main channel for the mapping over the shared details, one pelt/autounwrap if you need to generate some sort of AO or equivalent, one box unwrap for texture overlay, and probably also a side view mapping for a top-down gradient effect).
But of course some users would appreciate the tiling approach too. And some will of course complain about the Massive 2048 Texture of Everything automatically packed
(The assets are not for sale, but I just meant that an unwrap for unknown tangent space would make a safe approach that always works a good choice)
Batching Workflow (offtopic from UV discussion):
I am definitely aware of all the downsides, but the only way to find out the net change is to get a bit going with it.
So far I am satisfied and it works well, but if I come to regret it is what I will need to find out the coming months.
I am basically trading upfront effort and forced commitment for a very easy time in engine (both from usage and for batching)
and having more assets than initially needed at disposal. Another thing for consideration is that unity has this new crunch compression
which is just incredible in saving space, (4-10x saving over DXT with just a little artifacting you dont notice) so I do not worry about texture space at all (but Im of course staying in normal bounds). Also with the longer distance top down perspective I need some very soft edges.
This lowpoly concrete set I can highpoly all in one go. Making that all with a trim sheet would be 30x the effort, and Id never get the soft look or deformation on the real geo edges. And I can just make a revision at once, change the noise for a more natural look or total broken pieces and rebake. Or just make a less damaged alternative version in one go. Yes, redoing a single one is the same effort as redoing all but acceptable, but redoing all in the classical way would be a nightmare. Remodel 40, bake, import export, materials, textures. Also texel density is perfectly consistent, and texture work will also be. (These are pretty similar right now tho and yes I see the potential for reusage here)
Just look at this roast pig and sofa (and crate), I just throw that in the SDF builder and its done, this is exactly the lowpoly geo as base.
You cant make that with a trim sheet - definitely far from perfect or as good looking as a good artist making those highpolies by hand, but these are all viewed from pretty far away in top down, and that is more than acceptable, pretty good even. And I did not lay a finger on those highpolies.
Here is more representative for the generic sets. For the welding seams I just add a spline, add a random noise and I have a welding seam.
The Grain on the wood is even made with a directional noise. All these details I dont have to paint in later and are real geo surpassing the edges not just planar details like in substance painter or such. so yeah maybe its not the fastest and not the best looking or most UV efficient but its probably the highest quality per time spent and I feel like I should abuse that when I have that advantage.
Do you have any example of the shared texture workflow with soft edges? You mean classical trim sheet style? Or Sunset overdrive trim workflow style? (Edge decals would be out of question here) We will definitely use a trim sheet approach heavily on our future FPS project for the environments.
The current approach is already a modular reusable one. The buildings or main objects will only contain the mere unique foundation (solo, not in big sets) and many things come from the these large modular sets, although baked sets, while traditionally in such a game you would just make a complete building in one texture.
Well, at the end of the day it's all about what works, in a reasonable amount of time - and these assets sure are looking sweet
Indeed making items in batches (timewise and texture wise) is one way to optimize things, no doubt. As a matter of fact I have been doing exactly this on things like props/accessories myself for a little while now, something like 5 or so in one sheet. A smaller scope compared to what you are doing here but same principle.
FWIW what I got out of it is that it works well in a "let's buckle down for a few days and get that done" kind of way, and that's definitely better than having to restart the whole pipeline from scratch for each individual item ; but the downside is that there is no way to squeeze more content after the fact (or even halfway through) out of that very specific dataset - as opposed to using trimsheets/tiling allowing for infinite reuse. In a way it's a bit ironic : gameart being historically all about reuse and clever tricks, yet now becoming fully "locked in" so to speak. In other words : sculpting and baking may give infinite detail and no limitation, but it comes with the downside of being unable to edit anything ...
As for practical examples : I've exeprimented quite a bit with all that in the last year or so as I am trying to find good ways to speed things up but most importantly shifting to a non-linear way of doing things (basically unlearning the traditional full bake way, and leaning more towards techniques common in environment modeling). Will follow-up on that separately.