Home 3D Art Showcase & Critiques

The Bi-Monthly ENVIRONMENT ART Challenge | November - December (63)

1
greentooth
Offline / Send Message
kadeschui greentooth
Welcome, all! Time to kick off the LAST Monthly Environment & Prop Challenge for 2019!

Shout out to @alytlebird @Dreyzie @jeffryfor your participation in the Voting Thread! +5 internet pts to each of you :)

Remember if you don't finish in the time allotted, just keep plugging away and post when your work is finished. There's always some good progress that falls off the radar - we want to see your work! So keep going and finish those pieces!

Without further ado, here are our options for Challenge 63:

- ENVIRONMENTS -

HARD SURFACE CATEGORY:

Artist:https://www.artstation.com/blakerottinger

HAND PAINTED CATEGORY:

Artist:https://www.artstation.com/artwork/xZZbY

- PROPS -

HAND PAINTED CATEGORY:
(weapons only / armor suit)

Artist:https://www.artstation.com/artwork/oO9e2z

HARD SURFACE CATEGORY:


Artist:https://www.artstation.com/artwork/o822J


If you want to change up either concept a bit, as some people wanted, then feel free. Interpret these concepts to your liking.


Please read all the rules before starting.

When you are just starting out making a scene, it can seem complicated or imposing, so take the time to break it down. 

Think about how you can re-use assets, re-use textures, break it down as simple as possible and plan it out. A lot of people will break it down in their own way when they start out their challenge. Gather some reference images as well for different parts of the scene, maybe gather some refs and make it your own.

Take your time planning and blocking out, it will set you up for success later on.

Here are some specifics.
  • Try to post one critique for every post that you make. This will make for a better learning environment and help us all grow as artists.
  • You must use a game engine to present your work. Unreal Engine and CryEngine are very common engines that can be used but feel free to use any alternatives that you want. (Marmoset Toolbag is allowed as well)
  • You must try your best and finish as much as you can in the time frame provided.
  • Post what you are working on in this thread so that way it's a more centralized place for advice and critique. We don't need to have 1000 disjointed threads littering the forums. 
  • I would strongly encourage you to go and look at other games and see how they make their assets as well as get concept art to give it your own feel, but it must stay very close to the concept, if not super close. 
  • Well, that's about it. If you think that any rules should be changed, or there should be new additions to the rules, please let me know. As always, please feel free to provide feedback / suggestions in this thread or by messaging me directly.

All that matters is that you learn while being able to effectively critique others, as well as accept critiques on your own work. Remember to have fun. Cheers!

Replies

  • alytlebird
    Offline / Send Message
    alytlebird interpolator
    Yay! Happy this is up and running, and glad that the Dive Bar was a fairly popular option in the concept thread! I had a gut feeling that'd be the final concept, so I went ahead and spec'd it out, full asset/material list and time estimates. Ready to go!

    For anyone who might be on the fence and considering participating this time around, I'd strongly urge you to do so. :) It's a great time, really helps to have a community of people all working in the same timeframe who you can bounce ideas off of and get feedback from. Also, my project from Challenge #55 ( https://www.artstation.com/artwork/V5XkR ) has been on my portfolio for over a year, and contributed to me getting an internship at PlayStation this past summer. :) So your work from this challenge can go a long way!
  • AdrianZaplata
    Offline / Send Message
    AdrianZaplata triangle
    Finally! :) I'm happy to join ya in this challenge as this it my 1st one :) I'm going for the Dive Bar aswell. Not really familliar with UE/CryEngine though, so I'm thinking about presenting it with marmoset toolbag, what do you think? Good luck everyone!
  • tynew
    Offline / Send Message
    tynew polycounter lvl 9
    Hey Everyone! I think I'll be participating in this one as well. I think these challenges are a very useful way to improve as an artist, regardless of skill level as you work together and bounce feedback off each other. 
  • alytlebird
    Offline / Send Message
    alytlebird interpolator
    Finally! :) I'm happy to join ya in this challenge as this it my 1st one :) I'm going for the Dive Bar aswell. Not really familliar with UE/CryEngine though, so I'm thinking about presenting it with marmoset toolbag, what do you think? Good luck everyone!
    Marmoset may be pretty tough for a full environment like this, especially with more complex lighting like this scene has. It could handle individual lights, especially the neon, just fine, but putting them all together is gonna be another story. Plus, you've got trash and grunge buildup that is well-suited for a game engine. Honestly, there's no better time to learn Unreal than the present. :)

    Alright, here's a question: what does this section of the concept read as? I've been looking at it for a while now and I'm still not sure. The presence of the motorcycle nearby implies we're near the entrance/door to outside, but the gray box in the back looks like a fireplace, which wouldn't make much sense being close to a door to the outside. Thoughts?


  • Dreyzie
    Offline / Send Message
    Dreyzie polycounter lvl 3
    Finally! :) I'm happy to join ya in this challenge as this it my 1st one :) I'm going for the Dive Bar aswell. Not really familliar with UE/CryEngine though, so I'm thinking about presenting it with marmoset toolbag, what do you think? Good luck everyone!
    Marmoset may be pretty tough for a full environment like this, especially with more complex lighting like this scene has. It could handle individual lights, especially the neon, just fine, but putting them all together is gonna be another story. Plus, you've got trash and grunge buildup that is well-suited for a game engine. Honestly, there's no better time to learn Unreal than the present. :)

    Alright, here's a question: what does this section of the concept read as? I've been looking at it for a while now and I'm still not sure. The presence of the motorcycle nearby implies we're near the entrance/door to outside, but the gray box in the back looks like a fireplace, which wouldn't make much sense being close to a door to the outside. Thoughts?


    To me I think it could be the double doors leading to the kitchen / behind the bar area. At least that's what I'm planning on having it as in my scene. I thought it was a little odd having the bar completely closed off like that without an indication of a door, so I'm taking some artistic liberties here.  
  • BananaManyana
    Offline / Send Message
    BananaManyana polycounter lvl 3
    ququick block out on the hand painted environment :)
  • AdrianZaplata
    Offline / Send Message
    AdrianZaplata triangle
    Here's my first attempt to blockout with all the proportions of the Dive Bar. I'm still not happy with it, so I'll continue. I'm doing it first in Blender to get all the proportions well and then import it to UE and learn it as @alytlebird advised ;) Any criticism is welcome!


  • AdrianZaplata
    Offline / Send Message
    AdrianZaplata triangle
    Dreyzie said:
    Finally! :) I'm happy to join ya in this challenge as this it my 1st one :) I'm going for the Dive Bar aswell. Not really familliar with UE/CryEngine though, so I'm thinking about presenting it with marmoset toolbag, what do you think? Good luck everyone!
    Marmoset may be pretty tough for a full environment like this, especially with more complex lighting like this scene has. It could handle individual lights, especially the neon, just fine, but putting them all together is gonna be another story. Plus, you've got trash and grunge buildup that is well-suited for a game engine. Honestly, there's no better time to learn Unreal than the present. :)

    Alright, here's a question: what does this section of the concept read as? I've been looking at it for a while now and I'm still not sure. The presence of the motorcycle nearby implies we're near the entrance/door to outside, but the gray box in the back looks like a fireplace, which wouldn't make much sense being close to a door to the outside. Thoughts?


    To me I think it could be the double doors leading to the kitchen / behind the bar area. At least that's what I'm planning on having it as in my scene. I thought it was a little odd having the bar completely closed off like that without an indication of a door, so I'm taking some artistic liberties here.  
    Looks like a door to me aswell. Like a sliding doors...
  • alytlebird
    Offline / Send Message
    alytlebird interpolator
    Here's my first attempt to blockout with all the proportions of the Dive Bar. I'm still not happy with it, so I'll continue. I'm doing it first in Blender to get all the proportions well and then import it to UE and learn it as @alytlebird advised ;) Any criticism is welcome!
    Looking good for a first pass! Honestly, the proportions are tough to get right with this concept. I realized that while doing my own blockout. Looking at the size of the human refs in relation to the pool table, and the size of the stool on the right of the composition compared to the couches lining the walls... There's gotta be wiggle room. Just make sure you don't have too much empty space on the floor. The concept does a good job showing a space that feels full, without being cluttered necessarily. The chairs in your blockout feel very spaced out. Also if you aren't already, mess with the camera settings as you're testing out compositions. I had to bring my focal length down to 15 before I got anything remotely close to matching the concept's perspective.

    Still working on my blockout, being really fiddly with the size of the room and spacing of everything. Gonna be taking some liberties here and there, but I'm getting close to a good starting point.
  • McGreed
    Offline / Send Message
    McGreed polycounter lvl 15
    Dreyzie said:
    Finally! :) I'm happy to join ya in this challenge as this it my 1st one :) I'm going for the Dive Bar aswell. Not really familliar with UE/CryEngine though, so I'm thinking about presenting it with marmoset toolbag, what do you think? Good luck everyone!
    Marmoset may be pretty tough for a full environment like this, especially with more complex lighting like this scene has. It could handle individual lights, especially the neon, just fine, but putting them all together is gonna be another story. Plus, you've got trash and grunge buildup that is well-suited for a game engine. Honestly, there's no better time to learn Unreal than the present. :)

    Alright, here's a question: what does this section of the concept read as? I've been looking at it for a while now and I'm still not sure. The presence of the motorcycle nearby implies we're near the entrance/door to outside, but the gray box in the back looks like a fireplace, which wouldn't make much sense being close to a door to the outside. Thoughts?


    To me I think it could be the double doors leading to the kitchen / behind the bar area. At least that's what I'm planning on having it as in my scene. I thought it was a little odd having the bar completely closed off like that without an indication of a door, so I'm taking some artistic liberties here.  
    To me it looks like a fireplace, with all the clutter of souvenirs and memories, including a old classic motorbike. I don't think it's doors or entrance. The greybox is not high enough to be any kind of entrance, at most it goes up to shoulders, so seriously doubt it has anything to do with doors.
    However it's up to you to adjust your scene to how you feel like it should be, creative interpretation.

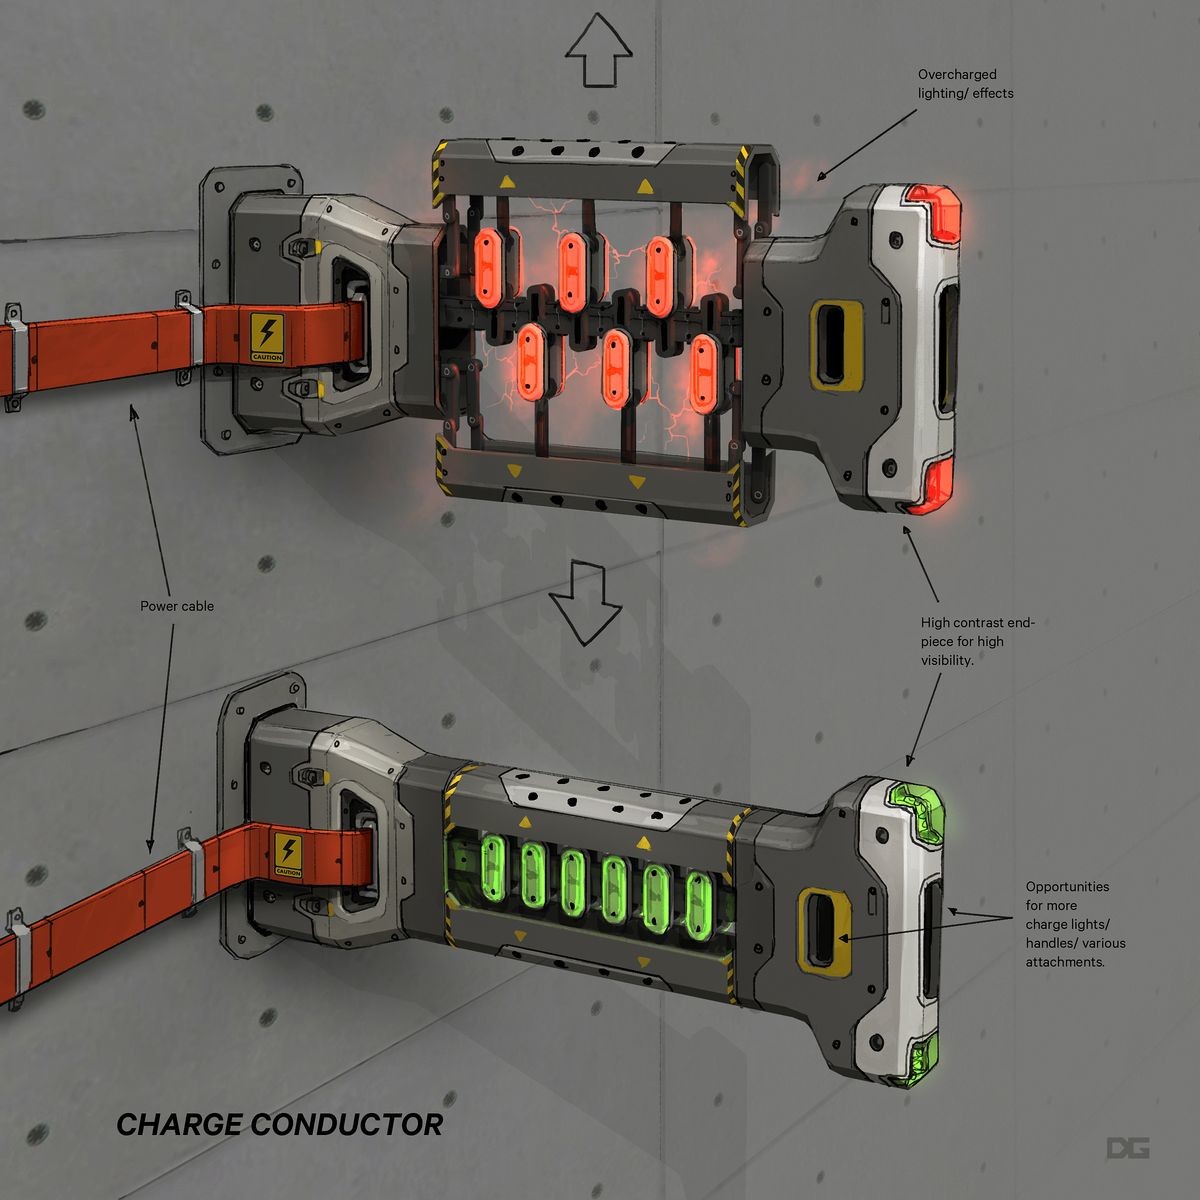
    Regarding the Prop concept of the Charge Conductor, I think I'm going to work on that one, however gotta redo some of the functionality, as currently as it is, there is no way it can function mechanically as it's setup now. Anyone else trying a hand on this one?
  • alytlebird
    Offline / Send Message
    alytlebird interpolator
    I think I finally cracked the code as far as matching the perspective, got a pretty decent match for my blockout in Unreal. The lighting is extremely rough, but I'll keep fiddling with that as time goes on. I tend to shy away from leaning too heavily on baked lighting, but for this project I don't see a way around it.

    There's a great tutorial by @PixelMasher where he goes over using emissive materials in a scene and then baking lighting so they are used as light sources. Leaned on that a bit for this first iteration, with some neat results! Thinking about doing another quick pass at the blockout to get all of the neon signs in place and seeing how that affects lighting.


  • AdrianZaplata
    Offline / Send Message
    AdrianZaplata triangle
    @alytlebird nice one! Are you making those blockout meshes in UE aswell or exporting them from 3d program?
  • alytlebird
    Offline / Send Message
    alytlebird interpolator
    @alytlebird nice one! Are you making those blockout meshes in UE aswell or exporting them from 3d program?
    I do my modeling in Maya then import into Unreal. :) I'm throwing in a bit of Blender now with the event of 2.8, but Maya is still the tool I'm most efficient with.

    Got a blockout update, much happier with the lighting now, except for the harsh shadow on the floor. But the signs in the back help a lot.


  • tynew
    Offline / Send Message
    tynew polycounter lvl 9
    Looking good @AdrianZaplata and @alytlebird! Did you guys use modular segments? I went about using 2x4 segments on the walls, 2x2s for the floor and 4x4s for the roof. Examining the concept, that pool table is enormous. The largest regular size for a table IRL is 3.6 meters long, in the concept, it looks almost double that, considering the scale of the bar/back wall. So it was a little confusing getting the scaling looking right. 
    I think I'm happy with the proportions of this since it's modular. I might give it a go blocking the entire thing in max with perspective match. I just realized that the guy smoking organizing the cue balls has no legs in the concept!

    EDIT: Whoops the lighting was a bit weird last shot. Uploaded a new pic of it, also decided to expand the room horizontally another 2m because it didn't seem like enough room for the motorcycle to relax. 


  • warbossdil
    Offline / Send Message
    warbossdil polycounter lvl 2
    Hi everyone. I´m kinda new to this, but i wanted to try it so here it goes.
    I decided to go with the conductors. So far i got this. still have to see if something's missing, and maybe use this prop to learn trim textures. also i have 0 idea on putting it on unreal ha.

  • McGreed
    Offline / Send Message
    McGreed polycounter lvl 15
    @warbossdil I'm currently also trying to figure out this prop, and I decided to rework some of the functionality, as it doesn't really work well from the concept, and I want to animate its on/off state in engine. Have no idea how to do that either, so good luck, will share if I figure out that part. :)
    Regarding your model, I know you have the same 'problem' as I, a lot of extra lines from after you split it up into separate parts, might want to clean it up. Don't know if you are keeping it like that (artistic freedom), but the top and bottom corners of the front part looks to be rounded on the concept, as well the front part is following the shape, and is not inset into it. The parts inside doesn't seem to be in the middle of the shell, needs to be a bit higher, as the rest is very symmetrical. But against, you don't mention what parts you being a bit free with.
    Overall your model feels a bit too tall, but might just be the angle of images, the concept is a bit more long, the middle parts should be a bit longer I think.
  • warbossdil
    Offline / Send Message
    warbossdil polycounter lvl 2
    @McGreed yeah i am struggling too with this piece. to be honest i started making the prop, and i'm trying to make it as close as possible, but i may be making so mistakes ha. I plan to clean it, but maybe i'll place some tris in some parts, and erase otrhers (i want to try making a high poly to bake, but retain some parts extruded).

    for the "on/off" part, i imagined something more like, there will be a handle that you can pull and rotate, and that will trigger the mechanism to reduce the overheat or something like that.

    the top and bottom i separated it 'cause there seems to be some cable inside and i wanted to model it, so the separated piece would be like a crystal, but idk if it looks correct.
    I am also struggling a lot with the middle part because the energy cells don't reach the top part as in the concept, but with the feedback you said, i think i understand a little bit what's my problem. I'll try to fix it, and post later the changes.

    Also good luck with the prop! i want to see your interpretation!
  • McGreed
    Offline / Send Message
    McGreed polycounter lvl 15
    Yeah, I know what you mean about the energy cells, still playing with ideas for it. I do have kinda the same idea as you about pulling the end, I want it so you pull the end, and it expand the top and bottom, the problem is the mechanism to 'push' them up and down, is a bit tricky.
    My process is a bit slow, because of work and time, but will post when I can. :)
  • tynew
    Offline / Send Message
    tynew polycounter lvl 9
    Blocking in some materials at the moment. I decided to put the toilets on the wall to the right of the camera. If I get time I might model those out as well since I've never done a bathroom before. I think filling out the bar and the minor decals/props will be the most time-consuming part of this challenge. 

  • alytlebird
    Offline / Send Message
    alytlebird interpolator
    tynew said:
    Looking good @AdrianZaplata and @alytlebird! Did you guys use modular segments?
    For my blockout I wasn't yet using modular stuff, but for the actual piece I will be. :) Your blockout is looking solid! The main thing I'm noticing is that there's a lot of empty space over on the right side and the composition is feeling lopsided because of that. Might want to move stuff around a bit, maybe rein in the wall behind the camera, or come up with a new way to fill that space.

    Progress update for me:

    Got the floor and ceiling mostly sorted out. I'm happy with the carpet material, got a nice vertex-paint setup in Unreal that I'm using so I can blend between normal and worn-out carpet, plus a tiling grunge on top of that.

    Did the beams and worn wood material as well, and I'm decently happy with it, but I think it still needs work. Thinking I may add knots, depending on how tough that winds up being in Substance Designer. Any suggestions there are appreciated!

  • McGreed
    Offline / Send Message
    McGreed polycounter lvl 15
    So got a bit work done on my charger model, worked on how to get the rigging done, as I haven't really done much rigging at all. Ended up with some sliders pushing the top/bottoms open, with some pistons connecting each charging elements. The front part will be what pulls the part open, gonna made use of the holes in the side on the concept as grips to pull at. This shows the closed, half-open and open state.

  • danielrobnik
    Offline / Send Message
    danielrobnik polycounter lvl 8
    Ooh, looking nice everyone!

    Been looking forward to joining one of these for a while, and now I have a bit of spare time to play with I thought I'd jump on in. I'm also trying the hard surface props, and have managed to make a bit of progress tonight. Tomorrow I'll add in all the little inner working of the expansion mechanism.

  • BananaManyana
    Offline / Send Message
    BananaManyana polycounter lvl 3
    Yeah Yeah not handpainted but I'm on limited time this month :) Quick tileable stylized substance designer slab generator I'll use for some parts of the environment.
  • tynew
    Offline / Send Message
    tynew polycounter lvl 9
    @alytlebird
    Good point on the empty area thanks! I did decide to move the back wall in closer to the scene and it helped a fair bit. I think your area is coming along quite well, can't really crit anything yet.

    Got the billiard table and couch done so far, just blocking the macro details. Materials aren't final, I don't want to spend too much time nitpicking this stuff right now, which is something I usually do. I noticed in the concept there is a long wooden shelf/plank directly above the couches. I seem to be picking something new up in the concept as I go along which means I need to improve my observation skills  =)

    My plan is to get to the 80% point before I start really finalizing anything, the Pareto principle is a must-read for anyone that procrastinates with their perfectionism. There are times when I stare so long at my artwork I can't figure out what's wrong with it unless I have fresh eyes. Plus the 80/20 rule is more enjoyable to work through!

  • BananaManyana
    Offline / Send Message
    BananaManyana polycounter lvl 3

    And some more bricks
  • McGreed
    Offline / Send Message
    McGreed polycounter lvl 15
    @tynew
    Yeah, best to get all the elements in scene in relative state and size, because it's not until you get it together you notice that, "oh the size is not working" or "This doesn't fit in as in the concept". But especially the scale is important, it's a pain in the arse to having to fix afterwards if you already make textures and unwrapped it all. If you want it to match the concept more, remember to set up a camera with the same FOV, also helps with scale.
  • jeffry
    Offline / Send Message
    jeffry polycounter lvl 3
    oh alright i see alot of ppl on the bar haha, i will go for the hand painted props
  • Illysian
    Offline / Send Message
    Illysian polycounter lvl 9
    Hey!  So I'm dabbling with the idea of joining the challenge but I wanted to try to push on my shader and material design.  Could the ceilings in the Pool concept be just 1 material and shader?  Looking for other opinions, usually I like to focus on modularity and modeling but trying to flex my material side.

    Here's a mockup of the primary shapes using Substance Designer

  • teodar23
    Offline / Send Message
    teodar23 sublime tool
    Great job so far, guys!
    Here's my attempt at the hard surface challenge:
  • alytlebird
    Offline / Send Message
    alytlebird interpolator
    tynew said:
    Got the billiard table and couch done so far, just blocking the macro details. Materials aren't final, I don't want to spend too much time nitpicking this stuff right now, which is something I usually do. I noticed in the concept there is a long wooden shelf/plank directly above the couches. I seem to be picking something new up in the concept as I go along which means I need to improve my observation skills  =)

    My plan is to get to the 80% point before I start really finalizing anything, the Pareto principle is a must-read for anyone that procrastinates with their perfectionism. There are times when I stare so long at my artwork I can't figure out what's wrong with it unless I have fresh eyes. Plus the 80/20 rule is more enjoyable to work through!
    I feel that about the nitpicking, and you're talking my language with the Pareto stuff! Feeling like I've already gone a bit too far with  some of my elements already, like tweaking the wood materials too much, but at least I'm getting into the swing of things.
    jeffry said:
    oh alright i see alot of ppl on the bar haha, i will go for the hand painted props
    You work on whatever your heart desires, don't feel intimidated by a popular concept. :)
    Illysian said:
    Hey!  So I'm dabbling with the idea of joining the challenge but I wanted to try to push on my shader and material design.  Could the ceilings in the Pool concept be just 1 material and shader?  Looking for other opinions, usually I like to focus on modularity and modeling but trying to flex my material side.
    I think it definitely could be run on one shader, just might be tricky getting all the wood grain to line up correctly without stretching along the areas where there's more displacement. Best of luck to you tho if you decided to give it a try!

    -----
    Update for me: got most of my wall kit done, along with the wood siding material. I did also wind up adding knots to the overhead beams, as well as vertex painting to paint in some chipped surfaces along said beams. Gonna get the exterior of the bar section done next, closing in on finishing up most of the structure pieces.


  • Zimzelen
    Offline / Send Message
    Zimzelen polycounter lvl 4
    A whole lot of progress going on in this challenge!

    I'm joining in by ALSO doing the handpainted cistern. I'm planning on making just the one concept, to make it as polished as possible and to have extra time since I've only ever done a handful of sculpting and painting, so I'm quite open to any advice here.


    Yeah Yeah not handpainted but I'm on limited time this month :) Quick tileable stylized substance designer slab generator I'll use for some parts of the environment.
    The slabs look real nice especially with the moss, have you applied it in the scene yet?  I figured I'd try to sculpt the individual blocks and then just copy and modify them enough so they don't look the same. 
  • GuillaumeLD
    Offline / Send Message
    GuillaumeLD polycounter lvl 3
    Hello, I decide this weekend to begin the challenge for the environment. Right now, I am satisfy about the result of the blocking.
    I Begin to 3D modelling the pool table.

  • tynew
    Offline / Send Message
    tynew polycounter lvl 9
    To the guys doing the dive bar, I found the actual stool in the concept online. Super helpful with a side profile shot as well. 


    Also, what's the best way to set up a material for the billiard light glass? Setting it to translucent is okay, but the moment you double side it either through the material or geometry it doesn't work with backface clipping. 
  • teodar23
    Offline / Send Message
    teodar23 sublime tool
    Love the progress guys!
    But i don't know whats the process here. Do I need to sign up somewhere in order to participate in this challenge?
    Anyways, here's my progress:

  • kadeschui
    Offline / Send Message
    kadeschui greentooth
    @teodar23 Glad you are joining us for the Challenge! No sign up necessary :) just post your progress (as you're already doing!) and offer constructive criticism to the other participants....that's it! 

    cheers!

    kade
  • Zant_1
    Hey all! First time participant here, and i'm actually in love with this concept!  So far i've made my basic blockout, and I honestly struggled quite a bit with the perspective and pool tables for giants, so any feedback is appreciated!   I'm also making this in Unreal for the first time (i've mostly used Unity in the past), so this is definitely going to be a learning experience!   It looks like everybody is making some great progress so far :D
  • BlakeBiehle
    Offline / Send Message
    BlakeBiehle polycounter lvl 2
    Hey everyone! Really awesome work I'm seeing here. I'm new to posting and thought I'd jump in on this as well. I'm working on the hand painted portion, (Although I am not handpainting it as much as just modeling it haha) Please let me know what you guys think! 
  • kadeschui
    Offline / Send Message
    kadeschui greentooth
    Hi All! I have updated the name of the Challenge to align with the The Bi-Monthly Character Art Challenge.

    Hopefully this will help new-comers and alleviate some confusion about the regularity of the Challenge :)

    kade
  • alytlebird
    Offline / Send Message
    alytlebird interpolator
    Got another update! This time, I've finished up the structure assets in the scene. Doors, curtains, fireplace, etc.


    Excited to be moving on to the hero assets next! I would also love any feedback or critique from what I've shown so far, if there's something that looks funky or sticks out, definitely lemme know! :)
  • rtos
    Offline / Send Message
    rtos polycounter lvl 2

    First WIP. I've never really done hard surface models before, I'm kind of confused about the workflow and common practices, specifically beveling and smooth shading. Should I set all my model to smooth shading and model with with subsurf modifier ? If so do you make your high poly with subsurf and then painfully go back and delete all unnecessary geometry before baking a normal map? And if so, how do you get a good bake on edges that aren't beveled in the low poly but beveled in the high poly? I'm probably overthinking this, or maybe not, just want to make sure I don't end up with tons of work down the line when I'm ready to bake and texture. Thank you for your help! I'm working in Blender.
  • teodar23
    Offline / Send Message
    teodar23 sublime tool
    !!! @warbossdil , @McGreed , @dan-r how are you guys coming along?
    I like that everybody has his/her own way of doing things.
    I managed to animate the thing, but i'm not sure about the proportions and some of the details. Only basic shapes for now as i will be doing most 'cuts' with textures.

  • tynew
    Offline / Send Message
    tynew polycounter lvl 9
    @rtos
    Yes you use the subsurf modifier in blender to preview your high poly. 

    The method you describe of removing geo from the high poly is called manual retopology. You don't do that in most cases.  

    The most efficient and least time wasting method is first model what we call a blockout or mid poly base mesh. You don't model this with subsurf modifier on. The blockout mesh basically has all the majority of details and forms established including and large curves (don't rely on subsurf to curve geometry because then you have to manual cleanup for low).

    From there you save that and hide it, and you can make your high poly and low poly mesh from the blockout much faster. All that's required on the high poly is support edge loops and the subsurf modifier, any micro details like screws and bolts etc. The low poly is just a simple cleanup of the blockout  geometry. 

    Oh and if you have large bevels, then establish that in the blockout. 

    A good tip is that you can keep these all in the same scene file. Just duplicate finished blockout to each high and low layers. i would just hide them in layers:
    Raw - blockout 
    High - high poly 
    Low - low poly and then UV map this. 
    Out - low poly mesh merged into parts required for ingame/ plus any like vertex colouring or sorting. 

    I'd Google hard surface modelling basics. Should find plenty of material. 

  • danielrobnik
    Offline / Send Message
    danielrobnik polycounter lvl 8
    Nice animation @teodar23, this is where I'm up to now.


    I'm going to be doing a similar thing and add the rest of the details with decals, so the next step is to make and bake down the details.
  • tynew
    Offline / Send Message
    tynew polycounter lvl 9
    @alytlebird
    Keep up the pace, you're doing really well! There really is quite a bit of work on this environment to do, keen to see you get some props in!

    Today I had the dumb thought to put the roof, the alternative wood plank wall texture, and plaster texture all into one trim. That turned out to be more of a headache than expected with sorting out the UVs. Probably wasted a good 4-5 hours figuring things out. Although I suppose at least than a majority of the scene can be batched into a single draw call. 

    So here is where I am right now:


    Roughed out the bar, still got a lot to do. I'm not sure it's even worth making the beer tap a unique prop with bake down since the Player wouldn't even see this in a proper game scenario. 


    The Chair was pretty relaxing to model, not a single hard geo edit, just did the entire thing with splines and modifiers. 

    Got the doors done to an alpha level for now. Will be putting decals I guess when I atlas an entire sheet of them. 


    It's starting to feel like a game space now. I still need to define my materials. I'm working on the Jukebox next,  the rest of the bar props, more detailed chesterfield couches. Just tons to do still! It's a bit of a grind, but writing down a list of tasks helps immensely and prevents doodling/procrastinating. 

  • BananaManyana
    Offline / Send Message
    BananaManyana polycounter lvl 3
    The slabs look real nice especially with the moss, have you applied it in the scene yet?  I figured I'd try to sculpt the individual blocks and then just copy and modify them enough so they don't look the same. 
    Not yet, I have already scultped a few slabs/bricks in Zbrush with deeper cracks etc, These Substance materials are more for the parts that will be obscured by vegetation :D
  • McGreed
    Offline / Send Message
    McGreed polycounter lvl 15
    @teodar23
    Yeah, it's a good thing we are not doing the model the same way, makes it more interesting. You might want to either slow down the animation or add more frames, it's a bit too fast to see properly what happens. I did the reverse mistake and made WAAAAY to high quality and many frames, doubt anyone is interested in a 400mb gif.  :p

    @danr looking good, I see your inner section is more compact/bulky then the way I have done, I assume you are still working on it? Or are you only working on the closed version of the model? Since I don't see the parts being able to move up and down.

    @rtos Looking good, glad someone trying the other model as well, I kinda forgot about it. Not much to say that @tynew hasn't already mentioned. I'm bad at my own advise, and have to fight my highpoly all the time because I didn't block out properly first. Learn from my mistake :)

    Haven't had time to do much on it so far, did a bit today and need to work on scale as well, feel like my model is a bit too thick, which is easy seen with the front when I started to add the corners. So need to redo some of that as well, I'm have done some of the insets into the model, but gonna use texture for others, mainly used the cuts to divide the model so I could easier work with loops for each part, because of holes ect. Still on the highpoly version, can't wait to be done with it and get some lowpoly and start texturing.

    Need to do some cleaning in the house and shopping today, but might have enough time to work a bit on it and post something again.

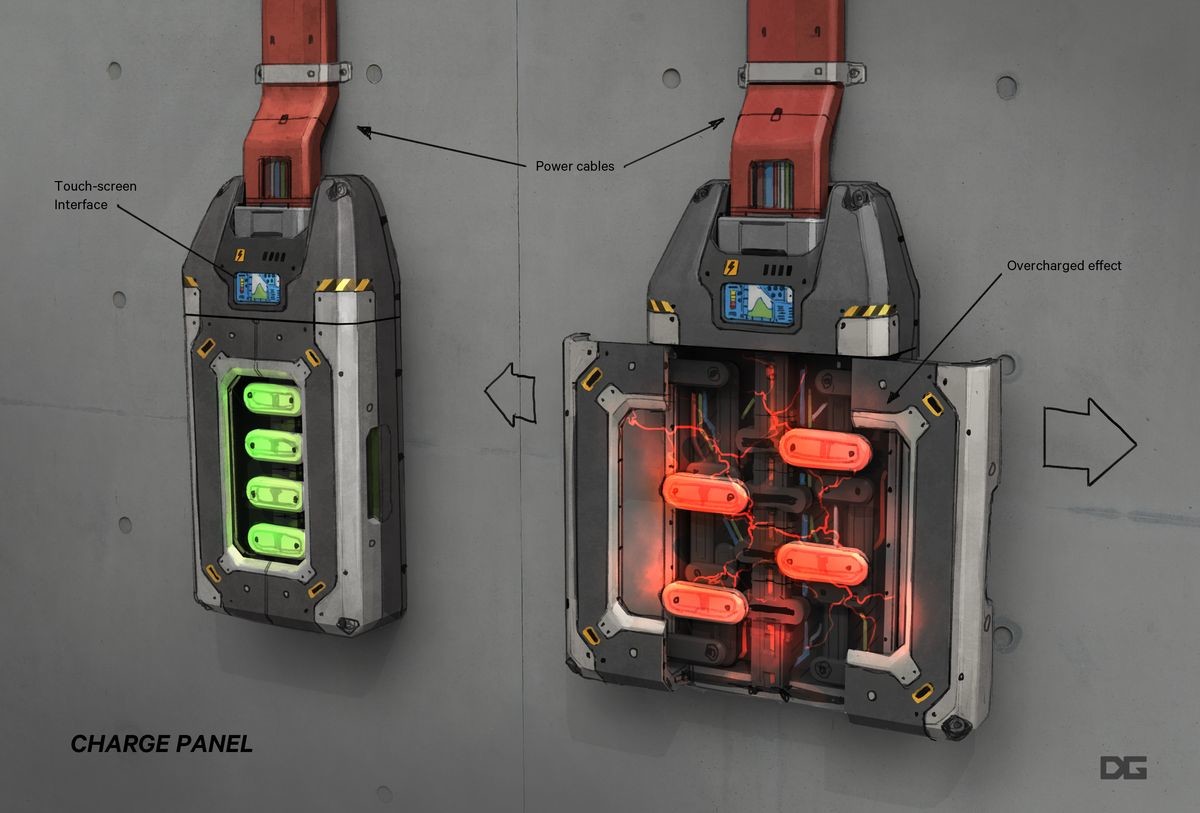
    Also looked up where the concept came from, and discovered that there was another version of it as well, the box version, which could have been fun to play with as well:

  • GuillaumeLD
    Offline / Send Message
    GuillaumeLD polycounter lvl 3
    Here a small update about my scene. I am happy about the result so far.
  • McGreed
    Offline / Send Message
    McGreed polycounter lvl 15
    Got a bit done this weekend, after the party effects had faded away. Having some trouble coming up with something good for the heating elements inside, looks kinda dumb so far. Apart from that, been working on cutting some more parts of the model, and adjusting it after scaling it a bit.


  • alytlebird
    Offline / Send Message
    alytlebird interpolator
    More progress. Finished the pool table today, wound up being quite the time-consumer, but I'm happy with it. Did the stool a while back as well, just haven't posted it yet.


  • warbossdil
    Offline / Send Message
    warbossdil polycounter lvl 2
    sooo... hi again XD here's my progress (though i think i went an go all the way haha)
    I also like how everyone made their own charger. very interesting ideas. 

    @teodar23
    the way it opens, and the internal pieces  ;)  i love it. just make the animation a lil bit slower, and maybe with more punch?
    @McGreed
    i liked a lot your separated pieces, and the pieces that move the upper and lower cases! 

    @dan-r
    nice beginning, i feel like it looks a little bulky, but i like it XD and maybe like i was, a little too short, maybe make it larger.

    @rtos
    i see you made the other charger. man i cannot wait to see how you make it. it already looks smooth.
    I also still don't know like, where's the middle spot, for example, with this model, i extruded on all the pieces that i wanted to have more volume like they have real volume, instead of baked volume, and the screws and small stuff i placed some floating geo (so then i don't have to burn my brain trying to fit geo  on weird places, though idk if it's a correct way) on a "high poly" (made a duplicate and then added bevels and such on the places i though it needed to be rounded, and then used it as a High Poly) and use it to bake the high poly onto the low poly.

    I did the textures in painter and the animation in maya. then all go to marmoset. I still don't have any idea on how to make it go red to green color. And i also wanted to add like some lighting like in the concept, and some gas going out, but it's something that i also don't know how to make.
    Also watching videos of unreal but still very early, so i don't even know which tutos to watch on the learn unreal page haha.

    But overall i like there this is going. BTW this is now a bi-monthly challenge? ._. 

    https://i.imgur.com/acTJtyZ.mp4  (animated :) )


1
Sign In or Register to comment.