The custom node tutorial - Basics

grand marshal polycounter
Hi, in this one, I'm going to show you some basic usage of the "custom" expression in the material editor in Unreal Engine. For "additional" information, check out the following link:
https://docs.unrealengine.com/latest/INT/Engine/Rendering/Materials/ExpressionReference/Custom/
Make sure, you noticed the limitations of it!
I won't teach you how to code HLSL, but basically this node offers to use the language and/with some engine specific functions, features. Specificness appears in specific expressions inside the code.
In this tutorial, I assume you know some very basics programming, variables, different types of them, etc...
Lets take a basic example of piece of code, that will just samples us a texture, based on given coordinates, and some stuff with the coordinates inside the code...
In this example, all of these variables takes place outside of the code, so you have some scalars, vectors, texture...
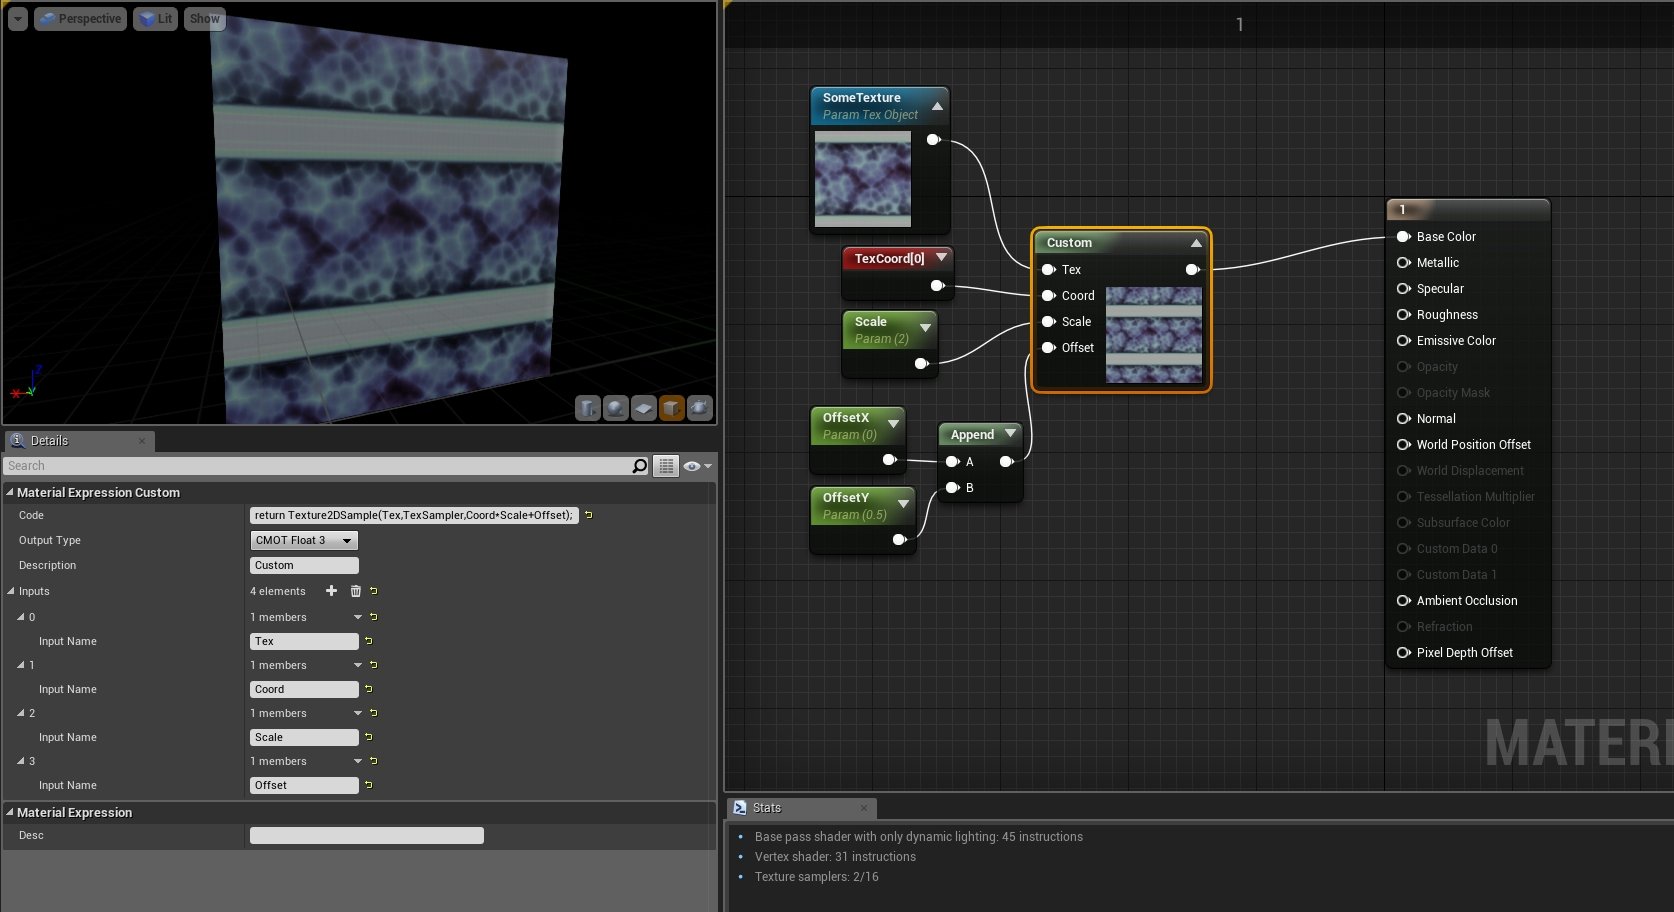
To add an input to the custom node, click the "+" icon on the details panel, when the custom node is selected. You can input any kind of variables, the amount of components of them, or lets call them channels, will be determined automatically, or you can get a channel of them with the equivalent of "component mask".
So we want to sample a texture with some UV settings, with some tiling and offset.
We want to return something that contains 3 channels, so R,G,B, or X,Y,Z or however you like it. To set the amount of output components, you need to set the "output type" on the details of the custom node. Set it to float 3 to get back RGB...
So we just want a texture sampler , with coordinates. To make a texture sampler, write:
Texture2DSample
After this, put brackets, and here you tell the "name" of the texture, so the name you used as an input. Then the name of it and "Sampler".
So the code would look like this:
Texture2DSample(Tex,TexSampler...
After this you need to put the coordinates, and then the one liner is complete, and you made the texture sampler, that might not be the most efficient way of sampling a texture with some coordinates, but that was not the point of this tutorial, anyways...This is how the full code would look like... Remember, there is an order between different kind of mathematical operations, so you may need some brackets based on what you do.
return Texture2DSampler(Tex,TexSampler,Coord*Scale+Offset);
"return" goes to the beginning of the last line of the code, and it makes your output.
You could probably do a lot of things as "one liners" and at this point the custom node might not seem so interesting, but it allows you to do loops, or huge messy webs to be evaluated nicely, easily.
Here are some examples of how would you apply some of your every day's nodes inside the custom node:
Panner with settings:
Inputs:
Coord - Can be texture coordinates
Speed - Scalar/Vector2
Tiling - Scalar
Code:
return Coord*Scale+(View.GameTime*Speed);
It returns you the panner node with speed and scale settings.
"View.GameTime" is the equivalent of the "time" node, it returns the continuous elapsed time of the game. To get this in 0-1 sequences, use "frac"...
frac(A);
or frac(some math);
To do a lerp , do this
lerp(A, B, Alpha);
Power:
pow(A, exp);
Dot:
dot (A,B);
......
Distance:
Inputs:
Point - Vector parameter - float 3
Coord - Bounding box based UVW - float 3
Code:
return distance(Coord,Point);
Returns the distance of a point compared to the box boundaries of the object...
Now lets recreate the exponential density function:
It says one divided by Input*Density on power of 2.718...
So its:
Inputs:
Input - float
X - float - Density
return 1/pow(2.718,Input*X);
Also check out:
https://msdn.microsoft.com/en-us/library/windows/desktop/ff471376(v=vs.85).aspx
This is the end of the first chapter, I hope you learned something. In the next one, I'm planning to show some basics of loops, and what they can be used for, and how.
Thanks for checking in.
https://docs.unrealengine.com/latest/INT/Engine/Rendering/Materials/ExpressionReference/Custom/
Make sure, you noticed the limitations of it!
I won't teach you how to code HLSL, but basically this node offers to use the language and/with some engine specific functions, features. Specificness appears in specific expressions inside the code.
In this tutorial, I assume you know some very basics programming, variables, different types of them, etc...
Lets take a basic example of piece of code, that will just samples us a texture, based on given coordinates, and some stuff with the coordinates inside the code...
In this example, all of these variables takes place outside of the code, so you have some scalars, vectors, texture...
To add an input to the custom node, click the "+" icon on the details panel, when the custom node is selected. You can input any kind of variables, the amount of components of them, or lets call them channels, will be determined automatically, or you can get a channel of them with the equivalent of "component mask".
So we want to sample a texture with some UV settings, with some tiling and offset.
We want to return something that contains 3 channels, so R,G,B, or X,Y,Z or however you like it. To set the amount of output components, you need to set the "output type" on the details of the custom node. Set it to float 3 to get back RGB...
So we just want a texture sampler , with coordinates. To make a texture sampler, write:
Texture2DSample
After this, put brackets, and here you tell the "name" of the texture, so the name you used as an input. Then the name of it and "Sampler".
So the code would look like this:
Texture2DSample(Tex,TexSampler...
After this you need to put the coordinates, and then the one liner is complete, and you made the texture sampler, that might not be the most efficient way of sampling a texture with some coordinates, but that was not the point of this tutorial, anyways...This is how the full code would look like... Remember, there is an order between different kind of mathematical operations, so you may need some brackets based on what you do.
return Texture2DSampler(Tex,TexSampler,Coord*Scale+Offset);
"return" goes to the beginning of the last line of the code, and it makes your output.
You could probably do a lot of things as "one liners" and at this point the custom node might not seem so interesting, but it allows you to do loops, or huge messy webs to be evaluated nicely, easily.
Here are some examples of how would you apply some of your every day's nodes inside the custom node:
Panner with settings:
Inputs:
Coord - Can be texture coordinates
Speed - Scalar/Vector2
Tiling - Scalar
Code:
return Coord*Scale+(View.GameTime*Speed);
It returns you the panner node with speed and scale settings.
"View.GameTime" is the equivalent of the "time" node, it returns the continuous elapsed time of the game. To get this in 0-1 sequences, use "frac"...
frac(A);
or frac(some math);
To do a lerp , do this
lerp(A, B, Alpha);
Power:
pow(A, exp);
Dot:
dot (A,B);
......
Distance:
Inputs:
Point - Vector parameter - float 3
Coord - Bounding box based UVW - float 3
Code:
return distance(Coord,Point);
Returns the distance of a point compared to the box boundaries of the object...
Now lets recreate the exponential density function:
It says one divided by Input*Density on power of 2.718...
So its:
Inputs:
Input - float
X - float - Density
return 1/pow(2.718,Input*X);
Also check out:
https://msdn.microsoft.com/en-us/library/windows/desktop/ff471376(v=vs.85).aspx
This is the end of the first chapter, I hope you learned something. In the next one, I'm planning to show some basics of loops, and what they can be used for, and how.
Thanks for checking in.
Replies
One minor typo in final code - it is Texture2DSample not Texture2DSampler 😀