Reallusion Character Design - LookingGlassGraphics

vertex
For My Reallusion Character Design Contest entry, I've decided to create a Samurai.

DAY 1:
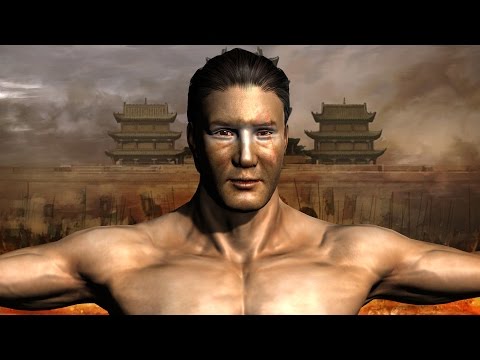
My 1st day of designing consisted of looking for a base facial image to use with the Crazy Talk 8 Pipeline program.
After searching online I decided to use an image of the Japanese actor Takeshi Kitano.
Before bringing the Facial Image into Crazy Talk, I cropped out the image and edited within Photoshop CS6 ME, cutting and cropping half of the face then flipping the image over for and even amount of light on his face. I then created scar details and war paint details over the face.
After a bit more editing I then got ready to bring the image into Crazy Talk to create a 3D head.


Once the 3D head was finished I then exported the Head and textures to the Asian Male base found within the Essential Morphs add-on for Iclone's Character Creator. After the 3D head exported onto the male base I then went on to adjust the skin tone, muscles, facial hairs, eyes, eyebrows, and a few other parameters within the Character Creator Program. The result is as follows;

The time lapse video of the process can be found at
 https://www.youtube.com/watch?v=Lr569BJncrg
DAY 1:
My 1st day of designing consisted of looking for a base facial image to use with the Crazy Talk 8 Pipeline program.
After searching online I decided to use an image of the Japanese actor Takeshi Kitano.
Before bringing the Facial Image into Crazy Talk, I cropped out the image and edited within Photoshop CS6 ME, cutting and cropping half of the face then flipping the image over for and even amount of light on his face. I then created scar details and war paint details over the face.
After a bit more editing I then got ready to bring the image into Crazy Talk to create a 3D head.
Once the 3D head was finished I then exported the Head and textures to the Asian Male base found within the Essential Morphs add-on for Iclone's Character Creator. After the 3D head exported onto the male base I then went on to adjust the skin tone, muscles, facial hairs, eyes, eyebrows, and a few other parameters within the Character Creator Program. The result is as follows;
The time lapse video of the process can be found at
https://www.youtube.com/watch?v=Lr569BJncrg
Replies
The second day of designing I spent some time with head gear for the Samurai. I used the Slick Hair Bun from the CC Template and then started work on the helmet.
The next step was to start creating the Mask and other details for the helmet making sure that it would fit the character’s head. I spent most of the day just creating the Mask and it’s details.
After I was satisfied with the overall look and shape of the mask I continued with the helmet and its details
I used Photoshop to create the helmet padding and added texture found on items via the internet. For example, leather stitching on an item, red leather texture, and an emblem found on an actual Samurai helmet. I cropped out these items to use over a shape I created in PS and came up with this image for the padding.
After the padding was finished I went in Autodesk Maya and create the armor for the rest of the helmet
After the textures and details were added to the helmet I was pleased with the final version
Time lapse video of the process can be found at
When creating the clothing and armor for the Samurai I started by going back into the Character Creator and selecting a plain base mesh for the upper and lower body. I then edited the texture to look as if the shirt and pants were armor chain-mail.
After setting the diffuse, bump, and specular attributes for the chain-mail I then went on to place the Samurai's neck-guard and add a texture I thought would work well with the overall look of the Samurai.
I then went on to create the arm bands that would hold the arm and shoulder armor. I use a torus shaped mesh to create the base and then gave it a red leather texture. The bands were then duplicated, re-positioned and re-scaled where needed.
After the arm bands were set in place, I went back into the character creator and placed a tank top over the chainmail mesh. This Tank-top, when textured, would act as a second layer of armor for the torso. I placed a roof shingle type texture over it, added a bump map, and gave it a leather styled look.
The next step in the process was bringing in a mesh from the Daz Studio program. I used the belt from the Shades of Atlantis suit and stripped it down so that only the front and back cloth, belt, and armor at the front of the mesh would be visible. I then used the decimator tool to remove unwanted polygons. I exported it into Iclone via 3DXchange, re-scaled, textured, and positioned it where needed.
This belt was then brought into Autodesk Maya and stripped down to three of the armored pads which I then used as the shoulder pads.
The breastplate was the final touch to the armor at the upper torso. I used the same technique importing a mesh from Daz Studio to use on the Samurai. I used the Marauders breast plate, then minimized the polygons using the decimator tool, and exported it for use in Iclone. Once I re-positioned the mesh I created a design in Adobe PS CS6 to use on the breastplate.
The images were of a Japanese style dragon and Bishamon , the Japanese God of War.
I then added the shoulder pad mesh as a part of the lower abdomen armor to compliment the breast plate. The final step was adjusting the texture and bump maps for the breastplate and lower torso armor.
Time lapse video of the process can be found at
The last ref image you posted (the black one) could look really nice with all the stitching.. its a pretty cool pattern
I spent the day reworking the armor to make it look more like Japanese Traditional Samurai armor. After removing the current breastplate , pads, and the arm bands, along with the skirt. I was at around 50k polygons. The polygon count went back up to about 62k when placing some of the new assets but it's still under the 68k it was currently at. I removed 8 of the assets as shown in my Day 4 progress above and was able to add 10 back with higher detail.
I will be adding the stitching to the should and leg armor and the lower portion of the torso armor. The stitching will be in black. I will set up physics on the pants towards the bottom area where the pants are most baggiest and meet the shin guards. The most current look of the Samurai model is as follows;
Day6:
Here's a video for the environment that will be used in the animation.
After reworking some of the textures, and adjusting the arm guards, I wanted to see how the assets on the Samurai would look with a walk cycle. There's still a few more meshes I have to create for the armor as well as some soft cloth assets that will be apart of the clothing as well. Here's a look at what I have so far.
great job
After modifying the armor from it's initial design I was able to break down the polygon count from 86k to 60k by removing the 1st breastplate, arm bands, and the armored belt. I then created even more assets to place on the Samurai which did bring the polygon count back up to 80k, but with plenty more parts for the armor and more detail. Overall the additional armor is as follows (Thighs; 3 plates of armor and 2 leather bands each, Legs; 1 shin guard, 1 knee pad, and 1 roped padding each, Hands; 1 plated armor ea, Forearms; 1 roped padding and 1 armored plate each, Shoulders; 1 plated armor each, Upper Torso; front and back armored plates and the Waist; 1 belt with four armored skirts and a front and back plate) The initial armor was nothing more than 1 breastplate that wrapped around the chest and back, the shoulder pads, and the armored belt. These 3 assets including the clothes and the Samurai character were 86k polygons. Now I have 33 assets for the armor, with clothing, and the Samurai at 81k. I multiplied the armor eleven-fold and still had less polygons than the initial design. The following is a time-lapse video of the process.