[MAYA] My ShaderFx Uber Shader

Been working on an Uber viewport shader for my daily work for some time, both for viewport production when speed is needed or previs.
I am by no way a programmer or anything of the kind, just an artist trying to be more efficient.
This shader is by no means optimized and probably there are A LOT of ways to do it better than I did.
But I decided to post it here because maybe someone else will benefit from it and because during all the time I worked in the area I used and continue to use lots of free resources, so, whenever I can, I try to contribute too.
I tried to make it so you can control almost any part of the shader and do as many different kind of materials as possible. This post will also function as a documentation as there are a lot of options.
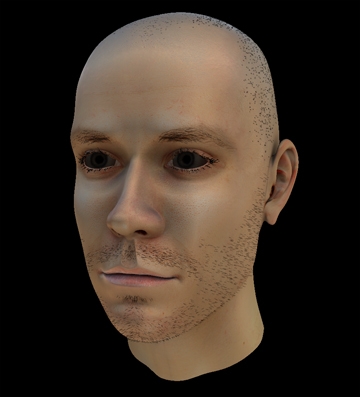
I will begin by showing an example of what can be done.
This is setup as a skin material. Left one is my shader, the right one is the dx11ubershader that comes with maya:
(This is a WIP model of mine, so, not of the highest quality, but gives the idea, both uses the same maps.)

It uses ShaderFx's Traditional Game Surface as a base but with things added and modified. And lots of things outside of it to achieve different effect.
So I will begin with the first part of the shader, its settings.
Settings is the first drop-down menu of the shader, its options modifies the shader as a whole, add or remove effects and change its techniques:
Note that modifying these will force the shader to recompile and will take a few seconds.

++++ Lets start with NUMBER_OF_LIGHTS:
It lets you set how many lights you want your shader to use.
3 is a good number.
You can set this to any value. But remember, maya's viewport does not use deferred lighting but rasterizer, so cranking this up will make your shader add A LOT of calculations and consume lots of resources, setting this up with a value larger then 30 will probably crash your software.
++++ This part is pretty much explanatory.
SSAO: Will enable screen space ambient occlusion effect on objects the shader is applied to. It must also be enabled on Viewport 2.0. It is usefull to disable it on transparent objects to avoid AO being applied on the transparent parts.
WIREFRAME: Will draw wireframe on objects the shader is applied to.
DEPTHWRITE AND DEPTHTEST: I have a pretty good idea of what it does, but not completely, I will leave this open to update when I fully understand it. Leave both checked. Maybe Kodde and Shaderfx can help me here.
GAMMA: Will use 2.2 Gamma.
Flipbackfaces: Enable it when you have problems with negative scaled objects that draw dark.
++++ These are the techniques the shader uses.
DIFFUSE: You have three options. LAMBERT, BLENDED NORMALS and OrenNayar .
Use BLENDED NORMALS for things like, skin, wax, or thin materials that scatters light.
Use OrenNayar (default) for most materials.
SPECULAR: You have five options. BLINN, PHONG, ANISOTROPIC, SKIN and GGX.
Use BLINN for most materials.
ANISOTROPIC for brushed metals.
SKIN for skin, wax, or thin materials that scatters light it will "boost" the highlights at very steep angles.
GGX (DEFAULT) is a microfacet model which produces accurate light reflection. Ggx is based on distribution model from Trowbridge and Reitz.
++++ This part is pretty much explanatory.
These are maps that add or modifies how the shader works, so they end up here on the settings menu.
All of these will add a slot for textures on the Attributes dropdown menu that otherwise will be hidden. Leaving those slots empty will mess up the shader.
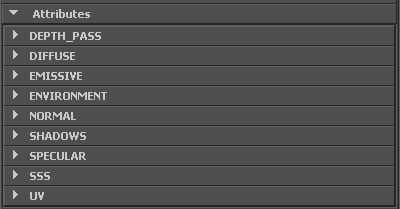
++++ The ATTRIBUTES dropdown menu ++++
Here is where you modify the shader to transform it into the kind of material you want.
Notice that almost all menus have a TRIPLANAR options, those will be explained in the UV part of this DOC.
The DEPTH_PASS

When Enabled it will override the ENTIRE shader. It is used to generate a depth pass of your objects.
To enable or disable it in all your shaders, you can select them all in the hypershade, and set it to on or off from the channel box.
Z_RANGE will set the maximum distance the shader will calculate the pass. Adjust it in accord to your scene size.

THE DIFFUSE MENU:

CONSERVE:
When enabled (default) the shader does its best to try and conserve energy.
Energy conservation is an important part of the shader. The light that comes off from the surface cannot be larger than the light that reaches it (except when the material itself emits light, from emission for example).
Turn it off for a more artistic control.
Note the examples bellow:
The first image shows a material without energy conservation. Notice that its too bright on the edges. That`s because there is reflection and diffuse color adding on top of each other, letting more light come out than it comes in.

CONSERVE fixes this by not allowing more light to come out than it comes in.

USE_DIFFUSE_MAP:
When enabled, it will use the texture plugged into the DIFFUSE_MAP slot
DIFFUSE_COLOR:
The diffuse color, notice that when USE_DIFFUSE_MAP is enabled, it will continue to affect the look of the shader.
When not using a texture, it will be the overall color of your material, when using a texture it will tint your texture. So you can darken it, tint the texture color or even boost its lightness by using white values higher then 1.
THE EMISSIVE MENU:

USE_EMISSIVE_MAP:
When enabled it will use the texture plugged in the EMISSIVE_MAP slot.
EMISSIVE:
The color emission. Notice that it will continue to affect the shader even when using a texture.
Also notice that it will not make your object "glow". It is not possible to make screen effects with ShaderFX.
THE ENVIRONMENT MENU:
All that your environment map controls are here, everything between reflections and Image Based Lighting (IBL) or indirect lighting.

USE_ENV_AS_IBL:
When enabled, it will use your reflection map as the source of the IBL, when disabled the IBL will be calculated from the SKY_GROUND_COLOR and SKY_COLOR.
NORMAL_IBL_PERTURB:
When using a normal map on your material, this will alter how much it affects the IBL.
Suggested values are between 0 and 1.
0 will have no effect.
1 will have full effect.
>1 will boost the effect.

ENV_IBL_BLUR:
Controls the blurriness of the IBL map.
This is an arbitrary value, it depends on the resolution of the texture you are using, larger texture will require a larger value to blur. Can be pretty much any value.
Larger values will blur it more.
Values too low will look like a second texture on your object and look very off, values too high will lose lighting detail.
Example: No lights, IBL only.
Value of 0:

Value of 6:
IBL_INTENSITY:
The intensity of the indirect lighting
SPECULAR_CONTROL_REFLECTION:
When enabled, the specular texture plugged in the specular slot inside the specular menu and color, will control, mask and tint the reflections.
USE_ENV_MAP:
When enabled, will use the texture plugged in the REFLECTION_MAP slot as reflection and IBL when needed.
USE_REFLECTION_BLUR_MAP:
When enabled it will use the alpha channel of the texture plugged in the SPECULAR_MAP slot under SPECULAR MENU to control the blurriness of the reflections.
Whites will blur the amount set in the REFL_BLUR, Blacks will have no blur. Will also affect Roughness in the SPECULAR MENU.
REFLECTION_MAP:
Slot for the texture used for reflections and IBL.
Only Latitude/Longitude maps are supported for now.
REFL_BLUR::
The blurriness of reflections. 0 = no blur, Higher values will blur the reflections.
This is an arbitrary value. Larger textures needs larger values to blur.
FRES_MIN:
Minimum value of fresnel effect, higher values pushes reflections to the border.
FRES_MAX:
Maximum value of fresnel, lower values pushes reflections to the center.
FRES_POW:
Weights the fresnel effect, 1 is total effect, 0 is no effect, you may use higher or lower values, but its not recommended.
EXPOSURE:
Exposure of the texture plugged in the REFLECTION_MAP slot.
An arbitrary positive or negative value. Specially useful when using HDR textures.
THE NORMAL MENU:
Controls the normal map effect to add detail. This menu is hidden when USE_NORMAL_MAP is turned off in the settings.
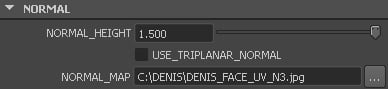
NORMAL_HEIGHT:
The intensity of the normal map plugged in the NORMAL_MAP slot.
Can be any positive or negative value.
NORMAL_MAP:
The slot used to plug your normal map.
Tangent space textures only.
THE SHADOWS MENU:

ShadowBias:
Bias of the shadow map, you may need to increase this value for very blurry shadows or lights casting shadows too close from the horizon line.
Also you may need do decrease this value when you have a large scene and increasingly low ShadowMap resolution due to scene size as shadows will start to disconnect from its caster and receiver.
Unfortunately, ShadowMap is generated by maya and passed to ShaderFX, there is no way that I know of to increase its resolution past 4096, or generate cascades, or PSSM. This will result in increased low ShadowMap resolution the more your scene size grows in space, as this 4096 shadow map will have to cover your entire scene.
WARNING: This is a VERY sensitive slider. Increasing this value will start to disconnect the shadows too close from its caster. Lowering the value will create shadow artifacts and put shadows in wrong places.
SHADOW_TAPS:
This will control the quality of the shadow map (the actual resolution is still controlled by maya lights).
Use values between 10 and 64.
Softer shadows will require higher values.
Values <10 will produce wrong results.
Values >10 will start to impact performance (HEAVLY). Specially when using multiple lights.
Values > 64 will produce a shader error and your object will turn red.
Here is the effect with the slider ranging from 1-64:

SHADOW_BLUR:
The blurriness of the shadow map.
This is an arbitrary value, must be higher than 0. This will vary depending on your scene size and shadow map resolution.
The closer to 0 the harder the shadows, larger values will start to blur the shadow map. Too close to 0 will produce wrong results and aliased shadows. Values too large will start putting shadows in wrong places and just look wrong.
Here is the effect, slider varying from 1 - 10:
THE SPECULAR MENU:

Roughness:
1 is a completely rough material, 0 is perfectly reflective.
Here is the effect from 1 to 0 with ggx specular method.

CAR_PAINT:
Enabling it will add flakes to the specular, simulating a car paint.
FLAKE_SCALE:
Arbitrary value >0. Increasing it will decrease the size of the flakes.
FLAKE_INTENSITY:
Arbitrary value >0. Increasing it will increase flakes intensity and spread.
USE_FRESNEL_SPEC:
Only activate it when using specular methods other then GGX and Skin, as they already use fresnel inside its calculations.
USE_SPECULAR_MAP:
When enabled the texture plugged in the SPECULAR_MAP will control the specular color.
SPEC_COLOR:
The color of the specular, notice that even when using a specular texture, this color will continue to affect and tint the reflections.
GLOSS_MAP:
A map to control the roughness and reflection blur when using triplanar specular, as it will be impossible to use alpha.
THE SSS MENU:
This will control the SSS effect of your material.
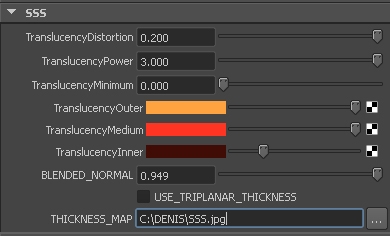
ALL TRANSLUCENCY OPTIONS ARE HIDDEN IF USE_THICKNESS_MAP IS TURNED OFF IN THE SETTINGS MENU.
TranslucencyDistortion:
Lower values will make the transluceny effect reach further.
TranslucencyPower:
Works similarly to TranslucencyDistortion.
TranslucencyMinimum:
This will add the translucency effect regardless of lights.
TranslucencyOuter:
The color when light reaches shallow parts of the skin.
TranslucencyMedium:
The color when light reaches the middle parts of the skin.
TranslucencyInner:
The color when light reaches the deeper parts of the skin.
BLENDED_NORMAL:
The overall effect of the blended normal when selected in the settings menu as the diffuse method.
1 is full effect.
0 is lambert.
THICKNESS_MAP:
The map used to tell the shader where light can go through.
This is ABSOLUTELY necessary when using translucency. It will be hidden when USE_THICKNESS_MAP option is turned off in the settings menu.
TIP: This map can be generated by baking ambient occlusion with your object normals inverted then inverting the map in an image edit software.
THE UV MENU:
Controls UV tiling and triplanar effect.

Triplanar is a way to project your texture in three different axis and use it without a UV map.
THE TEXTURES MUST BE SEAMLESS!
The method used here is the one described by The Game Assemblys “TGA Digital” .
You can check their tutorial here: 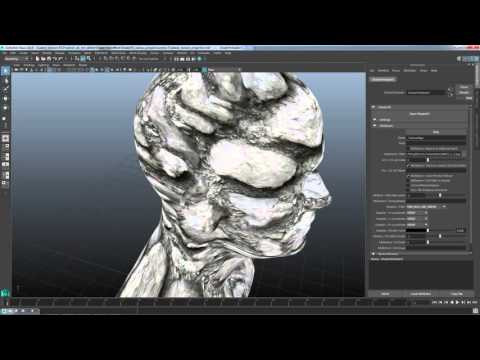 https://www.youtube.com/watch?v=lb5Bpl9R49o
Almost all textures here have a triplanar checkbox.
TRIPLANAR_MULT:
Larger values will increase the texture repeat.
Lower it and it will repeat less.
TRIPLANAR_BLEND:
Lower values will increase the blending between the three axis, set it too high and it will create seams on your objects.
REPEAT_U:
Number of times the texture will repeat in the horizontal.
1 is no tiling.
REPEAT_V:
Number of times the texture will repeat in the vertical.
1 is no tiling.
THE TRANSPARENCY MENU:
This menu will be hidden if either the USE_OPACITY_MAP or USE_CUTOUT_MAP are disabled in the settings menu.
When you enable either of those options, the alpha channel of your diffuse map will be used for those effects.

ALPHA_CUTOUT_MAP:
Only used when triplanar diffuse is enabled, as there will be impossible to use the alpha channel.
CUTOFF_VALUE:
USE_CUTOUT_MAP enables transparent objects to cast shadows.
But different then opacity, cutout can not be semi-transparent, its either opaque or completely transparent.
It is used, for example, for leaves textures on a tree, applied to a plane.
CUTOFF_VALUE is used to tell which part of the gray is black, and which is white, as there cannot be semi-transparent parts.
0 will tell that blacks are white, so there will be no cutout.
Increasing this value will start to "cut" your object based on your diffuse map alpha channel.
TIP: Both opacity and cutout can be used together. For example, on a cloud texture, using only cutout will cause it to have a very sharp edge, using both cutout and opacity will enable you to cast correct shadows and still have soft border on the edges of your texture.
THE DISPLACEMENT MENU:
Still fixing some bugs, triplanar displacement is not working yet.
!!!!!! CURRENT RELEASE !!!!!!
!!!!!! OLD RELEASES !!!!!!
Replies
ALPHA 001
Initial release.
Added energy conservation
Added simple displacement
Fixed Some doc errors
The guy is a free scan from "ten 24"
The girl is my model.
Will give it a try once I'm back at work from the holidays. Thanks for sharing.
Means a lot comming from you!
ALPHA_002
Added GGX specular method.
Please take special notice in the SPECULAR MENU area of the documentation.
Set shadow taps default to 10
Added OrenNayar diffuse method.
Changed spec_pow to roughness.
now roughness work 0-1 for all specular methods.
now roughness control roughness for OrenNayar diffuse method.
Changed shadow taps distribution to poisson taps. Now it goes to a max 64 taps, but with much improved quality. (working on a PCS solution for better performance and quality, and maybe PCSS for variable penumbra).
Fixed various issues with extreme lighting.
Fixed issues with OrenNayar.
Triplanar projections no longer move when objects move.
Added CarPaint option for specular:
Added high quality option to blur the environment map, both for reflection and IBL.
It uses 64 poisson samples. Be aware that this method may be a little expensive.
Now roughness blurs the reflections.
You still control the total reflection blurring in the same way as before.
Added control to scale reflection and IBL blur when using high quality blurring.
The material is defaulted for 8k reflection maps. The one I am using in the gif bellow is the "Walk of fame" from sIBL Archive. You will need to scale the blur CTRL and Blur values down for lower resolution maps.
Here is the comparisson, left using the new 64 poisson samples method, right, using the usual mip level method.
linked on shaderfx.com
Thank you!
Feeling a bit ashamed as the network is very messy right now
BTW, if you dont mind, I am trying to implement PCSS shadows from an nvidia sample.
One of the problems I am having is that I cannot solve this compile error (Again, I am no programmer, just starting to learn something).
This line of my custom code:
float shadMapDepth = tex2D(ShadowMap, uv + float2(i*stepSize,j*stepSize)).r;
its on 2 for loops. It gives an error. Cannot implicitly convert from "float" to "SamplerState".
Tried with GatherRed too, still the same error.
Is there a way around?
Thanks!!
Keep up the great work!
Edit: Alpha 005 link seems to be broken. Will give the 004 version a shot instead.
A shout to Shaderfx (Kees) or Kodde or anyone with shading knowledge, trying to implement PCSS, pretty complex for my level of knowledge. Kinda stuck, seems that I got the variable penumbra working, by animating the light size you can see the penumbra widening or getting sharper. But instead of it projecting the shadow, it seems that it projects the light view. Posting the group node I got to if anyone feels like trying to see whats wrong. Link
Thanks!
pcss_group
Some leakage and not so blurry edges.
Any ideas how can I convert this snipet into nodes?
(it might be having problems with too many for-loops)
try removing the loops and do only one sample as a test.
As the sampler has a isshadowmap toggle, and I am doing the sample inside the code, I thought maybe I was doing something wrong there, I tried to place some semantics on the function but no luck.
I will try to remove the for loops and report back
Yeah, I removed the for loop and the shader continues to go red, the code without the loop works outside the light loop.
I really think that the problem is me sampling the shadow map inside the code. Is there a way for me to put that "is shadow map" toggle inside my code, pass or do whatever it passes/do?
Thanks again!
Maya has confused users with too many hardware shaders...ShaderFX, Stingray, and DX11. It is great that you are figuring out a pre-viz workflow that actually works.
i couldnt download this fantastic shaders. i will love to test them.
SUNDEVILDAVE:
Thanks! Its still in ~alpha~ finishing the features I would like to use then I will start to optimize, as its not as straight forward as I`d like and not a bit efficient.
COMBO_JERMAN:
Thanks man! All versions are downloadable from the first post, just at the end.
Here is an update on the PCSS
I managed to calculate the penumbra using only nodes. It "works" haha, well, it still only works with directional light, some light angles will completely break the effect, but if I group the light and rotate it, it doesnt break (!!!! what?? lol)
And, I did not port the percentage close filter to nodes, so I am using the 64 samples poisson, the result? Well performance goes to a crawl. The penumbra calculation is very fast, surprisingly, but the sampling is too slow using the current method, need to port the PCF to get decent frame rate...
Sorry for some of the problems you are having. Hard to figure out what is going on from just looking at the posts here.
No problems! I think I got it, just need some adjustments.
You can check the nodes if you want, inside the shadowmap group of the traditional game shader in the version of this post.
ALPHA 006 RELEASE
Changelog:
-Added PCF shadow method (selectable in the new dropdown menu in the settings):
This is a Percentage-Close Filtering. It tries to concentrate its samples where it needs to blur, thus increasing performance. With its 8 samples, although you can notice some patterns close up, it generetes blurring with a quality level very close to the 64 samples poisson while being much, much faster.
-Added PCSS shadow method (selectable in the new dropdown menu in the settings):
This is a Percentage-Closer Soft Shadows. It is the PCF method, but instead of using a fixed kernel, it uses a distace method, meaning that shadows farther alway from its caster will blur more than those closer. Be aware, this is a costly effect, I have a titan X and it does take a hit by using it, not sure how I can optimize it more, again, I am no programmer.
Also it comes with its issues:
1- Only directional lights. Trying to use a spot light or any other will result in a blown out image without shadows.
2- Large kernels (blurring) (FILTER_WIDTH_PCSS) will result in errors on the edge of your scene as dark bars. I am trying to fix this issue by not allowing the shader to alter the borders of the shadow map, but no promisses. You can minimize it by increasing the shadow bias. But it has a limit, as large bias will start to disconnect shadows and objects will appear to "float".
3 - Kernels too large will start to have a sharp border, again, can be minimized by increasing the bias. Also it can be adjusted by messing with the SCENE_SCALE and LIGHT_SIZE. Although I do not recommend, those values are very sensitive, I am trying to make them more user friendly. Stick to the FILTER_WIDTH_PCSS.
-Fixed HQ reflections and IBL not being affected by normal map.
-Fixed triplanar Normal Maps. They work now.
-Removed gloss map from the alpha of the specular and added it to the gloss slot. Use a separate map now, easier for libraries.
-Some improvements on conserve.
Glad you are liking it!
New feature on the horizon!
Full physical sun/sky
Sun/sky, IBL and reflections are all generated in real time, based on the first directional light it finds in the scene.
2 new dropdown menus will be added in the settings, reflections and ibl, you will be able to select from normal, HQ and sky. This way the shader will only calculate the feature you want, thus increasing performance.
Here is a preview, left is a chrome material, middle a rough material without reflections, and right a fresnel material with blurred reflections.
And here a screenshot:
looks amazing
I was looking at GPU Gems 2, to try and integrate O`Neils technique into my sky.
Unfortunately, its not very good from the ground because it is single scattering, I will try Eric Bruneton's multi-scattering next.
For now I am happy with the lookup textures technique, it provides good artistic control, pleasant effect, its a breeze to make reflections and IBL and its fast.
But, O`Neils is very nice from outer space. So, I made an earth shader with it. Made some adaptations to the code itself, added some techniques and some other features, like normal maps, ggx, oren nayar and clouds. Maybe I will try to add some more advanced things to it later.
DNS error it seems.
Sorry for the long time no post, been very busy this week.
I am not happy with the shader layout, so I am going to do it all over again, make it much more straightforward and faster.
This week I`ve implemented the physical sun/sky, with mie and rayleigh calculations, volumetric clouds with raycasting and clouds shadows.
The Sun/Sky is based on O`Neils shaders and calculations from GPU Gems.
Clouds are adapted from a shader toy from Dave Hoskins, implented the phyisical sky in it, and made some adjustments to handle sun direction influence on the clouds raymarching.
The clouds shadows are made with a fractal noise projected using the shadowview projection and multiplying the light gain with it.
The problem is that its very hard to make reflections and IBL from it, well reflections is easy, blurring it, is not.
I thought about making a render target, then filtering it. I know how to make a render target, but I have no Idea how I can use the resulting texture in my shader. (kodde, kees, anyone?)
Anyway, here is a preview (gif introduces a lot of banding):
http://www.shaderfx.com/2014/11/setting-up-render-target-can-be-tricky.html?m=1
I did that it works, I just did not get how to use the generated texture as an ordinary texture, does it only output to the vertex shader? Or am I missing something?
Do I just add the top pass to the vertex shader grp and then use the unique named texture normally inside any shader?
Thats how I did it, but used in the traditional game shader.
I think that there is no way to do it only one time and reuse across shaders, right? For example, use a rendertarget on a sphere and use it as a lat long map thereafter.
There is a ExecuteScript node that takes MEL.
This could allow you to generate a texture once on first execution.
(shaderfx has some MEL commands to bake a section of the graph, up to a certain graph node to a texture on disk)
Not sure if that would work in your case since this particular shader would have to execute before everything else and not sure you can really control that...
Perhaps the MEL command could check if a texture exists in each shader and if it doesn't, it creates it (the next shader would then see it was already created?)
Thanks!
I will try those, my main concern is that the sky is kinda heavy, so if I execute this shader in every shader the performance will drop really fast.
You execute a script that sets a global variable if the sky texture has been generated or not.
First time, it will generate it.
For all other shaders, it won't, because the global value is now true.
Really have no idea if this would work.
I have a question though, about another thing, can I output values from shaderfx?
For example, I made an ocean shader that displaces vertex, can I output the displace value so I can make objects float?
My guess is not, a really ugly hack would to displace the vertex in a custom shaderfx shader, but I dont think it would hurt to make the question haha!
I was going to try to use tessendorf waves with fast fourier transforms, but as far as I can see it needs compute shaders and I guess its not possible with shaderfx (?)
Also, not sure why, vertexes in the displacement are disconnected.
Thanks again!
maybe the vertices of each shell are displaced differently (remember that in hardware, each face has its own vertex; they are not shared between faces)
If it is in shaderfx tessellation that cracks are happening, then that is not good.
The PN-AEN tessellation we have is supposed to prevent cracks.
No its a single plane with 30/30 divisions, no uv seams and no they are not displaced in the vertex shader.
Yes those cracks appear in the tesselation (using PN-AEN), if I use a tesselation ratio of 1, there are no cracks, if I increase it with either a fixed value or a distance based those cracks appear in the polys created by tesselation.
I think that it has something to do with my procedural textures and its uvs.
I am using 3 4D noises with different octaves and scales and the smoothVoronoy that is included in shaderfx.
Let me put here my findings.
1- If I use a vertex World position to directly input the UVW of my 4D (the fourth being time) I cannot use it to displace, as there will be a shader error and the shader will only display the vertices as red dots.
2- If I make a render target out of it, the shader will only displace the original vertices, the tesselated vertices will stay flat, generating a "spiked" mesh.
3- If I use the texCoord to input either the vertexWorldPos, or vertexPosition, the displacement will work, but I will get those cracks.
Also, I am almost getting my object to float. I am using my procedurals to displace the vertices on the vertex shader. I am just not sure how to avarage it all to displace all vertices in a certain direction from the pivot point, instead of deforming the entire mesh.
Thanks again!
If its the one thats inside de hw material grp its already there. If I need to use it outside, on my procedurals, I am not sure how to do it, as the compiler says I am using it incorrectly.
This is so amazing.
Cheers, D