Home Technical Talk

UV scramble

Offline / Send Message
Pinned
I was working on replicating this scrambled UV effect, posted about as a problem on polycount  here, but since deleted. That thread chalked it up to modo and zbrush incompatibility- but Does anyone know how to to create this effect (of each polygon's UV being rotated) on purpose?
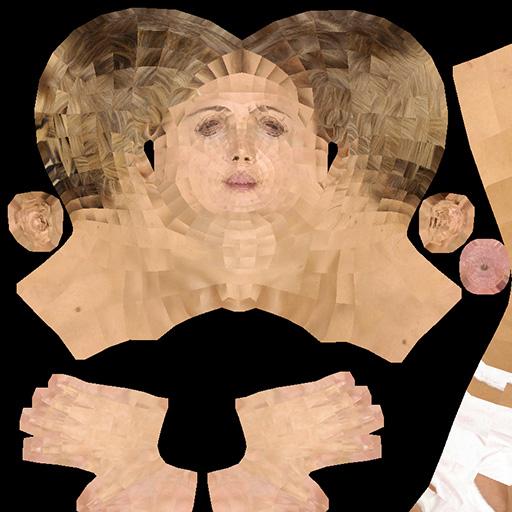
Replies

  • Farfarer
    Options
    Offline / Send Message
    In Modo, it's very easy - hit Rotate UVs from the UV tools.

    It sets the UV coordinates for each vertex to be the UV coordinate of the next vertex of the polygon.
  • BustBash
    Options
    Offline / Send Message
    Thanks Farfarer. In the example, the UVs are on the correct polygons, they are just rotated -90 and 90 degrees from the center line- it is easiest to perceive at the hairline. If your suggestion will do this, I'll download Modo now and give it a shot, with this clarification do you think it will?
    Thanks!
  • Eric Chadwick
  • Farfarer
    Options
    Offline / Send Message
    It's possible you'd have to activate symmetry in order to get it like that, but yes.
  • connect2infos
    Options
    Offline / Send Message
    If you'r working with 3ds max or maya it's because of smoothing groups
    you must put all your model in the same group of smoothing
    ctrl+A and clear all and then put them in 1 :smiley: 
  • blop
    Options
    Offline / Send Message
    I have seen this when I exported model from 3dsmax to zbrush. In 3ds max the UVs looked good. But After importing them in the Zbrush they suddenly "broke". Seams of the UV layout were all wrong.  Work around was that before exporting from 3DS I had to apply on the mesh EditMesh modifier. That helped. It is pretty weird workaround but worked.
  • BustBash
    Options
    Offline / Send Message
    Thanks everyone. So I got the Modo trial and the Rotate UV works on the model and appears just as I wanted- AMAZING!- but what I want to generate is the 2D texture map with each polygon rotated, like in the example posted initially.
    When I bake it, it just creates the fitted texture map without the rotated UV fields. Any tips?

    I'm trying to recreate the glitch on purpose for the kaleidoscopic look it creates-
    So thank you for all your help!
    The other program I have right now is C4D. 
  • BustBash
    Options
    Offline / Send Message
    A little closer, I deleted everything in the render output except "final color" and used top menu's Render>Bake from Object to Render Outputs 
    now the UV fields have edges, but still aren't rotated. Does anyone know how to get the rotated UVs on the model to bake into the UV texture map?


    Thanks again for the help!
  • Farfarer
    Options
    Offline / Send Message
    Right, that will take a little more fiddling.

    You'll want to have two UV maps on your mesh - one that the texture is applied to, and one you bake to.

    Do the scrambling on the UV map the texture is applied to, but keep the baking one clean and unscrambled.

    Change the "Final Color" output to "Diffuse Color" - otherwise you'll get shading on your mesh baked out.

    Then select your clean UV map and do your bake to render outputs.
  • Mark Dygert
    Options
    Offline / Send Message
    I run into this all the time bouncing back and forth between zbrush and 3dsmax. This workflow helped fix it most of the time https://www.youtube.com/watch?v=yQHOIh5VuzE

    The add editMesh works better for me, at least it keeps it from rotating most of them, but I still get the random poly that get rotated.

    If its not too many I'll fix it manually.

    If it's widespread I follow the steps in the video and usually end up doing a lot of exporting and loading and saving of UV's.

    I've even used morphix so I could morph the original 3dsmax model (wrong shape but good UVs) to match the shape of the zbrush export (right shape, messed up UVs).

  • BustBash
    Options
    Offline / Send Message
    Mark, thanks. I'm sure this will come in handy for anyone trying to solve the glitch.

    I was actually trying to purposefully recreate the glitch for the aesthetic effect. Farfarer- thanks!  Here's one example of a test image following your advice. It's just what I wanted. 

    The source image is from these artists: http://www.qwertzus.com/pano-face/
Sign In or Register to comment.