UDK - Glacier Crash
polycounter lvl 14
MOST RECENT:

==================================================================================================
Just started on this one. Primarily working from this concept by Adam Brockbank: http://www.croftgeneration.com/imagenes/galeria/concept_art/LCTR/bigimages/LCTR_Concept_Art_008.jpg
This concept was for the first Tomb Raider movie.
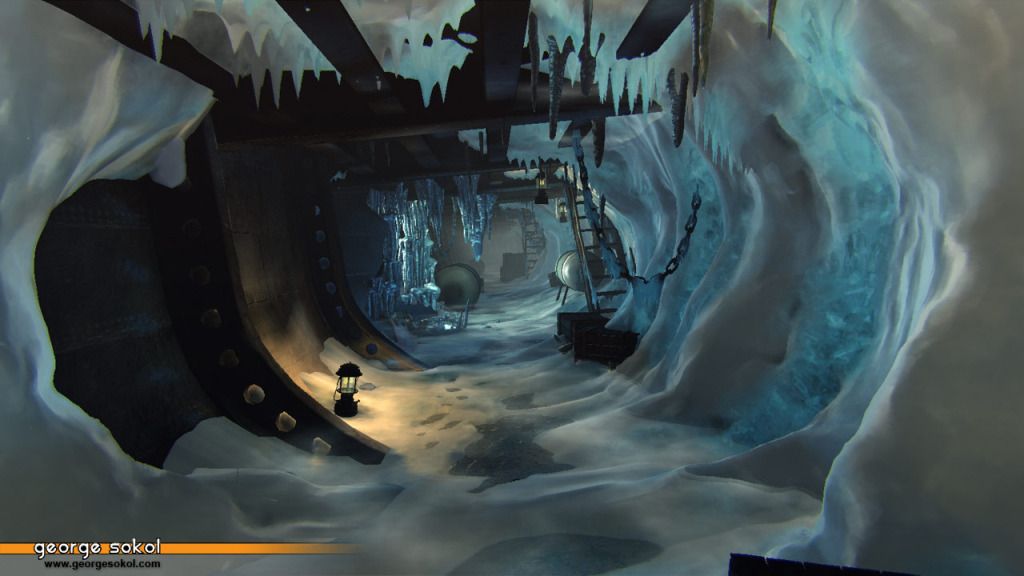
Just a blockout so far:

Basically its a ship thats buried in a glacier.
Trying a few new things as I go along here. Main challenge for me is that I'm a 3dsMax guy, but I'm going to do everything in Maya. I know my way around Maya a little bit, but I haven't really used it to do a complete environment yet.
Also, no idea how I'm going to handle the ice yet.
I'm thinking that maybe the area with the hole in it (hard to see but you can see the light coming in from it) might be a hole that leads outside of the glacier, like the ship is close to the edge. I'll have to try some things out around there to see what I want to do.
I know its pretty early on, but critiques/comments are welcome.
==================================================================================================
Just started on this one. Primarily working from this concept by Adam Brockbank: http://www.croftgeneration.com/imagenes/galeria/concept_art/LCTR/bigimages/LCTR_Concept_Art_008.jpg
This concept was for the first Tomb Raider movie.
Just a blockout so far:
Basically its a ship thats buried in a glacier.
Trying a few new things as I go along here. Main challenge for me is that I'm a 3dsMax guy, but I'm going to do everything in Maya. I know my way around Maya a little bit, but I haven't really used it to do a complete environment yet.
Also, no idea how I'm going to handle the ice yet.
I'm thinking that maybe the area with the hole in it (hard to see but you can see the light coming in from it) might be a hole that leads outside of the glacier, like the ship is close to the edge. I'll have to try some things out around there to see what I want to do.
I know its pretty early on, but critiques/comments are welcome.
Replies
Looking at the guys shadow which is on his right, the lighting looks like it's actually coming from the left. Like the ice has built up and frozen over a hole in the hull and all the light is getting filtered through that.
Which would be a cool effect to do, pain in the ass to figure out but awesome payoff.
chrisradsby:
Absolutely no idea what I'm going to do for the ice shader. Your right thought, I need to dig into that first.
DeadlyFreeze:
Oh yea, it does look like the light is coming from under the steps. I do have it set up on the left side, there is a hole after the second pillar, definitely hard to tell from the shot though. I really wasn't sure what I was going to do as far as how light comes in. I was thinking of having a hole there, like an entrance was dug to get into the ship. Having icicles cover that opening and diffusing all the light coming in sounds like a gool idea.
I had been busy doing other stuff the past few days..but I did a sculpt for one of the ice wall pieces today:
http://www.terrymatthes.com/unreal-2/materials/icy-material/
Thanks for the link!
I got around to doing a test bake on the wall piece above and I threw it into UDK with a basic material to see how it looked:
Haven't put too much thought in the material yet, I set up a matcap material to see what that would look like...but it looks like you cant use vertex colors with the transform expression since it colors all vertices white.
I made a sculpt for a second wall and a few single icicles...I'll finish those up and get them in UDK, then I'll focus a little more on the materials.
Also, I just picked up a new graphics card with dx11, so I may toy around with some dx11 stuff in this environment as well.
I might have some decent reference photos if you'd like me to upload some for you? I've literally only just got back and not sorted through them yet.
Hmmm sounds promising, I'll try that when I get home from work.
Orchidface:
Thanks!
ambershee:
Thats pretty awesome that you got to see some in person. I'm gonna try to get that blue in there. I do want to get some sub surface scattering going on, but I have never really tried that, so its gonna be a learning experience. Reference photos would be awesome!
That definitely worked. Thanks for pointing that out!
Baked the 2 ice/snow walls and the individual icicles and got them placed in the scene. I started toying with the material on the snow wall. I ended up getting a directx11 card last week, so I've also been trying out different dx11 features. I'm using tesselation on the ice/snow wall here.
Olli:
Yeah I was using SSS on here. I got that look mainly from having a medium value, high gloss spec, a soft fresnel, and some parallax..which kinda makes everything look glazed over.
I fiddled with the shader some more...I was mainly looking to get that translucent blue that you see in glacier walls a lot. I ended up setting up the matcap and using a little bit of emissive and came up with this:
I also tinkered with the icicles material a little bit..
That ice is wonderful!
Any chance of a cheeky screen-cap of the material?
*S-s-s-s-s-s-s-subscribed*
Here is now the material looks at the moment:
I'm sure this will change before I'm done with the environment...but this is the set up currently. Besides the snow, I haven't really touched the textures yet...so theres still plenty for me to do there.
If you have any other questions about the material (or anything else)...definitely let me know.
As far as I can see, your textures used are:
- COLOUR MatCap from your High-poly
- COLOUR Diffuse of the Ice and Sub Surface Scattering map
- HEIGHT Parallax map for BumpOffset as well as DX11 Tessellation from High-poly
- COLOUR Diffuse of the Snow
- SPECULAR Spec' map for the Snow texture (I'm guessing a noise map?)
- NORMAL MatCap from your High-poly
- NORMAL Detail normal for general detail
Is that right?
The grey-scale maps can be combined into single textures, or tacked onto colour textures as alpha channels, so you could probably reduce the texture draw-calls to about 4 or 5 too for some optimisation
*Starts trying out material himself*
Sounds like you might be confusing matcap for baked textures.
By matcap, I mean a spherical environment map...basically the same thing as the matcap materials in zbrush..the vector transform expression is switching the vector values from tangent space to view space. So basically, the section of the sphere map that is sampled depends on the angle of the camera to the object. If you google matcap or sphere map you can find out more about it.
This is what the texture looks like for that:
So the Matcap is being added to the diffuse..which right now is just the Ambient Occlusion bake multiplied by a color.
Your definitely right about dropping the grey scale textures into channels. When I'm getting close to having a final material I'll pack them all together.
Which would explain why my test material I tried earlier looked absolute gash compared to your wonderful composition
Here is where I'm at now:
I fiddled with lighting a little bit, added a few more blockout props..added more icicles.
I made new ceiling beams..textures aren't done yet. Also..texture on the wall on the left is just the ceiling beam texture..I'll replace that soon.
Your piece has such a great atmosphere @gsokol!
I replaced the blockout transverse frame pieces, made the metal plating texture for the wall, and..hard to see in this image..but replaced the placeholder water tank models in the background as well.
I also fiddled with the post process settings a little bit. I fiddled with Bokeh a little bit..which was really cool..and I adjusted the color a little bit..took out some of the reds to sell the cold, icey atmosphere.
I still have really slacked with texturing..specularity doesn't read very well on most things yet.
It has a kind of hand-painted look to it
As for the metal texture on the wall to the left, I feel it can use some work IMO. It feels like the black sheep to me in this piece. Dont get me wrong, it all looks awesome, but if I had to single out one thing right now, the texture on the left almost looks rushed if that makes sense. Maybe if you pushed the plates together some more it would help? The black bars between the plates seem really jagged and there seems like too much gap. The actual metal texture you made is pretty damn rad though, I really like its feel, but maybe some more organization and more firm lines between the plates would really tie that wall together
Iciban:
The shader does look confusing all at once..but when you build it up from scratch its a lot easier to separate everything and understand whats going on.
I didn't use a tutorial for the ice..but I did have to look up how to do a couple of things (MatCap, Tesselation/Displacement, Sub Surface Scattering). The displacement took a little experimenting..it seemed like every tutorial I found for displacement did something wrong, so I had to play around a little bit to get a good working combination.
Also....I just finished checking out Ryan Smith's (Virtuosic's) Advanced Mesh Paint Tutorial at 3d motive. Its a pretty sweet tutorial..I managed to pick up a few neat tricks with vert painting that I'll integrate next time I touch the shader.
As far as everything else goes, yea I just kinda learned along the way. I made it a point to try to get a better understanding of the UDK material editor with my last project..my Jetbike. Between that and the ice material...I've started to really get a grip on how the Material Editor works. Before that I didn't really know much..and I referenced tutorials a lot more.
I still have a few tricks up my sleeve for the ice..I'm not done with it yet. I've got a few cool ideas that I'll tackle a bit later.
Add3r:
Thanks for the critique! I'll agree with you..it does look a little harsh there. Those lines are shadows from the normal map..the edges are worn a little bit. The texture is actually a tiling texture...so I shrunk it down a little bit:
It seems to help a little bit, but is still pretty dark. I'll figure out something to make that not so harsh. Thanks for pointing that out!
Thanks Nick1!!! I think this might be the first time that I've ever received critique from a spam bot! I feel honored...
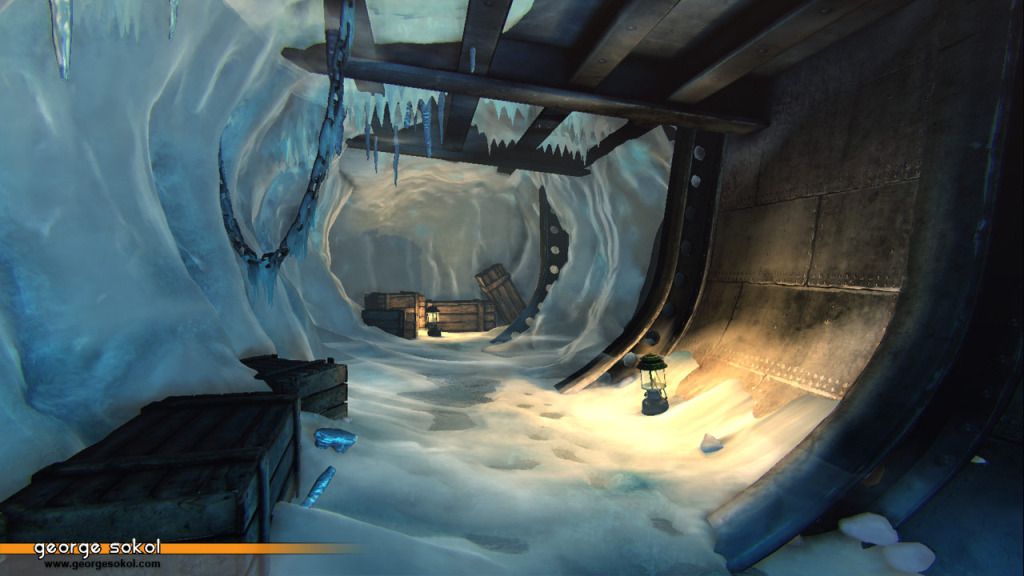
Anywhoo...I decided to figure out what I wanted to do for the hole in the shiphull, so I whipped this up tonight:
Skybox is a default UDK one..not mine..I'll replace it later. I just removed some of the meshes so you can see the entrance better..The hull piece thats missing will be partially there..I'm going to model in some damage later. Also, I hid the blockout icicle chunks..but those will be there later as well.
Here are the sculpts:
This includes a the single icicles that I had already done. For the clumps, I gave dynamesh a shot. Worked out pretty well...made getting the base shapes pretty quick and easy.
Also wanted to see how I might place them in the entrance. These meshes are just decimated versions of the high poly out of zbrush..I haven't made proper low poly models yet...thats next on the list.
The material for the sculpts is based off the Green Glass matcap from the Pixologic website, I just played with the properties and changed the hue a little bit.
If your interested, I threw it up here.
oh and the link is down
The udk material is fairly simple, the icicles aren't actually clear at all, they are completely opaque. I have a rimlight being added to the diffuse to get the nice highlights on the edges, and I'm using the heightmap as a transmission mask to make it look like light is bleeding through. Just a flat, high value spec at the moment with a pretty low gloss value. I'm using a low gloss instead of a high one because the wide specular highlights help make it look like light is passing through the icicles, vs being tight and giving a wet, opaque look.
Also, link was working if you right clicked and saved it, but clicking on it was going to an empty page. Dropping the file in a .zip folder fixed that..I updated the link in my previous post if you still want it.
Wow thats a very simple and elegant solution inside of UDK very cool, I would over think it like a mofo lol. can't wait to see more.
oh yeah I have had this thought for a while but creating a decal that only uses the emmissive to fake refracted light
Looks awesome though, nice work.
nice Ice material . is it the same you show the picture in first page ?
I Wonder How can I make a mat like this in Unity !
I realised I never uploaded any of those glacier pics. I'm doing it now, even if it is a bit late (the results here are better than the photos anyway)!
Edit: http://www.polycount.com/forum/showthread.php?goto=newpost&t=99018
PogoP:
Yea, your right they did look odd..I rotated them around a bit to make them looking like they are coming down at a similar angle.
Ehsan Gamer
Yup, same material. Making it in Unity would be trickly, but probably not impossible. Maybe check out one of the node based material editors on the asset store.
Ambershee
Yeah I see what you mean..most reference don't really have icicles. I'm using the excuse that its near the edge of a melting glacier...even though it might not be accurate. I'll stick with the rule of cool on this one
Update:
Got a few things done here:
Finished the large icicle chunks, added the puddles, added the lantern, finished the stairs..I think that covers it.