Worklog. BreaK-
Hi guys, after a long time from doing anything 2D or 3D I've decided to open up maya and photoshop again and do some work. Its been 4 years since I graduated university so I'm expecting to be massively rusty in both areas. My 3D work is much stronger than my 2D, so I'm hoping to improve in both areas but especially 2D, mostly through texture work.
Anyway, to ease myself in I thought I'd follow a couple of texturing tutorials and model something pretty basic, that would be easy to bake from high to low.
Heres what I've got.
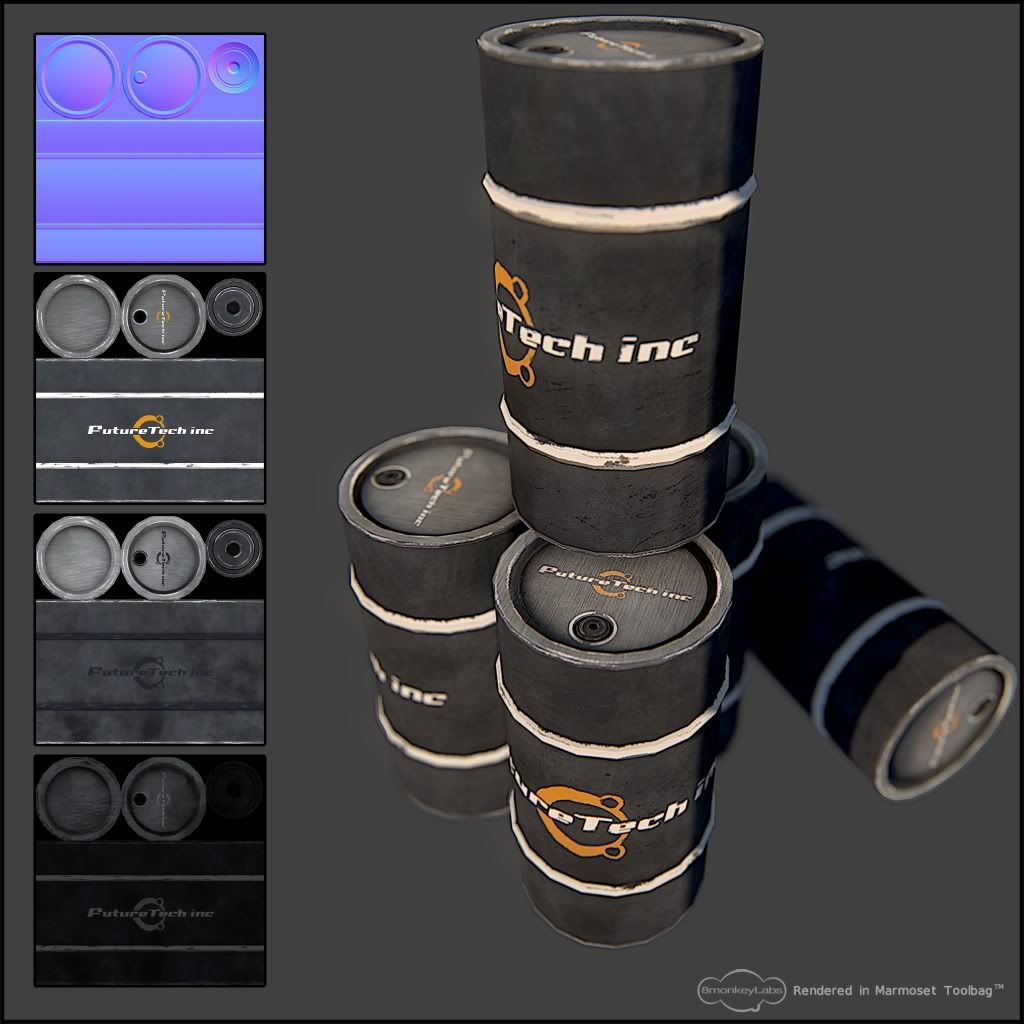
Modelling
I made 2 different sized models, the one in the picture above is 500 tris and the picture below is 160 tris. I have no idea what the average tris count for a barrel is but I've done both anyway. (Im suspecting its probably more round the 80 - 100 tris count).
Texturing
Again I'm thinking most barrels use a 512x512 texture size in game, so I might go back and lower mine from a 1024x1024.
I've never attempted a Gloss map before so It may need some tweaking, I'm hoping you guys may be able to give me a few pointers on that. Im also not too happy with the spec, but I've messed about with it for a few hours and this is the best result. I think it looks ok in Marmoset anyway.
At the minute I think its done, but I'm sure you guys will give me some crit to get back working on this! I know its nothing compared with some of the wonderful art on this forum but I'm taking it slow and trying to get some basic skills down.
Cheers guys.
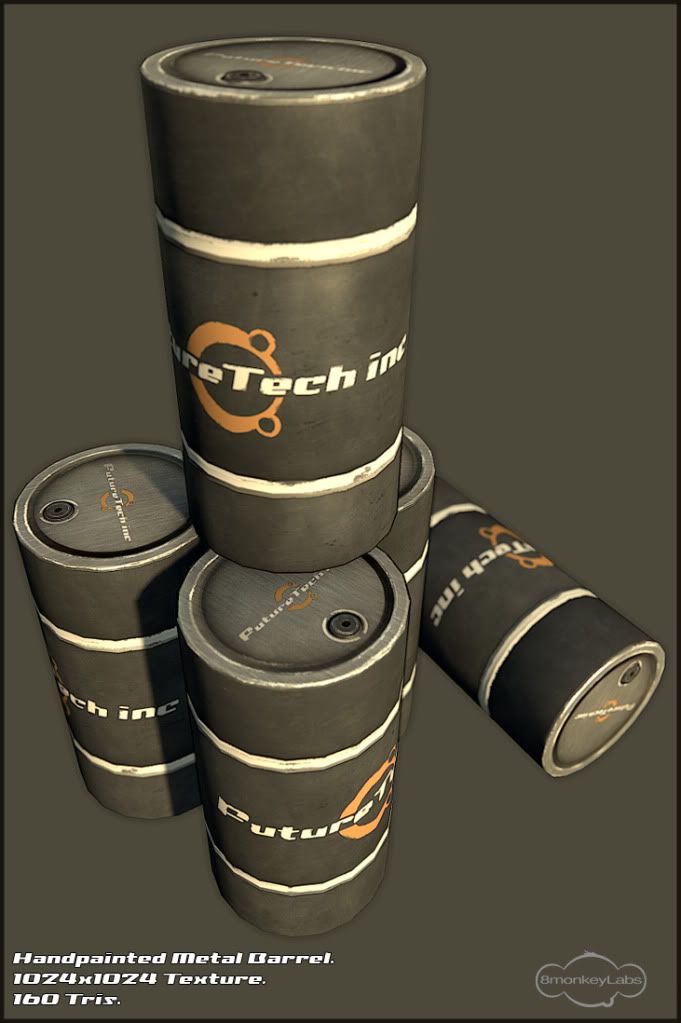
Anyway, to ease myself in I thought I'd follow a couple of texturing tutorials and model something pretty basic, that would be easy to bake from high to low.
Heres what I've got.
Modelling
I made 2 different sized models, the one in the picture above is 500 tris and the picture below is 160 tris. I have no idea what the average tris count for a barrel is but I've done both anyway. (Im suspecting its probably more round the 80 - 100 tris count).
Texturing
Again I'm thinking most barrels use a 512x512 texture size in game, so I might go back and lower mine from a 1024x1024.
I've never attempted a Gloss map before so It may need some tweaking, I'm hoping you guys may be able to give me a few pointers on that. Im also not too happy with the spec, but I've messed about with it for a few hours and this is the best result. I think it looks ok in Marmoset anyway.
At the minute I think its done, but I'm sure you guys will give me some crit to get back working on this! I know its nothing compared with some of the wonderful art on this forum but I'm taking it slow and trying to get some basic skills down.
Cheers guys.
Replies
I'm going to try and re-produce an assest from Crysis 2. Its one of the many concrete bollards that are littered around the city. It gives me chance to practice concrete texturing and lets me brush up on my metal too.
Heres the current High ---> Low bake.
I say current because I'd like to add detail to the concrete in ZBrush, but as a compete beginner at this Im struggling on the correct brushes/alphas to use.
Do you guys know of any tutorials that demonstrate this process? God ZBrush is hard!
Thanks!
I don't think you really nailed the metal on your barrel. It came off closer to rubber or plastic. The spec and gloss are very weak for something that is supposed to be metal.
Your second piece seems to be coming along okay. I don't know that you needed those dents? Is the whole thing concrete? If not what parts are? And if this is more or less the final lowpoly (didn't say cast), then I don't see why you couldn't do your concrete details in photoshop via Crazybump, Xnormal filters, Nvidia filters, or nDo. If you are not changing the shape very much it is normal information you could create with the texturing. It is pretty easy to make concrete look like concrete.
To be honest... I think you are above these small props. I think you might choose a larger asset to test your skills on.
Keep up the good work man
I see what you mean about the rubber looking metal. I'll have another pass at it. The spec does react nice, but the angle of the light needs to be facing the camera to get the metal to shine properly. It was my first time using Marmoset too, so I just used the "pavement" setting and that was that. I could maybe get a better shot by setting up a few lights. Something I'll learn for next time.
About the 2nd piece, yeah the dented piece is metal, as well as the 3 jutting out pieces. I want it to look like its been drove into a few times. (Trucks backing into it and the like). Might add some bullet holes too. I do have nDo so I'll give that a blast but I was thinking of taking chunks off the edges, so maybe its best to alter it in ZBrush?
I don't know, ZBrush would be a nice feather in my cap so to speak and I'm keane on learning it.
Thanks for your crit dude.
Also when using Gloss maps in Marmoset, do you know what channel to plug them into?
Is this better? I think its an improvement.
Ok so I have a fairly simple question.
This bollard I'm making is obviously made of concrete, but also has a large panel of metal running through it and I'm wondering what type of material to use. Blinn or Lambert? Im guessing if I use one or the other the spec & gloss maps will help seperate the 2 materials?
Oh and I'm still wondering what tab to plug my gloss map into in Marmoset?
Any help would be great guys.
Thanks again for your crit. I need you guys to help me improve.
So its fairly new built and modern, but had a few brushes with grenades, bullets and the like. Any ZBrush techniques handy to get this look?
Im struggling with Trim Dynamic and Planar Cut atm.
I'm getting a couple strange shadows, but im guessing thats the model as they dont appear on the Normal. I think these will be pretty much hidden when a diffuse is added.
One problem I'm having is baking the AO. Im getting strange reactions when I try to transfer maps from the high to low. Heres a screenshot.
Any ideas as to what I'm doing wrong? Is there any other way of generating an Accurate AO?
Thanks in advance guys.
Ah yeah, I can see the repeat now. Heh, I'll get on to that.
Apparently Maya 2011 has an issue with AO baking....great.
I've used XNormal to generate the AO but im not too happy with the results as yet. Getting seams in places. Never used it before so I guess it was a learning experience.
I would buy NDo2 if I wasn't so broke. That looks like an awesome program.
Heres what I've got so far. Just a new AO and Normal. Will begin work on the diffuse/spec/gloss tomorrow.
Crits more than welcome.
Thanks.
Let see them textures you have been promising!
Yeah man I see that. How do you go about doing this?
I've adjusted the cage as much as I can and still get the warping. Im baking from high to low in maya, is something like this better baked in XNormal?
I can't see how I can get rid of a little warping like this.
Any help would be awesome. Thanks.
Either that or make a normal map for those in photoshop.. it would take about 30 seconds!
I've pulled the cage in as far as it will go without it intruding into the model, and you're right I could do them in Photoshop, but I'm really trying to get the High/Low bakes down. I suppose creating a little detail like this it would be better/easier to use photoshop anyway?
I'll post more screens tomorrow when I've worked on this more. Day off work so I can hopefully get this thing done and move onto something else!
Thanks for your crit man!
First time I've used it so it may be the settings but I'm not getting great results.
Heres the AO. Its kinda patchy. Is this normal?
My settings.
I have closest if ray fails checked.
Edge Padding @ 22.
Bucket size @ 32.
AA is set to 4x.
Have you any ideas what I'm doing wrong?
Im getting strange results in XNormal when baking my normal map.
Heres a screen grab.
Any ideas what im doing wrong?
Thanks man. Sorted.
So.... I initially started this to take my mind off the USP, but this is turning out a lot better than I thought and I'm making really good progress.
Not too bothered about getting it 10000000% accurate, but I am going for quite a high level of detail. Sooooooo any crits you guys have would be awesome.
Heres where I'm up to.
Struggling to get my head around modelling the main body of the rifle. (Mostly because either side of the body varies massively to its counterpart).
Are there any techniques I should be using to make this easier.
i.e. Model 1 half then the other?
Thanks again guys. Really appreciate your help.
Im becoming aware of the fact that there about 1000 different accesories for the M4A1, so atm it may be a mix and match of a few different aftermarket parts. (I'm just googling images).
As long as I can get a low poly bake at the end of this I honestly dont care what version of the M4 this is.
As always crits are welcome. No doubt I've missed loads.
Thanks
Heres a little WIP. Got to add some details to the front door yet, but I just wanted to see if I had unwrapped the LP right.
Anyway I've ran into a small issue. Im not too sure if its the way I've unwrapped it, ot if theres too little/much edge padding on the bake, but im getting seems along the hard edges.
You can see here below.
Heres the Normal
Heres my UV's
Can you guys see where I've gone wrong. I'd love your help.
Thanks in advance. BreaK.
Thanks man, took your advice and moved the UV's around. Bit of a nightmare, surely there's an easier way.
Anyway it looks ok and im done with messing about with the UV's! Heres a little shot with a couple extra details on the door. Still have to add some screw/bolt details to the normal but ill do them in photoshop.
Thanks man.
Heres a couple shots of where I'm at.
Front
Side
Rear
Its taken me too long to generate the normal map due to some wierd goings on. Thanks too all the people who helped me figure the problems out!
Now on to texture.
EDIT.
I realise 1400+ tris for an asset like this isn't considered low, but as its for my portfolio and more importantly texture/baking practice I didn't want the overall look of it to suffer.
Finished off adding small normal details in NDo, and moved onto the diffuse.
Just trying out some different colour & font combo's at the minute.
Would love some crit if you have any.
Thanks. BreaK-
I'd love a bit of crit.
Thanks.
Thanks man, yeah....I'm not too sure how to create/add parallax mapping yet. Can you link me any decent tutorials?
I've had a bash at creating one in XNormal, and applying it in Marmoset, but it looks crap and is stretching the textures.
Noob question here.
Black is -
and white is +???
Parallax will always stretch, the only way around that is to model it in which would not be a good idea for something like this unless your engine handels it better that way.
Thanks man. Had a play around and might have something that looks ok.
I'm no expert on how displacement maps should look, so I cant easily spot if anything's wrong with it!
Heres a couple more screenshots.
No Gloss or Spec maps yet.
Firstly a shot of where I am with wearing the paint down.
This is a shot of the model with the disp map applied.
Once again any crit would be welcomed.
Thanks. BreaK-
Here you are.
Probably a little too many supporting edges tbh, but because of all the indents being the same, and running along the entire length of the object I had to put them in to stop the normal warping.
Again, not as low as I could have got it, but I like the end result.
Diffuse - Normal - Gloss - Specular
I've toned the specular down and added the gloss which gives a slightly more matt finish. Hopefully anyway.
Heres a final shot.
Let me know what you think guys, before I call this done.
Thanks. BreaK-
Yeah I thought that, but I'm going for the matt look, soo I've tweaked it up a little more but not too much.
Here's the last shot. Would love a bit of feedback on the texture guys, being only the second metal texture I've done, I'd like to improve more with your help.
Here you go.
Thanks for your input computron.
the biggest problem is there's not enough basic material variation. look at your spec and gloss maps, there's really no variation because of the limited range (its all midtones) lack of color and the same cloudy overlay throughout.
for the range:
plan out your materials before you make them. by having a fair range of materials you will get some nice contrast. you've got 4 different materials here (main painted blue metal, bare metal, rubber seal, stickers) but they're not represented in the spec and gloss. specular and gloss maps are both utility maps so they should really have a good range of darks, lights, and mids to represent your materials properly. think about how the real materials act, try to translate that into your maps, then execute.
for lack of color:
this is partly due to your bland overlays, but it's important to remember that the reason why we have colored specular maps is not really for overall tint, but for variation. for instance, the bare metal underneath the blue paint just kinda blends in to the paint because it has the same tone and specularity. if you made the bare metal darker on the specular and gave it a different tone it would probably stand out more. color gives life to boring materials.
for the boring overlays:
all you have now is just a cloudy super generic overlay for every material. go check out photos of the real thing, figure out how it wears, and add some unique photos for each material. it's also important to translate this real wear into the appropriate maps, because some wear only affects the gloss and some only affects the spec, while others may effect the diffuse too. this is really just where common sense and thinking come into play... use your head and it shouldn't be too hard.
the other thing is that your paint scratches look blatantly hand painted. remember that things like paint either chip (grab those shapes from photos) or get scraped with varying opacity (use photos to mask the hand painted edge scrapes so they have variation between scraped and not scraped).
sorry if that didn't make a ton of sense but i am severely lacking sleep. hope it helps...?
thanks for your feedback.
Yeah I know I need to use photo reference in my textures. Like I said, its the second metal texture I've attempted, so I'm still learning what specular & gloss values do to the image when in engine.
I need to increase my photo library of metal textures too, or go out with my camera.
Im not too sure how exciting I can make a cargo container though. I'm going to attempt something a little more dynamic next I think.
Thanks for the feedback man. I'll put it to good use.
Better or worse guys? help me out.
First attempt at this. I've created my site to store my folio on.
You can find it at www.break-art.com
Although I'm still updating it atm, could you tell me what you think of the layout.
I used Carbonmade to make it as Im rubbish and dont know how to create my own site from scratch. I've added a custom url though to make it seem a little more professional.
Ive added a WIP thread....is this a good idea?
Thanks!
Break.