Sci-Fi Train Interior
polycounter lvl 8
Hi all, my name is An-Tim Nguyen and I'm aspiring to become a 3D environment artist after finishing my studies at the Art Institute of California - Orange County. Right now we're about to start our three-week summer break so I thought that it'd be a great opportunity to work on a little environment for my portfolio.
I'd like to thank Don Ott (username: Ott) for pushing me to post my progress on polycount since it has been a while for me, and I'd also like to thank Brad Boyles (username: SouthpawSid) for being such a great supporter and friend.
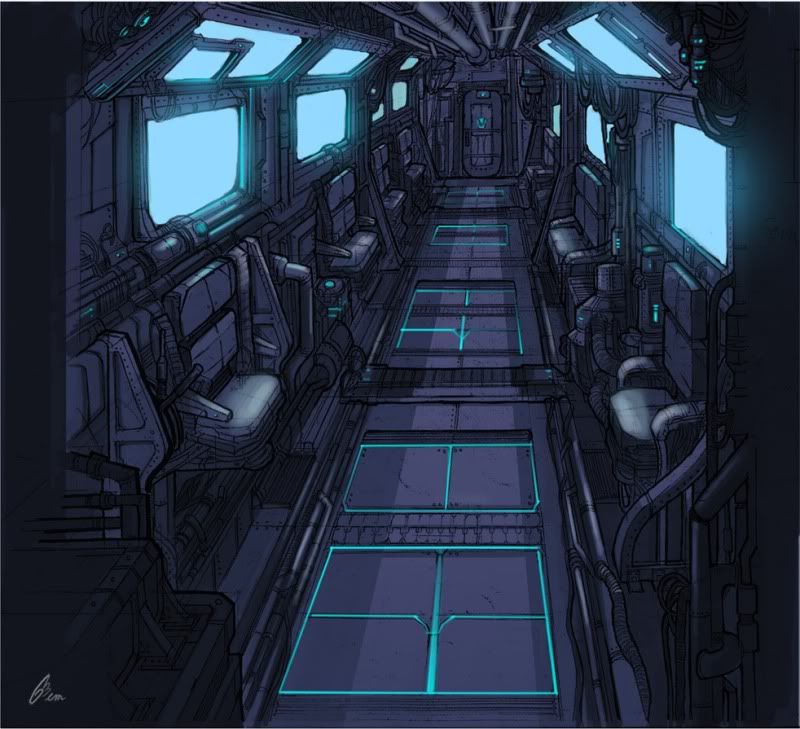
The concept art I'll be going off from is from my friend Gem Lim who graduated from Art Center not too long ago: http://lonewingy.blogspot.com/2008/01/train-interior-render-train-interior.html I got her permission a few months back to create a 3D version of it in UDK but I never got around to doing it until now. I hope she likes the end result. Initially I was going to give myself an entire week of crunch time to make it from start to finish until I learned that my family was going to pay me a visit for the entire month, so we'll see how it goes. Hopefully Murphy's Law will be merciful this time around.
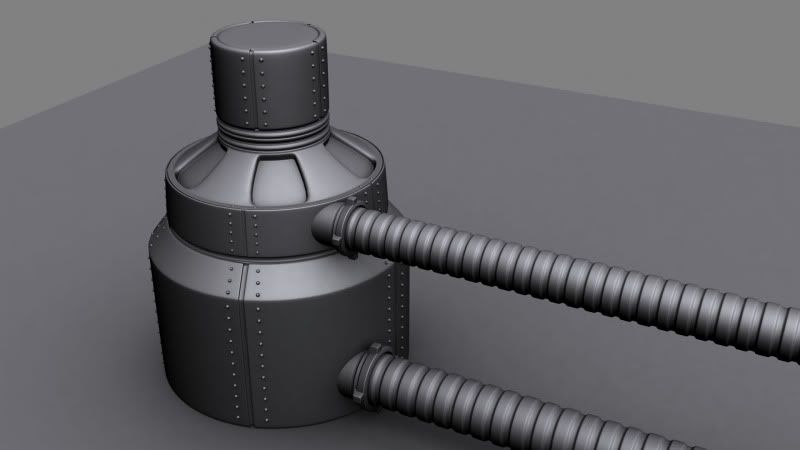
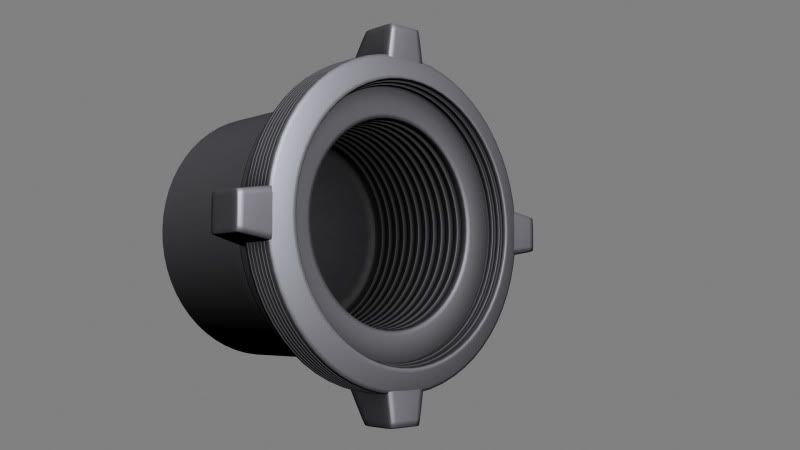
 Right now I just kinda started modeling the high poly mesh of what appears to be some sort of furnace asset in the mid-ground on the right. Took me a little bit longer than expected, but I'm still optimistic that I'll be able to piece this environment together quickly because of how modular it is. Also did some detailing on the inside of the pipe connectors (?) just in case I wanted to throw some of them around in the environment as well, popping out of the walls and connecting to the many tubes or something.
I am really looking forward to your guys' feedback, both positive and negative. Hopefully I can gain something constructive from this experience and learn new things.")

I'd like to thank Don Ott (username: Ott) for pushing me to post my progress on polycount since it has been a while for me, and I'd also like to thank Brad Boyles (username: SouthpawSid) for being such a great supporter and friend.
The concept art I'll be going off from is from my friend Gem Lim who graduated from Art Center not too long ago: http://lonewingy.blogspot.com/2008/01/train-interior-render-train-interior.html I got her permission a few months back to create a 3D version of it in UDK but I never got around to doing it until now. I hope she likes the end result. Initially I was going to give myself an entire week of crunch time to make it from start to finish until I learned that my family was going to pay me a visit for the entire month, so we'll see how it goes. Hopefully Murphy's Law will be merciful this time around.
Right now I just kinda started modeling the high poly mesh of what appears to be some sort of furnace asset in the mid-ground on the right. Took me a little bit longer than expected, but I'm still optimistic that I'll be able to piece this environment together quickly because of how modular it is. Also did some detailing on the inside of the pipe connectors (?) just in case I wanted to throw some of them around in the environment as well, popping out of the walls and connecting to the many tubes or something.I am really looking forward to your guys' feedback, both positive and negative. Hopefully I can gain something constructive from this experience and learn new things.
Replies
grey box it -> add some simple block colours -> do first pass lighting -> THEN START ON DETAILS
Looking forward to seeing your progress!
QFT. as fun as it is to rush in and get things going and detail like crazy, spend a little longer planning and you will be rewarded greatly down the track and will save you LOTS of time and frustration. learnt this the hard way
You guys are probably right, I think I should have blocked out the environment first to at least get a sense of shape, scale or mood. My logic at the time though was since the layout/composition was pretty simplistic (putting asset detailing aside), it wouldn't become as much of an issue. But now I'm assuming that I could run into problems like the proportions of the window compared to the width of the seat, etc.. Just got too excited I guess, recently wrapped up a truckload of work for a team project at school (did a lot of hand-painted texture work and Unreal material editing, so I really missed modeling my heart out.) :poly128:
The reason why I'm modeling high poly before low poly is because at school, we're more heavily trained towards asset modeling instead of environments (hence why I'm trying to learn from polycount on the side.) I am aware of other techniques like universal textures and multi-sub materials, but in this case since the concept was so rich in unique detail, I decided to build the modular pieces as individual assets. I am pretty confident that this method will be able to give me the results I want, unless pointed out otherwise.
@linkov and Crash: I considered this asset to be significantly large enough in size for some modeling attention. I think it's about waist high while sitting down. I admit though that screw-thread thing might have been overkill. :poly105:
@gsokol: That's exactly what I'm thinking, especially after examining some of the hallway pieces in the Fallout 3 editor (although they've expanded to T-sections, corner pieces, rusted versions, etc.)
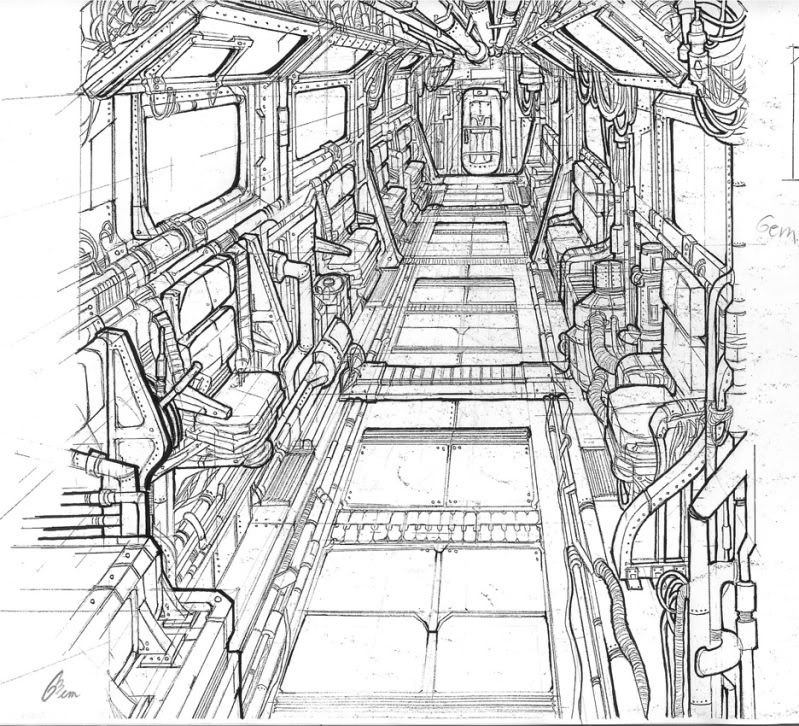
@doeseph: That is a question for Gem, but I believe that she drew the outline version with pencil, scanned it in and cleaned it up in Photoshop, and later did the color paintover.
Thank you once again for all of your feedback! Know that I'm really taking all of your input to heart because not only do I wish to learn more, but I really want to make this beautiful concept justice.
Anyways, work update: didn't get to model as much as I wanted since I was still wrapping up finals, but I'm done now and my summer break has finally started (even though family is in town now.) So I only have this high-poly window to show for now.
For the next update, I intend to make a blockout so that I can visualize my scene in its entirety, and I also want to get a seat done. Or some ceiling piping if I get lazy. :poly135:
Perhaps I should point you in the direction of the countless complaints I have heard you and your friends make about what your school is doing wrong before you make a statement like this...
If you showcase an environment, then say "I want to do an environment", and then try to defend why you are doing it differently than the "traditional" methods of blocking these spaces out first, I have a feeling there is a reason why people will disagree with your methods. This forum is full of people who start off with a couple pieces of HP models for their "environment" that gets buried beneath the pile of "Not actually going to finish this scene" threads we see daily.
If you want to actually take on this environment, start by blocking it in. In a way, this gives you multiple checklists and goals to set for yourself that can separate you from "I want to make a couple cool HP props" to the "I'm going to actually finish this" group instead:
You visually see the number of pieces you need to finish.
You can break down the scene easier by physically seeing the amount of objects that can be modular or unique.
You can plan your textures and which objects will be grouped together.
You can visualize which pieces and details can be used and re-used in other places.
You take care of major scale issues.
You realize that not everything needs to have a full HP model and bake.
etc...etc....etc.
These are just a few of the advantages of blocking this stuff out before you get too gung-ho about HP modeling a few random pieces and then realizing stuff isn't working. There isn't a "right' way to do any of this, but environment modeling and planning is a whole different ball of wax than making a few pretty props. Save yourself some headaches down the road and spend at least a good 2-4 hours blocking all the major shapes in and handling the logistics of the scene first.
+1
In this case, I've basically caged out simplified versions of my current high poly assets, akin to low poly modeling without as much structural detail and saved them as blockout props. Then I'd combine all of the blockout props into this blockout environment, scale everything to each other and tweaked proportions, and now I'll be re-exporting each of those assets and will be re-tweaking my high poly models to conform to those proportions and sizes. Luckily for me, there's nothing I actually have to rebuild from scratch; just mainly pushing and pulling vertices from here to there.
I'd like some opinions on my current work-in-progress blockout: I still need to add in a lot of individual assets and cables to clutter it up (as well as carve holes for windows), but I need a pair of fresh eyes for what I am currently assembling. Right now I am aware that since I've lowered the roof, it now feels more like a compact subway train car instead of where you had a lot of space to stand tall in the concept, but do you guys feel like it's a good idea? What bothers you visually right now? Also, this lighting setup is temporary until I carve out windows for outside light to peer in.
I also had a bit of high-poly modeling fun in-between for making the seats. I still need to tweak the proportions so that they fit the blockout, but all of the structural modeling goodness is able to be preserved. I've also had way too much fun detailing the bottom and backside of the chair, just in case someone decides to make the chairs destructible or something (nah, it was really because I just wanted to have fun with it. Who knows, I might be able to recycle it elsewhere someday.) :poly142:
Next update, I'm hoping to get a much more complete blockout and a little bit more modeling as well. :poly136:
Nevertheless, the show must go on! I've taken your guys' advice and tweaked the blockout even more. Window sizes have been re-tweaked, slight chair positioning as well, but most importantly I've narrowed the width of the wagon so that it would feel more cramped. Unfortunately, I haven't blocked out all of the piping and cabling detail yet which should really add to the visual clutter (as well as some of the cylindrical props.) Another interesting point was that I figured out that 3DS Max's default camera FOV was set at 45 degrees whereas Unreal's default player camera FOV (I'm aiming to import this environment into UDK) is set at 90 degrees. As a result, the environment would look larger and further in-game, so I started using a 90 degree FOV camera in Max to approximate my blockout for more accurate results.
Quite honestly, I was having the biggest problem trying to figure out how to get lighting to work properly for my blockout: I usually don't mess around with high quality rendering settings in 3DS Max since I mainly use Max for modeling before importing into game engine (so all of my lighting and material shader business is done there.) So I was REALLY trying to figure out how to make global illumination to work properly since I wasn't getting the effect I wanted from a standard ambient light: went from radiosity, to mentalray with final gather, etc... I was just wasting a lot of time. Then I figured that hey, since this blockout was intended for UDK then I might as well render it in UDK for lightmass. But while the scale was good, lightmass depends on lightmass which meant that I'd have to unwrap all of my non-final blockout props just to preview lighting: I didn't think that it was the most efficient way to tweak out composition on the fly.
So I stuck to the little I knew about Max renders with skylight, light tracer and default scanline renderer. I used a skylight so that I'd have ambient light and occlusion coming from the windows, but I tinted it to the concept's light color and cranked it up 3.5 times its initial value to really bleed from the windows and overflow the environment (I've also assigned the environment color to the same hue.) I've also added a direct light of lesser intensity coming from the right so that we'd have a sharp cast shadow pattern on the left seats, just to break up the monotony. I'm not digging the floors and wagon door at the end of hallway right now, so I'll be emphasizing on the emissive stripes on the floor panels and creating a light above the door. It should also be noted that the skylight with light tracer settings mattes all materials despite increasing the specular value on the default grey material, so I'm hoping that the specular would be able to help visually break up the geometry even more. :poly121:
Now for some high poly sci-fi box crates for the luggage compartment:
I await eagerly for more critiques on composition and mood lighting. Next update, I aim to add in more of the missing clutter (pipes, cables) into my blockout as well as some new renders of re-tweaked high poly models (because of adjusted proportions.) :poly142:
Some progress shots:
Still need to do some wall piping, cabling, cluttering and also noticed that the end of the hallway needs modifying so that the door would feel that it's fitting inside the wall. Sorry for slow progress.
I'm going to have to get rid of them anyways since I'm redoing the wall piping blockout, so the different assets would be able to mesh with each other more seamlessly.
Anyways, here are some more high-poly piece renders. I have taken some freedoms with the original concept, but I hope that you'll still be able to enjoy it:
Anyways, time for some more render shots (just finished the floor):
Initially the bottom portion of the side walls were going to have more greeble, but I've realized that it would be much more effective to use that space for piping detail I still need to block out. I hope to be done with modeling these high-poly pieces very soon.
If there is any critique I would have - I really feel like this is too cramped for a workable game space. It's already narrow, and all the clutter is making me feel claustrophobic. I know you're working off the concept, but walking through a corridor like this in-game would be a trippy mess, and I don't know if you might want to consider widening it a bit. I think that would also help your mechanical detail to not get lost in itself.
Good stuff though!
However, the lead level designer on that team project managed to push some time aside from his day job so now he's able to take care of the rest of the work needed to polish those environments. Also, one of my teachers learned about this sci-fi environment and decided that I was going to need this if I wanted to graduate (plus a lot of friends have been wanting to see more progress on it.) :poly142:
So lately I've been busting my chops to finish all of the modeling, both high-poly and low-poly (I've also re-proportioned the high-poly models according to the blockout models' dimensions.) I still need to unwrap the low-poly meshes, project all high-poly data, bring the meshes into Unreal with light map UVs, and to do texturing with lighting passes... a LOT to do but my resolve hasn't been weakened yet.
I can only upload 16 images max per post, so I'll be uploading the rest right away in a second post.
These pieces are modular in slices, and each slice has its set of repeated props. UVing should be fun. Stay tuned very shortly!
Note: At first I wanted all of the cabling to have different sets of unique patterns, so I was pathdeforming high-poly cables along splines... but the polycount was just way too extreme. It'll just be faster in Photoshop anyways.
Have you thought about lighting at this point? Will the train be in motion or stationery, these an interesting tutorial over on Hourences for looping sections of geometry, presumably if you attachted it to a number of different coloured dynamic lights you could get some really interesting results as the lights stream past the train
@lhazard: I think that the environment COULD have been wider as well now, even though my intention was to make it look very cramped. xD I have to admit that it is pretty difficult to navigate in it as a player character... not the best level design choice, but my goal is just to make a pretty in-game environment.
@SnakeDoctor: it was painful, but I got it done in a few days in Max. Some assets are sharing the same UV space because of their proportions. Custom keyboard shortcuts saved my life. xD
@Carter: Lighting is going to be stationary because I haven't made any plans for creating an exterior environment (cityscape, train station, etc) which would motivate lighting patterns moving across the train interior.
As usual, some progress shots. Been hauling butt like crazy, had been updating my portfolio website and I'm crossing my fingers that this environment will be part of it as well when completed soon.
I threw all of my assets into Unreal shortly afterwards because I remembered earlier on in this thread, people suggested that I plan out my lighting during the blocking out process so I wanted to see what it would look like. But I think that I ended up going really overboard about it so I'll have to get back to texturing very soon. Right now, models only have AO, normals and emissive masks (since Unreal Lightmass allows me to bake static lighting based off emissive surfaces.) Here's a viewport screenshot.
I initially just used a dominant directional light so that it would naturally act as if the outside light was shining inside. Ambient lighting was really dark but more importantly, the interior felt pretty flat. For those who know me, I have a little bit of an obsession with emissives when it comes to sci-fi themed elements and tend to lean towards Tron striping.
Also thought of Bladerunner while working on it and I remembered that for Tyrell's office there were some water caustic patterns that were dancing on the walls, even though they weren't motivated by any water source. I thought that was pretty cool and since my emissive skydome was very abstract, I thought that it could be visually interesting to create some dancing decals as well (tried lightfunctions at first, but couldn't figure out how to amplify it without bringing up the light brightness.) Also created a quick particle effect as an environmental thing, hoping it wouldn't be too cheesy.
Based on peer feedback at school, the emissive patterns are getting too noisy for the overall composition and it is TOO mono-chromatic for most people's tastes (thus having to move away from the original concept.) I trust their judgment though considering that I'm technically colorblind. =/
Here is a slight suggested adjustment based off a common complementary color scheme:
Re-baking lighting is going to be a pain considering that the blue ambient light is actually motivated by all of the interior emissive surfaces (not light from the outside.) As a result, if my static lighting were to be rebaked, it would be flood the environment with orange instead. Something for me to keep in mind.
Since all of the assets only have AO right now as their diffuse, I'm going to have to create textures (teacher's orders) to create color variation or whatnot. I was suggested to add some greens in the metal and whatnot, with some nice grime and colorful rust... what do you guys think? I'm open to suggestions right now.
Let me start off by saying "eww" at the latest image...with the orange lighting. Please, please don't do that haha.
I see where the feedback you are getting from school is coming from, but what you have there is just entirely too much. I actually like the monochromatic look, but if you were to change the colors, consider not having all the lights the same color. If It were up to me, I'd leave the majority of the lights blue, but change some of the lights to break up your environment a little bit...perhaps change the lighting on the wires to be a different color....or have the floor/pillars be one color but the seats are another...
* Do not go with so many lights!
Use these lights to add accents or better to guide the eye where you want it to be, where you want the viewer to look at. An asset you really like, or 'gameplay' wise a way to the next exit. As you see in the concept there are just a few lights, mainly on the ground to guide your way.
* Do not go with such a hard fog!
I would go with an outdoor light. Let the light from outdoors flood the scene and dont use fog that high in such a close distance. Use Fog, but not that thick. A little air should be okay. This could be better dealt with good lighting, perhaps darkening the foreground or the background, depends on what you want. So you have a nice gradient from front to back.
As for the lighting goes, I think I would do this way:
- Choose a dominant light source and get it right. This can be the sun comming in from the sides of the windows hitting the opposite wall with some warm light and hard shadows. Or it could be the lights on the roof or something like that. This is also a good time to consider composition, use the dominant light source to direct the players attention to something you find important in the scene.
- Add secondary lights and make sure they don't disturb the dominant light tooo much. This could be glows from chairs, sci-fi panels and so on.
- Add the last lights, this would usually be the lights you can use to light up some of the shadow filled areas where you might want to show off details.
Your lighting at the moment clearly lacks shadows and focus points. It's way to evenly spread.
For texturing, one of my teachers has always been on my case because I often shy away from adding as much color as possible in my textures. So to honor his constant badgering, I have decided to push my metal hues to the extreme, especially in the specular map where you can witness strong contrasts between blue and oranges.
I went with the idea of aging the interior because I thought that it would create a nice dichotomy with the modernity that science-fiction design carries. I also got a bit inspired by the visuals of Ninja Theory's upcoming game "Enslaved."
Anyways, I hope you enjoy these screenshots as much as I had enjoyed working on it. If there are any glaring problems you could point out, please say so so that I can start fixing it. Also lighting settings are set to "preview" quality so I'll be rebaking lights soon enough.