Any tips for normal mapping curved surface?
polycounter lvl 7
Hi All
I'm having a few issues with normal mapping and it would be great if someone could point me in the right direction.
Basically, I'm trying to make the following shape:
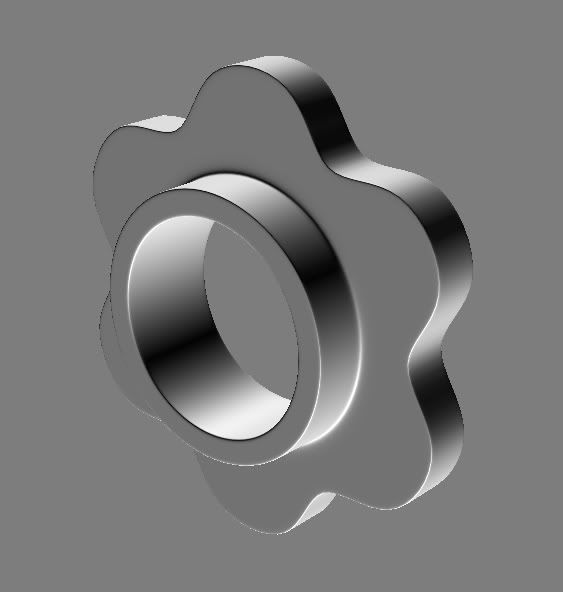
So I've constructed the low poly as follows:
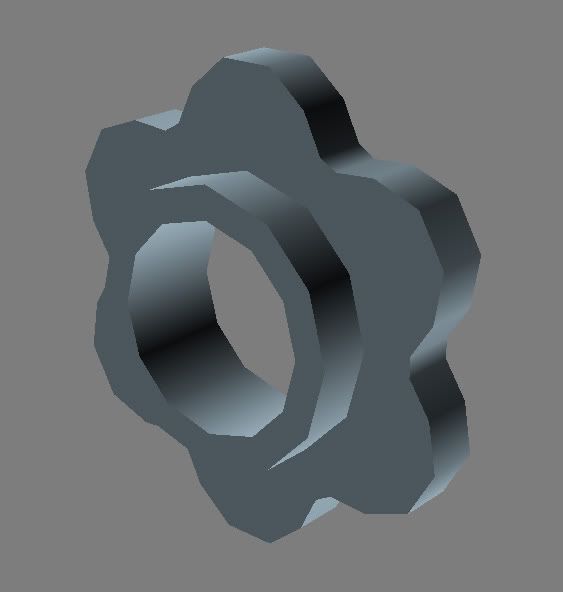
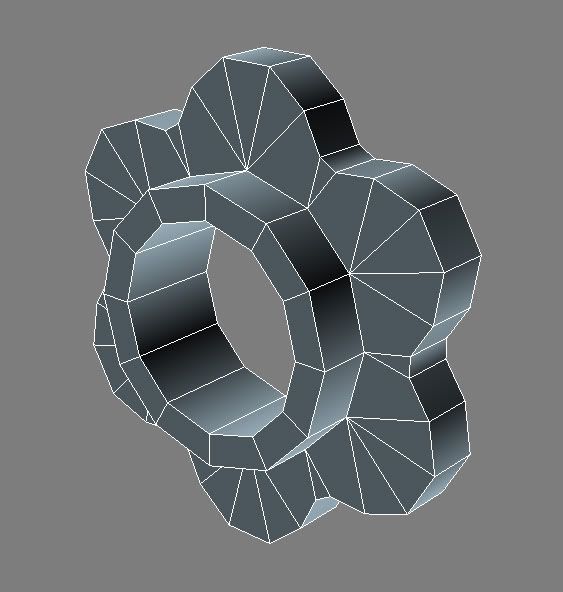
It's currently 240 triangles. I put together the UVs from Ben Bolton's tutorials ie - each smoothing group has it's own UV island. Now, when I attempt to bake the normal map, this is what I get:
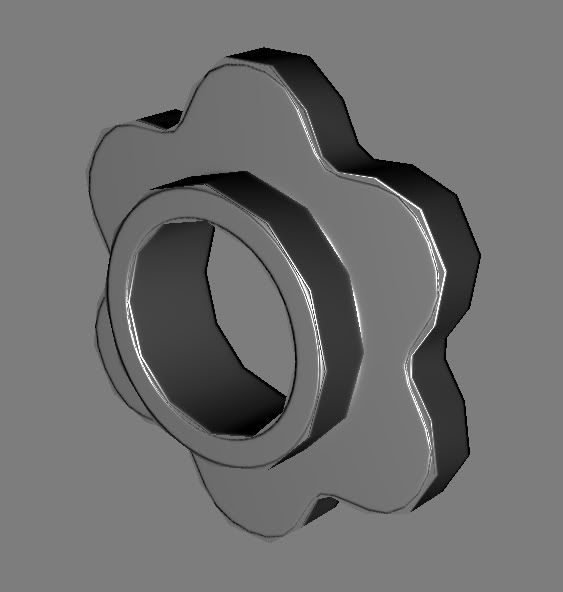
Now, I understand a little bit about normal maps and can see what it's trying to do, but overall it's not doing a very good job and I want to know how I can approach this better.
Is adding more poly's the best way? Or perhaps reviewing the smoothing groups and tweaking them, or just using one smoothing group and UV island?
I'm open to all suggestions, so please help me out.
Thanks!
I'm having a few issues with normal mapping and it would be great if someone could point me in the right direction.
Basically, I'm trying to make the following shape:
So I've constructed the low poly as follows:
It's currently 240 triangles. I put together the UVs from Ben Bolton's tutorials ie - each smoothing group has it's own UV island. Now, when I attempt to bake the normal map, this is what I get:
Now, I understand a little bit about normal maps and can see what it's trying to do, but overall it's not doing a very good job and I want to know how I can approach this better.
Is adding more poly's the best way? Or perhaps reviewing the smoothing groups and tweaking them, or just using one smoothing group and UV island?
I'm open to all suggestions, so please help me out.
Thanks!
Replies
tell me what app and I can maybe help you out.
Here is my UV's... Please don't judge! They are just a quick test, I plan on doing them properly later...
As you can see, they are basically split up by smoothing group.
However, there is a way to solve the issue completely using a different method. If, instead of creating a smoothed high poly, you can copy your low poly, and bevel all the edges you want smooth, and bake from that. Since there will be the same number of divisions, the only smoothing info you will get will be the beveled edges. So it will still look faceted, but it will also look smooth on the edges and won't have any errors.
This post demonstrates the method http://boards.polycount.net/showpost.php?p=1086613&postcount=6
I do this for almost all of my round shapes, there are some limitations to the method, but it is usually the best way to go.
here's some handy info:
http://wiki.polycount.net/Normal_Map#head-a31a81f6af2fac671775f40f4e2c64d6f4cf9b5f
replied too slow!
So, in the above images the projection was just reset to sit flush with the low poly.
I just did a test though and pushed it out a bit, but it doesn't seem to make any noticeable difference. For arguments sake here is the cage pushed out a bit:
Again, I can see what it's trying to do... Is it right to have the high poly completely enclosed?
EDIT: Far too slow...
Could you clarify what this means exactly? So I chamfer all the edges on the low poly prior to baking, then delete the edges afterwards?
The bottom part of that link.
Your first post seems to indicate that I chamfer the low poly, bake from the high poly then remove the extra edges from the low poly,
whereas Predators post indicates that I ditch the high poly, create a new 'high' poly by copying the low poly and chamfering the edges, then bake from that.
I'm afraid I'm now more confused than when I started
^^Start from the beginning and prepare for mind implosion...(happend to me), but its an awesome read and you learn so much. (assuming you aren't already digging through it)
Thats the best advice I can give, because I don't know enough to help without confusing you more or just giving wrong advice :thumbup:
I see your point, I think my problem is that I'm trying to use the normal map to compensate for low poly geometry, which is why it is struggling so much at certain angles.
For instance, here is the low poly with a bit more detail (456 tris, vs 240 for the original), and it looks a lot better.
I'm guessing that with smaller or more far away geometry it's OK to use simple meshes because the visual anomalies don't really come into effect until up close?
Thanks
But you guys keep posting about # of sides and other issues related to skewing etc, ignoring the real problem.... CW nailed it in his first couple posts.
Both of these suggestions are generally bad advice.
A. adding geometry to your low, baking, and then removing the geometry is quite terrible advice, as you're changing the mesh normals and will introduce smoothing errors.
B. This may help from some angles, i know people really like to get huge rage boners about some minor skewing on edges, but the fact remains that straightening edges may improve from a couple angles, but will actually make your mesh look quite a bit worse in most cases.
Also, if your design requires a lot of complex cilindrical shapes with very little sides, this is something you should try to attack and find a creative solution for before you get down to baking, the linked example is sort of a worst case, that i personally would try to avoid simply by changing the design, to something that is easier to represent with simplified shapes. This really is key in any high-low workflow, knowing what will and what will not work well when you get to baking.
Do this.
"Bevel the edges on the lowpoly before you bake. then remove IT after." is what I meant. Sorry for the confusion.
No worries Progg, it's all part of the learning curve for me.
You'll notice when add some soft edges to your low, and then use that as your high, it looks better at some very specific, worst-case angles, but in generally, the overly lowpoly look that you see at *every* angle with this method simply looks much worse, and doesn't make up for the gains at these very specific angles.
However, the "normal" method here, actually provides a near seamless highpoly look in some areas and at some viewing angles here, this is pretty ideal IMO. Generally you want to design and build your assets to showcase these angles, as you can do a LOT with not a whole lot of geometry, when you understand where to strategically place some extra edges to negate the wonkyness at acute angles.
Now, to the first problem, and everyone who said it couldn't be fixed, you guys are either confused by what the issue was, or totally wrong. Here is some comparison images showing what CW was talking about, the difference between a welded and unwelded cage.
High and Low OBJS:
http://dl.dropbox.com/u/499159/edgetest.rar
As is the silhouette is still really rough and with a little more geometry you could minimize the errors that are caused by the significant difference in geometry.
I still say normal maps are meant to mostly fake surface detail and suck at faking a high poly silhouette.
For one, you didn't actually bevel the edges, you just added loops and used edge smoothing to get a beveled look. However, if you actually use the bevel tool to created smooth edges, you get much better shading, which translates to a better normal map bake.
For example, beveled on the left, your version on the right.
I was also a bit troubled by your overall line of reasoning in choosing to use the HP method. The reasoning that something looks really good from one angle but really bad in another is something I don't think fits well with art for games. Sure you can pick angles where it looks good for a portfolio piece, but in production you don't really have that luxury. Sure, you always try to design assets to where they can be seen the best, but a prop in a game world can almost always be seen from every angle, especially dynamic props, and being able to bake a normal map that looks 90% as good from every angle seems preferable to 100% from 1 angle, and 20% from another.
Also, these are tiny feature on a model so in this case it isn't a huge issue either way. Many of the props I've made have large disks, where wavy lines like that would be very noticeable and really look crappy if made using the hp way.
Anyway, the point I'm trying to make is that I don't think the beveled method got a fair shake in your example, and that in production, the beveled way is usually preferable, at least in my experience. Sometimes of course you do need a HP (primarily if sculpting in other detail where you need to be able to smooth), but generally beveling the low poly is a valuable technique to know.
This was something i thought about right after i did the bake, sure i could improve the quality of the bevel a little, but the main point that this object looks obviously low poly from every angle still stands the same as it does on my example.
You always want to create your asset in a method that will show well for the intended viewing angle. Generally being creative in how you use your tri budget is how you can create really good quality assets, tricks like this tend to be pretty hackish and show their negatives blantantly. In an ideal situation you can simply use enough geometry to not have wavy lines where you know it will be a problem. Being a bit creative with your design or how you implement the design can go a long way, but this isn't always an option.
As far as how good this looks from this angle and how bad it looks from another, that is pretty subjective, and like i've said before, i'll take my object looking highres half the time over looking lowpoly 100% of the time, its as simple as that to me.
This is sort of a worse case asset here, and realistically i wouldn't choose either method, i would be adding some more geometry, or simplifying the shape to something that will bake better if adding more geometry wasn't an option.
There is a lot to be said about a *reasonable* amount of wavy lines, EI: slight wavyness can help sell a model a great deal, excessive wavyness is always going to be a problem(and yes, my example was excessive, but again, its one of those worst case things). When you reduce everything on your mesh to harsh straight lines, you loose that little bit of room where your normals actually can help to fake silhouette, and it simply looks unnatural.
Scale is very important, but even still, i would rather my object be convincing as a high-res imitation at *atleast some* angles, than be obviously jagged and low poly looking at *all angles*.
Its funny, because doing a proper high-res for this sort of shape at the very least, was actually faster than doing the low-poly hack version here, so i dont see a huge problem in production. Unless you're trying to say something else here, if so i think i've responded to it above.
At the end of the day my #1 goal will be to get my models looking as close to highpoly as possible, and i would say that its a rare day when throwing some bevels on my lowpoly mesh is going to accomplish that goal. You're free to do that if you deem it acceptable however.
[edit] Here is a fun little excessive, take a second and assume this is small part of a larger asset, its quite obvious to me here that on a smaller scale, the problem of wavy lines vanishes almost entirely, and that the HP version still manages to fake the silouhet in areas to an extent. The lowpoly bevel version however, looks like the same obviously lowpoly mesh from every angle.
So again, scale is very important, but the HP method to me clearly scales down quite a bit better. On a more complex asset, this will be very apparent.
Both ways are valid though, and while I still disagree with you on which to use and when to use them, I don't think there is anything new to say, so I'll agree to disagree
This has pretty much nailed it, but for my educational purposes can you please explain what you mean by welded and unwelded cages? Not sure if you mean the low poly mesh or the projection cage. I seemed to have fixed the problem myself but I'm ashamed to admit I don't know how I did it...
Secondly, Predator, I assumed that when you say bevelling edges you just mean chamfering. But your subsequent discussion with EQ indicates that it might be more than just that, by including curved surfaces. Is this something that can be done in Max, or is it a modo feature? Because I can't see a bevel option for edges.
Thanks again everyone, but in particular EQ and Predator for the trouble they've gone to.
Chamfering in Max is the same thing as Beveling in Maya. .. Well atleast until you start turning up the number of edges... Unless they fixed the weird topology that sometimes use to happen in Max. But that was a long time ago.
Cheers, I know that multiple chamfering with decreasing widths can introduce nice curves, I was just hoping there was a modifier that did it without the hassle!
the correct method IMO that he outlines will also give !00% better shadeing when veiwing the side profile...where as the beveled HP only gives you tiny improvements along the edges and the same low poly shading everywhere else
sorry guys I fell off the thread last night - had some personal volcano go off!
But that's the point I was trying to work towards!
For me, personally, ockham's razor sort of applies, use the most standard, most straightforward method as much as possible. Unless it is a *really* specific kind of asset or for a super specific use where you can do some clever wrangles and guarantee it won't look worse in any case.
If the silhouette needs more res for the screen size of the thing, then thats fine but I really hate having to dick around with low poly adding magic geometry just to make something work in a straightforward way. Just a personal bugbear of mine. ;-)
In max, by default if you're using a cage, your cage should be "averaged" or "welded", unless you have a really old version of max, or your edges are actually split instead of just using hard edges(smoothing groups). To get unwelded results you have to go into the bake options and click "use offset" this will use the mesh normals as they are, and not average them.
In maya, i'm not sure which is the default method, but you can go into the advanced options in surface transfer and set "Match using" to "geometry normals"(averaged) or "surface normals"(using mesh normals as is, ie with edge splits.
In Xnormal, the default method is to use an "unwelded" offset value, basically the same as doing the offset method in max. To get an averaged cage, you need to load your mesh into the 3d viewer, set up a cage, save your mesh in xnormal's proprietary format(SBM?) and make sure that mesh is being loaded in the lowpoly tab, and that "use cage" is enabled.
I hope that helps!
There is no perfect solution for the topic, you can't get an artifact-free normal mapped lowpoly cylinder that simulates the look of a more smooth cylinder in every aspect.
There's method A where you get a good high poly look at specific angles, and "wavy" line artifact at other angles.
Method B can give you a good beveled look at edges, but you're missing out on faking the cylinder having a more sides that method A does.
Personally I think I'd prefer method A in most cases. Combine this with the "superspecular" method of adding bevels if you can afford it and you will have a very clean normal map without nasty gradients all over the place.
Here's how I'd do it if I could afford the extra geometry. Settled for using one loop of hard edges as well. Rearranged the UV a bit, didn't bother optimizing the layout for this example.
If you're going to go in and add those small bevels to your low, you're actually adding a *lot* of geometry, geometry which could instead be used to simply improve the silhouette, thus reducing any wavyness and making the asset look much better. Adding bevels on top of a jaggy mesh to fix wavyness is almost *always* counter productive. You end up with a better bake, but at the cost of more geo, and the same poor silhouette. I'de be curious to see your tricount there.