Home Technical Talk

Tip-Zero Effort Beveling for normal maps

13
polycounter lvl 9
Offline / Send Message
r_fletch_r polycounter lvl 9
I've searched the normal mapping thread and i didnt find this tip so I thought I'd post it here.

If you are rendering with mental ray there is a superb time saving feature called 'Round Corners'.
Basically any hard edges the shader sees are automatically 'beveled' using a bump mapping trick.
The cool thing about this is that it's RTT compatible.


Heres a rendered example of the shader in action. both objects have exactly the same geometry.
example.png

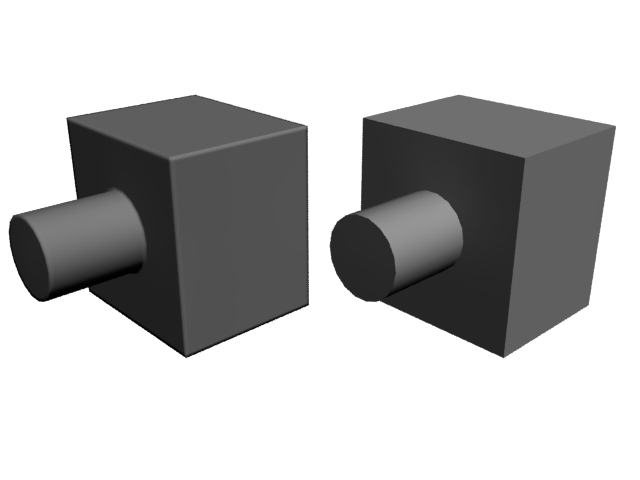
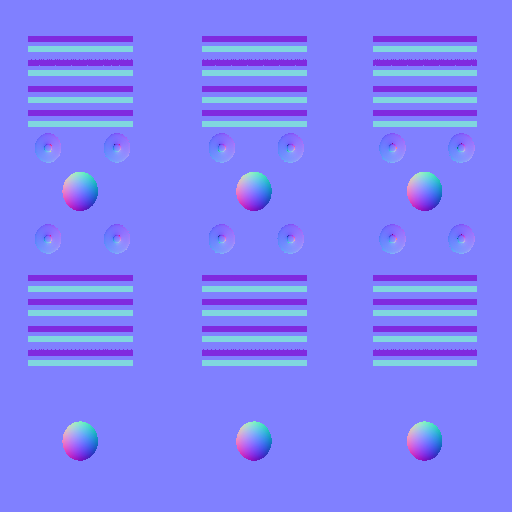
As as example i created this simple scene containing some boxes and a few bits of floating geometry The boxes are arranged in a grid pattern but obviously as they are not beveld they read as 1 flat surface.

scene.png

Using a Standard material to bake a normal map i get this

rc_test_1_NormalsMap.png

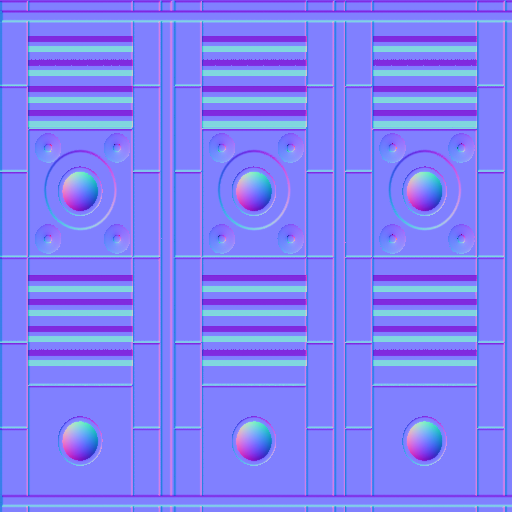
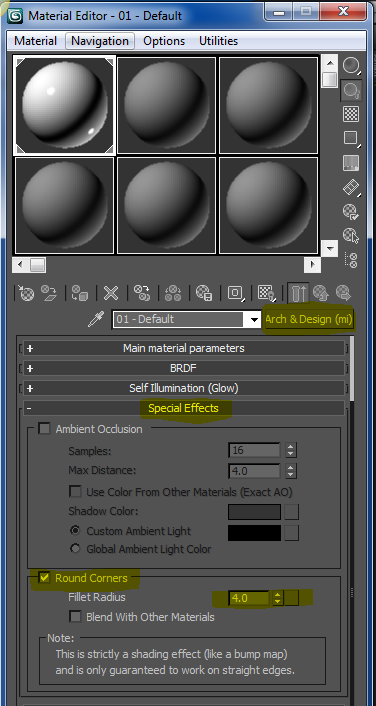
Now if I add a Arch & Design Material to the geometry, scroll down to 'Special Effects' and turn on round corners. I get this:

rc_test_NormalsMap.png

material_setting.png

EDIT:
Speed Issues
Ok there are some things you can do to speed this all up.
Firstly turn off Final Gather. this really slows things down
Secondly I've written a script to apply the round corners shader to a standard material which will render quicker
--Create a Standard Material with a round corners shader
mat = standardMaterial()
mat.bumpEnabled = on
mat.bumpMapAmount = 100
mat.bumpMap = Architectural__Round_Corners_Bump ()
meditMaterials[1] = mat

This will replace the material you have in slot 1 of the material editor. the shader fits in the standard materials bump slot. so you can tweak the radius there

Replies

  • cryrid
    Offline / Send Message
    cryrid interpolator
    Awesome. I just tried plugging a Rounder_Corners node into the Material (Softimage) and used Rendermap to capture the normals, and it created the same effect. This might come in handy.
  • hyrumark
    Offline / Send Message
    hyrumark polycounter lvl 12
    Wow that is amazing. I can't believe I've never heard of this before. If this is as good as it looks, goodbye sub-d modeling!
  • hyrumark
    Offline / Send Message
    hyrumark polycounter lvl 12
    Holy crap it even works with floating, separate geometry. The cylinder is separate and intersects with the extruded box, yet it still gives a nice chamfered edge where they intersect! This is going to change my life!

    bevelMR.jpg
  • GarageBay9
    Offline / Send Message
    GarageBay9 polycounter lvl 13
  • Peris
    Offline / Send Message
    Peris polycounter lvl 17
    haha that's really neat!
  • pior
    Offline / Send Message
    pior grand marshal polycounter
    To top it all, its available in both maya and max :P
    (Bram : ask Martin! He'll show you)
  • boyluya
    Offline / Send Message
    boyluya polycounter lvl 10
    Nice! Have to try this one!
  • sampson
    Offline / Send Message
    sampson polycounter lvl 9
    no need for turbosmooth versions? on simple props?! :O
  • r_fletch_r
    Offline / Send Message
    r_fletch_r polycounter lvl 9
    For you Maya users its available in mia_material. You can also unlock the node in the mia and use it in the bump slot of any material. I just wish they'd made a version for the scanline renderer

    Another trick to be aware of is you can use multiple versions of the material with different radii.
  • Entity
    Offline / Send Message
    Entity polycounter lvl 18
    Yeah, the arch&design material has been a godsend for us architecture folk :)
  • MoP
    Offline / Send Message
    MoP polycounter lvl 18
    Very cool, thanks for the tip :)
  • ZacD
    Offline / Send Message
    ZacD ngon master
    Anyone care to help and XSI user figure out how to set this up/try it out?
  • r_fletch_r
    Offline / Send Message
    r_fletch_r polycounter lvl 9
    Plug a bump/round corners node into your materials bump channel
  • r_fletch_r
    Offline / Send Message
    r_fletch_r polycounter lvl 9
    aparently its in nodes->illumination->architectural
  • Spatz
    Offline / Send Message
    Spatz polycounter lvl 13
    very nice...thanks man!
  • Neox
    Offline / Send Message
    Neox veteran polycounter
    never thought of using this for normalmaps even though i'm using it the whole day currently :D
    thanks

    never baked with mr so far it always seemed slower o.o
    however yan you turn on some sort of texture sampling there too as the resulting map you showed is pretty aliased
  • Michael Knubben
    Holy shit, this is rtt compatible? That's news to me!
  • divi
    Offline / Send Message
    divi polycounter lvl 12
    always felt like "that would be too awesome, no way it's gonna work, so why even bother".
    sweet!
  • vik
    Offline / Send Message
    vik polycounter lvl 13
    Nice one cheers!
  • Ghostscape
    Offline / Send Message
    Ghostscape polycounter lvl 13
    divi wrote: »
    always felt like "that would be too awesome, no way it's gonna work, so why even bother".
    sweet!

    Totally this. When they added this function (I think when they added Mental Ray?) I heard about it but didn't imagine it would actually work with RTT.

    holy shit
  • cryrid
    Offline / Send Message
    cryrid interpolator
    Anyone care to help and XSI user figure out how to set this up/try it out?
    There's a Rounded_Corners node under Nodes>Bump. Plug that into any material's bump port, and change the Bump mode to one of the "Set Bump Vector"s of your choice. Works like a charm.
    zeroeffort_bevels.jpg
  • r_fletch_r
    Offline / Send Message
    r_fletch_r polycounter lvl 9
    Neox wrote: »
    never thought of using this for normalmaps even though i'm using it the whole day currently :D
    thanks

    never baked with mr so far it always seemed slower o.o
    however yan you turn on some sort of texture sampling there too as the resulting map you showed is pretty aliased

    Just turn up the sampling in mental ray. increasing the minimal samples should fix that. I wasnt really focusing on the final result only demonstrating the effect
  • Ged
    Offline / Send Message
    Ged interpolator
    great tip now I just need to figure out when is best to use this and when it would be better to just subd model it
  • Shogun3d
    Offline / Send Message
    Shogun3d polycounter lvl 12
    Really nice technique, thanks for sharing.

    Takes a while to render it out since you really need to up the sampling in order to get clean normals but definitely a time saver.
  • r_fletch_r
    Offline / Send Message
    r_fletch_r polycounter lvl 9
    try upping the minimum sampling and leaving the max samples as they are. that usually helps
  • LiselottePulva
    thanks for sharing this technique, works perfect but slow rendertime.
  • r_fletch_r
    Offline / Send Message
    r_fletch_r polycounter lvl 9
    Ok so i looked at the speed issues and came up with some tips. Check the Original post
  • hyrumark
    Offline / Send Message
    hyrumark polycounter lvl 12
    What filter settings do you use? I've tried a lot of different settings and I can't get a clean RTT bake for the life of me, it always comes out grainy and pixelated along the edges?
  • ironbearxl
    Offline / Send Message
    ironbearxl polycounter lvl 18
    Wow, I would really like to see this feature in xNormal.
  • r_fletch_r
    Offline / Send Message
    r_fletch_r polycounter lvl 9
    hyrumark wrote: »
    What filter settings do you use? I've tried a lot of different settings and I can't get a clean RTT bake for the life of me, it always comes out grainy and pixelated along the edges?


    Without using silly sampling amounts i think the best way is to render oversize.
  • Yozora
    Offline / Send Message
    Yozora polycounter lvl 11
    ironbearxl wrote: »
    Wow, I would really like to see this feature in xNormal.

    yes please!
  • Eric Chadwick
    Great tip! Added to the wiki here, hope to add some pics too.
  • DarthNater
    Offline / Send Message
    DarthNater polycounter lvl 10
    I just sat here and freaked out like the N64 kid....

    This is a big time saver, nice find!
  • Ryan Smith
    Offline / Send Message
    Ryan Smith polycounter lvl 11
    How do i bake the information in maya? IT keeps telling me that i need a source mesh for Transfer Maps to work.


    Edit:

    Let me be more specific. 3DS Max can render procedural material information to a diffuse map or a normal map slot by just rendering to texture. When using transfer maps in maya, this does not work. Maya requires a target mesh and a source mesh or the Transfer Maps doesn't work properly. I have the shader working in the basic renderer, but when i use transfer maps, the normal information does not transfer. Is there a setting that i'm leaving unchecked?

    TL,DR: Can someone please walk us through what you have to do to get this working in maya?

    Thanks
  • nullfed
    Offline / Send Message
    nullfed polycounter lvl 9
    I've never really worked with mental ray before, so I looked for a tutorial on mia_roundcorners. This one covers using the node with maya materials and mental ray materials:

    [ame]http://www.youtube.com/watch?v=lEnsEGlFsBQ[/ame]

    This one uses a slightly different method for using it with MR materials:

    http://vimeo.com/8589074

    My problem (before it even gets to trying to transfer anything to a texture) is that none of these methods work for me on maya 2010. Being totally new to MR settings and materials is making it extra frustrating! Trying all of these methods on a cube gives me a render of a cube..

    Are there some MR render settings I need to enable to get these results? any help would be cool.
  • r_fletch_r
    Offline / Send Message
    r_fletch_r polycounter lvl 9
    measure your mesh and assign a sensible radius for the bevel based on the size of your mesh. this is all very dependent on scene scale.
  • Ryan Smith
    Offline / Send Message
    Ryan Smith polycounter lvl 11
    The problem isn't getting the material to work, it's getting it to bake.

    If anyone has a successful result from inside maya, please show how you did it.
  • MoP
    Offline / Send Message
    MoP polycounter lvl 18
    AFAIK Maya can't use Mental Ray to bake normals (not in Maya 2008 anyway). It can use Mental Ray for everything else but can only use the software renderer for baking normals, if I remember right.
  • Ryan Smith
    Offline / Send Message
    Ryan Smith polycounter lvl 11
    /begin QQ

    Ya cause that makes perfect sense.

    I had to make the switch to maya when i started work at DE, after using max for 7+ years. I have to be honest and say that i am extremely disappointed in Maya's modeling tools and general design.

    It's like they all got together and said, "Hey lets make a program that's super awesome for animation, but lets just half ass everything else, and just let the consumer work it out!" Everyone i know who uses maya and "prefers" it over max or XSI says that they have numerous plugins that "improve" their workflow. I have plenty of plugins for maya at my workstation, however it still sucks compared to Max's out of the box software. Seriously... fuck maya.

    /end QQ
  • DarthNater
    Offline / Send Message
    DarthNater polycounter lvl 10
    Virtuosic wrote: »
    /begin QQ

    Ya cause that makes perfect sense.

    I had to make the switch to maya when i started work at DE, after using max for 7+ years. I have to be honest and say that i am extremely disappointed in Maya's modeling tools and general design.

    It's like they all got together and said, "Hey lets make a program that's super awesome for animation, but lets just half ass everything else, and just let the consumer work it out!" Everyone i know who uses maya and "prefers" it over max or XSI says that they have numerous plugins that "improve" their workflow. I have plenty of plugins for maya at my workstation, however it still sucks compared to Max's out of the box software. Seriously... fuck maya.

    /end QQ

    That's what you get for becoming a Kanuck. Ya should stayed in PA ya bastard.

    Anyway, do they FORCE you to use Maya, I thought most places let you use whatever you want now?
  • nullfed
    Offline / Send Message
    nullfed polycounter lvl 9
    I found the answer - untick 'Use Maya Common settings' in the transfer maps dialog. I got a successful normal map this way. I'm now going to overuse this like crazy!

    no i'm not! spoke too soon! ah well...
  • kdm3d
    I did find a solution to using maya that makes it work just as well as max does for modeling.

    1. navigate to the root maya install directory. Locate the file uninstall.exe. Double click that and follow the prompts.

    2. insert the 3DsMax install cd into your dvd drive...

    well, you all see where this is going. Its a great workaround to getting that soft edge trick to work in maya. (my desperate attempt to keep this post on topic)
  • r_fletch_r
    Offline / Send Message
    r_fletch_r polycounter lvl 9
    lets not turn this into 'one of those threads'
  • Psyk0
    Offline / Send Message
    Psyk0 polycounter lvl 18
    Thanks for this, should be handy.

    Script error for me, max 9 x64, any ideas?
    wtf.jpg
  • r_fletch_r
    Offline / Send Message
    r_fletch_r polycounter lvl 9
    Psyk0 wrote: »
    Thanks for this, should be handy.

    Script error for me, max 9 x64, any ideas?
    wtf.jpg

    thats very weird. delete the line from the script and click the checkbox yourself
    --Create a Standard Material with a round corners shader
    mat = standardMaterial()
    mat.bumpMapAmount = 100
    mat.bumpMap = Architectural__Round_Corners_Bump ()
    meditMaterials[1] = mat
    

    if that doesnt work then try. you will need to set the bump amount to 100
    and turn on bump mapping in the maps rollout if it isnt on.
    mat.bumpMap = Architectural__Round_Corners_Bump ()
    meditMaterials[1] = ma
    

    its also possible that max 9 doesnt come with this shader
    type:
    classof  Architectural__Round_Corners_Bump
    
    into the maxscript listener. if it returns undefined then the shader isnt included in max 9
  • THE 5
    Offline / Send Message
    THE 5 polycounter lvl 13
    divi wrote: »
    always felt like "that would be too awesome, no way it's gonna work, so why even bother".
    sweet!
    Same here!

    Instead of using the script r_fletch_r provides, you could just "unlock" the Round_Corners_Bump Map and then select it from the Map Browser, just like applying a Noise map to the Bump slot (for Max that is).


    Guide to unlock the Round_Corners_Bump Map for all Shaders in 3DS Max:

    STEP 1:
    - Go to <your max install dir>\mentalray\shaders_standard\include
    - find architectural.mi and backup it!
    - open it with notepad and scroll down till you find

    # - Round corners bump shader

    - below that you will find a line that says

    declare shader vector "mia_roundcorners" (

    -delete the "vector"

    declare shader "mia_roundcorners" (

    -save the file and close it

    STEP 2:
    -now find architectural_max.mi just below the architectural.mi and backup it too!
    -open it with the notepad and scroll down till you find

    gui "gui_mia_roundcorners" {

    - below that you will find a line that says

    control "Global" "Global" (
    "uiName" "Architectural: Round Corners Bump",
    "category" "Bump",
    "addApply" "bump",
    "hidden"


    -write a # infront of the "hidden" to comment it out. Ignore the other "hidden".

    control "Global" "Global" (
    "uiName" "Architectural: Round Corners Bump",
    "category" "Bump",
    "addApply" "bump",
    #"hidden"


    -save the file and close it

    STEP 3:
    - launch Max
    - pick a standart material in the Material Editor
    - under the Maps rollout klick on the bump entity
    - choose "Architectural: Round Corners Bump" from the top of the maps list
    - adjust the radius (no clue what the other settings are good for)

    DONE!


    I guess the most of you already unlocked that, just wanted to finaly contribute something to Polycount too ;)
  • r_fletch_r
    Offline / Send Message
    r_fletch_r polycounter lvl 9
    THE 5 wrote: »
    Same here!

    Instead of using the script r_fletch_r provides, you could just "unlock" the Round_Corners_Bump Map and then select it from the Map Browser, just like applying a Noise map to the Bump slot (for Max that is).


    Guide to unlock the Round_Corners_Bump Map for all Shaders in 3DS Max:

    STEP 1:
    - Go to <your max install dir>mentalrayshaders_standardinclude
    - find architectural.mi and backup it!
    - open it with notepad and scroll down till you find

    # - Round corners bump shader

    - below that you will find a line that says

    declare shader vector "mia_roundcorners" (

    -delete the "vector"

    declare shader "mia_roundcorners" (

    -save the file and close it

    STEP 2:
    -now find architectural_max.mi just below the architectural.mi and backup it too!
    -open it with the notepad and scroll down till you find

    gui "gui_mia_roundcorners" {

    - below that you will find a line that says

    control "Global" "Global" (
    "uiName" "Architectural: Round Corners Bump",
    "category" "Bump",
    "addApply" "bump",
    "hidden"


    -write a # infront of the "hidden" to comment it out. Ignore the other "hidden".

    control "Global" "Global" (
    "uiName" "Architectural: Round Corners Bump",
    "category" "Bump",
    "addApply" "bump",
    #"hidden"


    -save the file and close it

    STEP 3:
    - launch Max
    - pick a standart material in the Material Editor
    - under the Maps rollout klick on the bump entity
    - choose "Architectural: Round Corners Bump" from the top of the maps list
    - adjust the radius (no clue what the other settings are good for)

    DONE!


    I guess the most of you already unlocked that, just wanted to finaly contribute something to Polycount too ;)

    :) nice one. I never could work out how to get this to show in max 2009
    it worked fine in 9.
  • 00Zero
    cool. saw the rounded corner thing a while ago, never really thought you could use it like that.

    For simple edge bevels on 90 degree corners i usually just take the UV layout into photoshop and fill in each face with white and then crazybump it. change the sliders to get the size of bevel you want and adjust intensity. works like a charm. just in case you want the same effect relatively quickly and youre not relying on MR.
  • Psyk0
    Offline / Send Message
    Psyk0 polycounter lvl 18
    Hey thanks The 5, i needed to add the # for it to show up! :)
  • r_fletch_r
    Offline / Send Message
    r_fletch_r polycounter lvl 9
    00Zero wrote: »
    cool. saw the rounded corner thing a while ago, never really thought you could use it like that.

    For simple edge bevels on 90 degree corners i usually just take the UV layout into photoshop and fill in each face with white and then crazybump it. change the sliders to get the size of bevel you want and adjust intensity. works like a charm. just in case you want the same effect relatively quickly and youre not relying on MR.

    You need to tell Ryan about that. I bet he world code it as a feature
13
Sign In or Register to comment.