The BRAWL² Tournament Challenge has been announced!
It starts May 12, and ends Oct 17. Let's see what you got!
https://polycount.com/discussion/237047/the-brawl²-tournament
It starts May 12, and ends Oct 17. Let's see what you got!
https://polycount.com/discussion/237047/the-brawl²-tournament
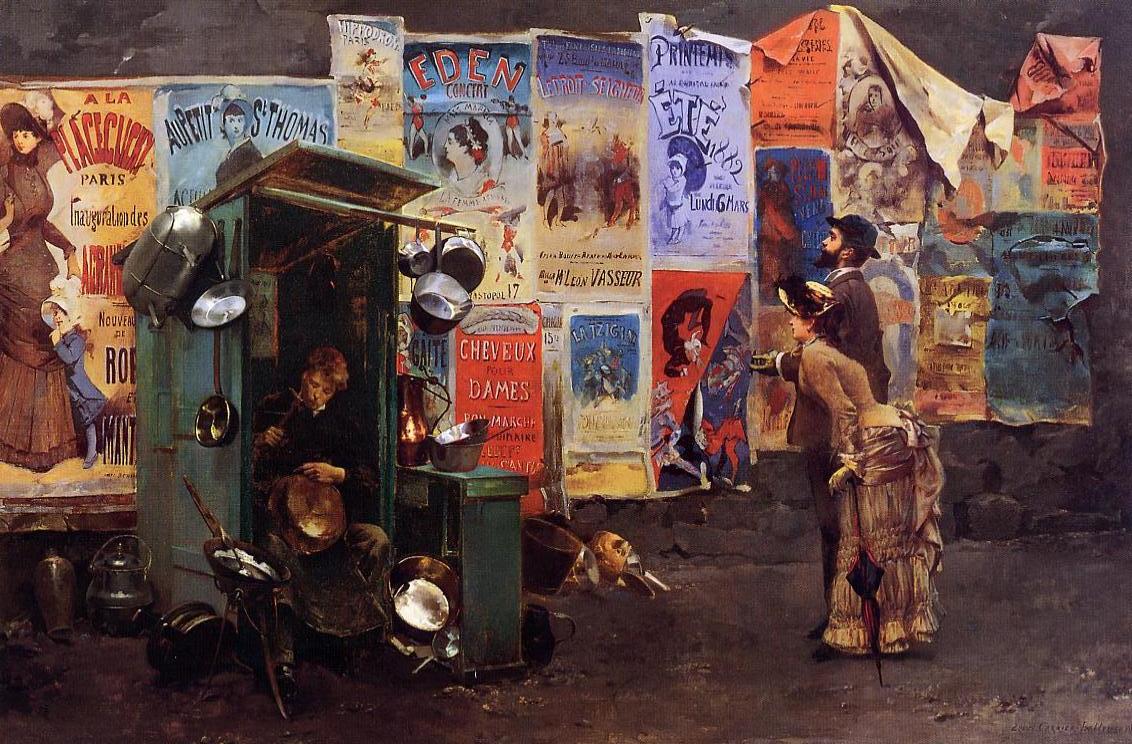
Beleuse Carrier - Mending the pots
Hello everybody,
this is my second project trying to learn more about the common used programms and workflows.
I'm trying to recreate the picture of beleuse carrier - mending the pots. Here's the reference:
I already did the blockout in 3ds Max and one brick wall.
When everything is done in 3ds max I want to export it all to the cryEngine.

Before, when I had to do walls and flat surfaces, I just loaded a wall texture into crazybump and saved its normal and spec files to use it then in the gameEngine or max.
This time I tried another approach for the brickwall, basically following this tutorial http://www.doom3world.org/phpbb2/viewtopic.php?t=17688.
I modelled a couple of bricks myself, placed them applied cement as well and baked the normal and the diffuse map out of it.
The result was ok, but the normalmap didn't have to much details, so I mixed the 3ds max normal map with a normalmap I did out of the diffuse in crazybump. The results were better then.
But in the end I am asking myself, is it really worth it to do all the modelling for the single bricks and the time lost for just a bit better normalmaps?!
Here's a comparison: On the left the low poly with its normal, diffuse and spec-map applied and on the right side the high poly.

Close-up:

Unfortunately, I don't know why, the baked diffuse lost a lot of quality and details (I baked it at 2048*2048 )
Does someone have an advice how to keep the details and improve the texture quality?
I hope you guys can help me out. I really want to do everything right from the beginning.
Greetings Andr
this is my second project trying to learn more about the common used programms and workflows.
I'm trying to recreate the picture of beleuse carrier - mending the pots. Here's the reference:

I already did the blockout in 3ds Max and one brick wall.
When everything is done in 3ds max I want to export it all to the cryEngine.

Before, when I had to do walls and flat surfaces, I just loaded a wall texture into crazybump and saved its normal and spec files to use it then in the gameEngine or max.
This time I tried another approach for the brickwall, basically following this tutorial http://www.doom3world.org/phpbb2/viewtopic.php?t=17688.
I modelled a couple of bricks myself, placed them applied cement as well and baked the normal and the diffuse map out of it.
The result was ok, but the normalmap didn't have to much details, so I mixed the 3ds max normal map with a normalmap I did out of the diffuse in crazybump. The results were better then.
But in the end I am asking myself, is it really worth it to do all the modelling for the single bricks and the time lost for just a bit better normalmaps?!
Here's a comparison: On the left the low poly with its normal, diffuse and spec-map applied and on the right side the high poly.

Close-up:

Unfortunately, I don't know why, the baked diffuse lost a lot of quality and details (I baked it at 2048*2048 )
Does someone have an advice how to keep the details and improve the texture quality?
I hope you guys can help me out. I really want to do everything right from the beginning.
Greetings Andr
Replies
Or maybe it's because of how you did a render-to-texture approach? I'm not really sure actually. An answer to your nomad map issues is that alot of edges are 90 degrees which doesn't give normal information. Another thing that's making your texture seem very flat is that there is no ambient occlusion around the bricks, everything seems like it's on the same plane.
The diffuse still doesn't look as crisp as the high-poly, but at least the bricks don't look that flat anymore with an AO multiplied to it.
I don't think it's a viewport issue, I am using 3point shader lite and checked the diffuse in photoshop as well.
Is there a way to bake a much higher quality diffuse, so that the result comes close to the high-poly diffuse quality? My renderer is set to default. I've tried it with the mental-ray renderer. It took way more time and the result was almost the same, not worth the lost time...
Exactly what part of your high poly mesh are you telling it to render at 2048?
Now I mended a lot of pots and objects. Still quite a lot of stuff to do, though.
By the way: How would you create the posters on the wall? As planes with the poster texture on it, no?! I hope this gives no flickering..
If you are taking the scene into an engine, there might be a better solution. In UDK, I might make it a decal instead of a plane.