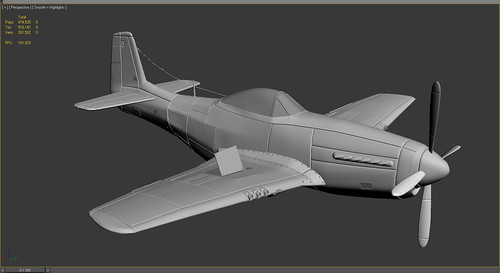
p51 Mustang WIP/feedback plz.
So heres the deal. These are some screenshots of the plane i've been working on. I am not sure if I am going in the right direction on modeling out the plates in the high poly or not. Any advice would be appreciated as I was about to start unwrapping the low poly but I'd rather not unwrap it only to find out the high poly wont work.
Feedback, criticism. Anything any everything.. I want to make this look good.
Thanks guys.")
angle2 by subzero565, on Flickr
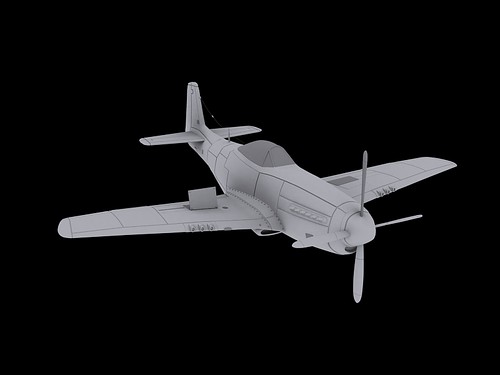
sky1 by subzero565, on Flickr
4 by subzero565, on Flickr
2 by subzero565, on Flickr
Feedback, criticism. Anything any everything.. I want to make this look good.
Thanks guys.
angle2 by subzero565, on Flickr
sky1 by subzero565, on Flickr
4 by subzero565, on Flickr
2 by subzero565, on Flickr
Replies
As for modeling the individual skin panels, you can, but unless they're going to be moving around or seen very close up, it's probably best to do those via normal maps. In reality, the Mustang was flush-riveted and the wing was frequently puttied smooth for speed, so there is actually very little "large" protruding or indented surface detail. If you're doing this for a pre-rendered product, you can use actual bump (offset) or displacement maps, which are very well suited to the thin mechanical seams of the skin paneling.
And ya from what I have read the plating is more flush to the plane. This was originally going to be just a side model to practice high poly modeling to low poly baking.
I might try a practice bake 2morrow just to see how it works and go from there. If that fails I will just texture the plating in via Photoshop.
Thanks again.
http://upload.wikimedia.org/wikipedia/commons/2/2d/P51-d_mustang_472216_arp.jpg
You could go back and carefully remove the pinching and keep the panels, but honestly you should probably just remove them all and add them later in Photoshop; it will be much easier to model the surface curvature of the airplane, and the depth and appearance of the panels will be easier to control.
...you can see the shape and proportion issues, right?
One thing that may have happened is that when you were laying out your references, you didn't make sure they maintained the proper dimensions. When I was working on IL-2 and Flight Sim, we would actually lay down markers for lengths along the datums, gear roots, wingtips, all kinds of stuff, and then crop hi-res scale drawings and fit them to the proper measurements. That way, even if the bitmap didn't have the right proportions, the reference plates we were modeling to in the work scene did. Good cross-sections showing the contours of the fuselage are also important, don't try to eyeball those.
There are enough scale drawings and 3-view diagrams of the P-51 to sink a ship. Between all of them you probably can find hi-res 3-views and enough accurate cross-sections to show the profile of the aircraft every inch from prop spinner to tail lights. Look up the wing airfoil profiles if necessary, I can't remember the NACA numbers off the top of my head, but if you don't get the wing correct all the way from the root to the wingtips, it won't look right.
Your biggest struggle is that you've picked possibly the single best-known and best-documented aircraft in history. People are going to know instinctively if it doesn't look right. Focus on the proper shapes first, then worry about details.
EDIT: Also, make sure your references are for the correct aircraft. Sort out any photos of home-built scale replicas (there are 3/4ths and 4/5ths scale flying replicas that are nearly indistinguishable except for the size of the pilot), and don't let any plans, diagrams, or references of the P-51H get mixed in. It was a different aircraft and had different shapes. Some P-51Ds were fitted with the H model's taller tail, either during the war or postwar by private owners. Quite a few P-51Ds today also have a differently shaped canopy to accommodate a passenger where the original radio equipment was placed, behind the pilot - it isn't accurate to a P-51D in service, with either the standard hood or the "Dallas" hood (on the P-51K, which was a P-51D built under license by another company with very small, subtle differences).
I'm not as familiar with RAF and RAAF lend-lease Mustang III and Mustang IVs, and info on them isn't as prolific, so if you find diagrams and references on them, use at your own risk. Supposedly Mustang III versions were similar or identical to P-51Cs while Mustang IVs were derived from the P-51D, but if my memory is correct Mustang IV versions had some changes specified by the RAF and I'm not precisely sure what those were. I doubt they were significant airframe changes but you can't assume so.
Also be wary of trying to substitute P-51B or C references for any part of the fuselage and wings. They had the framed canopy (or blown Malcom hood on some models) and 'razorback' fuselage without the later tail fillet, which is easy to tell, but you might think that the wing is similar. It's not. A cranked wing root span was introduced on the P-51D and the D / K wing wasn't interchangeable with the earlier B and C variants, but the differences are subtle.
Thanks again Garage for the reference and feedback. It sounds like you know a TON about this subject material and I am very thankful for the advice you have posted.
I think the major problem is that in my limited knowledge of the subject matter i gathered several different references for the p51 which ended up being different variations and I think what I ended up doing is modeling a little bit of each piece in my model. That being said I will probably just scrap making the plane realistic but rather making it stylized.
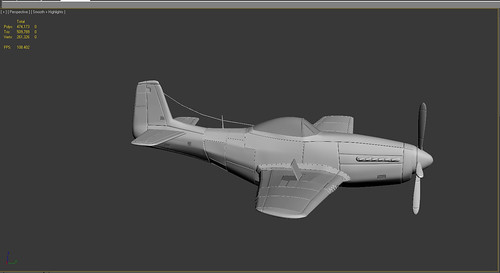
Anyways, here is an updated screen. I have extended the tail section and made some other minor changes based on the feedback.
Uploaded with ImageShack.us
Thanks again guys. I will post more wip shots soon.
The big things that stand out right now, to me, are that the nose and tail boom are too short. The whole fuselage in front of the canopy could be another 25% longer, and everything behind the canopy could be stretched another third.
The other big issue is that the way you've modeled the rear fuselage has it sweeping upwards into the tail. If you look at the photos, the fuselage itself actually goes directly back and its upper spine tapers to a level below the cockpit. The vertical stabilizer and that triangular fillet at the front of its base are very thin and basically sit on top of it - the fuselage doesn't blend into them much except for some small sheet metal fairings around the base.
Toss in those changes, plus thin down the back of the wings so they aren't so meaty, and you'll see the improvement immediately.
I think this is more of what you were thinking. Thanks again! Maybe tomorrow i actually start unwrapping... lol
Rear edge of the wing still has a strange bluntness to it (normally tapers to a thin edge), but it's not a huge issue.
Good work on the proportion changes, man. That made a huge improvement.
Lots of pictures and reference is best advice i can give you. Overlay your model on some pictures and let us know how u go.
Cheers
Anyways... here is the latest screengrab. I decided to make it look nice because I needed a break. hah
Uploaded with ImageShack.us
I think it is getting really close (minus some pinching issues) and I am not sure if I want to adjust more details at the moment. But if there is something glaring-inly wrong with it by all means let me know please!
At this point my model has changed so much that I am not sure If i even want to use my existing low poly. Anyone have any advice on how to retop the high poly in max??? ...besides for removing a bunch of edges. =/
Garage, Thanks man! Ya I tried to make it a bit thinner this time around.
JO, to answer your question... Yes, ultimately this will be the high poly model and then I will bake it to a lower poly model. I do have a lot of little details separate from the mesh, and I ended up taking the plates out altogether from previous models. Minus the wings which are causing some pinching right now.
ScubaSteve, Thanks so much for the picture showing exactly where my proportions were off. Having so many references and combining them to make this model I think was my downfall. I think this latest has fixed most issues.
3Drobbo, Thanks, you are correct! For some reason the little dip got smoothed out in my modeling. I went back and made it a bit more pronounced.
Vig, missed your comment in this last screengrab. I am not sure if I want to make the stabilizer much thinner then it is. I know based on screens its thinner but for this version I think the thickness helps. Not sure though I might make it thinner and see how it looks.
maybe something like this look will make it better and realistic top is from flight sim second is from real mustang and third is how it look in world war 2 from a museum.
any more questions let me know i love warbirds. Me with the mustang muahahhaha little scale ref for ya
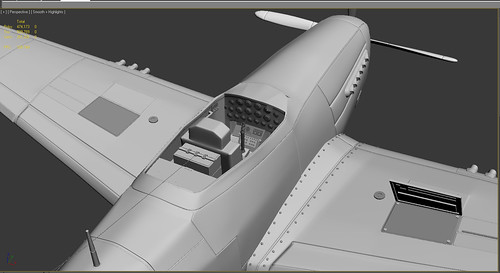
Also updated the cockpit with the more realistic style, ignore the little texture errors as that is not complete. =/
Feedback and suggestions appreciated as always!
Thanks again!
Seriously, they're crooked right now. Three black stripes with two white in between around the rear fuselage and the inner span of the wings. You should be able to get them nice and even with planar projection or a cylindrical unwrap of just those areas.
Here's why:
The leading edge of the vertical stabalizer's job is to slice air and direct it over the control surfaces. Your leading edge is really wide this would create a dangerous situation, because the aerodynamics are working in reverse. You can see in this photo (and in many others) its a little piece of metal riveted over the tail and the fuselage, it isn't one contiguous piece.
Ok the logic is off but you like how it looks. Well it creates some weird problems for the look too.
The sides of your plane are rounded, the sides of a P-51 are pretty much flat.
The rounded-ness of your fuselage leads to a wider tail section, which makes your vertical stabilizer wider than it should be, where it connects.
The bottom of your tail is bulbous, technically the shape from the side looks correct but the width is wonky down there.
It doesn't look like your tail has anyway to move its rudder or its elevator. These are separate pieces that move and control the plane, but they look like they're attached to the main surface. If you're going to detail the cockpit, you should probably separate these pieces also? If this was a game asset, they would have them animate. Same goes for the flaps and aileron.
The the fuselage on your model looks like it takes a bend up after the cockpit. partly because the sides aren't flat, and partly because the vertical stabilizer is so wide. The straight line from the back of the cockpit to the tip of the tail is rough and lumpy on your model.
Are there visible seams? Sure. Are they beveled and embossed plates... no not really.
I think the seams are too extreme, they overlapped the metal skin and riveted it in place. If you watched the Aviator Howard Hugues is obsessed with a flawless outer skin, he goes off on his team for not designing rivets that sit flat enough, and failing to reduce the seams impact on the aerodynamics of the plane. Sure he was a nut job but everyone was obsessed with the same thing back then.
I think you've got a good model but its just off in some areas that are making it look weird. I hope this helps!
Thanks it was just a quick test but after the re-work it should be fixed!
Vig: Thanks a bunch for the help on the adjustments... Today I spent some time re-working the back section of the plane and tried my best to fix most of the problems you pointed out and tried to work in your suggestions as well. I will be re-baking the AO and Normals probably tonight and have another shot for ya 2morrow. Thanks again for your help!
I is tired-ed.
So here is the new higher poly mixed in with some low pieces version of the plane.
I took your advice Vig and tried to smooth out parts of the plane that were a little bit bubbly, and I also made the stabilizer thinner and taller. Hopefully this is a little more of what you were thinking?
I am getting to the point to where I really need to finish this project as I have worked far too long on it. =/ LOL
Either way it has been a learning experience.
Thanks again for the feedback and comments!
/wags fist at past creative directors
I think one last round of tweaks in in order and you should be good to go.
Flatten out the sides and fix the slope in the top of the fuselage and I think you're ready to call the modeling done.
Notice the slope of the fuselage toward the tail lines up with the elevators in this ref.
Thanks a bunch again man I will add that to the list of last minute refinements. I have actually been tweaking the cockpit connection some more to make it a bit more rounded and less "boxy". Giving it a slope effect. Also detaching it in two pieces so that I can slide open the windshield to show off the cockpit itself.
I will try and post a screen of the wip later tonight and I will fix that angle you demonstrated. Thanks so much for your help... Getting closer... 1 step at a time.
Vig,
I fixed the angle you suggested and I also made some modifications to the cockpit area, where it connects.
Thanks again.
Sorry for the lack of updates.. I have been hard at work trying to make this thing right and I think I might have finally done it?
Maybe?
Just a disclaimer the nose has not been re-worked yet and that includes the propellers.
So heres What I did, Slimed the shape down... Holy crap it took a while but I managed to make this thing slim and flatter on the sides more of that p51 shape. The connection to the wings on both the back and main wings are actually connected to the plane. I also thinned down the wings in the back so they are more aerodynamic.
I took out the cuts that were unnecessarily on the body and straightened the ones on the wings. I also separated all the essential pieces, so that for the game model it could actually animate!
Re-worked all general aspects of the plane where I thought it seemed off, wings, body size and shape etc.
Let me know if I am on the right track (I sure hope I am!)
Thanks again to Garage and Vig for the big help lately and my buddy Sean who doesn't post here. And trance music... ahh motivation.. lol
A tip for catching these mistakes is to model with a shiny surface shader (blinn, phong), so you can see exactly what your surface is doing.
I made this quick paintover to show you where I feel your modeling mistakes are, and some quick suggestions. I don't know anything about planes, so I won't comment on the accuracy of your subject matter.
EDIT: I highly recommend you remove your bevels, as in the reference, they are extremely slight. I think that these details should be done in the texture.
Good luck!
I would really not try to model in too many panel lines. They're messing up your flow, just do them in 2D afterwards, you'll get them sharper on your texture even. As for the flaps and rudder: don't model them as a single model with the rest of you body. Detach and fix the openings. It just makes more sense to do it like in real life.
I think just in general, I notice a lack of refinement in your modeling workflow, which is leading to this sort of issues. Try to keep things simpler from the start, don't move on to details unless you are sure that proportions and large scale detail is 100% correct. A blockout can help, but also just starting of with a simpler mesh and refining that while you move on. Perhaps you could post your wireframe of the current state, maybe I can overpaint a bit.
Thanks for the replies and feedback. Sorry for the short reply running out the door as we speak. Just wanted to post a wireframe for ya. Keep in mind I have not re-worked everything yet.
Still not sure I want to take the cuts out but you guys know better than me... lol
ty again.
I also rounded out the shape of the nose and tried to smooth out the vertical stabilizer a bit more. I also added the propellers back in with a bit more detail on the connection.
Cycloverid,
Thanks for the paint over and the help with finding some modeling errors. I think i got rid of most of them.. Although I know the model isn't perfect. lol
Xoliul,
I love your shader and thanks for the advice on the cuts. I will try to put them into the texture. As you can see I have divided most of the parts of the plane into separate pieces, indicated by the color change.
Thanks again guys! I really want to move forward with this project, so let me know if theres any major things I need to change before i start on the low poly again.
You're getting pretty close. Keep up the work, you've made huge improvements.
Here, did an overlay for you...
I looked over the ref you sent me and made some more tweaks to the intake under the nose.
I also tweaked the wings and the tail section to get them more into proportion.
The only thing I was not sure of was what exact area you were referring to, when you said to unsmooth the area between the main tail and the smaller tail. ???
Oh and I redid the propellers, I think they are bit more accurate now.
Thanks again for all the help! The polycount community has been awesome!
So here is some texture work. I am pretty happy with the way it turned out and am leaning on calling it quits unless there are some things I might have missed?? Or maybe gone overboard on. Let me know what you think. I will probably mess with some more renders and shots tomorrow.
I wanted to go for a dirty version of the plane to practice some metal/grime work. And because it's fun to do!
Here is one screenshot and below is a link to the imageshack album.
http://img139.imageshack.us/g/render1c.jpg/
Thanks again for all your help guys!