Home 3D Art Showcase & Critiques

Alley Scene

1
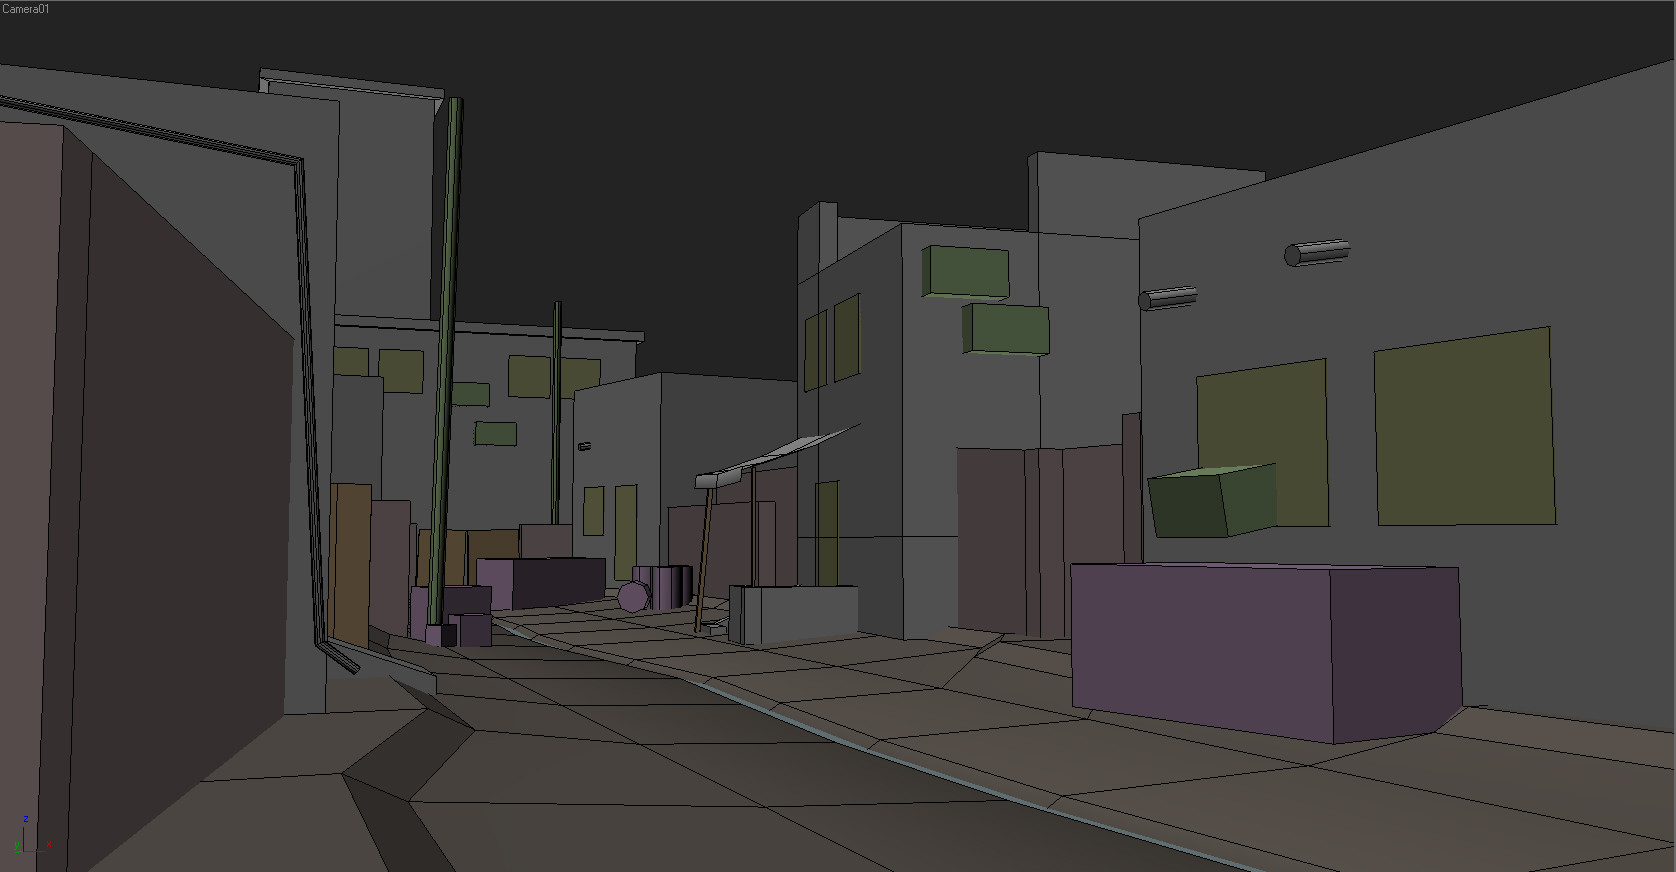
Ive been itching to make a scene based off this that I found a while back...

06_04.jpg


I was debating doing a WWII scene, or a more modern setting, but I think Im going to go with the more modern. I just spent 45 mins whipping up a super rough blockmodel and Im going to start fleshing it out now.

yellow = doors & windows
red = stone walls
brown = wood walls
purple = misc junk
green = ac, power lines and techy bits

Since this will be the biggest real-time scene Ive tackled yet, Id love to hear anybodies thoughts on my composition, or work flow / organization. I know this isnt much to look at now, but Ill update soon

kropat_street_blockout1.jpg

Replies

  • dlx
    Options
    Offline / Send Message
    dlx
    Looks like a good start. Big kudos for doing the rough composition before you start your assets. That's good workflow for sure! :)

    I would throw some quick lighting in there to see where your shadows will fall. The reference image is overcast but you'll probably want a stronger directional light in your scene.

    The telephone pole on the left lines up awkwardly with the building behind it and kills some of the depth in your scene. In the 2D image space they are near each other and a similar height. That fools our brain into thinking they are also near each other and a similar height in 3D space. Notice how the building in the reference image is clearly farther away because the pole is noticeably taller. In your scene, I would move the tall background building back and to the left a bit.

    The right third of the scene is a little sparse. Consider having something more eye-catching and detailed over there. Maybe the surface detail on that building and junk (dumpster?) will be enough to flesh out that part of the image.

    Don't forget the foliage in the reference image. The palm trees and the plants growing over the wall help to break up all the right angles.
  • Mechadus
    Options
    Offline / Send Message
    more fleshed out blockmodel....

    kropat_street_blockout2.jpg
  • Moosey_G
    Options
    Offline / Send Message
    Looks great, I'm loving where this is going. Are you aiming for polys within a certain limit or is this just going to be a nice portfolio piece?
  • Mechadus
    Options
    Offline / Send Message
    Thanks Moosey :) This is really just going to be a port piece, but Id like to work within reasonable poly limits.... not knowing exactly what those would be for a scene like this Im just gonna try and keep it as low as I can ;)
  • TrevorJ
    Options
    Offline / Send Message
    TrevorJ polycounter lvl 9
    The setup of this is looking really good, i agree with dlx, throwing a directional light in to see how some shadows will fall wouldn't be a bad idea.

    For poly count at GDC David Hugo was talking about their environments in Arkham Asylum and he said their average room had about 3000 static meshs(obviously redundant ones) and about 800k tris.

    Now i'm not sure what constitutes and "average" room, but just something to go by i guess. I wouldn't worry too much about it though, more and more i hear people just want to see good stuff, as long as its within reason.
  • Kumakay
    Options
    Offline / Send Message
    I agree with TrevorJ about the setup looking really good. The one suggestion that I would make is that the center, to me, feels like it could get busy. When I look at the reference shot I like how there is so much depth and that the street just keeps going and you don't really see and end to it. In your rough I just feel that the street ends a little quick. I want to see farther. That is just me though.

    As TrevorJ has said, as long as you keep the poly count within reason it should be good. Poly count is based more on a project by project basis. When you are on a project those in charge will determine how many polys you can use. As long as you don't go crazy, they won't really care at this point and for this project.

    Overall I am really liking what you've done and look forward to some progress on it. Cheers!
  • Dismembered
    Options
    Offline / Send Message
    Dismembered polycounter lvl 9
    I have spoken with people that work at Redstorm Entertainment, and they say that the poly count isn't so much an issue as the size of the textures are. I didn't get anything exact from them, though they did say that as long as isn't wasted use the polys.
  • vofff
    Options
    Offline / Send Message
    vofff polycounter lvl 10
    I have spoken with people that work at Redstorm Entertainment, and they say that the poly count isn't so much an issue as the size of the textures are. I didn't get anything exact from them, though they did say that as long as isn't wasted use the polys.

    It depends on what engine u use
  • Mechadus
    Options
    Offline / Send Message
    Just took a few mins to work on a modeling style (more look and feel than technical) that I want to take these buildings in... I kinda like it but I always want to hear the thoughts of the community.... Plz just look at the style tho, I know theres nGons and general wack-ness all over this thing and Im gonna fix that ;)


    *edit - oh yea, I decided to try and shoot for 3000 (ish) tris per bldg... is this reasonable?

    kropat_street_H1_01.jpg
  • dlx
    Options
    Offline / Send Message
    dlx
    The overall style is not bad. It's a little plain considering it gets the most real estate in your composition. I would spend more tris on details that have a bigger impact or at least affect the silhouette more. You could trade all those bevels and second floor details for other attachments, vents, wires, shutters, conduit, a more ornate railing etc.
  • mkandersson
    Options
    Offline / Send Message
    mkandersson polycounter lvl 7
    Love your architecture and greate scene so far.
    I would say you can go pretty high on tri count. Depending on engine of course. In UDK I would say that is acceptable if you export it in smaller pieces. But then again I’m no expert either.
  • gauss
    Options
    Offline / Send Message
    gauss polycounter lvl 18
    Ahahah that picture cracked me up when I saw it whenever ago--yeah good luck covering that alleyway with a shotgun. Sounds good. That aside I really like your choice of the enviroment and where you're going with it definitely seems sound, looking forward to watching this thread.
  • Rumkugel
    Options
    Offline / Send Message
    Rumkugel polycounter lvl 14
    Shotguns arent actually used to shoot people with, but rather to breach doors ;)
  • Mechadus
    Options
    Offline / Send Message
    Thanks for all the feedback!

    @ gauss - I know, I got a chuckle out of that too.. Dude obviously never played doom :P

    @ mkandersson - Cool, My plan is to export each building as a unique object, then rebuild the scene in UDK, and also to place the majority of my detail meshes in engine so I can instance similar geom between buildings

    @ dlx - Good point.. That building is sorta the focal point of the FG and it is pretty bland... Im gonna see about adding more big silhouette features to it

    General question... Im quickly approaching the areas of this project Im unsure of. Mostly the best way to go about texturing these buildings. My plan is to create several tiling texture sets for stucco, brick, concrete etc rather than unwrapping each bldg and painting custom maps (which is how Ive always done this in the past) so that I can get max texture resolution with smallish maps, and recycle maps as much as possible. Since this is a new method to me can anybody think of some noob pitfalls I should avoid? Here is the basic process Im going to attempt:

    -Flatten / normalize UV's
    -Apply base textures
    -Slice mesh where needed to add detail textures (broken areas, painted areas etc)
    -Use decals and detail meshes in UDK to break up obvious tiling

    sorry for such a vague question, I just want to do this properly, and Im honestly not sure the proper way to do it. Updates tonight regardless ;)
  • GarageBay9
    Options
    Offline / Send Message
    GarageBay9 polycounter lvl 13
    Rumkugel wrote: »
    Shotguns arent actually used to shoot people with, but rather to breach doors ;)

    Uh, I can guarantee you that those Mossbergs do more than just breach doors. Can't tell from this picture, but most of them even have bayonet lugs on them. Most dedicated breaching guns also have just pistol grips, but even with those, I can promise you the guy carrying it has some 00 buck or sabot slugs somewhere very close at hand in case hajji is hiding right behind the door.
    *edit - oh yea, I decided to try and shoot for 3000 (ish) tris per bldg... is this reasonable?
    I would think 3000 is a decent benchmark, and you can probably scale up or down reasonably from there based on the size of the building. Remember that a lot of the environment is going to be seen from street level. Don't spend 500 polys on everything from the ground to the top of the 1st floor, and then pack another 2500 into the second story. Try to spend most of your poly budget at player level and cut back the farther away from viewing distance you get. All the framing on the door and windows in that shot is looking kind of superfluous for the distance from the player it will probably be.

    EDIT: Another thing I noticed - you're building a lot of multi-story structures, where the original reference barely has anything above one story. Just wanted to point it out in case it was an unconscious change instead of a deliberate one. Dunno how loyal you wanted or meant to be to the original photo.

    alleypaintover.jpg
  • Mechadus
    Options
    Offline / Send Message
    @ GarageBay9 - thanks! Thats good advice about modeling for the players perspective.. I honestly hadnt really thought much about that. Your right that Im kinda straying from the ref too, but its sort of intentional. My original blockmodel was pretty close to the ref and it was kinda... blah. At this point Im more using it as a jumping off point... I really appreciate the markup tho :)

    I got a super quick base texture experiment done. These textures are awful and only place holders but close to the direction I want to go. Ill be replacing all of them. texturing is my biggest chalenge, so if I can make it better, plz tell me how :) right now Im at 2450 tris 1x 1024 and 4x 512 maps. Id like to get more effect out of the damaged areas, but not sure how.. maybe decals...? ideas?

    The green bits will be instanced detail meshes, not part of this model, and the bottom of the beams on the lower right will be covered by a fence in the scene.

    kropat_street_H1_02.jpg
  • GarageBay9
    Options
    Offline / Send Message
    GarageBay9 polycounter lvl 13
    My first instinct is that it's waaaay too dirty. Grime around the top where it runs down the walls, around the base where it piles up, and maybe some in seams and crevices, but right now it's really slathered on there.

    You could map the damaged spaces to a dedicated 'rubbled' area on your texture sheet, or paint and normal them where they are. If you're effectively using two 1024s, you've got plenty of resolution. I would combine those four 512s into one 1024 to save on draw calls, especially if they're all part of that building or going to be used together, unless you have an alpha channel in there somewhere and need the separation.

    The modeling looks very good. I think it's still a little heavy on the second story with some of the framing around the doors and windows, plus that cable and shelf you added for the upstairs AC, but overall I like the model so far. Might want to try resolving the lower end of those long wood beams differently instead of having them intersect the wall, but it's not a showstopper.
  • EMC3D
    Options
    Offline / Send Message
    EMC3D polycounter lvl 14
    Mechadus wrote: »
    @ GarageBay9 - thanks! Thats good advice about modeling for the players perspective.. I honestly hadnt really thought much about that. Your right that Im kinda straying from the ref too, but its sort of intentional. My original blockmodel was pretty close to the ref and it was kinda... blah. At this point Im more using it as a jumping off point... I really appreciate the markup tho :)

    I got a super quick base texture experiment done. These textures are awful and only place holders but close to the direction I want to go. Ill be replacing all of them. texturing is my biggest chalenge, so if I can make it better, plz tell me how :) right now Im at 2450 tris 1x 1024 and 4x 512 maps. Id like to get more effect out of the damaged areas, but not sure how.. maybe decals...? ideas?

    The green bits will be instanced detail meshes, not part of this model, and the bottom of the beams on the lower right will be covered by a fence in the scene.

    kropat_street_H1_02.jpg

    Looking good with the base, i would get this scene into the UDK if you arent already, it will give you the ability to vertex paint most of the damage and details to break up the tiling.

    Can you post your diffuse for the building? With the way the building is, i would set up a tiling texture starting with the border at the bottom [tile horizontally] followed by the body of the building texture, which also has the ability to tile horizontally then the roof pattern at the top to tile horizontally. Then do another 1024 with all the small assets on.

    So you would have x2 1024 maps for that one building, and if your using UDK you're going to have a few 512 / 256 textures laying around in the package for vertex painting purposes.

    Looking forward to this scene!
  • Dismembered
    Options
    Offline / Send Message
    Dismembered polycounter lvl 9
    Well, doing a quick rendering with a couple lights in there will help us see you textures better. As far as the damage goes, unless I missed some where that you didn't want to use zbrush/mudbox, you could go that route and bake some normal info in. And I can't tell from the screen grab if you have them or not, but, hand painting some scratches and dings over the edges of the destruction will help them stand out a bit more.
  • Mechadus
    Options
    Offline / Send Message
    @ GarageBay9 - yea, its entirely way too dirty. I noticed in all my ref that the majority of the materials in that area are very sun baked and chalky, rather than dark and grimy. I was planning to have a rubble type area on my map, but its more how to blend the damage with the undamaged using tiling textures thats tripping me up. I was thinking of keeping the 512's separate mostly so I could apply them to multiple models in UDK to reduce the total number of unique maps across the entire scene... or is it better practice to keep low numbers per model?


    @ MrBear - below is an image similar to my diff I used.. its not the same map, but Im at work and dont have mah images with me. I basically did what you were describing which is a 1024 with a top, middle and bottom segment that each tile H and V. Im very interested in experimenting with the vertex paint in UDK, but wont I have to add a bunch of edges to my model to give unreal more verts to paint on? I really need to experiment with that...

    @ Dismembered - good idea about the lights - Ill do that tonight. I honestly really do want to sculpt and bake this thing, but Im really trying to learn to use tiling textures so I can get better resolution without using huge images. I def plan to go that route for the detail meshes Im going to create tho.

    tile_example.jpg
  • EMC3D
    Options
    Offline / Send Message
    EMC3D polycounter lvl 14
    Mechadus wrote: »
    @ GarageBay9 - yea, its entirely way too dirty. I noticed in all my ref that the majority of the materials in that area are very sun baked and chalky, rather than dark and grimy. I was planning to have a rubble type area on my map, but its more how to blend the damage with the undamaged using tiling textures thats tripping me up. I was thinking of keeping the 512's separate mostly so I could apply them to multiple models in UDK to reduce the total number of unique maps across the entire scene... or is it better practice to keep low numbers per model?


    @ MrBear - below is an image similar to my diff I used.. its not the same map, but Im at work and dont have mah images with me. I basically did what you were describing which is a 1024 with a top, middle and bottom segment that each tile H and V. Im very interested in experimenting with the vertex paint in UDK, but wont I have to add a bunch of edges to my model to give unreal more verts to paint on? I really need to experiment with that...

    @ Dismembered - good idea about the lights - Ill do that tonight. I honestly really do want to sculpt and bake this thing, but Im really trying to learn to use tiling textures so I can get better resolution without using huge images. I def plan to go that route for the detail meshes Im going to create tho.

    tile_example.jpg

    Awesome, it's a cool tiling technique. Well in UDK you can do many other things like blend textures at different tiling levels, even use decals to project textures onto the model.

    About the vertex painting, i'm pretty sure you could do as much painting on that model as you want from what i've seen,

    [ame]http://www.youtube.com/watch?v=7UNpThobAkY&feature=related[/ame]

    Haven't done it myself yet since we're changing to UDK next year from UE3, but it's a case of throwing it in and testing i guess.
  • Mechadus
    Options
    Offline / Send Message
    yea, I saw that video too - I seriously WTF'd. You nailed it tho, I think its all just diving in and trying it. I finally got UDK working on my computer again, so I think Im going to try and play with that tonight ;)
  • Jet_Pilot
    Options
    Offline / Send Message
    Jet_Pilot polycounter lvl 10
    Mr Bear wrote: »
    Awesome, it's a cool tiling technique. Well in UDK you can do many other things like blend textures at different tiling levels, even use decals to project textures onto the model.

    About the vertex painting, i'm pretty sure you could do as much painting on that model as you want from what i've seen,

    http://www.youtube.com/watch?v=7UNpThobAkY&feature=related

    Haven't done it myself yet since we're changing to UDK next year from UE3, but it's a case of throwing it in and testing i guess.

    http://www.chrisalbeluhn.com/UDK_Advanced_Vertex_Painting.html
  • System
    Options
    Offline / Send Message
    System admin
    Party pooper comment: it's pretty difficult to give serious crits on texture with the image having a wireframe over it, I know it looks cool but it's not helping progress.

    Only thing I can see so far is the wooden balcony where 2 posts are using bend modifiers, this looks wrong. Why would posts that are all the same length bend under pressure if the top and bottom rail doesn't shift out of position? They would look better snapped or just removed totally.
  • Mechadus
    Options
    Offline / Send Message
    Quick update - I got a more refined set of base maps, and played around with vertex pain in UDK a bit... too much fun for its own good. Theres still al lot I want to tweak (assy lighting is high on the list), but I wanted to post some progress. The bricks have a normal map, but the rest of it is just diffuse for now. Currently trying to figure out how to add a random overlay of cracks on the stucco material around the edges.

    kropat_street_H1_03.jpg


    @ Jet_Pilot - thanks for the link man, super helpful.

    @ GCMP - Eh, not a pooper comment, your right. Up to that point I was thinking mostly of the mesh, so I sorta got caught up with the wires. The upper railing is going to be metal on this building, which is why its bent and not broken... if it just looks too strange tho, I ll do something else with it.
  • Moosey_G
    Options
    Offline / Send Message
    You've made a lot of progress, looks good. My only crit is that my eyes are drawn to the colorful rug hanging on the railing, but it looks so stiff like it's hardened, and kinda throws me off. I like how it's coming along though, you've inspired me to get to some environment modeling of my own done.
  • Dismembered
    Options
    Offline / Send Message
    Dismembered polycounter lvl 9
    It is looking good, but there are a couple things that jump out at me. First off the small brick wall on the wood platform. Idk if that is a placeholder atm or not but I am not sure why a short brick wall would even be up there. And the pipe coming out of the balcony...that just seems like weird architecture. Maybe I am just being weird about those two things but yeah. And like Moosey said the carpet as well, you might want to add some folds to it to give it more life.
  • Moosey_G
    Options
    Offline / Send Message
    It is looking good, but there are a couple things that jump out at me. First off the small brick wall on the wood platform. Idk if that is a placeholder atm or not but I am not sure why a short brick wall would even be up there. And the pipe coming out of the balcony...that just seems like weird architecture. Maybe I am just being weird about those two things but yeah. And like Moosey said the carpet as well, you might want to add some folds to it to give it more life.

    Definitely the pipe, I didn't really notice that. Piping usually goes through the inner walls and below a building as opposed to through a balcony, which probably is completely solid inside.
  • Jet_Pilot
    Options
    Offline / Send Message
    Jet_Pilot polycounter lvl 10
    It is looking good, but there are a couple things that jump out at me. First off the small brick wall on the wood platform. Idk if that is a placeholder atm or not but I am not sure why a short brick wall would even be up there. And the pipe coming out of the balcony...that just seems like weird architecture. Maybe I am just being weird about those two things but yeah. And like Moosey said the carpet as well, you might want to add some folds to it to give it more life.

    The short brick wall is so people don't fall off the balcony. (notice the boarded up door) and the pipe sticking out is to allow rain water to drain off the balcony, because the railings are elevated the water wont drain and will pool.

    After working on 'Six Days in Fallujah" and looking at tons of pictures I would say this house is a great example of what kind of buildings are over there. I love the attention to detail.
  • Mechadus
    Options
    Offline / Send Message
    I haz made updates!

    Thanks for the replys - Ive been tweaking stuff and experimenting a lot, and finally have enough for a progress post.

    @ Jet_pilot - Thanks man.. Since this is all new territory for me I feel a bit lost at times, but its encouraging to hear Im going in the right direction!

    Anyways... I got a lot of the modeling and UV work done on the major elements, and changed a bit from the original ref image, but im overall happy with where its going. I feel right now that its pretty bland, but I really think once I get the base structures down, I can really make it pop with detail meshes like edge-bricks, rubble and general purpose junk. heres a UDK screenie:

    kropat_street_WIP1.jpg

    Some of the updated buildings:
    kropat_street_H2_01.jpg
    kropat_street_H2_02.jpg


    kropat_street_H3_01.jpg


    and I began playing around with making textures from 3d... Im just using MAX / Xnormal for now, but eventually I really need to learn Zbrush... I know its particularly good at this kinda stuff.. just so little time to learn new software :(

    kropat_street_brix1.jpg
    kropat_street_brix2.jpg

    I loves me them crits, so please, let me know wha y'all think!
  • vofff
    Options
    Offline / Send Message
    vofff polycounter lvl 10
  • SHEPEIRO
    Options
    Offline / Send Message
    SHEPEIRO polycounter lvl 17
    your lighting looks too orange desat it a bit
  • EMC3D
    Options
    Offline / Send Message
    EMC3D polycounter lvl 14
    Really like this project, was well happy when you posted the new shots in game, it's looking awesome. If i can say one thing, GET A SKY IN THERE! For real man, you need the type of sky before you go lighting otherwise it won't sell even at these stages, also gives depth to the level, and allows you to start going into DOF and messing with heightfog.

    Really impressed so far, can't wait for more!
  • SHEPEIRO
    Options
    Offline / Send Message
    SHEPEIRO polycounter lvl 17
  • EMC3D
    Options
    Offline / Send Message
    EMC3D polycounter lvl 14
    SHEPEIRO wrote: »
    paintover3.JPG

    Good drawover, this + depth of field will really start setting the mood. Sky not as blue though, it's very whitish in the concept, but you can try out different skyboxes.
  • SHEPEIRO
    Options
    Offline / Send Message
    SHEPEIRO polycounter lvl 17
    i agree...pity i got rid of the psd
  • Mechadus
    Options
    Offline / Send Message
    Its been a busy week but I finally got some more progress made...

    @ Vofff - Holy crap... That guy is freaking amazing. Very inspiring, but also makes me want to crawl under a rock and die lol. Thanks for the link tho, I definately aspire to be as good as that one day! Damn if that doesnt make me want to start over tho ;)

    @ Shepiro - Thanks for the paintover man! I totally agree that right now its way too orange. I love the look of your tweaked image. Once I get the majority of the meshes in the scene, and rough materials on everything I plan to really work on the lighting and post effects. Im most certainly going to try and match your image tho... the desat and haze really adds character to it.

    @ MrBear - Im glad you like this project so far :) Your right that the sky really adds a lot to it. I plan to make a cool sky with my beloved Vray, and probably do some coolness with clouds / sunset or something. I have about 50 awesome skyboxes I made for arch viz, but they are all really bright and happy.. Im really thinking like a 5am red sunrise type thing for this scene, but dunno. I want to get crazy with volumetric clouds, but most of the ref I have just shows clear blue skys...

    anyway.... updatez yay. I got a few more buildings in engine with rough textures (no normals or spec on most of it so far) and I generally feel like there will be a lot of tweaking to get the right general feel down. I still plan to go pretty nuts with the detail meshes and decals too.

    kropat_street_WIP2.jpg
    kropat_street_H4_02.jpg
  • sampson
    Options
    Offline / Send Message
    sampson polycounter lvl 9
    one thing i notice is you should keep your brick sizes a bit more constant. it throws off the scale quite a bit
  • EMC3D
    Options
    Offline / Send Message
    EMC3D polycounter lvl 14
    Yeah for sure man deffo need some stuff in the sky, also need to get yourself some heightfog and depth of field in there. Have you played with the world post processing yet? Try and set your "Scene Desaturation" between 0.110 / 0.250 it gives a nice overall effect and weakens any colors that are too strong, give it a shot.

    Also nice camera angle on the second shot, just grunge it up like you said you were to get contrast in the scene. Grunge that floor up son! lerps, rotators, add nodes, etc.

    Coming on nicely :)
  • Mechadus
    Options
    Offline / Send Message
    Finally found some time to work on this a bit... still loads of work to do, but the feedback so far has been uber helpful and very appreciated :) I lost the scene file due to a crash, so had to rebuild it all, easy enough tho.. luckily I didn't loose the entire package. I havent redone the vert painting yet. The stones on the ground are UDK meshes - I plan to make something similar. Im not sure how to best handle the crap and water on the ground... Im thinking a vertex blend material with displacement for the 'crap' layer.

    @ sampson - now that you brought my attention to it, yea - the brick scale is a bit wonky. I'm going to touch that up for sure.

    @ Mr Bear - your post tips totally did the trick! I blew out the highlights a bit to try and get a sun-parched feel... too much?

    kropat_street_WIP3.jpg
    kropat_street_WIP4.jpg

    Im going to be pretty busy with work / freelance and putting new windows in my house for the next couple weeks, so probably no updates for a bit :(
  • EMC3D
    Options
    Offline / Send Message
    EMC3D polycounter lvl 14
    Yeah it's starting to shape up now man! I've known many people to lose their UDK scenes due to it crashing or with pc problems, gonna be making me paranoid enough now to make atleast 2 back-ups at every save lol.

    You're not done yet so there's no major overall crit to the scene, maybe tweak the desaturation a little, so you can get a bit more contrast in the scene, but as you said you haven't re-done the vertex painting yet.

    DoF looks nice in the distance, not sure about the sky at the moment, almost looks as if its pitch white, but that's just a personal nick flick.

    Looking forward to more updates, goodluck with the windows and stuff :)!
  • teaandcigarettes
    Options
    Offline / Send Message
    teaandcigarettes polycounter lvl 12
    I think it would bo good if you went back to your highpoly bricks and added some grout. At the moment, you have incredibly strong Ambient Occlusion baked into your diffuse which is completely killing your textures.
  • Mechadus
    Options
    Offline / Send Message
    @ Mr Bear - Yea, Im a dumbass for not saving a backup copy. I was diligent about backing up the packages, but totally spaced a backup of the scene... when my hdd pooped out it vanished. Grrr. I got cool with it this time tho, and set up a scheduled task in windows to manually copy the scene and package files to another drive every time windows shuts down... hopefully wont have that very frusterating issue again. I still think the lighting and post has a long way to go b4 Im happy with it, but I cant wait to get back to it. I still have so much work to put into this scene that its a bit daunting, but so much fun!


    @ teaandcigarettes - I totally agree - I have the brick materials set up in udk so I can paint the grout in with the Vert paint tool, based off a depth map. When I lost the scene I also lost a couple hours worth of vert painting, and I just havent redone it yet. If it still looks wonky after that tho, Ill certainly go back and touch it up. I suck at textures, so I realy appreciate the input
  • Mechadus
    Options
    Offline / Send Message
    quick update - Ive been working on props whenever I can find the time, but progress has been painfully slow. Hopefully this weekend Ill be able to wrap up some of the big issues and get some base textures spread around if I can get more than 2 hours to myself.

    Does anybody have suggestions how I can best do the trashy water puddle in the middle of the road? Im thinking using vertex paint to blend from sand -> mud -> water, and then use trash / rubble meshes to add some variety?

    KROPAT_STREET_WIP6.jpg
    KROPAT_STREET_WIP5.jpg
  • Envelope
    Options
    Offline / Send Message
    Hi, been looking at this. Good progression. I think it was a good move to pull away from the more orange-ish lighting. Something that still stands out to me is that your first building on the right is less saturated than the second building (on the right), which is further away from the camera. I would invert those two! It's throwing off my sense of depth.

    Composition wise, I really am starting to like it. The lines going down the street are nice. The wall on the left is a little distracting but I'm sure there are lots of objects that you are going to throw all over that wall to break it up a little bit.

    Composition on the second shot is not as strong. It seems that your goal is to show the satellite building in the background. But, you have added a lot of competing vertical elements that really take away from the strength that you had in earlier shots.

    Good stuff, keep it up~
  • SHEPEIRO
    Options
    Offline / Send Message
    SHEPEIRO polycounter lvl 17
    hmmm sky shouldnyt be darker than ground if its so desaturated...dont look right me thinks

    preffered it when it was almost washout
  • Mechadus
    Options
    Offline / Send Message
    @ envelope - Thanks for the crit.. I really never noticed the issue with the 2 buildings till you pointed it out.. Now that I look at it I totally see what you mean tho. Ill try swapping them, and leveling the textures between the buildings to see what looks good. And yea, the walls are all just placeholders for now :)

    @ Shepiro - I lost my skydome mesh in another crash and totally forgot to replace it when I took these screens at 1:30am :P I agree tho, much better with bright sky
  • Mechadus
    Options
    Offline / Send Message
    Minor updates... Ive been up to my eyeballs in art tests and freelance for the past couple months, but I found some time to wrap up some wip elements on my alley scene, and polish some textures. JetPilot commented that my cinder blocks are way too big so Im going to fix that, and the white walls are just place holders for now. The ground really hurts my feelings as well, so Ill eventually fix up all that stuff. C&C are always appreciated!

    kropat_street_WIP7b.jpg
  • SimonT
    Options
    Offline / Send Message
    SimonT interpolator
  • Mark Dygert
    Options
    Offline / Send Message
    Looking great keep up the nice work.

    Two crits:

    1) If that's an overcast sky your shadows wouldn't be as sharp.

    2) You might want to watch the texture size on some of your props, I can almost read masterlock on the padlock thats either using a lot more pixels than it should or you did a great job at faking detail with only a few pixels.

    2.5) Also its a good idea to think about logo's, copyright and those sorts of things even if it says "MasterFlock" they can sue. I wouldn't really worry about them coming after you now, but future employers will worry as whatever you creatively barrow opens up legal problems for them later on. Don't be the guy they have to watch like a hawk because something almost went through. It's good to get in the habit of not recreating those kinds of detail asap.

    Also check out these scripts, they help quite a bit in creating stone/brick surfaces and are prefect for taking into a sculpting app to do a little damage.
    http://www.scriptspot.com/3ds-max/scripts/stone-placement-tools
    http://www.scriptspot.com/3ds-max/scripts/rock-generator
1
Sign In or Register to comment.