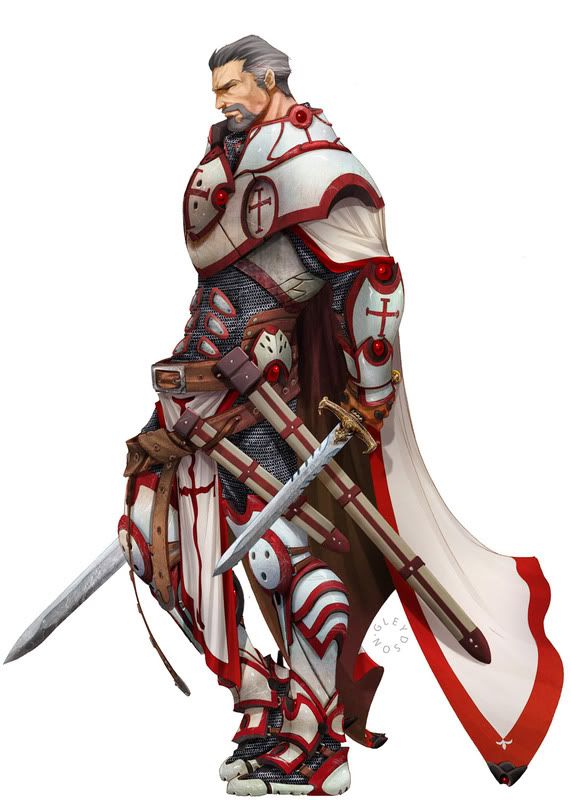
new project (Fantasy Knight Guy)
ok So I really need to start kicking myself in the ass harder after not landing that gig recently (see previous thread)
So I really wanted to start doing work again for myself (ive been doing a but ton of freelance that really not worth wild nor can I show or just not paying me )
So I was going through my folder of random images and came across this beauty and remembered I wanted to work on him once I discoved a way to do nice chain maile to confrom to a flow of polygons correctly *luckly with the new max plugin Recently in the tech section I got my wish!*
So I figured not only will I be working on a new character I Wanted to do EVERYTHING new
New generic Base mesh to model// sculpt from
New anatomy studys
New technology studys (get him in unreal with additional shader work)
So with that introduction out of the way lets begin
my new dude

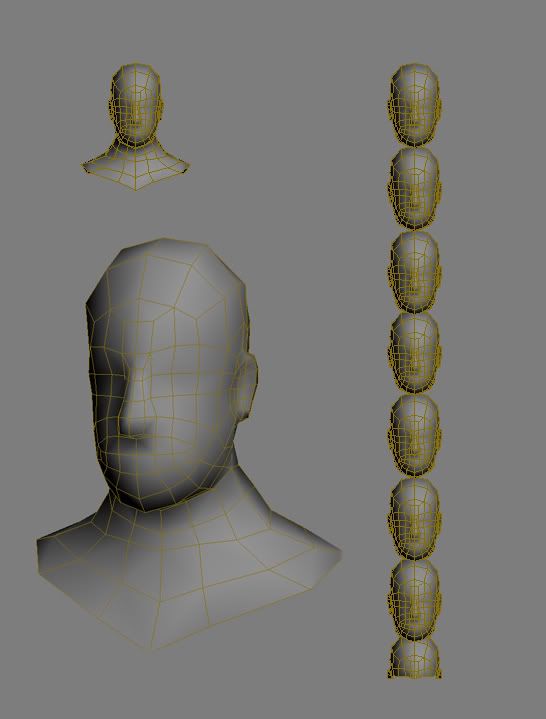
And my base mesh so far.

So Very EARLY WIP just getting the height setup and a generic Sub D head.
Im using a cross combination style of heads from Arsh's generic base mesh and a combination of techniques my buddy polyhertz showed me on his super secret base mesh character
(You shall reveal all your secrets to me polyhertz!)
The mouth area topology ring works really nicely for sculpting lips ive seen it first hand. And arshes, ear area is great for sculpting the ear area and such.
Well Everyone I want this to be a new awesome piece so kick my ass take my name kick me while im down I want everyone to rip me as much as possible so I can improve and make something awesome!
EDIT: gleydson is the guy who made the concept and his work is AWESOME! Credit to that man!
"Jack Farrell, all rights reserved".
So I really wanted to start doing work again for myself (ive been doing a but ton of freelance that really not worth wild nor can I show or just not paying me )
So I was going through my folder of random images and came across this beauty and remembered I wanted to work on him once I discoved a way to do nice chain maile to confrom to a flow of polygons correctly *luckly with the new max plugin Recently in the tech section I got my wish!*
So I figured not only will I be working on a new character I Wanted to do EVERYTHING new
New generic Base mesh to model// sculpt from
New anatomy studys
New technology studys (get him in unreal with additional shader work)
So with that introduction out of the way lets begin
my new dude

And my base mesh so far.

So Very EARLY WIP just getting the height setup and a generic Sub D head.
Im using a cross combination style of heads from Arsh's generic base mesh and a combination of techniques my buddy polyhertz showed me on his super secret base mesh character
(You shall reveal all your secrets to me polyhertz!)
The mouth area topology ring works really nicely for sculpting lips ive seen it first hand. And arshes, ear area is great for sculpting the ear area and such.
Well Everyone I want this to be a new awesome piece so kick my ass take my name kick me while im down I want everyone to rip me as much as possible so I can improve and make something awesome!
EDIT: gleydson is the guy who made the concept and his work is AWESOME! Credit to that man!
"Jack Farrell, all rights reserved".
Replies
Started torso area at this point, Debating about the way the edge flow is going near the back, suggestions on that one anyone?
The flow doesn't look "wrong" per se, I'm just curious about all the poles you have. Sometimes they're unavoidable, but (and I'm no pro, so I could be wrong) for sculpting programs, you usually want to avoid them whenever possible.
http://www.polyphobia.de/public/advices/op.jpg
right now having two poles that close together with bite you while sculpting
Got a chance today at lunch to mess with him , fixed edge flow and such and started on the legs
2 issues im having
issue 1 I wanted to add another cut so he actually had a roundness to the ass and not just a point sticking out (it feels to close to arsh's base mesh and thats what im trying to avoid, I want my own base mesh!)
issue 2: Im not sure if the density of the model as far as poly disribution is to much or to little?
never was good at figuring a good amount.
EDIT:
Be good to have the image attached wouldnt it?
the torso is definitely better than the first post.
random images mean : I have no idea who made it and where it is I got it from so WHOEVER MADE IT ALL CREDIT TO YOU!
1 get a good tileable image of chainmail, and desaturate ( not that there is much of that to do with chainmail)
2 increase the brightness and contrast.
3 clonestamp it onto a layer over your nmap( so you can make sure its in the right place)
4 run the black and white mail layer through nvidia's normal mapping plugin for photoshop.
5 adjust the blue level to make your new n map almost a yellowish color
6 lay that layer over your nmap with an opacity of around 40%
( this may need some tweaking but for fine details that are a pain to prep a mesh for this works nicely, good for skin aswell)
gl man
2- the concept is SIGNED, how hard is it to google 'gleydson' and give proper credit?
Im thinking this is a good base mesh to start with I changed alot but debating about adding more edges on this or not..
Also a question
the hands : Now ive seen different methods to making the hands for sculpting some straight out some curved and some wide handed
I did semi curved (very suttle) but VERY wide handed,
Is there a better method to making hands for sculpting purposes ? Ive never once really seen this subject touched at all..
Oh yea if this mesh comes out good enough I'll release it to anyone who wants to use it on polycount (after I get this right though, and I know it works well for sculpting)
A few things were wrong
mainly I did what he refers to as "midget syndrom" meaning my mesh was to short in some areas, so that was fixed, errors above you guys listed was fixed up, also reshaped out the mesh and made the head more of a correct shape, and fixed the amount of geo so it was even
(thanks again polyhertz)
gonna start testing out some high poly soon
im not anatomy whiz, but at the moment its as if he's leaning forward
otherwise, it seems okay
interesting project btw. cant wait to see it done!
started to test out a method of how to make the chainmail , just a quick test but Im thinking this method can work at a mid poly range..
MUCH wip and more to come!
He gets a lot of stuff published in ballistic publications.
http://www.ballisticpublishing.com/bsw/viewEntries.php?bookID=22&l=C
http://www.gureiduson.deviantart.com/
I might be wrong but im 99% sure thats him as the image up top bears his signature.
Cool trick for the chain mail looks like its working
The base mesh looks like it came out pretty good, a little on the skinny side but we'll have to see how it goes with the armor and tweaking.
And my sugestion would be to take it to Zbrush now and try it before calling it done, change the pose for a more "alive" one, sculp it some and see if you need to change the topology, bring it back to max, rework, Zbrush again and so on...
NEVAH!
ok ok fine Im gonna fix it later tonight , Your ear flow is still funky to me though but I'll create a new one soon.
So I remade my final version of the base mesh (Till I find a flaw with this one) And im going to be begin sculpting the anatomy soon.
also to reference of what was said earlier, the chain mail I had posted was a test of a new plugin for max that was posted on here called slidknit
I luckly have a powerful computer so I ran into little to no errors when using it for a complex mesh as the chainmail...but when you really start doing crazy patterns the thing starts spazzing out when you skin deform it....
Anywho heres the latest version, hopefully tonight will have some sculpting put in.
(oh yea Hertz: I found that the ear like how I have allowed me to sculpt it in easier versus the one you had, and I prefre my guy to smile instead of frowning like yours :P )
anywho so worked on base mesh got ALOT of details in only sub d 2 , right now I was only workin on form and proportions for this guy
that was before the leg spazzed out....polyhertz did a patch up job but in the process I lost sub D 1...im a bit annoyed about what happened so Just wanted to post some progress....I think im going to start this sculpt again hoping the leg wont spaz tommorrow.
So ignor the tumor/burn/cancer wounds all over him....gonna start a new one tommorrow...
(RAGE)
On a good note new base mesh gets uber details quick in low sub ds which is what I wanted.
but still...
*throws computer*
RAGE!
keep it up!
looks really wicked.
I think you should bring out the wings(Lats) more.
So you finished your dudley?never saw the finals!
Btw, thanks to jhonny for giving up a nice tip
Until I can get that shader to work dudley is my 2ndary project, I want to finish him but shaders are a new strange alien world to me and ive been trying to get all the help I can get from it but just havent had the best of luck with it.
anywho yea like I said that model you see posted above im redoing due to a mess up in the models geo and the uvs didnt hold on him for some reason (thats necessary for my chain mail part of my model)
man johny your the 3rd guy who hasnt read what I posted I swear I need to have everything in picture format for people to listen
anyway like I said it was a quick sculpt and it was only sub d 2 , but the damn mesh spazzed out created a tri point and died, so im restarting tonight, I didnt get a chance to play with forms or anything yet.
New mesh tonight I'll start smaller and work my way up again , and yes I am using reference , I'll pay more closer attention to details, ( I didnt smooth anything out I was just gettin form in)
And I have a puppy not a cat!
Keep it up though, don't give up! I can see you getting this where you want, with continued effort. The density looks pretty good to work with. edit: I read your post but might have missed the point, so don't take this the wrong way. Or else.
Anywho heres the knight guy so far.
what do you guys say, draw overs and generally beating me up to tell me what to fix is appreciated
Sammmmmmmeeeeee problem as johny says, progressing sub-d levels WAYYYY TOO EARLY!
Take a step back, look at the cheeks(concaved from the front view, wtf?) chin, neck etc. Those areas are nowhere near solid enough to begin detailing on. But you've already starting doing hair detailing?!? The last possible thing you should be doing!
Also, it really seems like you may spend too much time modeling from one angle, its really obvious with the ears and the cheeks, which actually look ok from the side view, but terrible in the front shot. Again the ears can be attributed to detailing way too fast, before you actually had the shape of the ears formed you sub-divided way too high and did all the detailing.
Really i would say start over, you're not going to progress very fast, or even at all until you can drop some of these bad habits dude. The best possible thing you can do is perfect the basics, that way you have a solid foundation to build up from, right now you're really struggeling to do that.
Blue = landmarks
green =suggested edgeloops
red =suggested silhouette
-woog
Base
Sculpt
retopo
optimise
done
....and why hack up arsh's base.?..its not a big deal....but lets say you took the hands beause you're having trouble modeling base hands...then you probly need to practice hands. I would go back to basics. Building your own basemesh is a pain in the ass...but hopefully you'll learn something from it
low odor: agreed
penrod: your one of my favorite artists on polycount with some of the work youve been doing, but I really dont feel what you said was fair , if you looked at the post since page 1 I started a base mesh from scratch I even wrote word for word "I dont want to copy Arsh's base mesh I want to recreate a new one for my needs"
The only thing that is similar is the ear setup that arsh made that I liked for sculpting , and my new version right now has that modified now thats more simplified and basic topology in the ear / chin area.
I will be posting the new version of the base mesh some time this week I need to change the underarm area due to pinch points ive been runing into.
Earthquake: that comment you wrote has had me working on sculpts at lunch every day, and working at night redoing heads from scratch. I hate the chin area, I dont get how the muscles/ skin form to make a good strong chin. Are there examples you would suggest?
Because he created this one from scratch... and is learning and at the end can say it's all their own creation rather then use arsh's basemesh and tell everyone it's all their creation.