Home 3D Art Showcase & Critiques

Soviet Scout Drone - Now Finished - Feedback Super Welcome

Commiesaur
triangle
Offline / Send Message
Commiesaur triangle
Edit: Finished ArtStation post here: https://www.artstation.com/artwork/B1r33A

I took a step back from the environment challenge to try and focus on a somewhat simpler project which I wanted to carry through the full pipeline for the first time (been doing lots of modeling tutorials, but this my first step towards a completed project with UVs, baking and texturing). For someone who is doing their first proper bake, the contest prop seemed a bit scary and I did want to dabble a bit with concepting an original design. I started with a reference board on pureref drawing together various simple eye-style drones/probes and a few soviet or soviet inspired items I wanted to grab and incorporate to the design:

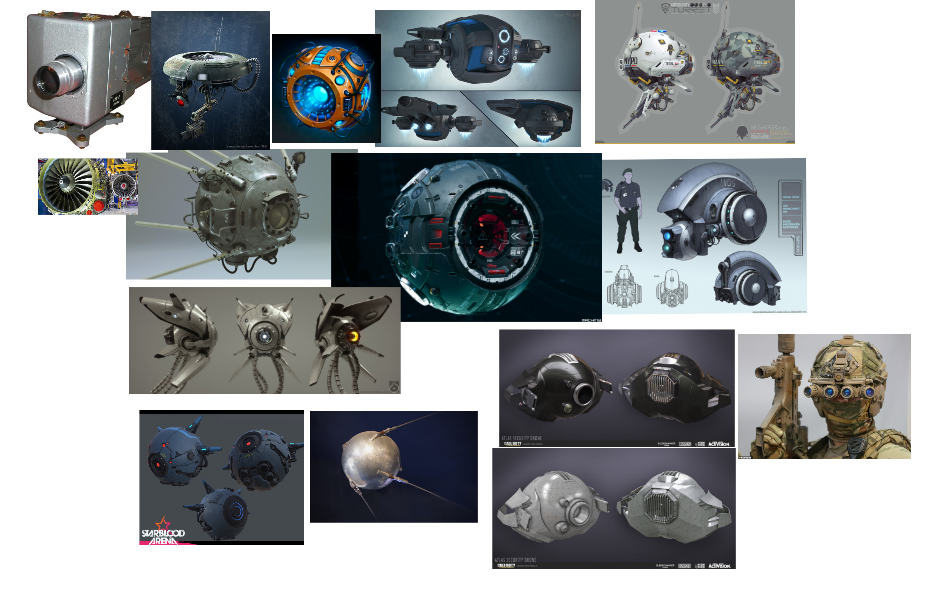
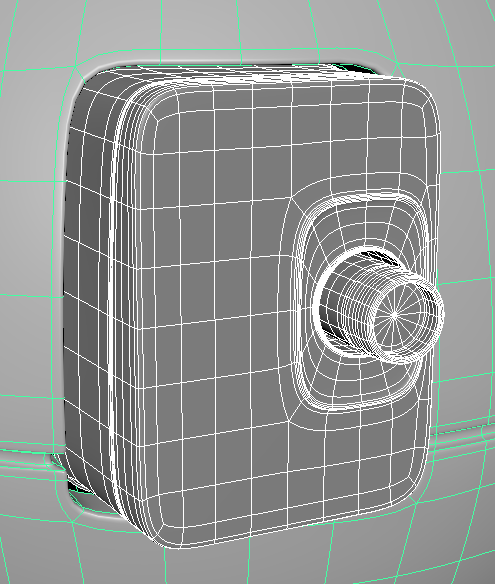
I took Sputnik as core inspiration especially the antennas, which I wanted to reposition but overall wanted to build a very similar design. The heavy soviet camera stood out as a really distinct main camera. Given that the idea is a sort of scout or surveillance drone I also took inspiration from some Ukrainian nightvision goggles for some additional cameras. Didn't want to leave propulsion to pure sci-fi magic, so made some pseudo jet fans, 3 side ones and one larger one at the bottom not pictured in screens (as a modeling problem it's basically identical. Threw in a couple panel breaks, a rear charging station and a rubber base over the central fan.

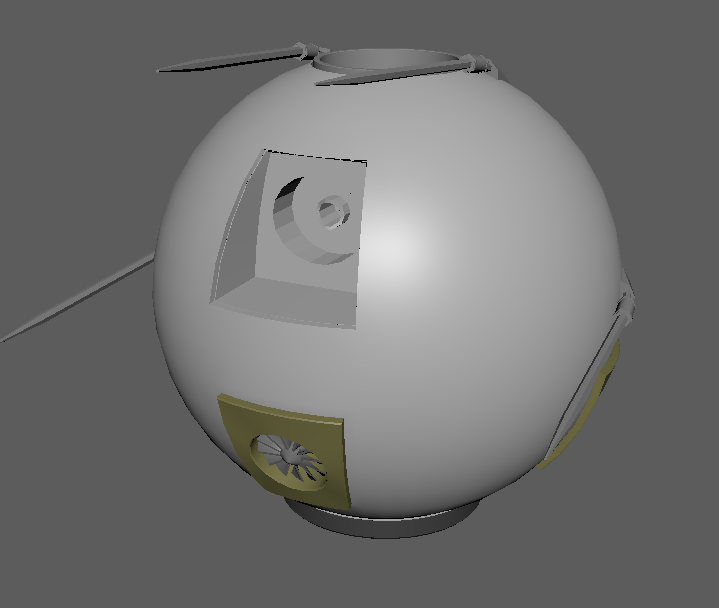
I have achieved a hi-poly model which I am quite content with overall, fully smoothed/subdivided it sits at around 600k tris:


As I've attempted to build out a low-poly however, I've been getting absolutely murdered in my attempts to run some test bakes. I have an 18k lowpoly and a 13k one (which I think I made some incorrectable mistakes on, and due to poor file management may have to re-edit some parts from the 18k save to bring it down to 13k w/out the flaws.


Heres a screen of the 18k lowpoly, 13k is gotten from optimizing fans, and than adding a few nice bonus bevels.

Screen below from hi-poly of probably the biggest trouble area for me to match and attempt to bake, basically all substance test bakes have been a disaster...

Low poly rear, the inward cut cubby being another point where I'm struggling to match low poly to hi poly and the bake quickly went crazy in any tests.


My attempt to match the geo better with the low poly to the two key elements (main camera, rear socket) using some extra large bevels led to the semi-unrecoverable lowpoly file (didn't think about consequences of moving some already optimized triangles).

On my test bakes I've been using mostly automated UVs. Do I need really optimized low-poly UVs before even attempting a good bake? If so how can I even have that if I still have to play around with low poly geo to line up? The panel breaks I've made have been no problem, but the key geo areas, 1)Main Camera entrance to shell, 2) back socket and 3) antenna screw-like connector have just had series upon series of catastrophic failures. And I don't know where to start in terms of it being the geo itself,the bad UVs or the baking process.

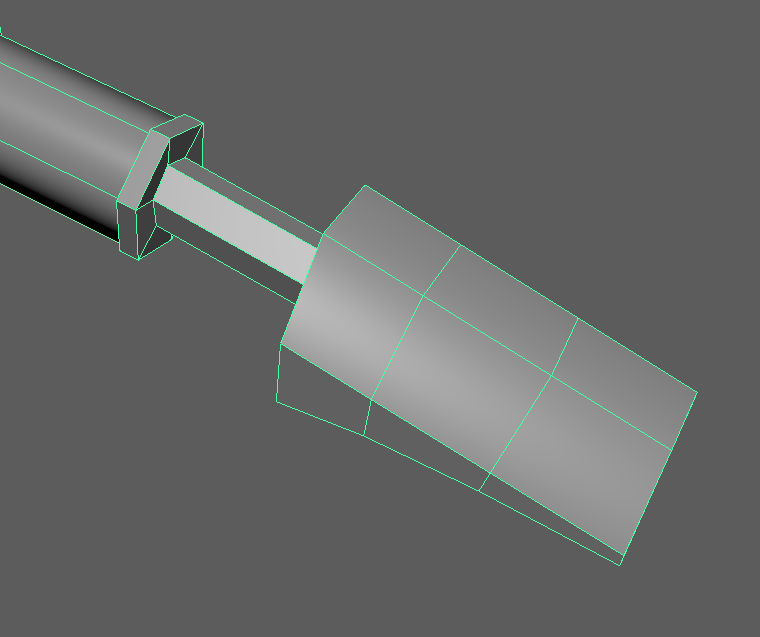
My low poly work with the antenna. Grooves get projected on to the shell behind, or sometimes both the core part and the shell behind.


Should I abandon trying to bake in Substance and try working out of Marmoset instead? I've been hesitant since obviously Marmoset has a pretty big price tag for someone still getting foundations down.

Really struggling with the whole low-poly bake aspect here and not sure where to go to really understand what I need out of my low poly geo to be able to take the detail well. Some guidance here would be tremendously appreciated.


Replies

  • teodar23
    Options
    Offline / Send Message
    teodar23 sublime tool
    It would be much easier for me (and im guessing for others as well) to understand where the problem comes from if you show us what the bakes look like. Also do some overlapped screenshots and maybe it will become apparent where the issue lies.
    I'm betting on ray distance and/or direction. But automated uvs desnt sound good either.
    So it could be a number of things and i strongly suggest against automated uvs unless its really small and basic shapes.
    Baking errors are pretty common so dont get discouraged, just keep in mind that its a learning curve and it takes some practice.
  • rexo12
    Options
    Offline / Send Message
    rexo12 interpolator
    Marmoset was great for me to understand how baking actually works as a beginner, although frankly i've moved back over to substance purely for how much faster it is. That said, I think all you really need to do to understand baking is just send a bunch of test shapes down the pipe to see what you can and can't get away with. Marmoset's interactive cages and skew maps and so forth just made it a little more interesting to do.

    Are you using bake groups? I would also unwrap by hand - eliminate any funny business caused by the auto-unwrap. Give us some shots of the bake errors and your UVs please.
  • Commiesaur
    Options
    Offline / Send Message
    Commiesaur triangle
    Hey all, thanks for the feedback so far. I´ve been working the last few days on unwrapping the UVs (first time doing this, and most of the tutorials I seen are working with some much simpler objects. I've had a lot of restarting from scratch, and also probably lost at least a day to trying to figure why Maya unfold3d wasn't working before tossing the project in Maya 2022 where it worked).

    These are my hand unwrapped UVs. Aimed for maximizing texel density on the main circular shell and than scaled down anything barely visible (stuff behind fans). I've also stacked the fanblade UVs which is probably part of whats haunting me with the fanblade bakes, which I'll get to shortly.


    Quick screen of how the UVs look on the model itself. I know texel density is uneven but I'm trying to cram everything into one Texture set. and wanted to scale up detail where possible on antennas and the front plate for the cameras.

    Taking this much more efficiently unwrapped object into Substance for the baking I've had some much better results but with a number of key issues I'm not sure how to deal with.


    Overall bake is looking pretty good from a distance and I seem to have even resolved most of the key issues with the Antenna (couldn't get screw shape captured, but I think there just wasnt enough texture space with the old autounwrapped set.

    However I have some key issues especially looking a bit closer up:


    The back here is very rough and clearly not capturing the broader high poly shape.


    The main cam is extremely rough around the edges with some clear issues there. Also not sure the best way to smooth over/resolve this. This includes both the main edge/profile and also the edges of the first cylindrical area opening up the space out of which the camera is coming.


    This piece which borders/support the fan on the site also came out like this, whereas the symmetrical one on the other side came out fine.


    FInally the fan blades themselves are all looking a bit rough, which I'm sure has to do with me packing all the fanblade UVs together to save space, but I'm not sure what the approach is to try and do something like this well. I can't really afford the space for every fan blade texture to take up individiual space on the UV map.


    Thanks again for the help so far, I thought going into this I could sort of test the bake before finalizing UVs incase heavier mesh changes needed to be made. UV work has taught me that my "not very complex" asset is actually still quite a lot of work to get done right. But I do want to really smooth out all the bake issues as best I can to try and get the asset in a decent place as a potential first portfolio piece.

  • rexo12
    Options
    Offline / Send Message
    rexo12 interpolator
    My opinion is that you should probably do away with your 1-textureset-only goal. At this level, it's more important to have clean bakes and UVs, rather than stressing about optimisation, and all the extra problems that mirroring and stacking islands brings. My suspicion is that your texel density is not high enough, and it's okay for a portfolio piece like this to have 2 texturesets. Do you know what the exact density value is? What are you targeting? (10.24px/cm, 20.48, etc.)

    That said, notes about the bakes in themself:

    Stacking the blades, when there isn't perfect duplication across all the high/low copies - in geometry and UV islands, is going to cause bake errors from slight differences causing overlaps and misalignment.

    This can be dealt with in 3 ways: By separating the UV islands out - which I understand is not preferable, making sure they're perfectly aligned (tedious) - or by only baking a single copy of the stacked items. For the last option, you can duplicate your low poly and delete all but one copy of the stacked items from the mesh. Baking that and applying the maps to the 'master' low poly will prevent overlap errors, if your UV islands are properly stacked. Alternatively, you can use bake groups and give the extraneous objects names that have no corresponding high poly group, so that no rays are cast to them.


    I can already tell this is going to cause problems. Is this the non-visible geometry you mentioned?
    As an aside, make sure you are giving a bit of padding between your islands. I can't tell how closely you're packing these, but you want about 5px of padding (for a 2K texture) to prevent bleeding on your edges.

    The back section looks like ray intersection errors. This can be mitigated with bake groups, and/or by adjusting the ray distance.

    A lot of the issues on the main cam can be caused by low texel density, as well as skewing caused by the Triangle-fan/N-gons. There is stuff about UV splits, hard edges and so forth that can cause those dirty lines in the middle of your bevels, however I've never really grasped that side of things as I've always used blender and don't know the analogous concepts from Maya/3DS, and also don't run into those issues for whatever reason. This thread *may* help you:
    https://polycount.com/discussion/107196/youre-making-me-hard-making-sense-of-hard-edges-uvs-normal-maps-and-vertex-counts/p1


  • Commiesaur
    Options
    Offline / Send Message
    Commiesaur triangle
    So I got through this more or less and have it ready to begin diving into texturing. There are still areas I'm unhappy with, but then taking a step back you have to be pretty far away to zoom in on them and I don't think they should be critical

    The answer was just lots of suffering through UV tweaking, messing with softened/hardened edges, adding more bevels to the lowpoly and redoing all the UVs to make space for the fan blades. I'm really understanding in this project what everyone says about that final 10-20% being most of the work. Lots of troubleshooting where there's no real related tutorial to dive into. I downloaded Marmoset and was trying to use it, helped me understand baking a bit better, but once I found/fixed issues, the bake wasn't very different from Substance. Not convinced its worth the $300 yet when Substance will pass me a basically free student license, though I plan to test it for rendering the asset.

    There were a couple parts (Fan base square things and one of the antenna joints) where just keeping the lowpoly worked and looked better. The Fan bases had some odd edge issue that I could not resolve no matter what I experimented with, that was not even near the UV seams.

    I just threw on some default shiny materials to highlight any problem areas as a test, this weekend will be diving into doing the proper texturing from the ground up. Hope I've got enough of the UV/bake foundations in to carry through the texturing to the finish. But my experience up to this stage has definitely prepared me for the likelyhood it isn't going to be that easy.


  • Commiesaur
    Options
    Offline / Send Message
    Commiesaur triangle
    False alarm, I am apparently not anywhere near to through with it, since it seems what I have set up is in fact set up with every material id resulting in its own separate texture set and I apparently need to bake an ID map instead and begin to develop/distribute materials based on that. Back to square one.
  • rexo12
    Options
    Offline / Send Message
    rexo12 interpolator
    What texel density are you targeting for this?
  • Commiesaur
    Options
    Offline / Send Message
    Commiesaur triangle
    Aiming for 20ish on most objects, with some brought higher (in particular some parts of the antenna with higher detail). Basically the max size I was able to get the main shell to within a UV square, than extrapolated to the other parts with a few scaled up if high importance/detail.

    I think I have solved this by going into Marmoset, redoing the baking there, than baking a separate color map id which looks like it will work. Have everything brought back into Substance and was able to test it a bit. I should be able to at least go ahead and make the material textures for now even if the color id map might need some slight adjustment later on.
  • Commiesaur
    Options
    Offline / Send Message
    Commiesaur triangle
    Very beginning stages of texturing, laid out basic materials, only really started to go into details on the main front camera as well as a little bit on the main shell. Trying to avoid smart materials and build things myself to better understand the substance workflow. ID map has worked so far, though there are a few spots with just a slight line of things being off, you can see one of those lines on the inside edge of the main cam in the first screen. Will look to correct that, maybe manually in gimp?

    Lots of work to be done adding height/normal, especially rivets. Will be my first time adding those smaller details via normal/height maps so I'll see how it goes. Also first time adding text, and to make it more complicated thematically it should be in Russian. Still quite happy to have at least gotten to this stage, taken a while and I've learned a ton. Hoping after the texturing (probably a good week or so of part time work off) its a good enough base to be worth presenting, something I'll really need feedback on later.

    Still super happy with just how much I've learned about the whole pipeline after mostly having studied just modeling. Thanks to all comments/feedback s far.


  • Commiesaur
    Options
    Offline / Send Message
    Commiesaur triangle
    Some more progress on texturing, learning how to get text into substance (especially Cyrillic characters, substance font setup really no help there....). Need more details on the top, dust, wear on secondary metal elements and the base of the three camera thing. But making progress bit by bit.


  • Fabi_G
    Options
    Offline / Send Message
    Fabi_G insane polycounter
    You could do some overpaints to apply some aspects from your references to your specific object and setting a target to work towards. Doesn't need to look pretty, just to define what goes where storytelling wise and to play with the distribution of shapes (for example main chassis is not just one uniform color but has patches with hue/value variation where the surface was renewed). Good luck :)
  • Commiesaur
    Options
    Offline / Send Message
    Commiesaur triangle
    Added some heavier details to the shell paint, layers of dust, more normal changes to the three cameras, etc. and am ready to call the project finished for now: https://www.artstation.com/artwork/B1r33A

    I think there is still a lot to improve. Particularly I think a deeper understanding of paint with industrial materials, primers etc. But as an initial go at a full asset from scratch I'm pretty happy. Hope it at least crosses the quality bar of being decent enough that I won't have to take it down when I have a more developed portfolio and am applying for roles down the road.


Sign In or Register to comment.