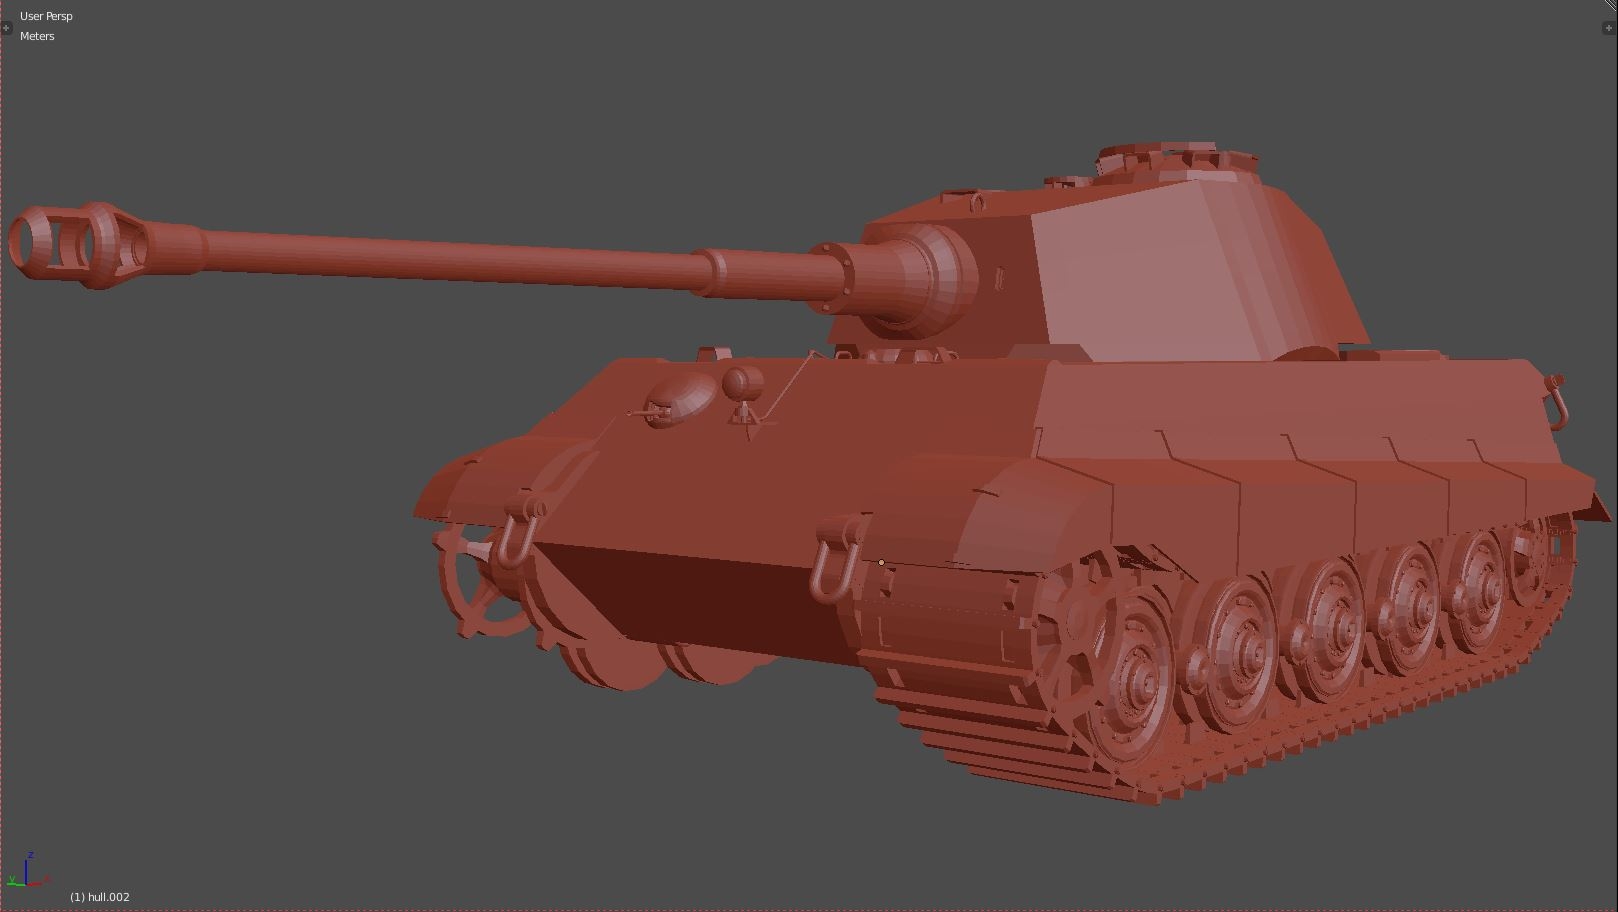
Sd.Kfz.182 Pz.Kpfw.VI Ausf.B "Königstiger" (Henschel Turret)
Hiya:
I've been out of the loop for a while creating 3D content of any description, as a result psych'd to finally get back into the 'groove' having a crack refreshing various skillsets through a complex long held hardsurface passion project (...which I confess is in tandem with other personal stuff on another forum)
Hence this assignment will be split into separate parts i.e. 3D Still, VFX Shot and a possible browser based playable demo/prototype, whilst at the same time putting into practise optimisation techniques I've picked up here-n-there.
So at a glance fairly ambitious overarching exercise in general I've taken on but nonetheless I'll try and do my best keeping to a somewhat 'regular' update schedule despite foreseen wavering levels of motivation throughout.
Oh...and peer review positive or otherwise as always most welcome ![]()
Anyways needless to say an extended workload over a period of time possibly 10 - 12 month (...whenever it's finished) timeframe, that'll include but not limited to the following:
DISCIPLINE:
- Subd modelling
- Retopology
- UV Unwrapping
- Realistic Materials
- Rigging
- Animation
- Sculpting
- Simulation
- Compositing
- Game dev
PRODUCTION PIPELINE:
- Blender
- Inkscape
- GIMP
- xNormal
- Utimate Unwrap Pro
- Blend4Web (WebGL) https://www.blend4web.com/en/technologies/blend4web-ce/
REFERENCES:
Modeling
http://www.koenigstiger.ch/english/index.html
http://www.worldwar2aces.com/panzer-tank/kingtiger/
Animation/FX
www.youtube.com/watch?v=Oqm4gunNTFo

www.youtube.com/watch?v=Oqm4gunNTFo

Base Mesh - Blockout (current state)


Cheers.

Replies
@cromadbomber - Thankyou. I'm pretty satisfied with the overall topology at the moment.
Update - sub-d time, beginning with the tank's running gear: I typically use reflective matcaps just as a sort of 'diagnostic' aid, validating geo consistency in Edit mode.
Looks cool!
@Caiterade - Thankyou. Heh...yeah blame naming this thread on my fondness for 'minutiae' in regards to most things I've an interest in or could it be put down too a simple "Geeky" characteristic?!
Oh...and the full German name plus literal translation in double quotation marks of the abbreviated title:
Sd.Kfz.- Sonderkraftfahrzeug "Special Purpose Motor Vehicle" (ordnance inventory designation)
182 - Armoured Vehicle Category Number (simply denotes Tank)
Pz.Kpfw. - Panzerkampfwagen "Battle Tank" (in this case heavy)
VI - Vehicle Mark (series generation)
Ausf.B - Ausführung B "Variant B" (second production model)
Königstiger - "Bengal Tiger" (unofficial name I believe given by the troops who'd served with them?)
Henschel Turret - Henschel & Son (the German turret manufacturer)
...whew! that's about it in a nutshell.
Just completed the inner bank of roadwheels, due in part caused by further time constraints doing this stuff by my day job still nonetheless progress.
A particular challenge was re-editing the idler wheel into one useable shape, 'head desking' multiple topology design iterations until I'd knocked one out I'm mostly happy living with. From my POV not too dense geometry wise so I guess at this stage shading errors might be kept to a minimum - sort of?!
Cheers.
Sorry barely enough to show meriting an update after the amount time away not working on this but still progress however minimal.
More work refining the road-wheel suspension arm shapes.
What program are you using?
@CybranM - Thanks and Blender is my DCC app of choice specifically the 2.75 build [64 bit]
I've been working with it since the 2.4xx days so needless to say pretty much welded too it's 'idiosyncrasies' at this point, in that it'll be quite a challenge if for whatever reason I had to make a switch after all this time.
Looking good! Quick question though, is this thus far just the high poly and you intend to bake down into a game ready version?
If so, i have a couple of comments. Keep an eye on those edges, you may want to overemphasize them, so while not being as real world accurate, they will bake down in the normal map better and produce better quality results. ie you will get more pixels representing the bevel.
The other point is, if you are going for a low poly model, what sort of polycount are you aiming for? I ask as are you intending to have the wheel bolts and little metal plates connecting them also modeled in the low poly (in which case the completed model will be in the region of 250k+ tris) or will you bake these details down into the normal map? (so the final model will be in the 50k to 100k tri range). If the later, you may want to change how they parts are modeled, so instead of the sides of the bolts and metal plates being completely at right angles to the top faces, you in-fact model a bevel on the side faces. This again allows for more pixels in the normal map to be used to represent the angle changes of these details, so the normal map pops a bit more.
All the above may be irrelevant however, if the answer to the first question is "no, i am not doing a game ready model!"
Whisky
@WhiskyDelta - Thankyou, you've nailed it in one and the tips are extremely helpful
I've set myself quite a task mainly for revision but there are those areas in asset production where I'm a complete noob, complex playable 3D game content being one such bottle neck, so I appreciate your insights no end. At the moment just enjoying getting back into the 'swing' of things particularly the modelling part initially however most definitely research into more depth as this project progresses. My intent is to output a 3D Still, VFX shot and a small level say a war torn town/village, something similar too the climatic battle scene in "Saving Private Ryan" or rural scene? where the player in 3rd person controls the vehicle, firing, with surrounding environment AI objects registering destruction effects.
A game I pretty much became obsessed by was, well actually when time permits still play is "Theatre of War 2: Kursk 1943" serves as inspiration for my idea. Anyway whether I get to the point of developing hopefully something close to what I've in mind either browser based or Unity standalone EXE not entirely sure at this point but the learning process alone trying to get there will likely prove invaluable nevertheless.
Cheers.
Still plugging away, here's some output from the last day or so drive sprocket outer ring teeth shape.
OMG!...the complexity of this thing modelling wise is...for me a mind bending challenge too get a somewhat near enough real life composite facsimile, let alone 1:1 duplicate.
Oh well, thus far at least still an awesome blast.
Anyway here's more doodling refining the drive sprocket shape just prior too walking out tha door for a 12hr night shift doing my 'day' job.
...now aren't I a good boy
Hi there:
I've another update for this project after a long absence mainly due too work commitments and also having to re-work this particular track link shape a number of times into somewhat two contiguous meshes, over as many months since last stopping by. Anyway I think captured most of the relevant detail
Cheers.
Another update...already?! must be on a roll
All righty then, in solid mode with GLS lighting enabled I think the object's shape/silhouette looks a 'close enough' match too the reference material...
Anyway next up adding/refining welds and of course bevel'ing dem hard edges together with other surface detail.
Cheers.
@CybranM - Hey thanks man, I probably will for the 3D still final render 'beauty shot' although when it comes too the in-engine playable version which is a ways off I'm not entirely sure at this point but at a guess wholly dependent upon my texturing skills...
such as they are...
Anyway here's some ref's I'd ripped off the Net, that'll serve as inspiration:
(Detailed model kits via Tamiya 1:16 scale)
Zimmerit (anti magnetic mine paste)