wrapping my head around modular design

polycounter lvl 12
Hey guys, I've been struggling with getting some principles of modular design into my head, and was wondering if someone could explain something to me.
Modular texturing/materials is obvious enough when working with flat planes, as in the Thiago Klafke tutorial - allocate texture space to a plane in a logical/practical fashion, then map the lo-poly geo to it.
Where I'm confused is what to do when using more complex low-poly geometry but still getting it to conform to a square texture space. I know one method is to still work with pre-allocated square texture map, and just assign any extraneous geometry that results from extruding on Z-axis to the pre-existing texture sheet without giving that new geometry its own texture space (like the 3d Motive Modular Building tutorial).
But what about this example from Philip K:
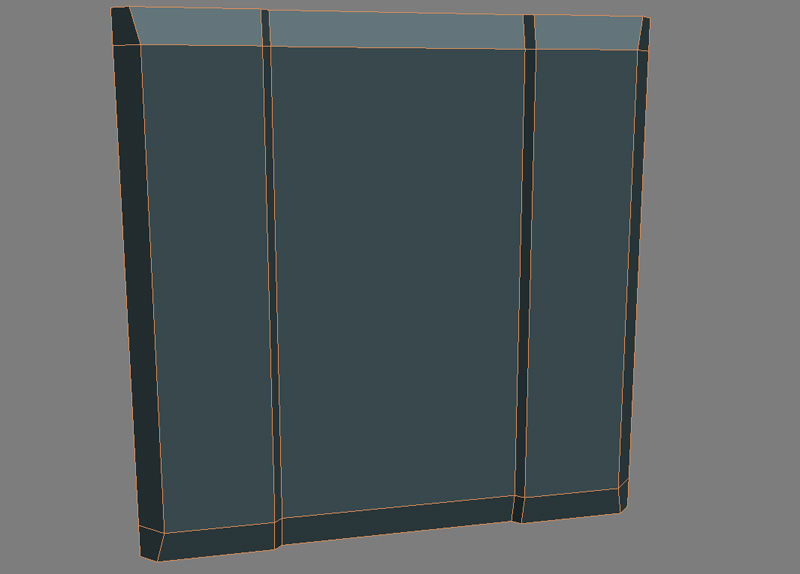
He maps all the extruded geometry to its own texture space, but still ensures the entire shape fits perfectly into a square UV space? Is there a method of doing this when designing more complex low-poly geo?
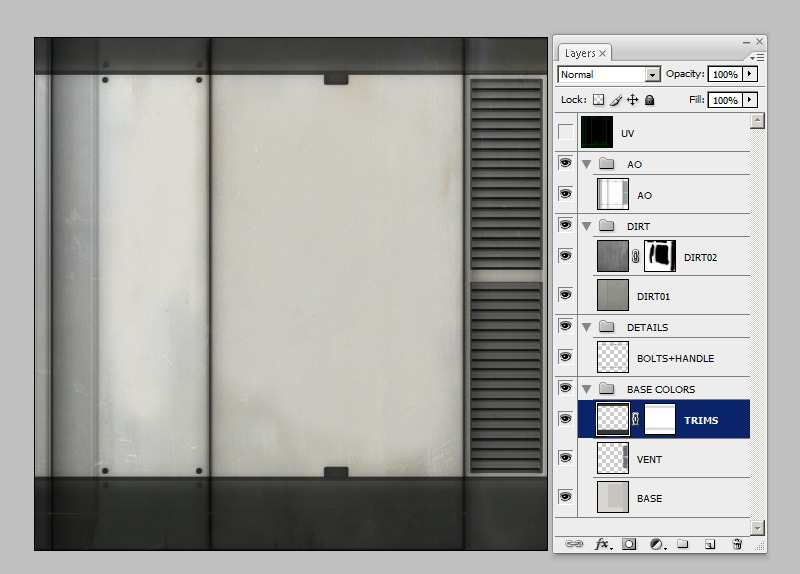
Another example would be something like this:

You can see there's edge definition/damage in the material where major planar changes/'folds' occur, which means it was baked down at least partially from a similarly shaped high poly, however the texture still fits on a perfect square.
Are there any tips/tutorials for solving stuff like this?
Modular texturing/materials is obvious enough when working with flat planes, as in the Thiago Klafke tutorial - allocate texture space to a plane in a logical/practical fashion, then map the lo-poly geo to it.
Where I'm confused is what to do when using more complex low-poly geometry but still getting it to conform to a square texture space. I know one method is to still work with pre-allocated square texture map, and just assign any extraneous geometry that results from extruding on Z-axis to the pre-existing texture sheet without giving that new geometry its own texture space (like the 3d Motive Modular Building tutorial).
But what about this example from Philip K:
He maps all the extruded geometry to its own texture space, but still ensures the entire shape fits perfectly into a square UV space? Is there a method of doing this when designing more complex low-poly geo?
Another example would be something like this:
You can see there's edge definition/damage in the material where major planar changes/'folds' occur, which means it was baked down at least partially from a similarly shaped high poly, however the texture still fits on a perfect square.
Are there any tips/tutorials for solving stuff like this?
Replies
http://www.thiagoklafke.com/modularenvironments.html
It's a good read. It has to do with using the grid and knowing geometry basics. Do be aware that your examples and the link provided are all relating to sci fi as the methods behind sci fi are typically modular and grid based anyways.
If you look at environments like skyrim or things with more organic geometry, it will demand a bit more textures to utilize modularity (as I type this I'm wondering if I should approach this challenge, it seems interesting enough..). Nonetheless, there is a bit of difference between creating the elements but assembling them is relatively the same.
There is also a talk that bethesda has about fallout and skyrim and thei approach to designing a modular environment. It's on gamasutra somewhere, but I don't have the link on hand atm.
Anyway, best thing to do is play around with a layout. Like sketch out different areas of a texture sheet before you have anything close to a final product to see how you want to unwrap and model your elements. Gray box essentially, with guide lines.
http://blog.joelburgess.com/2013/04/skyrims-modular-level-design-gdc-2013.html
Texturing first and then applying geo to the textures isn't the only way to make modular environments.
You can also just make modular pieces as if they were just an asset. You'll get a better relationship between your normals and your geometry this way. This is especially true of scifi environments which aren't the 'beveled squares on flat walls' style of geometry.
You can also combine these methods - texture some things uniquely and use a pre-made texture for others.
Yea for sure, I guess my question was I see all these nice modular pieces that ppl still manage to fit into a square texture space, like perfectly, and that aren't just simple planes (Like in the philip K example vs the Thiago Klafke one) Another example to illustrate my inquiry would be this modular building exterior by Simon Fuchs: http://www.simonfuchs.net/folio/project06.htm
He's got some (relatively) complicated low-poly geo going on but if you look at this flats he manages to fit most of the stuff perfectly into a square:
So I was just wondering if there is a way to essentially build stuff so that it can fit into a square uv space better, if that makes any sense.
Making sure you can straighten your UV's into strips easily helps a lot. I find building geometry as a single surface (no open edges) also helps a lot to compact the UVs. Obviously sometimes this can waste polys so it depends on what kind of geometry you're creating.
Hmm, what exactly do you mean?
I've done a bit of this on some past projects and one method was to take a plane and put the full texture on, then cut it up where you plan to have each element. With each element, you can then add edge loops and move the geometry along an axis.
The main thing is that seams will typically occur in the AO areas or where a normals edge is in the normal map, therefore you make a bunch of pieces cut from the main texture map, a sort of kit bash, then put them back together in a new way.
Sorry if that doesn't explain exactly, the method of creating a kit bash from a single texture page is usually iterative, for me at least, because I can't just plan out everything and it's perfect. I'll color code areas of my texture map or have simple normals that I know I'll add more detail to once I figure it works.
It's touch and go because you're making your own texture sheet, designed in a specific way with specific elements and aesthetics that work together differently than others. From the examples you've researched, keep in mind that less is more, Thaigo does more with the geometry than relying on the texture to do all the work.
Same thing with Tor Frick,
http://www.polycount.com/forum/showthread.php?t=89682
Page 2 and 9 have some good info, I think 5 shows how he UVs too.
Play around, do some tests, throw it up here and we'll help out as we can. You'll learn more doing it than thinking about it.