[CE3] Wrecked Apartment

polycounter lvl 17
Environment DONE! 


And a flythrough!
[ame="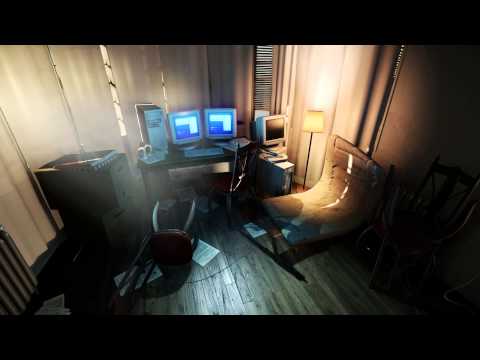 https://www.youtube.com/watch?v=J2gOlFa99lE"]Wrecked Apartment (NDO & DDO) - YouTube[/ame]
BREAKDOWN:
I've finished writing the post-mortem/breakdown! I really hope there's some information here that you'll find useful! I sure learned a lot from this project!

Link in image above, or by clicking here (.pdf)
Again, thank you all so kindly for helping me with this project!
ORIGINAL POST
Hey all!
Been a little while since I posted any of my stuff, so I thought I'd start this thread to post my progress on this environment. I'm following a concept made by Victor Jonsson.
So far I've just made a couple of props and some of the base elements of the apartment, and it's looking quite clean and un-wrecked, but that'll change later on.
I've only used dDo and nDo2 for the texturing. No manual texturing at all so far, except for the base photos, and I'll do my best to keep it this way.")
This is what I have so far:


Please let me know what you think!
Cheers!
Livestream link (will make new post to announce the broadcasts): http://www.twitch.tv/disting_
And a flythrough!
[ame="
https://www.youtube.com/watch?v=J2gOlFa99lE"]Wrecked Apartment (NDO & DDO) - YouTube[/ame]BREAKDOWN:
I've finished writing the post-mortem/breakdown! I really hope there's some information here that you'll find useful! I sure learned a lot from this project!
Link in image above, or by clicking here (.pdf)
Again, thank you all so kindly for helping me with this project!
ORIGINAL POST
Hey all!
Been a little while since I posted any of my stuff, so I thought I'd start this thread to post my progress on this environment. I'm following a concept made by Victor Jonsson.
So far I've just made a couple of props and some of the base elements of the apartment, and it's looking quite clean and un-wrecked, but that'll change later on.
I've only used dDo and nDo2 for the texturing. No manual texturing at all so far, except for the base photos, and I'll do my best to keep it this way.
This is what I have so far:
Please let me know what you think!
Cheers!
Livestream link (will make new post to announce the broadcasts): http://www.twitch.tv/disting_
Replies
Compared to the concept, the hallway seems to wide and the boxes seem huge, also the focal view is very different in the concept it makes it feel more cramped.
Would love to see a workflow break down for the textures at some point.
One thought is the edge wear on the door is maybe too uniform? It looks like you have it on every edge evenly. I would maybe break up the thickness and placement of the edge wear, and possibly not put it on every edge.
Great lighting as well!
Everything is heading in the perfect direction, I would love if you could show us how you set-up the material of the floor, I really like the subtle brushed reflections, is it real-time?
As for the wall, I would decrease the tilling of those motifs making them bigger and prominent and therefor making the texture less noisy, also increasing the spec and gloss of the motifs themselves to get some different material readability against the red satin material. just like in the concept.
Oh and looking at the door, careful with using ddo, sometimes it might give you a very "mathematical" look to your scratches, they're very consistent around the corners of the door, it would look better if you masked some of those.
This is off to a great start man, will be keeping an eye on.
The scene itself looks like a perfect start tough, love the lighting
To be honest this looks way better then my apartment I live in. LOL
@maxivz: Cheers! The materials really aren't anything special. I can share the material I use for the floor in my next update.
@skyline5gtr: It's a simple directional light yeah, but I'm using a bunch of filler lights to emulate global illumination.
@Stromberg90: Thanks for the feedback! I've made the hallway slightly more narrow, but I want to be able to run around in the apartment in game mode, so I don't wanna make it too narrow.
@mats effect: Thanks! Yeah, I'll be posting a breakdown once I'm done with the scene.
@wester: Very good point! I've made the wear and tear slightly less
uniform in the scene than it is in the prop shot. I might reduce the wear even more though. Much appreciated!
@[HP}: Thank you! The spec actually does have the motifs in it, but I might pump them up slightly as you suggested. Thanks for the feedback! =D
Again, thank you all for the feedback, I really appreciate it!
I'll be posting an update later tonight.
Firefox with updated Flash.
Look forward to seeing more! Subbing so I can catch the next live stream, but for now I'll just watch the recorded one
Edit: Nevermind about the light setup, I hadn't made it to the part in the video where you go over your UDK scene.
Been busy working on the metal bookshelf and the chais today during the livestream.
Finished up the chair after the livestream (I'll do a breakdown of it next stream) so I thought I'd show you an update of the environment.
So much left to do! =D
why would you avoid manual texturing ?
i thought the advantage of using dDo was that it boosts one's workflow and not merely automate or replace regular painting/texturing.
right now the textures/details look good but very uniform and recognizable in terms of automated details.
if you add that extra layer of hand crafted details you can take this so much further.
just my 2 cents
Edit: @ aajohnny -- The problem is that it doesn't always look awesome. If you use it wisely it can help a lot, but if you rely on it to do everything you often end up with a texture that has wear and other effects in places it shouldn't be and it looks unnatural. I don't think anyone is "against" dDo, they are against using dDo as a 100% replacement for texturing everything.
I'm using dDo and nDo as a challenge, trying to automate as much as possible. So far it's working like a charm and it's speeding up my workflow enormously, but as some have commented on regarding the door for example, some of the wear need to be toned down manually. I hear what you are saying about using dDo as a tool to boost the workflow and not replacing manual labor, but that's not exactly the point. I want to try and push the tool and see what I can do with it.
@shinobix: I'm using base photos for nDo2 to generate photonormals and I used a wallpaper pattern as a base diffuse for the wall texture in dDo. On top of that I added slight miscolouration, subtle stains and so on. The pattern itself is not generated through dDo. Hope that clears it up.
Glad I could help! I'll be doing a lot of dDo work in the upcoming livestreams during this project. Feel free to tune in!
It can actually be perfectly used as a PS ui replacement (wich it does amazing) combined with a fast/good previwer.
With the custom detail layers (add empty layer, and paint in the mask with brushes, b/w photosource in a layer and add as detail).
all the presets/effects just used as a bonus tool.
I find it actually surprising that not more people use it that way and it has this "automation" association, but that may just be me.
anyway, sorry about that
Looking good so far, as your works always is, and looking forward to the end result ^^
Just some things I am curious about:
In udk do you actually have a material/shader set up that somewhat mimics that dDo/marmoset does, and if not, how do you feel about what you see in the previewer, versus what you get in udk.
and sort of connected, why do you choose udk over cryengine, considering how cryengine does its lighting, it seems like it would be a closer match. (not saying one is better then the other, just curious why you prefer udk in combination with dDo/skyshop).
The floor and the wallpaper textures look so nice, its like their maps perfectly blend together. My only suggestion would be to fill the empty space on the left metal shelf with some carboard boxes/books like in the concept so it doesn't look so empty, but I guess that will come in later.
Anyway, I'm going to keep an eye on this thread.
@joeriv: Personally I find it pretty difficult getting similar results in UDK as I get in Skyshop/Marmoset. It is possible to get similar results, but I'm not entirely sure how. I actually switched to Cryengine because I was really impressed with the results I got with the textures and models when I tested on a couple of props.
So as I just mentioned, I switched to CryEngine 3 instead of UDK. I've also made a couple more props and tweaked the existing textures, such as the door to get rid of some of the over the top wear. I've also changed the specularity of the wallpapers, making the motifs more reflective.
Cheers!
Try not to make the floor shiney all over the place, this person living here probably wasn't that clean looking at the concept :P Following this,
good luck!
@Rhoutermans: Thank you for the feedback! I'll definitely look into that.
Cheers!
Layout is WIP, just as just about everything else. Just put some stuff in the room for now. ^^
Very WIP room as well. Will be a work room later.
A wip highpoly picture frame.
A teak table.
Please lemme know what you think!
Also, make that interior glass bumpy!
And add a diffuse map to the exterior windows glass.
It's very gamey when the glass looks all the same on scenes, it's a very little detail that makes all the diference for me.
@[HP]: Thank you! I will definitely try the bumpy and dusty glass. Think it'll look really cool having the interior glass bumpy. Much appreciated!
The painting is a bit WIP, as you prolly can tell. ^^
All details were nDo'ed and then textured with dDo. No highpoly.
Any feedback is appreciated!
the wood is maybe a little to glossy in spaces,
like the closet with books, it has a nice crack along the side wich make it look a bit worn but it has the gloss off a newly varnished one
I'd love to see a lighting only/detail lighting image if you don't mind. Concerning your lighting, I think everything reads really well, good directionality, bounce, and purpose. The room far right is receiving more light than I think it should as it's on the diffuse side of the house. Is there a light source in there that I'm not seeing? Either way, I'd kill that light and have the illumination from the doorway dissipate to a very gentle value as it reaches that room. I think downplaying some of the space would add some great contrast to an already great image. When I look at that room alone (in image 2) it looks as if there's a nuetral point light filling the space and it really takes away from that warm sun splashing light across the chaotic apartment. If you're using the light source from outside, I'd prefer not use it and let the natural light do the talking...but that's just me.
The far room down the hall away from the door looks nice too. Might be nice to have the light intensity be just as strong as it is but have it bounce a little less in that space so that the room falls off into the evening shadows just a bit more. Doing so will introduce more of a gradient from your doorway down the hall to that room. Maybe just pulling down the indirect scale/saturation would do the trick?
I'm also wondering what you can do to introduce a touch of color contrast in the image. Everything is pretty warm in hue so maybe the addition of less intense areas would bring some darker tones to the scene that you could push into the cool hues for contrast's sake.
All in all, this critique is mainly personal taste so take it all with a grain of sea salt (and maybe vinegar?). I think the point here is to shift intensities where you can in your lighting so that your brightest splash of light and color comes from your doorway and everything else plays second to that very cool focal point.
I'll be watching this piece come together, great work so far!
- Jon
EDIT - Also...maybe address the depth a little with a light touch of fog/DOF?
@Endfinity Jon: I'd love to post a lighting image, but I actually don't know how to do that in Cryengine ^^. If anyone knows, please let me know.
I've adjusted the right room's lighting a bit, but seeing as it's faaar from final the lighting is still very WIP. Hope you like it better now.
I'll take a pass on the post process, maybe a bit more color contrast could work! I'll try it for sure.
Some updates from the last couple of days!
The hanging cables are wip. Just took the cables from the monitors and scaled them. Will add proper cables soon!
Curtains are currently untextured. Just a flat color, so that will change soon.
Super early shot of the kitchen.
Please lemme know what you think!