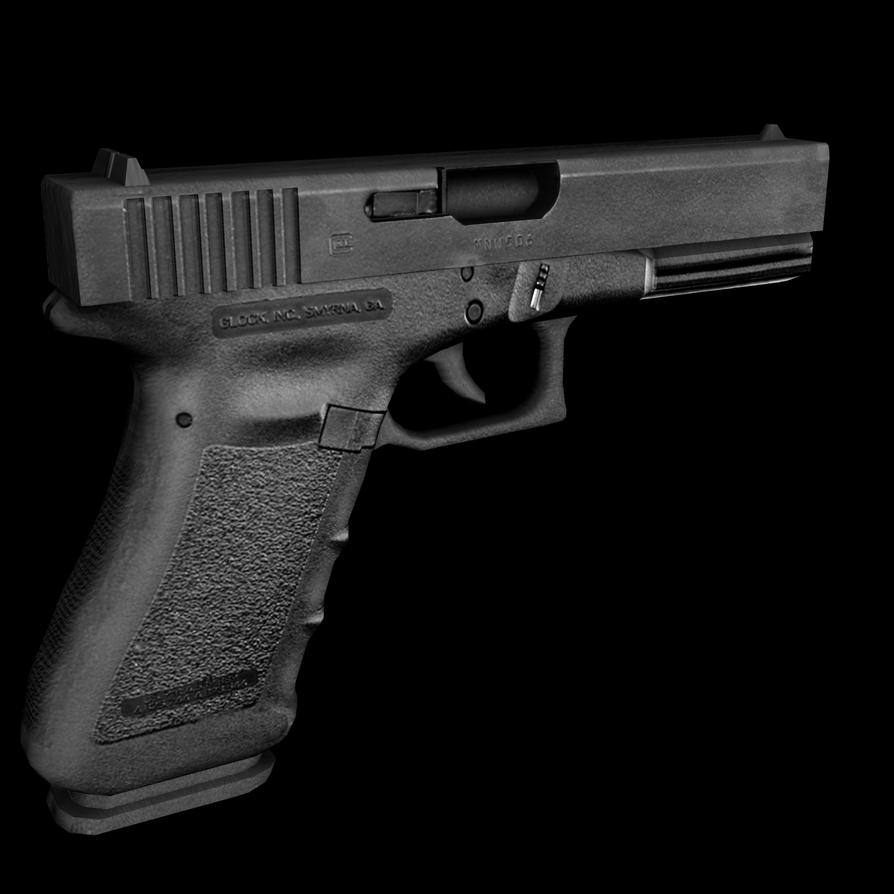
Game model of the Glock 17 semi-automatic pistol (rigged and animated for game)
comments and criticism encouraged just trying to improve my model/texture before I use it for another game
Flats, wires etc, otherwise we may as well crit the carpet in the local loo.
Will have to dig them out because they're on an old hard drive somewhere, just had this render lying around so I thought I'd throw it up here and see what you guys think,the wireframe and textures are inbound
Vector render from 2 different angles and a shot of the rig, actually managed to find the textures but they are unbelievably bad UV's and such so Ill re-do those before I upload ( I made this model at the end of my first year of modelling so I hadn't really learnt the ins and outs of UVing at this point
{Edit} Just thought I'd add the poly count is just short of 6k tri's without a clean up
did you just project the Texture onto the modell? cause it needs alot of work or is it the lightning .
The pros: Clean Modell very clean
The Cons: Bad texture, very bad.
Tips: Could've made the glock highpoly and projected the detailed parts onto the Low poly. Even a AO map would've helped it .
Keep at it!
Thanks very much for the encouragement, the texture was taken from a side view of the actually gun and I used the plainer parts of the weapon to generate the sides and other bits that weren't visible on the image, I've since learnt that is a bad technique and I was thinking of scrapping the texture and starting again anyway. I will keep updated with any progress
I wouldn't say alot but yeah I haven't gone through clean up as this is a model I made after about 8 months of modeling and I've just decided to drag in out now I have a bit more experience, also I don't know if you can see but there are extrudes on the slide that go inwards so that accounts for the polys there, aside from the grip on the handle that's a bit high I don't really see where I could reduce, if its not too much trouble could you circle where I could reduce?
you could reduce on grip, don't need much detail anyway since it will be covered by a hand. The trigger and trigger guard has loops that does not add to much detail or shape, such things you could reduce.
this is the type of modeling I typically see in Maya users for whatever reason (some, not all of course). Not trying to be a jerk. Just noticing. Lots of of edge loops left in that don't need to be there
Let's see a nice hi res glock to get some normal map info from! Then go back and optimize your lo res, new UVS, sexy bakes, all that jazz. Keep going
For the rig, you don't really need any joints for this. They are just gonna complicate matters.
Instead you can do more or less everything with simple hierarchies and constraints. Most of the moving parts move around a well defined axis and have more or less only one degree of freedom. Just make sure when you are done modelling that everything has a sensible pivots, clean transforms and good names and it's gonna be a breeze.
you could reduce on grip, don't need much detail anyway since it will be covered by a hand. The trigger and trigger guard has loops that does not add to much detail or shape, such things you could reduce.
Genuinely helpful comment, straight to the point and very clear.
Thanks you very much for the help
this is the type of modeling I typically see in Maya users for whatever reason (some, not all of course). Not trying to be a jerk. Just noticing. Lots of of edge loops left in that don't need to be there
Let's see a nice hi res glock to get some normal map info from! Then go back and optimize your lo res, new UVS, sexy bakes, all that jazz. Keep going
Thanks for the reply
As I mentioned earlier I made this very early on when I was learning modeling and didn't really know about edge flow or optimization or anything. Just thought I'd post this as an early example of my work, now I have some feed back on where to improve on it I think I'm defiantly going to pull it out the cupboard and do some work on it.
As for the high res model to bake would you suggest hard surface sculpting in Z brush or just going high poly in maya as I don't really have much experience with sculpting?
For the rig, you don't really need any joints for this. They are just gonna complicate matters.
Instead you can do more or less everything with simple hierarchies and constraints. Most of the moving parts move around a well defined axis and have more or less only one degree of freedom. Just make sure when you are done modelling that everything has a sensible pivots, clean transforms and good names and it's gonna be a breeze.
Not sure if I made it clear in my earlier post but I already have this weapon functioning in a game engine so the rig isn't really a problem.
I'm not entirely sure how I would go about doing this hierarchie method, is it literally just parenting the objects to controllers similar to a facial rig?
A link to as tutorial explaining this would be helpful thanks
Sorry, didn't read too well Thought you would bake the animations.
Replies
I kid!!!
Flats, wires etc, otherwise we may as well crit the carpet in the local loo.
Will have to dig them out because they're on an old hard drive somewhere, just had this render lying around so I thought I'd throw it up here and see what you guys think,the wireframe and textures are inbound
Vector render from 2 different angles and a shot of the rig, actually managed to find the textures but they are unbelievably bad UV's and such so Ill re-do those before I upload ( I made this model at the end of my first year of modelling so I hadn't really learnt the ins and outs of UVing at this point
{Edit} Just thought I'd add the poly count is just short of 6k tri's without a clean up
The pros: Clean Modell very clean
The Cons: Bad texture, very bad.
Tips: Could've made the glock highpoly and projected the detailed parts onto the Low poly. Even a AO map would've helped it .
Keep at it!
Thanks very much for the encouragement, the texture was taken from a side view of the actually gun and I used the plainer parts of the weapon to generate the sides and other bits that weren't visible on the image, I've since learnt that is a bad technique and I was thinking of scrapping the texture and starting again anyway. I will keep updated with any progress
I wouldn't say alot but yeah I haven't gone through clean up as this is a model I made after about 8 months of modeling and I've just decided to drag in out now I have a bit more experience, also I don't know if you can see but there are extrudes on the slide that go inwards so that accounts for the polys there, aside from the grip on the handle that's a bit high I don't really see where I could reduce, if its not too much trouble could you circle where I could reduce?
Let's see a nice hi res glock to get some normal map info from! Then go back and optimize your lo res, new UVS, sexy bakes, all that jazz. Keep going
Instead you can do more or less everything with simple hierarchies and constraints. Most of the moving parts move around a well defined axis and have more or less only one degree of freedom. Just make sure when you are done modelling that everything has a sensible pivots, clean transforms and good names and it's gonna be a breeze.
Genuinely helpful comment, straight to the point and very clear.
Thanks you very much for the help
Thanks for the reply
As I mentioned earlier I made this very early on when I was learning modeling and didn't really know about edge flow or optimization or anything. Just thought I'd post this as an early example of my work, now I have some feed back on where to improve on it I think I'm defiantly going to pull it out the cupboard and do some work on it.
As for the high res model to bake would you suggest hard surface sculpting in Z brush or just going high poly in maya as I don't really have much experience with sculpting?
Not sure if I made it clear in my earlier post but I already have this weapon functioning in a game engine so the rig isn't really a problem.
I'm not entirely sure how I would go about doing this hierarchie method, is it literally just parenting the objects to controllers similar to a facial rig?
A link to as tutorial explaining this would be helpful thanks
Sorry, didn't read too well Thought you would bake the animations.