[Lightmaps] What causes these lighting errors on my meshes?
Theres been a pretty serious lighting problem with some of my meshes, which I've been stupidly ignoring for a while now. Now I just want to know what I'm doing to my lightmaps that I shouldn't be. My UV's are definitely more than 3 pixels apart and theres no overlapping going on.
The problem mainly affects my modular building sets and the problem sticks out a MILE when you join a modular piece to an identical one (to make a wall twice as long for example). What happens is theres like a "dogs ear fold" shadow, that will usallly appear on an upper corner of the mesh, and seems impossible to get rid of outside of editing the lightmap in some unknown way. Whatever I'm doing to cause this, it looks terrible and is ruining my meshes, so I REALLY, desperately want to sort this out for good and for all.
I'll post some screens of the problem meshes, followed by their lightmaps so you can hopefully see the mistakes I've made and tell me about 'em!
Problem mesh 1:-
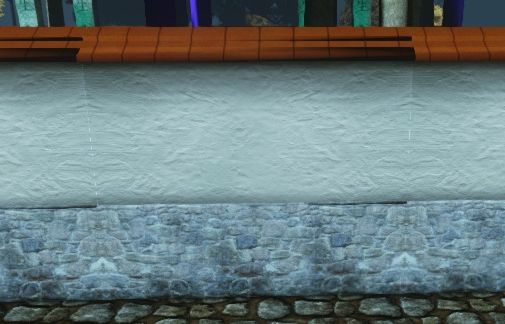
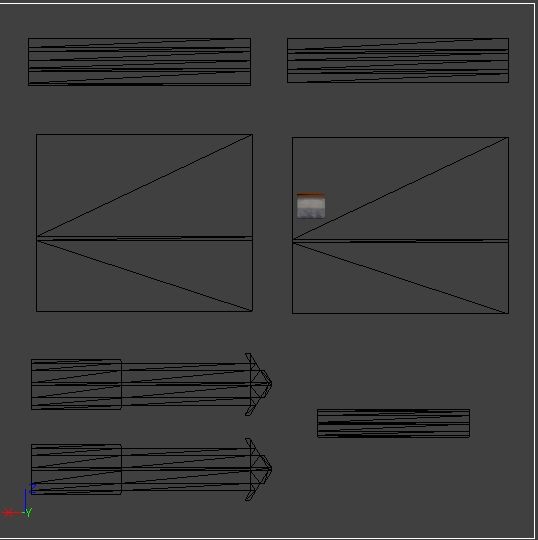
Lightmap:-
As you can see, plenty of space between UV's to preven leaking, and no overlapping. What could be causing the weirdness on the top of the "stone skirting board", the plaster, and worst of all the "roof tiles"?
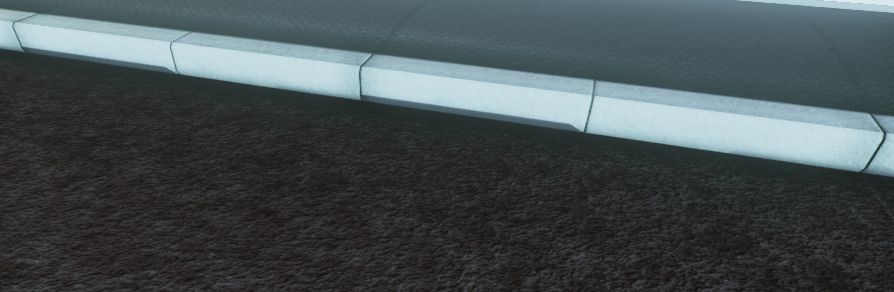
Problem mesh 2:-
Lightmap:-
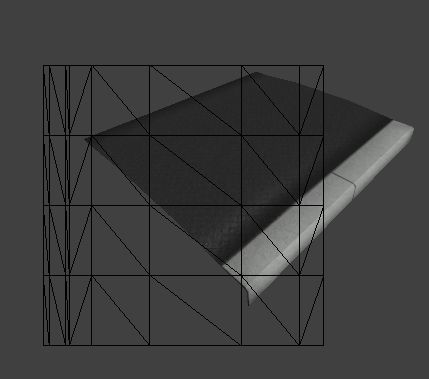
This mesh is just a plane with a fold at the end to create the curb, so the lightmap is extremely basic, with only 1 UV, but it still causes problems? Any ideas why?
I'm going through my modular meshes now and uploading more as I find them. Any help on this matter would be REALLY appreciated, thanks!
The problem mainly affects my modular building sets and the problem sticks out a MILE when you join a modular piece to an identical one (to make a wall twice as long for example). What happens is theres like a "dogs ear fold" shadow, that will usallly appear on an upper corner of the mesh, and seems impossible to get rid of outside of editing the lightmap in some unknown way. Whatever I'm doing to cause this, it looks terrible and is ruining my meshes, so I REALLY, desperately want to sort this out for good and for all.
I'll post some screens of the problem meshes, followed by their lightmaps so you can hopefully see the mistakes I've made and tell me about 'em!
Problem mesh 1:-
Lightmap:-
As you can see, plenty of space between UV's to preven leaking, and no overlapping. What could be causing the weirdness on the top of the "stone skirting board", the plaster, and worst of all the "roof tiles"?
Problem mesh 2:-
Lightmap:-
This mesh is just a plane with a fold at the end to create the curb, so the lightmap is extremely basic, with only 1 UV, but it still causes problems? Any ideas why?
I'm going through my modular meshes now and uploading more as I find them. Any help on this matter would be REALLY appreciated, thanks!
Replies
try turning off post process preview in the editor to check this
Also try and do a search on lightmaps here in polycount and google, you will find a lot of information on it, it's quite a common "problem"
http://forums.epicgames.com/threads/916768-Lightmass-Issue-%28black-seams-edge-pixel-padding-default-settings%29
New edge seam problems (different to the "phantom shadow" problems):-
Stomberg90, could you tell me how to get to this "post process" menu? I found a few ways of toggling AO, but I cant see any menu or button called post process? Is it somewhere in the world properties? Are you talking about "allow ambient occlusion" under the rendering tab of world properties? If so, I already tried that, along with the "post process previs" button and the lightmass tab of world properties. None of them make any difference visually, (strangely enough!).
Edit: I just pulled up the mesh in 3DS Max and applied all the maps using 3Point Shader, to see if the problem was being caused by one of the maps rather than the lightmap, or some UDK problem, but the error's dont show in 3 Point, so the problem must be with UDK.
Thanks all
Hopefully Im not the only one who's faced this issue, Im at a loss here...
[ame="
Anyway, enough of that lol! So from what I can see, what I need to do is just increase the amount of padding / empty space between my UV islands, and make sure the verts conform to the grid lines. I need to find out how to use snapping in the UV editor.
I'll post back when I've tried all this out. Hopefully I'll have a smile on my face!
Edit: Okay, I've just been trying to optimise my lightmaps for the Japanese Wall. Now I have the grid setup so that 1 cell = 1 pixel, and Im making sure that as many edges as possible are lined up against the lines of the grid, and that theres atleast 3 pixels between each UV. After doing all of this, and refining it a few times, I've managed to reduce (but DEFINITELY not fix) the problem. It seems like its not possible to completely fix the problem... There MUST be a way! Surely?
Is there anything else that could be causing this problem?
I dont think any of the verts are welded. All I did was create the UV islands by making the seams, then using unfolding and flatten mapping, then just arranged them in the UV editor. Do you think welding the UV's will help? If so, can you tell me more? Also, I tried shrinking the UV's but it doesn't seem to make much difference. This is a mystery and a half...
- I tried making a version with welded UV's. The only UV islands I could weld were the two main faces (the big square UV's) since they were the only UV's with identical verts, but that just made the problem worse.
- I just tried making a version where the UV's extend right to the boundaries of the UV box (with welded main faces), but when I imported this, the lightmap seems to get "lost in translation", and it completely changes the layout of the UV's when viewed in UDK (it makes my lightmap UV's overlap), making the lighting look completely messed up. Things just get weirder and weirder...
Every time I make a change, I try building light with "Pad Mappings" enabled AND disabled, just to be sure, and the build quality is set to "Medium", with Lightmass always enabled.
Here is the new optimised lightmap for my Jap Wall. As you can see, most of the edges now line up to the "32x32 pixel" grid, and there is atleast 3 pixels worth of padding between UV's, but the same errors still persist. Can anybody point out for me where Im going wrong?:-
I really need to get to the bottom of this, but it seems like either Im the only person on the planet who this is happening to, or nobody has truly explained what it is, and how to fix it, anywhere except the most top secret CIA websites, or the darkest corners of the deepest, most uncharted reaches of the internets seedy underworld.
The video was helpful, but it only half fixed things. The only time you would be able to align every edge to a line on the UVW grid, is if (like in the video) you're ONLY working with simple cubes or extremely basic primitives. Now, my wall is really simple, but its not simple enough to apply this solution to.
I really need to find out what is causing this. I dont know any other engines that I consider to be as intuitive and, even fun to use, as UDK (not keen on Unity OR CryEngine), so I dont want to have to completely throw the proverbial book at UDK...