The BRAWL² Tournament Challenge has been announced!
It starts May 12, and ends Oct 17. Let's see what you got!
https://polycount.com/discussion/237047/the-brawl²-tournament
It starts May 12, and ends Oct 17. Let's see what you got!
https://polycount.com/discussion/237047/the-brawl²-tournament
Practice - Shotgun - M37
I started doing the tutorial that was made by Millenia.
But it just isnt turning out right, can any help me figure out whats wrong.
after hours of work I baked and my normal maps suck.......i think . Please can someone help me figure out how to get it look good.
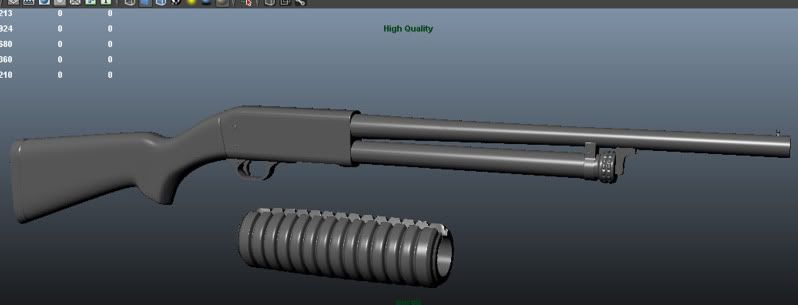
High poly

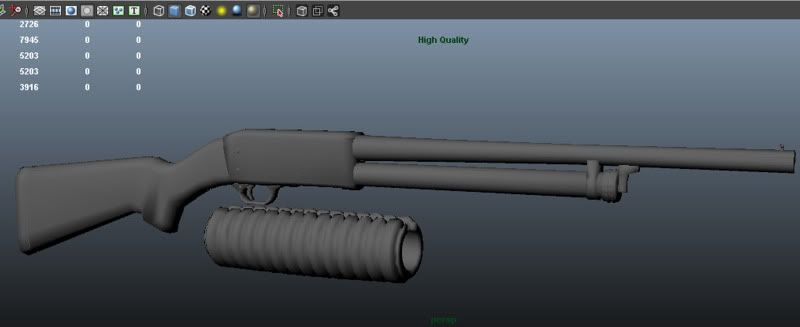
Low poly

there is no detail from any of the floating geom on the low poly, some things seem kinda blobby. please ask for any more pics, thanks
thanks in advance guys. :thumbup:
But it just isnt turning out right, can any help me figure out whats wrong.
after hours of work I baked and my normal maps suck.......i think
High poly

Low poly

there is no detail from any of the floating geom on the low poly, some things seem kinda blobby. please ask for any more pics, thanks
thanks in advance guys. :thumbup:
Replies
What are you baking with and what setting are you using?
Low poly wireframe
High Poly wireframe
Models covering each other before baking
baking settings 1
baking settings 2
baking settings 3
UV maps
Thanks again guys.
for the normals i used 512x512.
@bek: yeah it does taper in the middle, i was using an image plane of the gun, I guess i thought that it tapered in the middle, guess i was wrong lol.
Again thanks for the replies guys. Really wanna get this right
The Uvs look ok I guess. You could really do with mirroring uvs (for example both sides of the trigger guard on 1 uvw island) and then scale up some parts to fill the empty space.
But. Normals still dont look right. I cant get the cage to just cover the model. some parts of the model just wont be covered unless I increase the cage, but then other parts of the model are over covered, if you get what i mean?
And here it is on the low poly with normals.
Guns should be 2048 size textures (or more).
these are the results
what are your guys thoughts?
thanks again for any advice.
Also I cant seem to shift that jaggy edges around the piece.
Can anyone help me with that?
THanks for your feedback guys
Could it be that Maya just sucks at baking?
How would you go about baking complex things like that correctly inside Maya..
Thanks:)
You can use this image:
To compare relative texel sizes. Just make sure all light and dark checkerboard squares are roughly the same size.
You have a ton of black space in your texture map. Take that small piece (I assume its one of the circles on the right and move it to that giant black space on the left and scale it bigger. But as of now that looks perfectly fine. You can't expect infinite detail so that you can zoom in to see ants on your model. You will never be that zoomed in for that piece not matter what.
I made 4 corrections to my workflow:
1/ If your using tangent space normals, open up hipershade window and check that the bump projection node is set to tangent space normals as its usualy set to bump by default.
2/ Select low your poly mesh and smooth the normals.
3/ Make sure that the search envelope/cage as shown in bake settings 1 fully encloses the high poly mesh you wish to bake by increasing the %, you can make manual adjustment to the envelope by selecting individual verts.
4/ Chamfer all 90 degree edges as normal baking dose not like right angles.
I hope one of these steps may improve your results.
Rgs
Mike
dpadam is right, you wont really be able to see that normal detail in a FPS view. But you might want to optimise your UV's better.
Yes i thought i'd have to reorganise my UV map I knew looking at it when i finished it, but me being impatient and wanting to see how the baking process went got to me i guess.
Gonna do what you said though and re organise my UVs and make sure ALL of the important stuff has enough space, and not waste space
Thank you for all of your feedback again! ill post an update when I do it!
thanks
I just have a little question regarding gloss maps.
I've never used a gloss map before. So I dont really know how they work, and millenia is using max in his tut and xoliul shader.
Here are my textures
Diffuse
Normals
Specular
Gloss
So with following the tutorial i created them this way. and i tried to understand as best as i could.
Ok without gloss here is the gun.
and with the gloss map here is the gun.
There is a slight change in the width of the spec, which is if my knowledge serves me correctly that is what a gloss map is supposed to do. the size of the spec right?
But if i alter the gloss map with darken it alot or lighten it alot, nothing changes, but i though lighter = more gloss, darker = less gloss.
so i guess my question is,
how do gloss maps work inside of maya?
where to you input them into maya? (cosine power?)
I also would like this gun to go into UDK. so any information on how to implement the gloss map into UDK would be great.
and any information anyways would be great.
Thanks as always polys
Ben
as for the differnces between maya and max, a simple google search will yield results you are looking for.
also on a side note, you rearranged the uv sheet increasing some parts and leaving other important geo... if you struggle with unwrapping again FOLLOW the tutorial and try and match what millenia does. The last chapter of the tutorial is where you have to stop and think about what millenia is doing and why hes doing it and try and replicate it - its not like the other chapters where your following 1 for 1, you have to stop and think and take the time to get the same result.
he gives you the information so that you can replicate it one for one if your willing to really pick it apart... there is so many people doing this tutorial but few who are coming out with the same results - If you did a side by side of your gun to the tuts gun see how it differs and ask your self why, what has he done to get the spec to shine in certain areas and yet dull in others and try and replicate it, instead of following the tutorial through, you have to ask yourself questions along the way and challenge yourself to pull out the important information.
the gun itself has decent overall shape (and you did a better job of the stock than I did) but the texture really really needs pushing... you have two very good tuts on texturing given to you so I suggest you follow both of them (both the millenia tut and the racer 445 texture tut - also read the article too).
this feed back isn't intended to come off as harsh, infact the only feedback you need you can get from yourself. Save your image out and save out millenia's and either have them side by side or flick back and forth and if they look the same then thats the good feedback and if it doesnt, open maya/photoshop/youtube back up and ask yourself why... All the information is in there to get the same quality. Even if the end product isnt 100% identical its ok as long as you can see where it isnt and why, its important to learn why for your next model.
best of luck.
Yeah I know the texture looks unfinished. Its because it is unfinished. I haven't finished the tutorial yet. Its just the gloss maps are giving me troubles at the point of where I am. I have put mine and millenias side by side and this is why I ask
He puts his gloss maps into the gloss map node of the xoliul shader.
Where do I put them in maya? That kinda was my question overall because I am not getting the same results as he is getting upto the point of where I am in the tutorial.:(
I have gone backwards and forwards through the tutorial trying to find out where I am going wrong with it.
But again thank you for the feedback ill go back through and try and find more
This is a UDK render.
I feel i can make it better, but i just need some guidance.
Thanks in advance for any feedback