Monthly Environment Art Challenge - March & April 2017 (47)
Hello everyone and welcome to the Monthly Environment & Prop Challenge for the month(s) of March and April !!!
I'm glad to see more finished pieces this past round than ever! Truly hard work and great breakdowns/critiques by all.
Remember if you don't finish in the time allotted, just keep plugging away and post when your work is finished. There's always some good progress that falls off the radar - we want to see your work! So keep going and finish those pieces!
We had some pretty close votes on the hard surface prop this time - I figure since we have multiple hammers for the hand-painted category, why not multiple turrets! Good luck all and can't wait to see all the awesome work this time.
Without further ado, here are our options for Challenge 47!

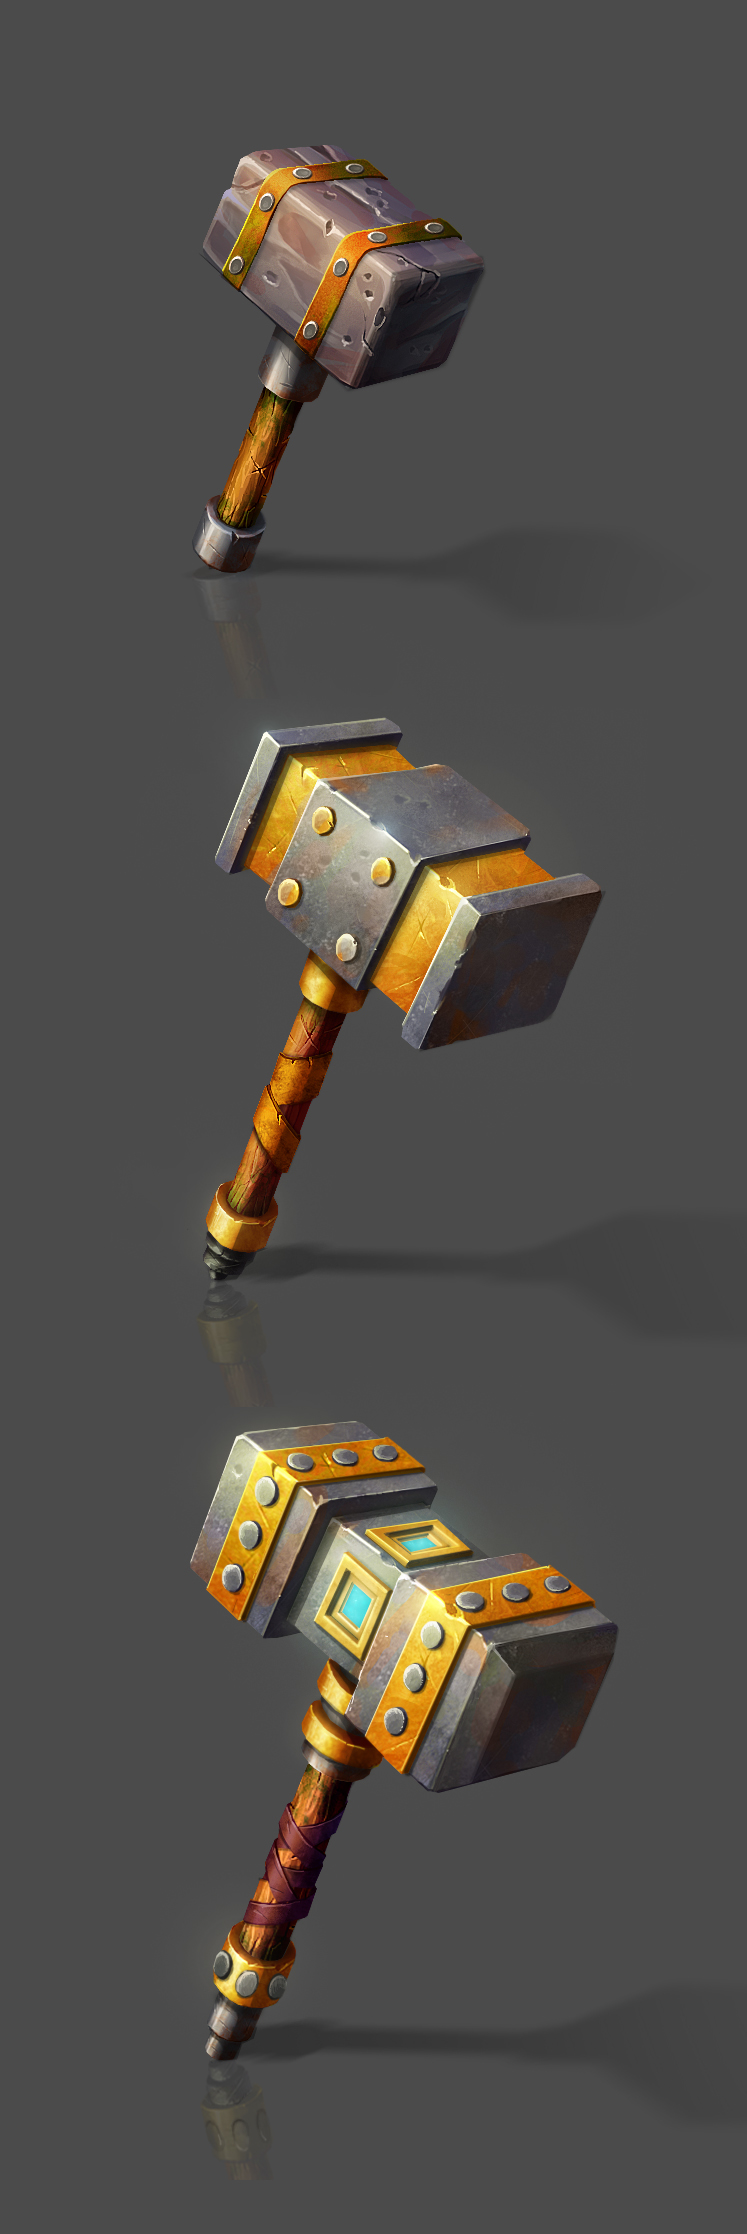
HAND PAINTED CATEGORY:

artist: William Niu

HAND PAINTED CATEGORY:

artist: Yana Blyzniuk
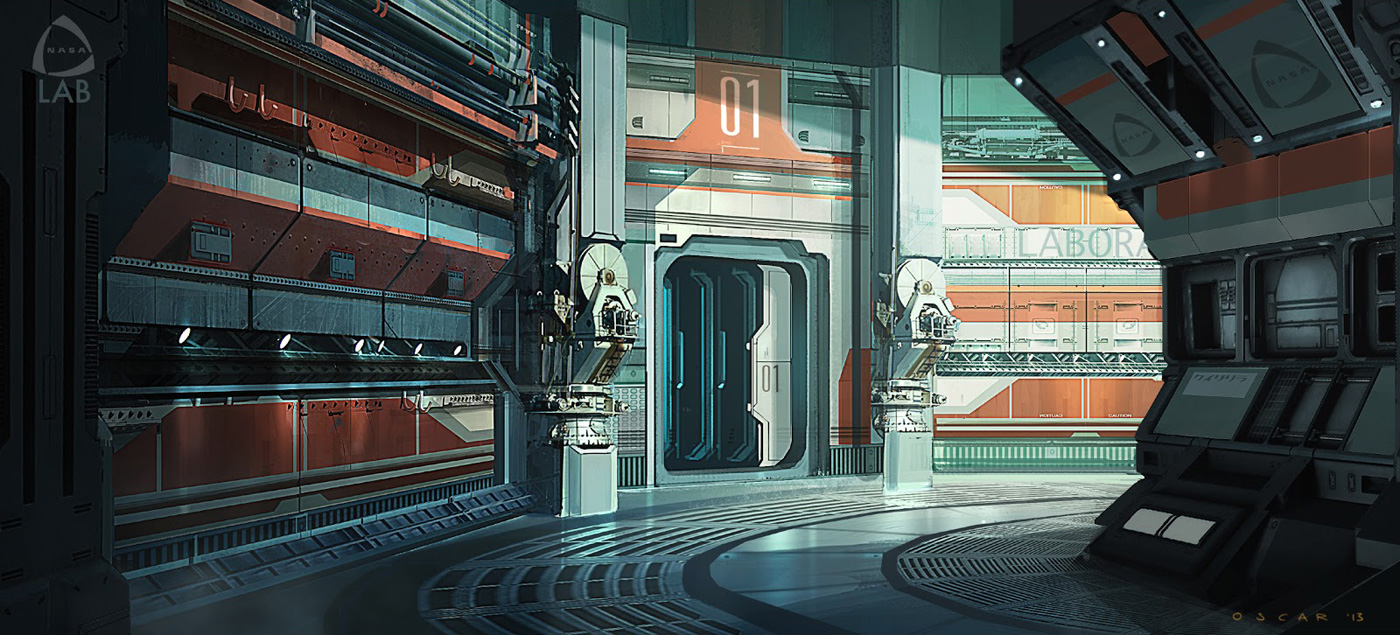
HARD SURFACE CATEGORY:

artist: Colin G

artist: Evolution - Battle for Utopia
If you want to change up either concept a bit, as some people wanted, then feel free. Interpret these concepts to your liking.

artist: William Niu

HAND PAINTED CATEGORY:

artist: Yana Blyzniuk
HARD SURFACE CATEGORY:

artist: Colin G

artist: Evolution - Battle for Utopia
If you want to change up either concept a bit, as some people wanted, then feel free. Interpret these concepts to your liking.

Please read all the rules before starting.
When you are just starting out making a scene, it can seem complicated or imposing, so take the time to break it down.
Think about how you can re-use assets, re-use textures, break it down as simple as possible and plan it out. A lot of people will break it down in their own way when they start out their challenge. Gather some reference images as well for different parts of the scene, maybe gather some refs and make it your own.
Take your time planning and blocking out, it will set you up for success later on.
Here are some specifics.
- Try to post one critique for every post that you make. This will make for a better learning environment and help us all grow as artists.
- You must use a game engine to present your work. Unreal Engine and CryEngine are very common engines that can be used but feel free to use any alternatives that you want. (Marmoset Toolbag is allowed as well)
- You must try your best and finish as much as you can in the time frame provided.
- Post what you are working on in this thread so that way it's a more centralized place for advice and critique. We don't need to have 1000 disjointed threads littering the forums.
- I would strongly encourage you to go and look at other games and see how they make their assets as well as get concept art to give it your own feel, but it must stay very close to the concept, if not super close.
All that matters is that you learn while being able to effectively critique others, as well as accept critiques on your own work. Remember to have fun. Cheers!


Replies
Good luck to everyone!
Here is a picture with the HP done. From now i will post here and in my thread the texturing process. Still need to add some rotation function to the HP. Dont forget to have fun :>
High poly looks great and the bake looks pretty crisp from what I can see, well done
@Nathan M
Looks like a solid start so far, I think the stairs on the left of the building just need some spacing between them, they look as though they are stacked, whereas the concept as small beams between each one. I hope that is clear, otherwise good job, I can't wait to see more
I will hopefully upload some of my progress tomorrow sometime
Xgen crashing like hell. 5 crashes in last 30 minute.... my gtx960 going to hell with redshift i think xD
How the hell did you UV that beautiful object?
For the ears. Yes they are
I started texturing the bottom piece, still wip. The material i am trying to achive is from this motorcycle from Terminator.
Any C&C is very welcome.
Ref
I have blocked out the hammers, the leather straps will come once I start sculpting (will just extract from the handle mesh and sculpt from there).
The plan is to have a stylised sculpt and then I will do handpainted textures on top
Your hammers looks solid, waiting for the sculpted version, have fun :>
I've blocked out the market scene and started trying to get everything in the right perspective. I might sculpt the cat but will see how long it takes to finish the rest.
@s1dK Looking awesoome! There will be some references to look at if I stuck with something haha
@Piemaster oh its gonna be cool
@Poseiden nice block out
@plord that block out looks like a great start do you have turbosmooth applied already?
Hey guys, i`m calling this one done, maybe i will revisit sometime to make another texture variation, but for now i`m done.
I had a lot of fun model this thing and learning in the process, thanks all and have fun in the challenge! You can see more on my Artstation -> https://www.artstation.com/artwork/a60d0
or here -> http://polycount.com/discussion/182544/hardsurface-modeling-sci-fi-turret-gun#latest
Poseiden: nice blockout so far, but the building in the concept looks about 2 meters wider than your model.
I started blocking out the heavy turret:
[ Image deleted due to Photobucket's greed ]
this design doesn't make alot of mechanical sense, so i might try to engineer some of these hinges and hydraulics to look more like they are functional. for now, i am just making a quick block out of the large proportions, and hopefully this will give me a nice chunky mech surface to play around with Star Citizen techniques i have been meaning to try out, like medium poly geometry with face weighted normals covered in mesh decal panel lines. i doubt ill finish this, but ill play around with detailing parts of it, just for a bit of practice, and to add parts to my mechanical kit bash collection.
Your blockout looks good, keep going!
@Shuaws Nah, I'm using Modo for work, so I havily rely on edge weights and rounded edge shader
@s1dK Nice textures man! Still, I will moan You about the contrast in textures or on mesh parts
@Omnicypher Nice idea! I've read about their workflow and it looked super cool, want to try this someday. I was curious how they blend the albedo/rough texture seamlessly between main mesh and that decal plane that is holding the normals (or they working with opacity?), wondering if it will be easy to do in engine for casual person
I chose the Pit City invironment, so here's the 2D block out. I divided the scene into buldings (blue), walkways (purple), metals & lights (green) and everything (yellow).
And here is the 3D blockout. The angle and the right staircase were giving me a hard time.
@Poseiden Nice blockout! you got quite some details in there, lots of assets. the perspective looks a bit off indeed, it might be useful that when you start your blockout you setup the camera first, put the image in the background, add some basic cubes and shapes and make them roughly line up, it doesn't have to be 100% matching of course but just to get the general idea of how the shapes fit in.
@Mainrak Good start:) Maybe a tip for the stairs, add a reference 'character'. I always add a standard character, or just a cube and give it a rough size of a human character. It looks like you are using 3ds max, what you can do is just add a biped and use that as scaling reference. Place it next to the stairs and see if the character would actually be able to walk on it.
This is what I have so far with the first "Tier 1" Hammer as I've labeled it. Low poly model and normal/ao baked in substance painter from my zbrush sculpt. Looks like I have to fix some of the UV's in the pommel, but otherwise I'm really happy so far with the result.
Also brand new to texturing in Substance Painter, so I'm super stoked to try it out, but it also might take me a bit longer.
@Piemaster digging your models so far... excited to see where you go with the sculpts and textures.
@M.Petersen Blockout is looking good! What's your next step?
Here's my progress so far, still have a few bits to model in before I move on. So far I'm really liking this concept.
@Poseiden I actually really like the way you've proportioned your building, it adds lots of character! I was also thinking about doing the wood boards as one piece but decided to go with a tileable design.
Keep it up.
Jesse Walsh that sculpt is looking great, but maybe the bolts could have more of a bevel, so it shows up better on the normal map. also the straps could be a bit thicker.
i blocked out a quick environment, with fog and lights to get the mood going, and i made a hard surface material that uses 16 x 16 color pallette and 16 x 16 masks texture, along with a 1024 noise texture, which gives me a wide variety of metal, rubber, plastic, and glow. I still plan to play with adding deferred decal meshes to get panel lines and painted details, but here is what it looks like in game:
[ Images deleted due to photobucket's greed ]
Hey guys @M.Petersen @Mainrak @melisac @jonnavidson nice work! It would be cool for me to see the process, how to approach this subjects
@SDimitrius Nice work! Yeah, looks like unfolded uv's
@Jesse Walsh Whoa man, that's nice work and sticking with the concept! Awesome! I'm curious about painter pass for stylized weapons, didn't know much about it
Arriving a little bit late, decided to do the "Pit City" environment. So far I've done the blocking of the environment.
Getting the proportions and the right angle is really tricky!
My proportions were way off my first try.
I am a bit late, I decided to join this challenge, I don't have a lot of experience at 3D (first time uploading my work to polycount too) , also never modeled nothing Sci-Fi related yet, I hope to learn a lot from this challenge, will be doing some mistakes but let's give it a try.
I am going to model the turret in my free time, already made a basic blockout to get those shapes working, What do you think?
Anyways here's sculpt progress, my plan is to use this to get familiar with PBR and test it on stylized shapes like the dagger below from
stevston89.
@jonnavidson You might want to double check some of your proportions. The ladders in the concept are at approximately the same angle and are the same height. Your top left ladder looks correct, but the top right one is way different.
@Omnicypher @Plord Thanks for the feedback! I took the advice and beefed up the bolts and the leather straps a little. I then baked the bolts as part of the hammer head, which might have been a mistake....
Speaking of baking... I have a 800 vert baked lowpoly that I am somewhat happy with. The only problem is that some of the noise I had on the hammer head in zbrush didn't translate well. It looks like lines on the hammer head. I want to smooth it out in Substance Painter, but can't figure out how to do so. I think I need to convert the normal to a height map within painter, but I am a substance newb and dont know how to go about it. Any advice would be greatly appreciated.
I've tried to keep the sculpting to a minimum and let substance painter do most of the work (I feel like it takes too long to bake normals from ~30million tri HP models) Any feedback or tips are welcome!
@Clement_N Looking good!
@Xelan101 Looks amazing! At first, i thought it was a different hammer because the concept one has clean edges, but still looks amazing
In projects like these should i be trying to have as low polygons as possible, since it will be in an engine?
I have created my sculpt and was just about so create the LP and bake my maps. I'm not going to worry too much about polycount, but I won't go mad of course. Mainly I want to focus on the creation of stylised PBR textures.
@Jesse Walsh Think that some noise maps like 'bnw spots' (content in painter), in fill layer, and working on the height channel only, tiled few times will do the job
@Daniel_Swing Looks nice man! The thing that catches my eye are those bright-white highlights on the hammer, maybe a bit less on opacity?
@Mainrak I think that tris count is personal preference If it is not specified in the first post
EDIT: Oh and your stuff looks super sweet!
Daniel_Swing If you're planning on doing a handpainted look I'd gather a sizeable reference of the particular style you want to achieve. Do you want it looking like WoW? Wildstar? Diablo? etc and then take a good look at how they paint the materials you want to use. (also don't neglect real world materials either, that's where they learned it from) Look for example at the Doomhammer, for a good representation of stylized stone, metal and leather etc. Right now it seems in the early stages of texturing, but I think it'll really benefit from
some serious ref consulting.
Mainrak Thanks! Yeah I decided to take it a bit further into the chunky bevel WoW territory, cause that's my comfort zone for stuff like this. I feel like it helps the forms read nicer and lets you own a lower poly model easier, cause you can definite those details with broad low poly bevels.
DkuCook Nice
I appreciate all the love for my sculpt, gonna work on the low poly today, see if I can keep the momentum going
@xelan101 You're right... after hearing that and looking back at my sculpt it is feeling pretty soft and not as defined as it should be for those types of materials. I'm really loving your sculpt btw! Specifically the details in the wood and the broader pock marks on the stone , and i see the sharper and more defined edges that you're suggesting for mine. I do think the silhouette of yours is a bit too rounded on the main head of the hammer... i think it's being caused from the large bevel on the ends. I know you mentioned you really wanted to push those forms and that style, but I think if you toned that bevel back just a bit it might be more pleasing to the eye. Thanks again for the tip! Definitely put fresh eyes on it for me
@DkuCook I really like the details on your sculpt! Especially the cracks! And overall your sculpt is looking solid. I cant tell if it's just the perspective of your screen shots, but i get the feeling that the scale is off just a bit. Either the handle is too long, or the head of the hammer is too short for me. Cheers! cant wait to see more.
It's been a long time since I made any 3d enviroment in game engine, so I decided to do one
I thought it would be cool to make whole scene based on this concept since it could be plan on some kind of square. This is what I mean:
I made simple color scheme to show how I see modularity for assets- Im not sure about and I'd love to hear some more experienced person opinion.
Here is shot from Unity:
I done blockout for models and light(Im not sure about it
Also I made first asset to test how it looks, I'll polish it later. Now I'm kinda testing my workflow with Blender and Substance Painter.
Thank you guys for cool challange! Wish you very best!
@Xelan101 This is my first time working with a Specular PRB workflow, I've worked with the Metalness workflow before. I found this post had some useful information to get me started if you were looking for guidance with PBR. https://www.marmoset.co/posts/pbr-texture-conversion/
@SDimitrius Thanks for the feedback, I think your right. taking a second look, I think the handle is longer than in the original concept. For this piece I'm not going to worry about it. But I'm hoping to create all 3 of the hammers, to hopefully see an improvement in my work. So I'll make sure i nail the scale on my next one.
@Daniel_Swing I love the texture you have created for your handle. Did you paint the lighting information into your diffuse? or are you using a PBR workflow to get that result?