Home 3D Art Showcase & Critiques

Spaceship , Hardsurface , subdivision polymodeling learning and help

1
polycounter lvl 14
Offline / Send Message
NAIMA polycounter lvl 14
HEllo , I am making a spaceship for a contest with the goal of learning this high poly hardsurface techniques I am not knowing much , so I am having a hard time for making two things mostly :smile:
1 Avoid triangles and use with efficience the crease set + opensubdiv.
I am using 3dsmax 2017.

Well the first is self explicative , the second everytime I set the edges in the crease set to something I am satisfied with and I go bak at modeling they get again messed up  , and have to redo all time ...

then I would like some sugestions on how to cut in a subdivision of the model to not have all a single block wich I read is not optimal , here some images of the model I am doing and the wires hoping to get feedback and sugestions on how to actually cut and split parts , topology and general subdivision.


Replies

  • Sam Leheny
    Options
    Offline / Send Message
    Sam Leheny polycounter lvl 9
    Such a lovely shape. Like if Apple got into the air craft industry.
  • .Wiki
    Options
    Offline / Send Message
    .Wiki polycounter lvl 8
    i really like the shape of the ship. Looks like a transporter for atmospheric landings.

    There are two things:

    1. You dont have to avoid triangles. Sometimes you cant and if they dont mess up your shading it doesnt matter if there is a triangle.
    2. Currently you are limiting yourself by trying to model everything out of one mesh. The window frame and the glass can be separate geometries.
  • musashidan
    Options
    Offline / Send Message
    musashidan high dynamic range
    Glad to see you posted this over here. :) As @.wiki says, modeling everything from a single part is asking for trouble when using sub-d.
    You're better off breaking everything apart. Aswell as the window frames, break the ship into panels, break the wings away, etc. Have refs of shuttle and various aircraft up and try to model things as they are in the real world. Nothing complex is ever built from a single part.

    Also, adding edgeloops below your creaseset modifier is going to break your creasing, of course. Because the topolgy has changed below the creasing in these areas has to be reset.
  • NAIMA
    Options
    Offline / Send Message
    NAIMA polycounter lvl 14
  • NAIMA
    Options
    Offline / Send Message
    NAIMA polycounter lvl 14
  • NAIMA
    Options
    Offline / Send Message
    NAIMA polycounter lvl 14
    Ok thankyou , I broke the Cockpit area into 3 parts, the glass , the frames and the main fuselage that is the rest of the ship still , I am not sure of how I could cut parts of the ship ?
    I have requadded everything and now its all quads , but not sure of the topology , is it good for that kind of ship?

    I also was toying with the idea of adding those two kid of long thrusters onsides and two VTOL engines that appeara nd disappear on sides when in landing mode ...

    What you think ? How you sugest me to introduce those engines? model them aparT? Cut parts into the wings and attach ? Or cut parts into the wings to follow the shape but not directly attach?

    I found that the creaseset is more usefull on small objects detached where I have better control , like the whole frame of the windows .

    httpwwwphantomworksxyzassetsimagesusers20160508373_Qbg4H7gASPdy2BRTM1GGptC5E7y8kdpng
    httpwwwphantomworksxyzassetsimagesusers20160508373_bQWjgn7xE9HY6hMirgOjd7VMSWdSYJpng

    httpwwwphantomworksxyzassetsimagesusers20160508373_LaXJhxQhQmJw9eAjdEyL1scyO2QvHlpng

    Also about the engines + wings, they have clearly a different topology , shoul dI reduce quads on wings to adapt the engiens or the opposite?


  • NAIMA
    Options
    Offline / Send Message
    NAIMA polycounter lvl 14
    Also , is there any tool that can allow me to adgjoust the curvature flow of a edge loop? I tired flow tool in the edge loop ribbon but that creates more ZZ shapes .
  • huffer
    Options
    Offline / Send Message
    huffer interpolator
    You can use soft selection to move the loop and surrounding loops around to get the flow you want.
  • NAIMA
    Options
    Offline / Send Message
    NAIMA polycounter lvl 14
    Ok another question please, I wanted to make several plating etc in the final airplane but I am wondering when those plating need to be planned out and done , at imediatly after the first blockout like I am now or much after?
    By plating I was thinking of splitting the model into several objects and shell each and everyone of them , and by plating I mean something like is visible on spaceships or aircrafts , of course I am pointing toward a subtle plating , not a classic bulky spaceship one but more like the airplans of modern age.

  • NAIMA
    Options
    Offline / Send Message
    NAIMA polycounter lvl 14
    For example I would like the ship to havevsome black outlines for decoration to give a sorta of shuttle look at bottom but also use to give a sleeker appearance , would this need to be cut elenent ad well?

  • Dethling
    Options
    Offline / Send Message
    Dethling polycounter lvl 11

    Depends how detailed you want to go / what you are aiming for. :) 

    Different methodes would be:

    1. add the panel lining in the texture itself (maybe also to the normal map via tools like ndo) > no modelling needed bt depends on your UV/Texturing skills

    2. model all panels into the high poly model > high poly model/baking needed, also texture resolution have to be appropiate

    3. mid-poly modelling with floater decals > no high poly model needed (only for the floater)


    1. Would be for low-poly games (mobile, top down strategy title etc.)

    2. Would be the "standard" workflow for normal shooter, adventure games etc.

    3. Would be for next gen games (e.g. Star Citizen)


    As the purpose of this model is to learn high poly modelling skills, I would take option 2 and model everything.

    But also keep in mind that especially with a high poly model it's often the best to model the object like it's build in reality.

    Take a car as an example: If you build a low poly model of it, the doors, hood and frame would be one one object.

    For a high poly model you can (or have to) go "full in": Hull, Frame, Doors (even handles and bolts) should be seperate objects. Of course this will explode your poly count, but for a high poly model poly count is not what you should look at. :)

  • nexusmax
    Options
    Offline / Send Message
    nexusmax polycounter lvl 18
    Cool design. Reminds me of Avatar some what
  • NAIMA
    Options
    Offline / Send Message
    NAIMA polycounter lvl 14

    nexusmax said:
    Cool design. Reminds me of Avatar some what
    Thankyou here is my reference image .


    Dethling said:

    Depends how detailed you want to go / what you are aiming for. :) 

    Different methodes would be:

    1. add the panel lining in the texture itself (maybe also to the normal map via tools like ndo) > no modelling needed bt depends on your UV/Texturing skills

    2. model all panels into the high poly model > high poly model/baking needed, also texture resolution have to be appropiate

    3. mid-poly modelling with floater decals > no high poly model needed (only for the floater)


    1. Would be for low-poly games (mobile, top down strategy title etc.)

    2. Would be the "standard" workflow for normal shooter, adventure games etc.

    3. Would be for next gen games (e.g. Star Citizen)


    As the purpose of this model is to learn high poly modelling skills, I would take option 2 and model everything.

    But also keep in mind that especially with a high poly model it's often the best to model the object like it's build in reality.

    Take a car as an example: If you build a low poly model of it, the doors, hood and frame would be one one object.

    For a high poly model you can (or have to) go "full in": Hull, Frame, Doors (even handles and bolts) should be seperate objects. Of course this will explode your poly count, but for a high poly model poly count is not what you should look at. :)


    Thanks , I want to learn hard surface modeling , so I am going for option 2.
    I am thinking of rendering it throught materials , not sure if I want or will texture it unless may be in a photoshop paintover , but thats too far in future for now .
    I have been watching several tutorials on the subject like the FXHive, Arrimus 3D, and the but for some reason I am missing something especially when its about curved surface geometry.
    I am not finding myself really comfortable with the opensubdif , for some reason it seems better the turbosmooth still and the old method of the edge loop support, compared to the creaseset use , but for now I am sticking with the opensubdiv and edge lopp support and I am keeping the stack so I can go back to do edits.

    I am trying to guess a segmentation of the hull as I want a sort of black border to run across the ttip of the wings and the border of the hull.

    I want to model every hull split and cut , I have watched the video of Cantarell on his awesome mi24 and I have seen he splitted a lot of faces using simply a shell and deleting the inner part, I am trying to do the same , but due to the curved nature of the ship I have a lot of problems on junctions , looks not really polish or precise , dunno what I am doing wrong , so I will post some pics .

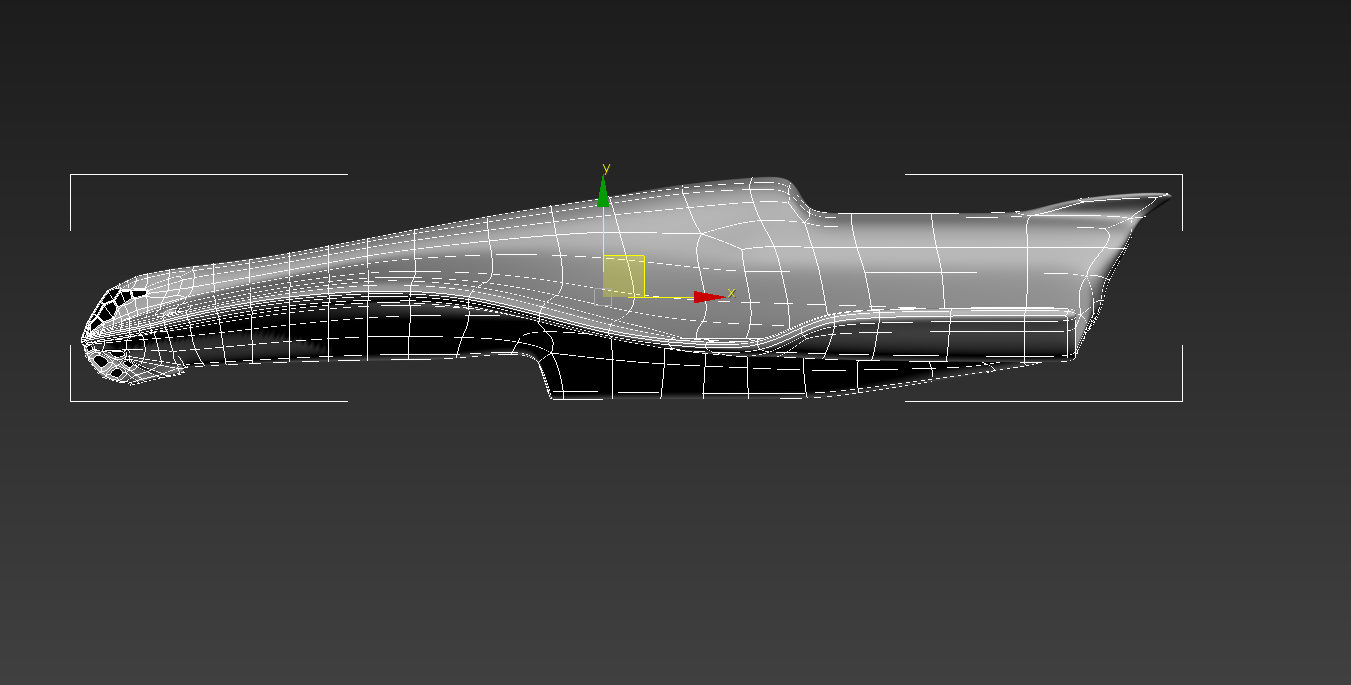
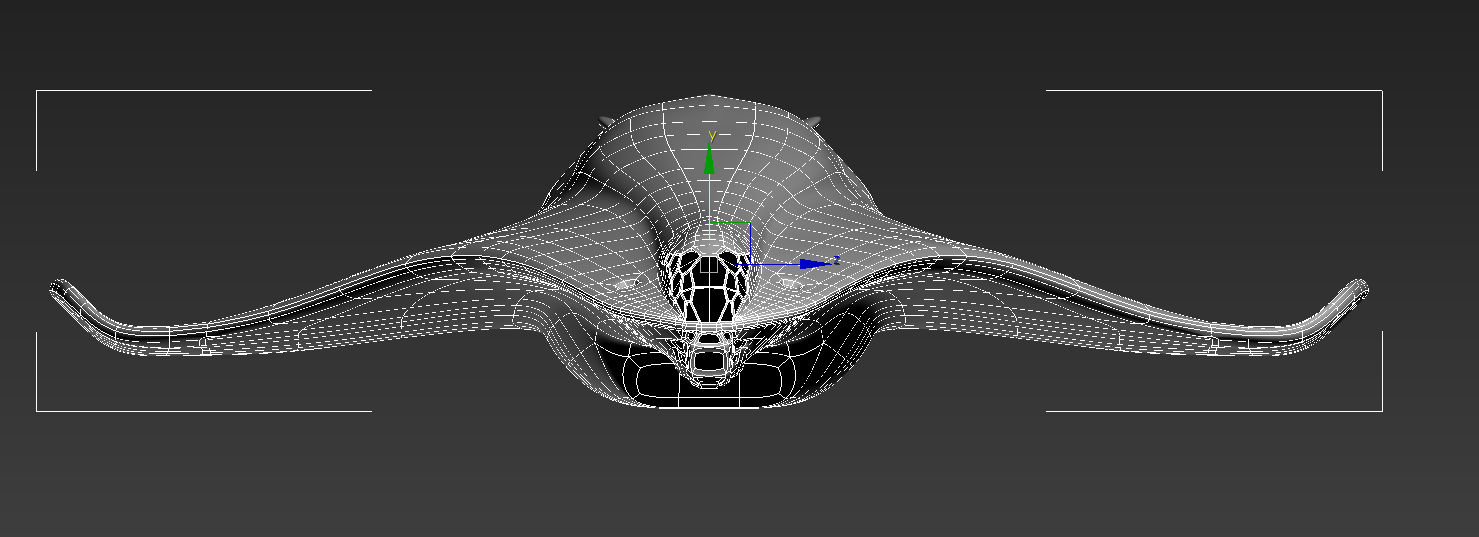
    Here the general rendering of how looks partially on some sections with opensupd applied , not all have it and some are more roughly worked but the main parts I worked on are the upper Cockpit area and the tip nose.

    httpiimgurcoma3vKgnajpg

    Here some wires that shows the initial segmentation I thought .


    httpiimgurcomBgKbo3ljpg
    httpiimgurcomhPRJqgajpg
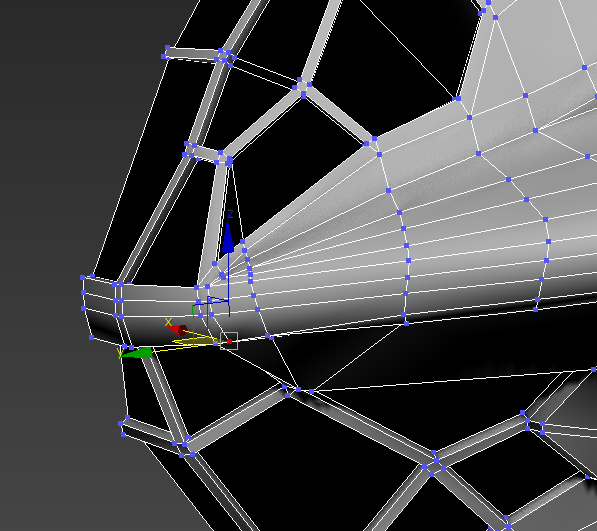
    Here a close up detail of the problems . notice the misalignment of panels, the see trought , the gaps etc ... the upper is with opensubd on and the latter is without .

    the stack is composed of base poly ( original panel segment ) with the initial edge support loops , then shell with a inside extrusion of 0.05 m , then edit poly on wich I added the edge loops on the sides of the shell , then simmetry and then opensubd.

    httpiimgurcom0wXCqIrjpg


    httpiimgurcomYORJ2ywjpg

    Here without the smooth.

    httpiimgurcomO7EvrgAjpg

    Hope you can help me make it better :) .

    I am inspiring to car modeling tutorial , especially sport car as the curves are pretty sleek and hard surface possibly .

    I want to do this to grow up as modeller and pass to the next level, but I am feeling frustrated at traits couse I am not able to express all the nice Ideas I have in mind throught the tool.


  • NAIMA
    Options
    Offline / Send Message
    NAIMA polycounter lvl 14
  • Dethling
    Options
    Offline / Send Message
    Dethling polycounter lvl 11
    I normally work with turbosmooth for my high poly.
    To avoid strange gaps etc. I try to also align the support loops of objects, so they have the same curvature.
    Also zoom out and watch it from a normal viewers distance. Sometimes it only looks like a problem from close up, but if you zoom out, the difference is not visible at all.
  • NAIMA
    Options
    Offline / Send Message
    NAIMA polycounter lvl 14
    So is good way to go to make each panel a separate object? seems also that deleting interior face improves ? I have seen other people make instead intruded edges to make panel lines , others extrude faces , it seems though that the detached one might be more efficient?
  • le0tard
    Options
    Offline / Send Message
    le0tard polycounter lvl 9
    great shape design!
  • NAIMA
    Options
    Offline / Send Message
    NAIMA polycounter lvl 14
    Thankyou .

    also for minorpaneling might be worth use instead other technique or the separated pieces is always the best ? And is good to have a solid underlayer under panels?
    also would be worth adding a tessellate modifie:smile: in the stack ?
    my actual stack on a panel is like :smile:


    Opensubdiv
    symmetry
    editpoly
    shell
    editpoly
  • Dethling
    Options
    Offline / Send Message
    Dethling polycounter lvl 11
    As said before for a high poly model it's most times the best to break down the model into his real world parts. It's more work of course, but most times you avoid strange geo and also it looks more believable.

    Having a underlaying object for the panels is not bad (you avoid holes in the model with it), but check out how it looks at the end.

    For the stack, I normally try to use as less steps as possible, so my normal stack would look like this:

    Turbosmooth
    Symmetry (if needed)
    Editable Poly

    Also try to use instance copies for similar parts (like the engines) instead of doing both by hand, this will speed up your work.
  • Dextkiller
    Options
    Offline / Send Message
    Dextkiller polycounter lvl 7
    If you pulled your supporting edges in a little tighter I think those indents would actually look quite nice from a moderate distance while also helping smooth out your normals if you decide to bake this onto a low poly at some point in the future.

     Make sure that you're also looping the inside of the gaps, that should help pull those up closer to one another. I can't tell from the pictures if you've got supporting loops on the inside facing areas but that should help if you dont.
  • NAIMA
    Options
    Offline / Send Message
    NAIMA polycounter lvl 14
    Thankyou , what you mean by smoothing normals? 

    Btw here is an image from the sc avenger ship paneling , looking at the picture seems part is cutted in panels and others are just drawed on surface which in my opinion looks little less realistic, to have the best effect on realism is better to model even the smaller panels as separate objects or instead use an intrude/bevel option? Also to have more and less visible seams on panels what would be the best approach?


  • Dethling
    Options
    Offline / Send Message
    Dethling polycounter lvl 11
    Be carefull with the Star Citizen models.
    They are using a really special set up for their models. :)

    As far as I know they use a mid-poly modeling approach, with weigthed normals to get round edges (no normal maps or high poly models at all).
    Then they add details with floaters for which they have special textures, shaders etc. which allows them to add things like panel lines and other small stuff with a ultra high level of detail. So the panel lines of the ships aren't really modelled into the ship but floating a few inch on top of it.

    In one of their videos (or was it the GDC talk?) they talked about the ship design and that they approach it more like a level then a prop.

  • NAIMA
    Options
    Offline / Send Message
    NAIMA polycounter lvl 14
    Oh but I didnt mean to use that image to do it like they Implement ingame , I want to do a ho model and I was using that image just as a reference for style of paneling, so I see some higher cuts more deep and minor panels , since I want to do all in HD I wanted to guess the best approach . Eventually I might do it for a possible future poly friendly mode, but for now I want to learn hp modeling and this is the main focus :).
    SO about making the smaller panels also those wold have to be separate pieces?
  • Dethling
    Options
    Offline / Send Message
    Dethling polycounter lvl 11
    It's always the question about "what is easier, what looks better at the end" :)
    For myself I found it always much easier for my high poly models to break them into their real world parts and then model/subd each of this parts on it's own.
    It normally creates a more realistic look and you also avoid some strange geometry issue :)
  • NAIMA
    Options
    Offline / Send Message
    NAIMA polycounter lvl 14
    Ok , I will try to make first the main blocks and then go on the smaller details, do you have anything related to this subject  to sugest like a tutorial , a making of or something similar of aircraft hd to watch?
  • Blade113
    Options
    Offline / Send Message
    Blade113 polycounter lvl 8

    nice job bruh..

    btw. I downloaded 3ds Max 2017 yesterday after using Blender for about 2,5 years, and it's pain to work with :D

  • NAIMA
    Options
    Offline / Send Message
    NAIMA polycounter lvl 14
    Thankyou :) .
    Ok I am exploring engines now and this is a future age spacecraft designed for exploration in hazardous environments especially adapt to enter atmospheres of alien planets and use at its own advantage as for gliding on dense atmospheres or high winds saving also fuel in order to perform long time scansions on ground or lower altitudes in gas giants for example , somewhere shielded by radiation and safe to resist high pressures.

    Here are some early exploration of the engine rear , I wanted to have three types of engines, the main one is central and the Jump engine , for jumping on hyperlanes, the nacelles ones are the Sublight engines for insystemic travel and the on wings one are rotating thrusters for atmospheric floating in Vtol style , the ship will also features several little holes for for RCS thrusters ( reaction control system ).


    httpiimgurcom10jrQwpjpg

  • Dethling
    Options
    Offline / Send Message
    Dethling polycounter lvl 11
    Good progress.
    Looking forward to see more updates.
  • NAIMA
    Options
    Offline / Send Message
    NAIMA polycounter lvl 14
    Btw I am having a problem with my save file, everytime I try toopen in 3dsmax goes idle with the hourglass icon and black screen , I can load fine older saves, but I would have lost some progress wich its annoying. I do not get what's wrong .
    Recently the more I worked today the more I was getting crashes after crashes and I dunno if there is something wrong with the file itself or may be is my pc ? Is anyone having 3dsmax 2017 and is willing to check for errors my file?

  • NAIMA
    Options
    Offline / Send Message
    NAIMA polycounter lvl 14
    Ok in meanwhile between a crash and the other, ( actually one every 2 minutes, I am still exploring the outlines fo the black lines, what do you think ? Sugestions ? think to change ? Too heavy ? too light ? Is there a reason btw behing the black coloring of some parts of the shuttles?
    I also added some small hexagonal windows to test their position , they are not really well visible on the black background but I think coul dstand out more once they are illuminated, or I coul dmake the glass just black and put in another position ? Sugestions on that too?

    As said b4 the vtols are temporary to remember the position , the top hole is a Airlock for entering and exiting the spaceship , bottom of the hull I will place a triple modular venter , the hangar entrance and may be a small Eva pod for EVA operations.


    Anyway here is what I was doing


  • Dethling
    Options
    Offline / Send Message
    Dethling polycounter lvl 11
    Like the color sheme so far. :)
    As far as I know the dark areas at teh space shuttle are simply another material (e.g. the heat shield). 
    For windows I would minimize them.
    Space ships are very straight forward designed. Windows are always a weak spot in every construction (beside the additional weight), so they would only put them where they are really needed. 

    For the MAX crashes I have no idea, maybe the polycount is to high for your system or the modifier stack is to heavy. 
  • skyline5gtr
    Options
    Offline / Send Message
    skyline5gtr polycounter lvl 9
    Learn to love the chamfer modifier and quad chamfer. Your topo for highpoly is only really suggestive lol as once smoothed the shape will change anyways. You need to recognize and learn when certain areas are problems like 4-5 edges coming together at a single vert point edge will pinch , or how to properly cut out a hole stuff like that 
  • NAIMA
    Options
    Offline / Send Message
    NAIMA polycounter lvl 14
    Learn to love the chamfer modifier and quad chamfer. Your topo for highpoly is only really suggestive lol as once smoothed the shape will change anyways. You need to recognize and learn when certain areas are problems like 4-5 edges coming together at a single vert point edge will pinch , or how to properly cut out a hole stuff like that 
    Sorry I haven't understood what do you mean?
  • Dethling
    Options
    Offline / Send Message
    Dethling polycounter lvl 11
    Chamfer & quadchamfer allows you to easily add support edges for your turbosmooth'ed model.  It can be a little bit messy sometime, but most of the time it safes a lot of time. :)
    There are some nice videos out there which explain how and when to use them.
  • NAIMA
    Options
    Offline / Send Message
    NAIMA polycounter lvl 14
    Dethling said:
    Chamfer & quadchamfer allows you to easily add support edges for your turbosmooth'ed model.  It can be a little bit messy sometime, but most of the time it safes a lot of time. :)
    There are some nice videos out there which explain how and when to use them.
    Oh but I am using them but only when I need, I am using mostly swift loop , extrude with no height  and manually other times.
  • Dethling
    Options
    Offline / Send Message
    Dethling polycounter lvl 11
    It's always good to know all tools which you have available, so give it a try. ;)
    I sometimes create some simple shapes in max and simply try out some modifier/option just to see what they are doing and if they allow me to fasten things up. The "art" is to know when to use which tool to get the best results. 
  • NAIMA
    Options
    Offline / Send Message
    NAIMA polycounter lvl 14

    This is just to see if proportions of the ship are correct, I reduced the wing thickness on the back and left untouched on front, I am not sure if the thickness is fine or if is too thin or too big so I added some human figures to as reference , what you think?Or may be I should reduce the thickness just on the flpas level? With a too thin wing though not sure if I can put proper Vtols.

    httpiimgurcom1yAK986jpg

    httpiimgurcomWa1ZQXzjpg

    httpiimgurcomuuifU8njpg


  • Cyph3r
    Options
    Offline / Send Message
    Cyph3r polycounter lvl 9
    This looks really good! The only thing I don't like is the 'honeycomb' cockpit frame. But I suppose that's hardly an objective point. 
  • NAIMA
    Options
    Offline / Send Message
    NAIMA polycounter lvl 14
    Thanks , I spent a whole day working on the engine trying different solutions but none looked good seems to me the most simple approach gives a better result .
    This for the Quantum side engines, the main thrusters will be more detailed .

    httpiimgurcomBgvw5fijpg

  • NAIMA
    Options
    Offline / Send Message
    NAIMA polycounter lvl 14
    Some other updates and tests .

    hYOJCpBjpg
    S3Gc5h9jpg
    gSOSdpMjpg


  • NAIMA
    Options
    Offline / Send Message
    NAIMA polycounter lvl 14
    Here a wip on themain rear Engines.

    httpiimgurcomNzisHLHjpg

  • Twister3
    Options
    Offline / Send Message
    Twister3 polycounter lvl 12
    Wow nice engines! You are making good progress, can't wait to see it finished :)
  • NAIMA
    Options
    Offline / Send Message
    NAIMA polycounter lvl 14
    Thankyou , :) ...I need to make also the Vtol engines that I dcided to make retractable and under the wings , then the side quantum engines and then link all together with greeble and pipes to connect to the fuel tanks inside the ship and the main intakes . 

    I have refined allship shape then and corrected the seam junctions , so itsgetting out of blockout phase .

    I have to decide if to applyho ey hex style also to lower cockpitwindow or not , Not sure ifit blends well like that or eventually reverse that style upper .

    Then mostly the shape is final , the top of engine will feature some instruments and fuel tanks running vertically inside the ship behinf engines , easily accessible by pipesof all engines. 

    Lot of structure is occupied by thick hull as well . 

    I have played with some boxing of the interiors and I must say there is not much space insude as I thought , so the feeling is the one of a large submarine with one main largerhangar .

    To keep silouette of the lower bay contained I am thinking to make it open like a dort of mouth , like the jaw rotating down and becoming a ramp by itself fir the rover . 

    In theory its possibleto have 3 floors with narrow environment and possible camera issues in 3rd person view or higher roof enfironment if I limit to two floors ...bstil to be decided , anyway theinteriors are definetly possible allowing fir both cargo load and rover . 

    I  also redid the wingtips, now they can rotate upper or lower to help stabilization in flight and landing , will have to find a way to seal the junctions better to not allow airflow between the joints .

    I have decidedwhere to place the landing gears and its basically pointing most on the rear ones with the extra frontal for further stability .

    Now the last thing is ... Thetop bottom portion of the structure, the one on behind the onewiththehexagonal series of little windows . I amreally torn on what to do there as I do not like the shape and find it uninteresting .

    I thought of adding a simple deck rear view , but despite the idea is cool I didn't find a decent shapeto go with . 
    Another idea was to add a landing pad like for small crafts as on some submarines .
    Another idea was to just detailit with instrumentalstuff.
    Another idea was to drop it and make a smooth continuum .
    Another idea. Was to make a detacheBle craft for escape shuttle or else .... Though the need of that is relative as the ship is mot so big and can land by itself , plus I will be adding single escapepods for eachh person . Since I planned for ssix crewmen , I might add 8 safepods for redundance . 

    So basically I need some sugestions exploring viable shape for thetop back part of the ship :) .
  • NAIMA
    Options
    Offline / Send Message
    NAIMA polycounter lvl 14
    Ok here are some new images update :) ...please feel free to criticize every bit and especially on the workflow because I am doing this to learn .

    Its my real first time hard surface modeling so ....


  • Medusa3d
    Options
    Offline / Send Message
    Medusa3d null
    Hey Naima,

    Your ship is turning out really nice, I especially like the engines. Well done!  :)

    The silvery areas look a bit empty to me, you could break them into more panels. Think about how the ship was built/assembled. Also, by breaking it into more pieces, you can get rid of some pinches, which is always nice. 

    Another thing that I noticed was that some windows have sharp corners, instead of rounded. Flying crafts have rounded corners around windows because the curved shape helps prevent stress building up. Like for example: passenger planes, they all have round windows.

  • NAIMA
    Options
    Offline / Send Message
    NAIMA polycounter lvl 14
    Medusa3d said:
    Hey Naima,

    Your ship is turning out really nice, I especially like the engines. Well done!  :)

    The silvery areas look a bit empty to me, you could break them into more panels. Think about how the ship was built/assembled. Also, by breaking it into more pieces, you can get rid of some pinches, which is always nice. 

    Another thing that I noticed was that some windows have sharp corners, instead of rounded. Flying crafts have rounded corners around windows because the curved shape helps prevent stress building up. Like for example: passenger planes, they all have round windows.

    Cool thanks, do you have any sugestion on how to proceede to cut panels further? I see you sawmy other thread on paneling , if I would procede as I am It woudl be quite stressfull to separate in the low poly thepanels as I would loose the curvature, and if I instead Cut on top of the turbosmoothed one I guess I will have more density , preserve the curvature but then I will have to manually go and weld every extra vertices?
    Do yo have any sugestion workflow for that part?
  • tda
    Options
    Offline / Send Message
    tda polycounter lvl 16
    Looking really cool man, hugely ambitious. Props for taking on such a big project! I really dig the shape, very fluid and animal like. Will be interesting to watch it progress :)
  • aaronmwolford
    Options
    Offline / Send Message
    aaronmwolford polycounter lvl 8
    Great looking progress. The engine work is really nice. 
  • Medusa3d
    Options
    Offline / Send Message
    Medusa3d null
    Are you going to make a game model of this ship too? Or is it just the highpoly, for practice?

    If there's enough poly density in the low poly, the overall curvature of the shapes should remain. I cut the main panels and add the support edges, like I mentioned in the other thread. 

    If there's not enough density then in an Edit Poly I set different smoothing groups for the surface (if there are hard edges to be considered), and add another 1 Iteration Turbosmooth (uncheck Isoline Display, check Smoothing Groups). This way I get more polys on the mesh, but still preserve the overall shape. Then add another Edit Poly on top and I clean up the edges I don't need, if it's necessary.  I always toggle Show End Result on and off, to check for pinches.

    So my modifier stack looks like this, starting from bottom :Edit Poly (for smoothing groups),Turbosmooth (1 iteration, no isoline display, Smoothing Groups checked), Edit Poly (for cleaning up unnecessary edges), Turbosmooth (2 iterations, isoline display checked). And when I'm happy with the shape and topology, I collapse to the top Edit Poly. I tend to collapse modifiers quite often both for keeping a clean stack and for avoiding corrupted meshes.

    A different method worth checking, in case you haven't seen them yet, you can watch Simon Fuchs hardsurface tutorials: https://gumroad.com/simonfuchs

  • NAIMA
    Options
    Offline / Send Message
    NAIMA polycounter lvl 14
    All High poly ...
1
Sign In or Register to comment.